Not
Bu sayfaya erişim yetkilendirme gerektiriyor. Oturum açmayı veya dizinleri değiştirmeyi deneyebilirsiniz.
Bu sayfaya erişim yetkilendirme gerektiriyor. Dizinleri değiştirmeyi deneyebilirsiniz.
Note
This is an advanced topic that assumes you have already read and understood these topics:
While you can create custom APIs through a designer or with code, you can also define them by working with files within a solution. Using files within a solution may be the preferred option for solution publishers who apply the recommended best practices for Application Lifecycle Management (ALM).
A solution file is a compressed (zip) file that has been exported from a Microsoft Dataverse instance. The contents of this file can be extracted and the components checked into a source repository. The contents can be edited and then compressed again. The changes applied to the solution are part of the solution and are created when the solution is imported.
Note
These processes are typically automated with tools and processes that are beyond the scope of this topic. This topic will focus on the simple scenario of creating a custom API by manually manipulating the extracted files in a solution to demonstrate how the data in the files can be used to create custom API. More information: Source control with solution files
Step 1: Create an Unmanaged solution
You shouldn't try to compose a solution file manually. Use the tools in Power Apps to generate a solution file. Use the steps in the following articles to create and export a solution. The solution doesn't need to contain any solution components.
-
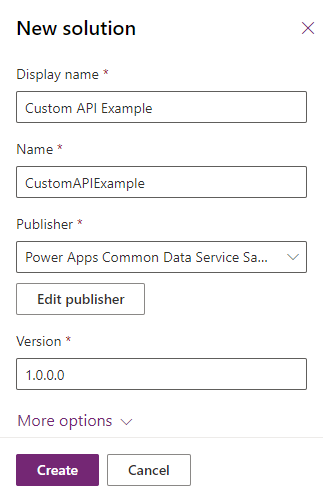
For this example, the solution is defined simply like this:

-
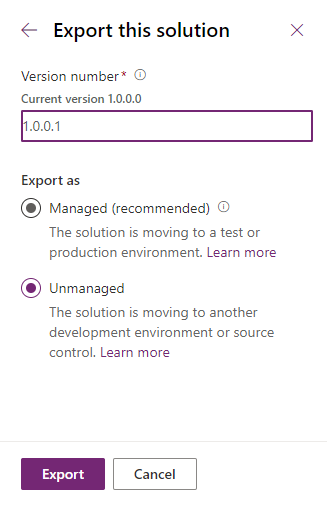
For this example, make sure you export an unmanaged solution. Managed solution is the default.

You can find the exported file in your downloads folder. It has a name that depends on the name and version of the solution, in this case: CustomAPIExample_1_0_0_2.zip.
Step 2: Extract the contents of the solution and update the version
The solution is a compressed (zip) file.
Right-click on the file and choose Extract All... from the context menu.
You should see just the following three files in the folder:
[Content_Types].xmlcustomizations.xmlsolution.xml
Open the solution.xml file and locate the
Versionelement.<ImportExportXml version="9.1.0.23474" SolutionPackageVersion="9.1" languagecode="1033" generatedBy="CrmLive" xmlns:xsi="http://www.w3.org/2001/XMLSchema-instance"> <SolutionManifest> <UniqueName>CustomAPIExample</UniqueName> <LocalizedNames> <LocalizedName description="Custom API Example" languagecode="1033" /> </LocalizedNames> <Descriptions /> <Version>1.0.0.1</Version>Update the value by 1. In this example, it's
<Version>1.0.0.2</Version>.Save the file.
Step 3: Add the definition of the custom API
All custom APIs in a solution are found within a folder named customapis. Within that folder each custom API will be in a folder named after the custom API UniqueName property.
Within the folder, the data representing the custom API is found within an XML file named customapi.xml
In the folder with the extracted files, create a new folder named
customapis.In the customapis folder, create a folder with the
UniqueNameof the custom API you want to create. For this example, we usesample_CustomAPIExample.In the sample_CustomAPIExample folder you created, create a file named
customapi.xml.Edit the
customapi.xmlto set the properties of the custom API you want to create. For this example, we use the following xml:<customapi uniquename="sample_CustomAPIExample"> <allowedcustomprocessingsteptype>0</allowedcustomprocessingsteptype> <bindingtype>0</bindingtype> <boundentitylogicalname /> <description default="A simple example of a custom API"> <label description="A simple example of a custom API" languagecode="1033" /> </description> <displayname default="Custom API Example"> <label description="Custom API Example" languagecode="1033" /> </displayname> <iscustomizable>0</iscustomizable> <executeprivilegename /> <isfunction>0</isfunction> <isprivate>0</isprivate> <name>sample_CustomAPIExample</name> <plugintypeid /> </customapi>
See the information in Custom API table columns to set the values of the elements.
Set a relation to a plug-in type (optional)
If you already have a Plug-in Type that you want to associate with this custom API, you can include a reference to it in this definition by adding the following element within the <customapi> element:
<plugintypeid>
   <plugintypeexportkey>{Add the GUID value of the plug-in type export key}</plugintypeexportkey>
</plugintypeid>
OR
<plugintypeid>
 <plugintypeid>{Add the GUID value of the plug-in type id}</plugintypeid>
</plugintypeid>
Note
Either value will work, but we recommend you use the plugintypeexportkey.
You can retrieve the PluginTypeExportKey and PluginTypeId values using a Web API query like this where you know the name of the plug-in type:
GET [Organization Uri]/api/data/v9.2/plugintypes?$select=name,plugintypeid,plugintypeexportkey&$filter=contains(name,'MyPlugin.TypeName')
Step 4: Add any custom API Request Parameters
Any definitions of request parameters for the custom API are included in a folder called customapirequestparameters. Within that folder each custom API Request Parameter will be in a folder named after the custom API Request Parameter UniqueName property.
- If your custom API has any request parameters, within the folder for the custom API you created in the previous step, create a folder named
customapirequestparameters. - For each custom API Request Parameter, create a new folder using the
UniqueNameproperty of the custom API Request Parameter. For this example, we useStringParameter. - Within the folder, add an xml file named
customapirequestparameter.xml. - Edit the customapirequestparameter.xml file to set the properties of the custom API you want to create. For this example, we use the following:
<customapirequestparameter uniquename="StringParameter">
  <description default="The StringParameter request parameter for custom API Example">
    <label description="The StringParameter request parameter for custom API Example" languagecode="1033" />
  </description>
  <displayname default="Custom API Example String Parameter">
    <label description="Custom API Example String Parameter" languagecode="1033" />
  </displayname>
  <iscustomizable>0</iscustomizable>
  <isoptional>0</isoptional>
  <logicalentityname />
  <name>sample_CustomAPIExample.StringParameter</name>
  <type>10</type>
</customapirequestparameter>
See the information in CustomAPIRequestParameter Table Columns to set the values of the elements.
Step 5: Add any custom API Response Properties
Any definitions of response properties for the custom API are included in a folder called customapiresponseproperties. Within that folder each custom API Response Property will be in a folder named after the custom API Response Property UniqueName property.
- If your custom API has any response properties, within the folder for the custom API you created in Step 3: Add the definition of the custom API, create a folder named
customapiresponseproperties. - For each custom API Response Property, create a new folder using the
UniqueNameproperty of the custom API Response Property. For this example, we useStringProperty. - Within the folder, add an xml file named
customapiresponseproperty.xml. - Edit the customapiresponseproperty.xml file to set the properties of the custom API you want to create. For this example, we use the following:
<customapiresponseproperty uniquename="StringProperty">
  <description default="The StringProperty response property for custom API Example">
    <label description="The StringProperty response property for custom API Example" languagecode="1033" />
  </description>
  <displayname default="Custom API Example String Property">
    <label description="Custom API Example String Property" languagecode="1033" />
  </displayname>
  <iscustomizable>0</iscustomizable>
  <logicalentityname />
  <name>sample_CustomAPIExample.StringProperty</name>
  <type>10</type>
</customapiresponseproperty>
See the information in CustomAPIResponseProperty Table Columns to set the values of the elements.
Note
While the schema for request parameters and response properties is very similar, note that isoptional is not valid for a response property and will cause an error when you try to import the solution.
Step 6: Compress the files to create a new solution file
Return to the folder where you extracted the original solution file in Step 2: Extract the contents of the solution and update the version
Select all the extracted files and the customapis folder you created.

Right-click the selected files and choose Send to > Compressed (zipped folder).
You can rename the resulting file to be anything you want. For this example, rename it to match the original exported solution file:
CustomAPIExample_1_0_0_2.zip.
Step 7: Import the solution with the definition of your custom API
Return to Power Apps and select Solutions.
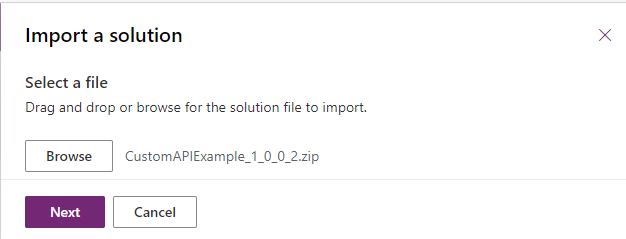
Select Import and follow the instructions to select the solution file you created in the previous step.

Note
If you see a warning saying This version of the solution package is already installed, you must not have updated the
Versionelement of the solution.xml as described in Step 2: Extract the contents of the solution and update the version.You should see a warning saying This solution package contains an update for a solution that is already installed. Select Import to continue.
Wait a few minutes while the solution import completes.
Note
It is possible you will see an error if another solution is being installed at the same time. More information: Concurrent solution operation failures
Step 8: Verify that the custom API was added to your solution
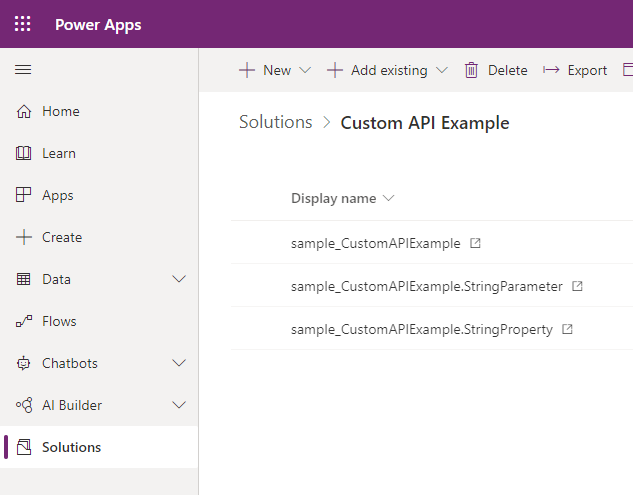
Open the solution you created and verify that the custom API and the associated request parameters and response properties are included.

At this point, you can test your API using the steps describe in Test your custom API
Update a custom API in a solution
After you ship a solution that contains a custom API, you may want to make some changes to the custom API in your unmanaged solution. You can add new parameters or response properties and make changes to those columns that support being updated, such as the displayname and description.
Important
You cannot introduce a change to a custom API in a solution that modifies any of the properties that cannot be changed after they are saved. When you install a newer version of a solution that contains a definition of a custom API, it will attempt to update the custom API, custom API Request Parameters, and custom API Response properties. A solution update is the same as trying to update the custom API using any other method.
The following are properties in the solution files that cannot be changed after a custom API is created:
- Custom API properties:
allowedcustomprocessingsteptypebindingtypeboundentitylogicalnameisfunctionuniquenameworkflowsdkstepenabled
- Custom API RequestParameter properties:
isoptionallogicalentitynametypeuniquename
- Custom API Response Property properties:
logicalentitynametypeuniquename
More information: CustomAPI tables
Providing Localized Labels with the solution
As an alternative to using the process described in Localized Label values, if you're editing the solution files for custom API entities, you can provide translations directly in these files. For example if you want to provide Japanese localized labels for your custom API, you can provide them for the description and displayname properties as shown below:
<customapi uniquename="sample_CustomAPIExample">
  <allowedcustomprocessingsteptype>0</allowedcustomprocessingsteptype>
  <bindingtype>0</bindingtype>
  <description default="A simple example of a custom API">
    <label description="A simple example of a custom API" languagecode="1033" />
    <label description="カスタムAPIの簡単な例" languagecode="1041" />
  </description>
  <displayname default="Custom API Example">
    <label description="Custom API Example" languagecode="1033" />
    <label description="カスタムAPIの例" languagecode="1041" />
  </displayname>
  <iscustomizable>0</iscustomizable>
  <isfunction>0</isfunction>
  <name>sample_CustomAPIExample</name>
</customapi>
See also
Create and use custom APIs
CustomAPI tables
Create a custom API using the plug-in registration tool
Create a custom API in Power Apps
Create a custom API with code
Create your own messages