Not
Bu sayfaya erişim yetkilendirme gerektiriyor. Oturum açmayı veya dizinleri değiştirmeyi deneyebilirsiniz.
Bu sayfaya erişim yetkilendirme gerektiriyor. Dizinleri değiştirmeyi deneyebilirsiniz.
Social Framework, Twitter ve Facebook gibi sosyal ağlarla etkileşime yönelik birleşik bir API'nin yanı sıra Çin'deki kullanıcılar için SinaWeibo sağlar.
Social Framework'ün kullanılması, uygulamaların kimlik doğrulamasını yönetmek zorunda kalmadan tek bir API'den sosyal ağlarla etkileşim kurmasına olanak tanır. Gönderi oluşturmak için sistem tarafından sağlanan bir görünüm denetleyicisinin yanı sıra her sosyal ağın API'sini HTTP üzerinden tüketmeye olanak tanıyan bir soyutlama içerir.
Twitter'a Bağlan
Twitter Hesabı Ayarlar
Social Framework kullanarak Twitter'a bağlanmak için cihaz ayarlarında aşağıda gösterildiği gibi bir hesabın yapılandırılması gerekir:
Twitter ile bir hesap girildikten ve doğrulandıktan sonra, Twitter'a erişmek için Social Framework sınıflarını kullanan cihazdaki tüm uygulamalar bu hesabı kullanır.
Tweet gönderme
Social Framework, bir tweet'i düzenlemek ve göndermek için sistem tarafından sağlanan bir görünüm sunan adlı SLComposeViewController bir denetleyici içerir. Aşağıdaki ekran görüntüsünde bu görünümün bir örneği gösterilmektedir:
Twitter ile kullanmak SLComposeViewController için aşağıda gösterildiği gibi ile yöntemi SLServiceType.Twitter çağrılarak FromService denetleyicinin bir örneği oluşturulmalıdır:
var slComposer = SLComposeViewController.FromService (SLServiceType.Twitter);
SLComposeViewController Örnek döndürüldükten sonra, Twitter'a göndermek üzere bir kullanıcı arabirimi sunmak için kullanılabilir. Ancak, yapmanız gereken ilk şey sosyal ağın kullanılabilirliğini denetlemektir, Bu durumda Twitter, arayarak IsAvailable:
if (SLComposeViewController.IsAvailable (SLServiceKind.Twitter)) {
  ...
}
SLComposeViewController kullanıcı etkileşimi olmadan hiçbir zaman doğrudan tweet göndermez. Ancak, aşağıdaki yöntemlerle başlatılabilir:
SetInitialText– Tweette gösterilecek ilk metni ekler.AddUrl– Tweete url ekler.AddImage– Tweete bir resim ekler.
Başlatıldıktan sonra çağrılması PresentVIewController , tarafından SLComposeViewControlleroluşturulan görünümü görüntüler. Kullanıcı daha sonra isteğe bağlı olarak tweet'i düzenleyebilir ve gönderebilir veya göndermeyi iptal edebilir. Her iki durumda da denetleyici, aşağıda gösterildiği gibi tweetin gönderilip gönderilmediğini veya iptal edilip edilmediğini görmek için de kontrol edilebileceği bölümünde kapatılmalıdır CompletionHandler:
slComposer.CompletionHandler += (result) => {
  InvokeOnMainThread (() => {
    DismissViewController (true, null);
    resultsTextView.Text = result.ToString ();
  });
};
Tweet Örneği
Aşağıdaki kod, tweet göndermek için kullanılan bir görünümü sunmak için öğesinin kullanılmasını SLComposeViewController gösterir:
using System;
using Social;
using UIKit;

namespace SocialFrameworkDemo
{
    public partial class ViewController : UIViewController
    {
        #region Private Variables
        private SLComposeViewController _twitterComposer = SLComposeViewController.FromService (SLServiceType.Twitter);
        #endregion

        #region Computed Properties
        public bool isTwitterAvailable {
            get { return SLComposeViewController.IsAvailable (SLServiceKind.Twitter); }
        }

        public SLComposeViewController TwitterComposer {
            get { return _twitterComposer; }
        }
        #endregion

        #region Constructors
        protected ViewController (IntPtr handle) : base (handle)
        {

        }
        #endregion

        #region Override Methods
        public override void ViewWillAppear (bool animated)
        {
            base.ViewWillAppear (animated);

            // Update UI based on state
            SendTweet.Enabled = isTwitterAvailable;
        }
        #endregion

        #region Actions
        partial void SendTweet_TouchUpInside (UIButton sender)
        {
            // Set initial message
            TwitterComposer.SetInitialText ("Hello Twitter!");
            TwitterComposer.AddImage (UIImage.FromFile ("Icon.png"));
            TwitterComposer.CompletionHandler += (result) => {
                InvokeOnMainThread (() => {
                    DismissViewController (true, null);
                    Console.WriteLine ("Results: {0}", result);
                });
            };

            // Display controller
            PresentViewController (TwitterComposer, true, null);
        }
        #endregion
    }
}
Twitter API'lerini çağırma
Sosyal Çerçeve, sosyal ağlara HTTP istekleri gönderme desteği de içerir. İsteği, belirli bir sosyal ağın API'sini hedeflemek için kullanılan bir SLRequest sınıfta kapsüller.
Örneğin, aşağıdaki kod genel zaman çizelgesini almak için Twitter'a bir istekte bulunur (yukarıda verilen kodu genişleterek):
using Accounts;
...

#region Private Variables
private ACAccount _twitterAccount;
#endregion

#region Computed Properties
public ACAccount TwitterAccount {
    get { return _twitterAccount; }
}
#endregion

#region Override Methods
public override void ViewWillAppear (bool animated)
{
    base.ViewWillAppear (animated);

    // Update UI based on state
    SendTweet.Enabled = isTwitterAvailable;
    RequestTwitterTimeline.Enabled = false;

    // Initialize Twitter Account access
    var accountStore = new ACAccountStore ();
    var accountType = accountStore.FindAccountType (ACAccountType.Twitter);

    // Request access to Twitter account
    accountStore.RequestAccess (accountType, (granted, error) => {
        // Allowed by user?
        if (granted) {
            // Get account
            _twitterAccount = accountStore.Accounts [accountStore.Accounts.Length - 1];
            InvokeOnMainThread (() => {
                // Update UI
                RequestTwitterTimeline.Enabled = true;
            });
        }
    });
}
#endregion

#region Actions
partial void RequestTwitterTimeline_TouchUpInside (UIButton sender)
{
    // Initialize request
    var parameters = new NSDictionary ();
    var url = new NSUrl("https://api.twitter.com/1.1/statuses/user_timeline.json?count=10");
    var request = SLRequest.Create (SLServiceKind.Twitter, SLRequestMethod.Get, url, parameters);

    // Request data
    request.Account = TwitterAccount;
    request.PerformRequest ((data, response, error) => {
        // Was there an error?
        if (error == null) {
            // Was the request successful?
            if (response.StatusCode == 200) {
                // Yes, display it
                InvokeOnMainThread (() => {
                    Results.Text = data.ToString ();
                });
            } else {
                // No, display error
                InvokeOnMainThread (() => {
                    Results.Text = string.Format ("Error: {0}", response.StatusCode);
                });
            }
        } else {
            // No, display error
            InvokeOnMainThread (() => {
                Results.Text = string.Format ("Error: {0}", error);
            });
        }
    });
}
#endregion
Şimdi bu koda ayrıntılı olarak bakalım. İlk olarak, Hesap Mağazası'na erişim kazanır ve bir Twitter hesabının türünü alır:
var accountStore = new ACAccountStore ();
var accountType = accountStore.FindAccountType (ACAccountType.Twitter);
Ardından kullanıcıdan uygulamanızın Twitter hesabına erişip erişemediğini sorar ve erişim verilirse hesap belleğe yüklenir ve kullanıcı arabirimi güncelleştirilir:
// Request access to Twitter account
accountStore.RequestAccess (accountType, (granted, error) => {
    // Allowed by user?
    if (granted) {
        // Get account
        _twitterAccount = accountStore.Accounts [accountStore.Accounts.Length - 1];
        InvokeOnMainThread (() => {
            // Update UI
            RequestTwitterTimeline.Enabled = true;
        });
    }
});
Kullanıcı zaman çizelgesi verilerini istediğinde (kullanıcı arabirimindeki bir düğmeye dokunarak), uygulama ilk olarak Twitter'dan verilere erişmek için bir istek oluşturur:
// Initialize request
var parameters = new NSDictionary ();
var url = new NSUrl("https://api.twitter.com/1.1/statuses/user_timeline.json?count=10");
var request = SLRequest.Create (SLServiceKind.Twitter, SLRequestMethod.Get, url, parameters);
Bu örnek, döndürülen sonuçları URL'ye ekleyerek ?count=10 son on girdiyle sınırlandırmaktır. Son olarak, isteği Twitter hesabına ekler (yukarıda yüklenen) ve twitter'a çağrı yaparak verileri getirir:
// Request data
request.Account = TwitterAccount;
request.PerformRequest ((data, response, error) => {
    // Was there an error?
    if (error == null) {
        // Was the request successful?
        if (response.StatusCode == 200) {
            // Yes, display it
            InvokeOnMainThread (() => {
                Results.Text = data.ToString ();
            });
        } else {
            // No, display error
            InvokeOnMainThread (() => {
                Results.Text = string.Format ("Error: {0}", response.StatusCode);
            });
        }
    } else {
        // No, display error
        InvokeOnMainThread (() => {
            Results.Text = string.Format ("Error: {0}", error);
        });
    }
});
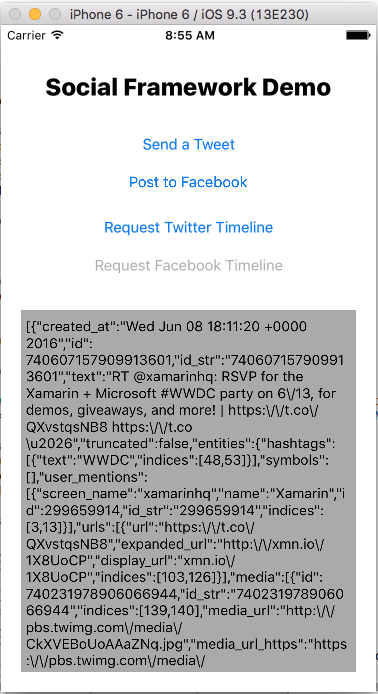
Veriler başarıyla yüklendiyse ham JSON verileri görüntülenir (aşağıdaki örnek çıktıda olduğu gibi):
Gerçek bir uygulamada JSON sonuçları normal olarak ayrıştırılabilir ve sonuçlar kullanıcıya sunulabilir. JSON ayrıştırma hakkında bilgi için bkz . Giriş Web Hizmetleri .
Facebook'a Bağlan
Facebook Hesabı Ayarlar
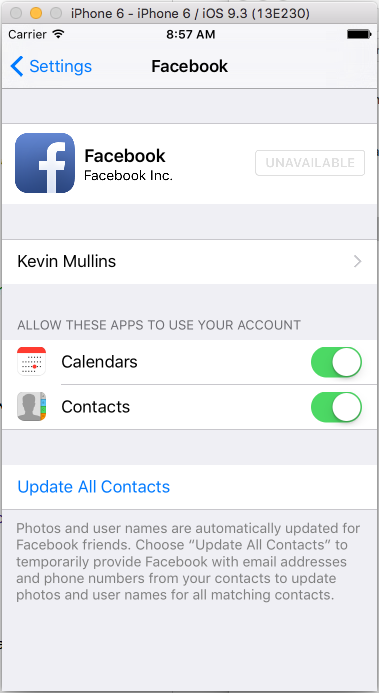
Sosyal Çerçeve ile Facebook'a Bağlan, yukarıda gösterilen Twitter için kullanılan işlemle neredeyse aynıdır. Bir Facebook kullanıcı hesabı aşağıda gösterildiği gibi cihaz ayarlarında yapılandırılmalıdır:
Yapılandırıldıktan sonra, Cihazda Social Framework kullanan tüm uygulamalar Facebook'a bağlanmak için bu hesabı kullanır.
Facebook'a gönderme
Sosyal Çerçeve birden çok sosyal ağa erişmek için tasarlanmış birleşik bir API olduğundan kod, kullanılan sosyal ağdan bağımsız olarak neredeyse aynı kalır.
Örneğin, SLComposeViewController tam olarak daha önce gösterilen Twitter örneğinde olduğu gibi kullanılabilir, bunun tek farkı Facebook'a özgü ayarlara ve seçeneklere geçmektir. Örneğin:
using System;
using Foundation;
using Social;
using UIKit;

namespace SocialFrameworkDemo
{
    public partial class ViewController : UIViewController
    {
        #region Private Variables
        private SLComposeViewController _facebookComposer = SLComposeViewController.FromService (SLServiceType.Facebook);
        #endregion

        #region Computed Properties
        public bool isFacebookAvailable {
            get { return SLComposeViewController.IsAvailable (SLServiceKind.Facebook); }
        }

        public SLComposeViewController FacebookComposer {
            get { return _facebookComposer; }
        }
        #endregion

        #region Constructors
        protected ViewController (IntPtr handle) : base (handle)
        {

        }
        #endregion

        #region Override Methods
        public override void ViewWillAppear (bool animated)
        {
            base.ViewWillAppear (animated);

            // Update UI based on state
            PostToFacebook.Enabled = isFacebookAvailable;
        }
        #endregion

        #region Actions
        partial void PostToFacebook_TouchUpInside (UIButton sender)
        {
            // Set initial message
            FacebookComposer.SetInitialText ("Hello Facebook!");
            FacebookComposer.AddImage (UIImage.FromFile ("Icon.png"));
            FacebookComposer.CompletionHandler += (result) => {
                InvokeOnMainThread (() => {
                    DismissViewController (true, null);
                    Console.WriteLine ("Results: {0}", result);
                });
            };

            // Display controller
            PresentViewController (FacebookComposer, true, null);
        }
        #endregion
    }
}
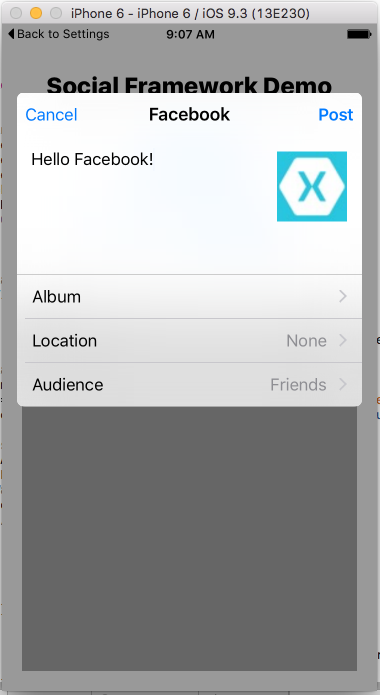
Facebook ile kullanıldığında, SLComposeViewController Facebook'un bu örnekte başlık olarak gösterildiği Twitter örneğiyle neredeyse aynı görünen bir görünüm görüntülenir:
Facebook Graph API'lerini çağırma
Twitter örneğine benzer şekilde, Social Framework'ün nesnesi Facebook'un SLRequest graf API'siyle kullanılabilir. Örneğin, aşağıdaki kod graf API'sinden Xamarin hesabıyla ilgili bilgileri döndürür (yukarıda verilen kodu genişleterek):
using Accounts;
...

#region Private Variables
private ACAccount _facebookAccount;
#endregion

#region Computed Properties
public ACAccount FacebookAccount {
    get { return _facebookAccount; }
}
#endregion

#region Override Methods
public override void ViewWillAppear (bool animated)
{
    base.ViewWillAppear (animated);

    // Update UI based on state
    PostToFacebook.Enabled = isFacebookAvailable;
    RequestFacebookTimeline.Enabled = false;

    // Initialize Facebook Account access
    var accountStore = new ACAccountStore ();
    var options = new AccountStoreOptions ();
    var options.FacebookAppId = ""; // Enter your specific Facebook App ID here
    accountType = accountStore.FindAccountType (ACAccountType.Facebook);

    // Request access to Facebook account
    accountStore.RequestAccess (accountType, options, (granted, error) => {
        // Allowed by user?
        if (granted) {
            // Get account
            _facebookAccount = accountStore.Accounts [accountStore.Accounts.Length - 1];
            InvokeOnMainThread (() => {
                // Update UI
                RequestFacebookTimeline.Enabled = true;
            });
        }
    });

}
#endregion

#region Actions
partial void RequestFacebookTimeline_TouchUpInside (UIButton sender)
{
    // Initialize request
    var parameters = new NSDictionary ();
    var url = new NSUrl ("https://graph.facebook.com/283148898401104");
    var request = SLRequest.Create (SLServiceKind.Facebook, SLRequestMethod.Get, url, parameters);

    // Request data
    request.Account = FacebookAccount;
    request.PerformRequest ((data, response, error) => {
        // Was there an error?
        if (error == null) {
            // Was the request successful?
            if (response.StatusCode == 200) {
                // Yes, display it
                InvokeOnMainThread (() => {
                    Results.Text = data.ToString ();
                });
            } else {
                // No, display error
                InvokeOnMainThread (() => {
                    Results.Text = string.Format ("Error: {0}", response.StatusCode);
                });
            }
        } else {
            // No, display error
            InvokeOnMainThread (() => {
                Results.Text = string.Format ("Error: {0}", error);
            });
        }
    });
}
#endregion
Bu kodla yukarıda sunulan Twitter sürümü arasındaki tek gerçek fark, Facebook'un, istekte bulunarak bir seçenek olarak ayarlanması gereken Bir Geliştirici/Uygulamaya özgü kimlik (Facebook'un Geliştirici Portalı'ndan oluşturabileceğiniz) alma gereksinimidir:
var options = new AccountStoreOptions ();
var options.FacebookAppId = ""; // Enter your specific Facebook App ID here
...

// Request access to Facebook account
accountStore.RequestAccess (accountType, options, (granted, error) => {
    ...
});
Bu seçeneğin ayarlanamaması (veya geçersiz bir anahtar kullanılması) hataya neden olur veya veri döndürülmemesine neden olur.
Özet
Bu makalede, Twitter ve Facebook ile etkileşime geçmek için Social Framework'ün nasıl kullanılacağı gösterildi. Cihaz ayarlarında her sosyal ağ için hesapların nerede yapılandırıldığı gösterildi. Ayrıca, sosyal ağlara göndermek üzere birleşik bir görünüm sunmak için öğesinin nasıl kullanılacağı SLComposeViewController da anlatıldı. Ayrıca, her sosyal ağın SLRequest API'sini çağırmak için kullanılan sınıfı inceledi.


