Change the Color Scheme of the Dashboard and Launchpad
Applies To: Windows Server 2016 Essentials, Windows Server 2012 R2 Essentials, Windows Server 2012 Essentials
You can change the color scheme of the Dashboard and the Launchpad by defining the colors that you want to use in an XML formatted file, installing the .xml file in a folder on the server, and by specifying the .xml file name in a registry entry.
Create the xml file
The following example shows the possible contents of the .xml file:
<DashboardTheme xmlns="https://www.microsoft.com/HSBS/Dashboard/Branding/2010">

  <!-- Hex color values overwriting default SKU theme colors -->

    <SplashScreenBackgroundColor HexValue="FFFFFFFF"/>
    <SplashScreenBorderColor HexValue="FF000000"/>
    <MainHeaderBackgroundColor HexValue="FF414141"/>
    <MainTabBackgroundColor HexValue="FFFFFFFF"/>
    <MainTabFontColor HexValue="FF999999"/>
    <MainTabHoverFontColor HexValue="FF0072BC"/>
    <MainTabSelectedFontColor HexValue="FF0072BC"/>
    <MainButtonPressedBackgroundColor HexValue="FF0072BC"/>
    <MainButtonFontColor HexValue="FFFFFFFF"/>
    <MainButtonBorderColor HexValue="FF6E6E6E"/>
    <ScrollButtonBackgroundColor HexValue="FFF0F0F0"/>
    <ScrollButtonArrowColor HexValue="FF999999"/>
    <ScrollButtonHoverBackgroundColor HexValue="FF999999"/>
    <ScrollButtonHoverArrowColor HexValue="FF6E6E6E"/>
    <ScrollButtonSelectedBackgroundColor HexValue="FF6E6E6E"/>
    <ScrollButtonSelectedArrowColor HexValue="FFFFFFFF"/>
    <ScrollButtonDisabledBackgroundColor HexValue="FFF8F8F8"/>
    <ScrollButtonDisabledArrowColor HexValue="FFCCCCCC"/>
    <AlertTextBlockBackground HexValue="FFFFFFFF"/>
    <AlertTextBlockFont HexValue="FF000000"/>
    <FontColor HexValue="FF000000"/>
    <SubTabBarBackgroundColor HexValue="FFFFFFFF"/>
    <SubTabBackgroundColor HexValue="FFFFFFFF"/>
    <SubTabSelectedBackgroundColor HexValue="FF414141"/>
    <SubTabBorderColor HexValue="FF787878"/>
    <SubTabFontColor HexValue="FF787878"/>
    <SubTabHoverFontColor HexValue="FF0072BC"/>
    <SubTabPressedFontColor HexValue="FFFFFFFF"/>
    <ListViewColor HexValue="FFFFFFFF"/>
    <PageBorderColor HexValue="FF999999"/>
    <LaunchpadButtonHoverBorderColor HexValue="FF6BA0B4"/>
    <LaunchpadButtonHoverBackgroundColor HexValue="FF41788F"/>
    <ClientArrowColor HexValue="FFFFFFFF"/>
    <ClientGlyphColor HexValue="FFFFFFFF"/>
    <SplitterColor HexValue="FF83C6E2"/>
    <HomePageBackColor     HexValue="FFFFFFFF"/>
    <CategoryNotExpandedBackColor HexValue="FFFFB343"/>
    <CategoryExpandedBackColor HexValue="FFF26522"/>
    <CategoryNotExpandedForeColor HexValue="FF2A2A2A"/>
    <CategoryExpandedForeColor HexValue="FFFFFFFF"/>
    <HomePageTaskListForeColor    HexValue="FF2A2A2A"/>
    <HomePageTaskListBackColor HexValue="FFEAEAEA"/>
    <HomePageTaskListHoverForeColor      HexValue="FF2A2A2A"/>
    <HomePageTaskListItemBorderColor     HexValue="FF999999"/>
    <HomePageTaskListSelectedForeColor   HexValue="FFFFFFFF"/>
    <HomePageTaskListSelectedBackColor   HexValue="FFF26522"/>
    <HomePageTaskDetailStatusForeColor   HexValue="FFF26522"/>
    <HomePageTaskDetailDescriptionForeColor     HexValue="FF2A2A2A"/>
    <HomePageLinkForeColor HexValue="FF0072BC"/>
    <HomePageLinkSelectedForeColor HexValue="FF0054A6"/>
    <HomePageLinkHoverForeColor   HexValue="FF0072BC"/>
    <PropertyFormForeColor HexValue="FF2A2A2A"/>
    <PropertyFormTabHoverColor HexValue="FF0072BC"/>
    <PropertyFormTabSelectedColor HexValue="FFFFFFFF"/>
    <PropertyFormTabSelectedBackColor HexValue="FF414141"/>
    <TaskPanelBackColor HexValue="FFFFFFFF"/>
    <TaskPanelItemForeColor HexValue="FF2A2A2A"/>
    <TaskPanelGroupTitleForeColor HexValue="FF2A2A2A"/>
    <TaskPanelGroupTitleBackColor HexValue="FFCCCCCC"/>
    <DashboardClientBackColor HexValue="FF004050"/>
    <DashboardClientTitleColor HexValue="FFFFFFFF"/>
    <DashboardClientOptionsForeColor HexValue="FFFFFFFF"/>
    <DashboardClientOptionsItemForeColor HexValue="FF2A2A2A"/>
    <DashboardClientHelpForeColor HexValue="FF0054A6"/>
    <ClientSignInForeColor HexValue="FFFFFFFF"/>
    <ClientSignInWaterMarkForeColor HexValue="FF999999"/>
    <ClientSignInUserNameForeColor HexValue="FF2A2A2A"/>
    <ClientSignInPassWordSpecificBackColor HexValue="FFCCCCCC"/>
    <ClientSignInButtonBackColor HexValue="FF004050"/>
    <ClientSignInPassWordForeColor HexValue="FF2A2A2A"/>
    <LaunchPadBackColor HexValue="FF004050"/>
    <LaunchPadPageTitleColor HexValue="FFFFFFFF"/>
    <LaunchPadItemForeColor HexValue="FFFFFFFF"/>
  <LaunchPadItemHoverColor HexValue="33FFFFFF"/>
  <LaunchPadItemIconBackgroundColor HexValue="F2004050"/>
</DashboardTheme >
Important
The xml elements must be specified in the order listed in the previous example.
Note
All values of the HexValue attribute are examples of hexadecimal values for colors. You can enter any hexadecimal color value that you want to use.
Use Notepad or Visual Studio 2010 to create the .xml file that contains the tags for the areas that you want to customize. The file can be given any name, but it must have a .xml extension. For a description of the areas that can be customized on the Dashboard and Launchpad, see Dashboard and Launchpad areas that can be changed.
To install the .xml file
On the server, move your mouse to the upper right corner of the screen, and click Search.
In the Search box, type regedit, and then click the Regedit application.
In the left pane, expand HKEY_LOCAL_MACHINE, expand SOFTWARE, expand Microsoft, expand Windows Server. If the OEM key does not exist, you must complete the following steps to create it:
Right-click Windows Server, point to New, and then click Key.
Type OEM for the name of the key.
Right-click OEM, point to New, and then click String Value.
Enter CustomColorScheme as the name of the string, and then press Enter.
Right-click CustomColorScheme in the right pane, and then click Modify.
Enter the name of the file, and then click OK.
Copy the file to %programFiles%\Windows Server\Bin\OEM. If the OEM directory does not exist, create it.
Dashboard and Launchpad areas that can be changed
This section includes examples of Dashboard and Launchpad areas that can be customized.
Examples
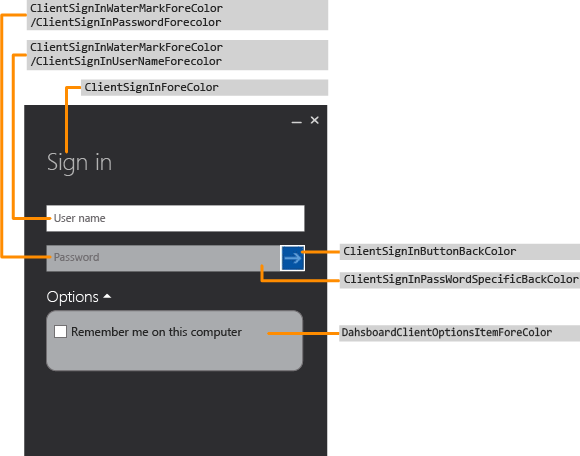
Figure 1: Sign-in page of the Dashboard

Figure 2: Launchpad

Figure 3: Sign-in page of the Launchpad

Figure 4: Dashboard text

Figure 5: Subtab border

Figure 6: Task pane

Figure 7a: Product Splash Screen

Figure 7b: Home Page

See Also
Creating and Customizing the Image Additional Customizations Preparing the Image for Deployment Testing the Customer Experience