Not
Bu sayfaya erişim yetkilendirme gerektiriyor. Oturum açmayı veya dizinleri değiştirmeyi deneyebilirsiniz.
Bu sayfaya erişim yetkilendirme gerektiriyor. Dizinleri değiştirmeyi deneyebilirsiniz.
Bu, geleneksel kullanıcı adı ve parola kimlik doğrulama sistemlerine alternatif olarak Windows Hello kullanan paketlenmiş bir Windows app oluşturma adımlarının ilk bölümüdür. Bu durumda, uygulama bir WinUI 3 uygulamasıdır, ancak WPF ve Windows Forms uygulamaları dahil, tüm paketli Windows uygulamalarında aynı yaklaşımı kullanabilirsiniz. Uygulama, oturum açmak için bir kullanıcı adı kullanır ve her hesap için bir Hello anahtarı oluşturur. Bu hesaplar, Windows Hello yapılandırmasında Windows Ayarları'nda ayarlanan PIN ile korunur.
Bu rehber iki bölüme ayrılmıştır: uygulamayı oluşturma ve arka uç hizmetini bağlama. Bu makaleyi tamamladığınızda 2. Bölüm: Windows Hello oturum açma hizmeti bölümüne geçin.
Başlamadan önce, Windows Hello nasıl çalıştığını genel olarak anlamak için Windows Hello genel bakış bölümünü okumalısınız.
Başlayın
Bu project oluşturmak için C# ve XAML konusunda biraz deneyime ihtiyacınız olacaktır. Ayrıca Bir Windows 10 veya Windows 11 makinesinde Visual Studio 2026 kullanmanız gerekir. Geliştirme ortamınızı ayarlamayla ilgili tüm yönergeler için bkz. Windows uygulamaları geliştirmeye başlama .
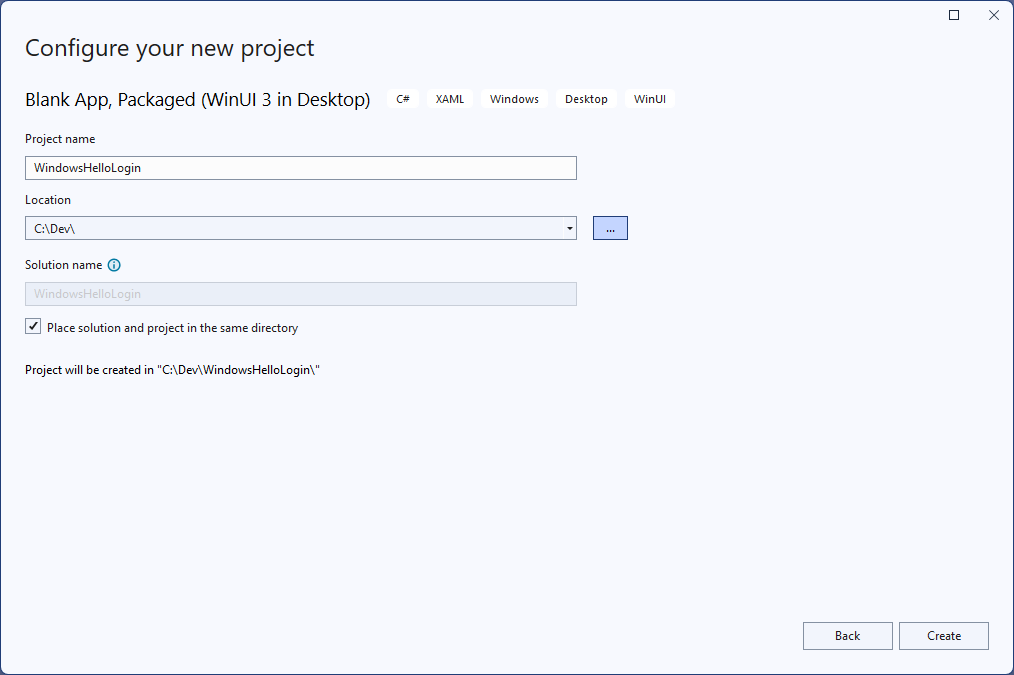
- Visual Studio File>New>Project öğesini seçin.
- Yeni Project iletişim kutusunun açılan filtrelerinde, sırasıyla C#/C++, Windows ve WinUI seçin.
- WinUI Boş Uygulama (Paketlenmiş) öğesini seçin ve uygulamanızı "WindowsHelloLogin" olarak adlandırın.
- Yeni uygulamayı derleyin ve çalıştırın (F5), ekranda boş bir pencere görmeniz gerekir. Uygulamayı kapatın.
Alıştırma 1: Windows Hello ile oturum açma
Bu alıştırmada makinede Windows Hello ayarlanıp ayarlanmadığını denetlemeyi ve Windows Hello kullanarak bir hesapta oturum açmayı öğreneceksiniz.
Yeni project çözümde "Görünümler" adlı yeni bir klasör oluşturun. Bu klasör, bu örnekte gidilecek sayfaları içerir. Solution Explorer'da project sağ tıklayın, Add>Yeni Klasör'ı seçin ve klasörü Views olarak yeniden adlandırın.

MainWindow.xaml dosyasını açın ve
Windowiçeriğini boş birStackPanelveyaGriddenetimiyle değiştirin. MainWindow yüklendiğinde sayfa gezintisi uygulayacak ve yeni bir sayfaya geçiş yapacağız, bu nedenle MainWindow'da herhangi bir içeriğe ihtiyacımız olmayacak.XAML'de
Titlebir özellik ekleyin. Özniteliği şu şekilde görünmelidir:Title="Windows Hello Login".Derleme hatalarını önlemek için myButton_Click olay işleyicisini MainWindow.xaml.cs kaldırın. Bu örnek için bu olay işleyicisi gerekli değildir.
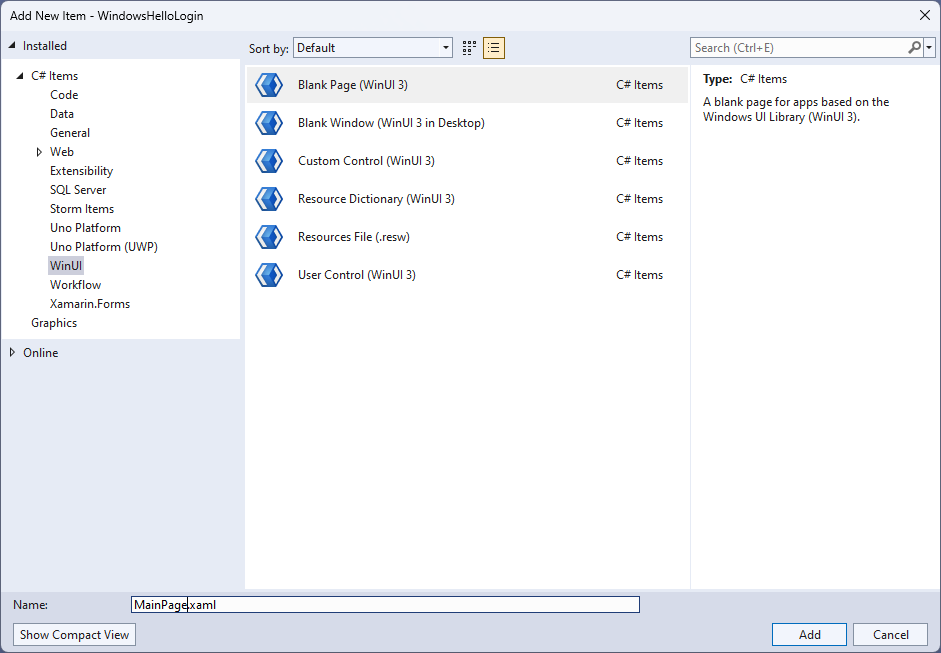
Yeni Görünümler klasörüne sağ tıklayın,Yeni Öğe Ekle'yi> seçin ve Boş Sayfa şablonunu seçin. Bu sayfaya "MainPage.xaml" adını verin.
App.xaml.cs dosyasını açın ve Uygulama için sayfa gezintisi uygulamak üzere OnLaunched işleyicisini güncelleştirin. Sayfaları yüklerken oluşan hatalarla başa çıkmak için bir RootFrame_NavigationFailed işleyici yöntemi de eklemeniz gerekir.
protected override void OnLaunched(Microsoft.UI.Xaml.LaunchActivatedEventArgs args)
{
    m_window = new MainWindow();
    var rootFrame = new Frame();
    rootFrame.NavigationFailed += RootFrame_NavigationFailed;
    rootFrame.Navigate(typeof(MainPage), args);
    m_window.Content = rootFrame;
    m_window.Activate();
}

private void RootFrame_NavigationFailed(object sender, NavigationFailedEventArgs e)
{
    throw new Exception($"Error loading page {e.SourcePageType.FullName}");
}
Ayrıca koddaki derleme hatalarını çözmek için App.xaml.cs dosyasının en üstüne dört using deyimi eklemeniz gerekir.
using Microsoft.UI.Xaml.Controls;
using Microsoft.UI.Xaml.Navigation;
using System;
using WindowsHelloLogin.Views;
Yeni Görünümler klasörüne sağ tıklayın,Yeni Öğe Ekle'yi> seçin ve Boş Sayfa şablonunu seçin. Bu sayfaya "Login.xaml" adını verin.
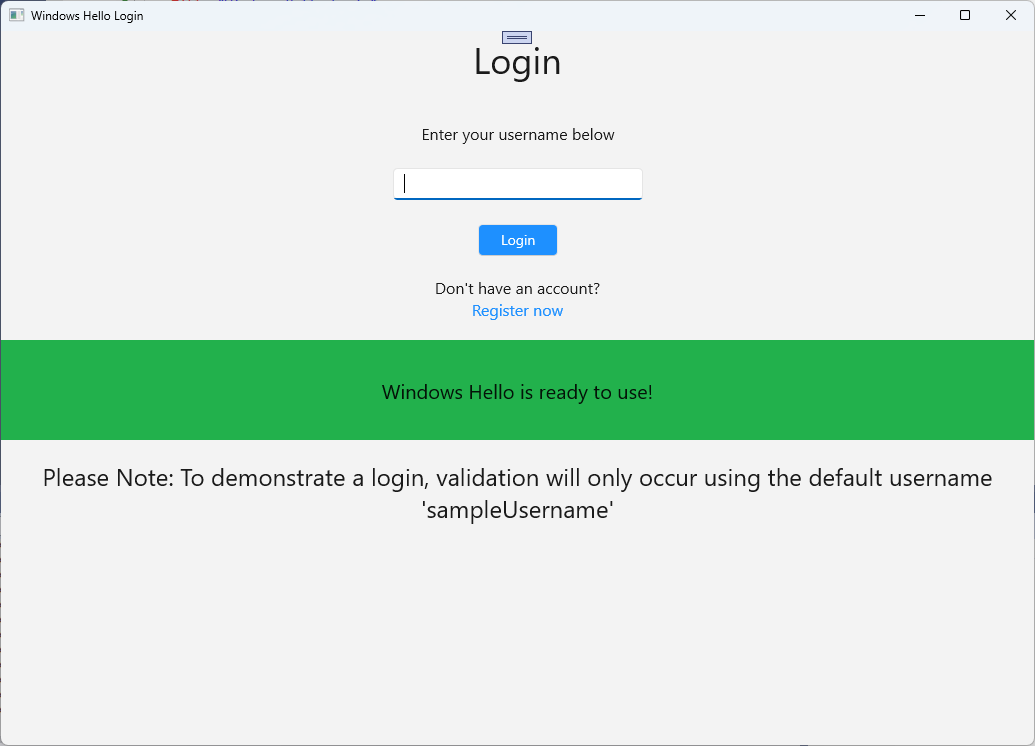
Yeni oturum açma sayfasının kullanıcı arabirimini tanımlamak için aşağıdaki XAML'yi ekleyin. Bu XAML, aşağıdaki çocukları hizalamak üzere bir
StackPaneltanımlar.Bir başlık içerecek
TextBlock.Hata iletileri için A
TextBlock.Kullanıcı adı girişi için bir
TextBox.Bir
Buttonkayıt sayfasına gitmek için.Windows Hello'nun durumunu içeren bir
TextBlock.Henüz arka uç veya yapılandırılmış kullanıcı olmadığından Oturum Açma sayfasını açıklamak için bir
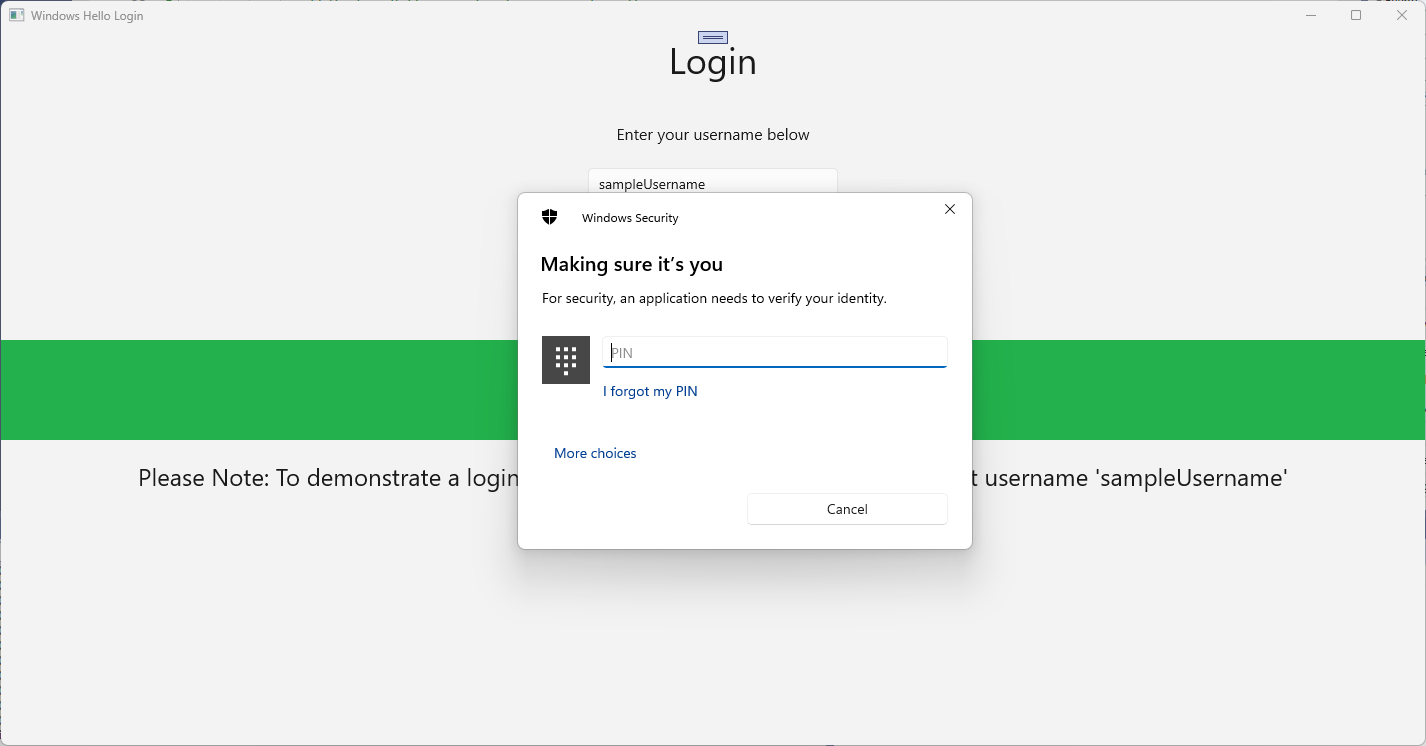
TextBlock.<Grid> <StackPanel> <TextBlock Text="Login" FontSize="36" Margin="4" TextAlignment="Center"/> <TextBlock x:Name="ErrorMessage" Text="" FontSize="20" Margin="4" Foreground="Red" TextAlignment="Center"/> <TextBlock Text="Enter your username below" Margin="0,0,0,20" TextWrapping="Wrap" Width="300" TextAlignment="Center" VerticalAlignment="Center" FontSize="16"/> <TextBox x:Name="UsernameTextBox" Margin="4" Width="250"/> <Button x:Name="LoginButton" Content="Login" Background="DodgerBlue" Foreground="White" Click="LoginButton_Click" Width="80" HorizontalAlignment="Center" Margin="0,20"/> <TextBlock Text="Don't have an account?" TextAlignment="Center" VerticalAlignment="Center" FontSize="16"/> <TextBlock x:Name="RegisterButtonTextBlock" Text="Register now" PointerPressed="RegisterButtonTextBlock_OnPointerPressed" Foreground="DodgerBlue" TextAlignment="Center" VerticalAlignment="Center" FontSize="16"/> <Border x:Name="WindowsHelloStatus" Background="#22B14C" Margin="0,20" Height="100" > <TextBlock x:Name="WindowsHelloStatusText" Text="Windows Hello is ready to use!" Margin="4" TextAlignment="Center" VerticalAlignment="Center" FontSize="20"/> </Border> <TextBlock x:Name="LoginExplanation" FontSize="24" TextAlignment="Center" TextWrapping="Wrap" Text="Please Note: To demonstrate a login, validation will only occur using the default username 'sampleUsername'"/> </StackPanel> </Grid>
Çözümün derlenmesi için code-behind dosyasına birkaç yöntem eklenmesi gerekir. Login.xaml.cs dosyasını düzenlemek için F7 tuşuna basın veya Solution Explorer kullanın. Login ve Register olaylarını işlemek için aşağıdaki iki olay yöntemini ekleyin. Şimdilik bu yöntemler öğesini
ErrorMessage.Textboş bir dize olarak ayarlayacak. Aşağıdaki using deyimlerini eklediğinizden emin olun. Sonraki adımlar için gerekli olacaktır.using Microsoft.UI.Xaml; using Microsoft.UI.Xaml.Controls; using Microsoft.UI.Xaml.Input; using Microsoft.UI.Xaml.Media; using Microsoft.UI.Xaml.Navigation; using System; namespace WindowsHelloLogin.Views { public sealed partial class Login : Page { public Login() { this.InitializeComponent(); } private void LoginButton_Click(object sender, RoutedEventArgs e) { ErrorMessage.Text = ""; } private void RegisterButtonTextBlock_OnPointerPressed(object sender, PointerRoutedEventArgs e) { ErrorMessage.Text = ""; } } }Oturum Açma sayfasını işlemek için MainPage kodunu düzenleyerek MainPage yüklendiğinde Oturum Açma sayfasına gidin. MainPage.xaml.cs dosyasını açın. Solution Explorer'da MainPage.xaml.cs çift tıklayın. Bunu bulamazsanız MainPage.xaml dosyasının yanındaki küçük oka tıklayarak arka planda kod dosyasını gösterin. Oturum Açma sayfasına gidilecek bir Yüklü olay işleyicisi yöntemi oluşturun.
namespace WindowsHelloLogin.Views
{
    public sealed partial class MainPage : Page
    {
        public MainPage()
        {
            this.InitializeComponent();
            Loaded += MainPage_Loaded;
        }

        private void MainPage_Loaded(object sender, RoutedEventArgs e)
        {
            Frame.Navigate(typeof(Login));
        }
    }
}
Login sayfasında, geçerli makinede Windows Hello kullanılabilir olup olmadığını doğrulamak için
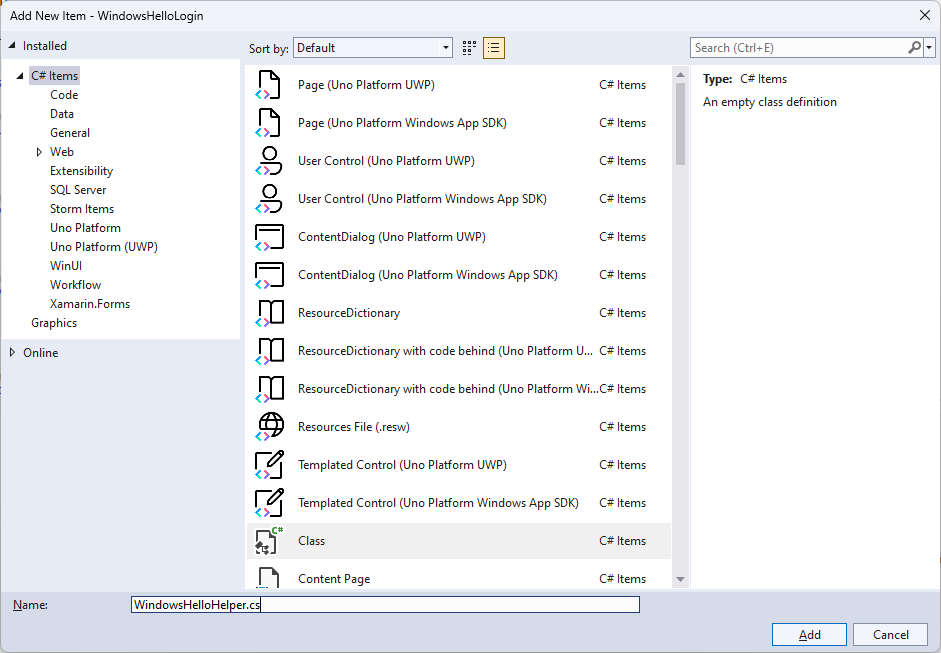
OnNavigatedToolayını işlemeniz gerekir. Login.xaml.cs aşağıdaki kodu uygulayın. WindowsHelloHelper nesnesinin bir hata olduğunu gösterdiğini fark edeceksiniz. Bunun nedeni, bu yardımcı sınıfı henüz oluşturmamış olmamızdır.public sealed partial class Login : Page { public Login() { this.InitializeComponent(); } protected override async void OnNavigatedTo(NavigationEventArgs e) { // Check if Windows Hello is set up and available on this machine if (await WindowsHelloHelper.WindowsHelloAvailableCheckAsync()) { } else { // Windows Hello isn't set up, so inform the user WindowsHelloStatus.Background = new SolidColorBrush(Windows.UI.Color.FromArgb(255, 50, 170, 207)); WindowsHelloStatusText.Text = $"Windows Hello is not set up!{Environment.NewLine}Please go to Windows Settings and set up a PIN to use it."; LoginButton.IsEnabled = false; } } }WindowsHelloHelper sınıfını oluşturmak için WindowsHelloLogin project öğesine sağ tıklayın ve Add>Yeni Klasör öğesine tıklayın. Bu klasöre Yardımcı Programlar adını verin.
Yardımcı Programlar klasörüne sağ tıklayın veSınıf> seçin. Bu yeni sınıfa "WindowsHelloHelper.cs" adını verin.
WindowsHelloHelper sınıfının kapsamını
public staticolacak şekilde değiştirin, ardından kullanıcıyı Windows Hello kullanılmaya hazır olup olmadığını bildirmek için aşağıdaki yöntemi ekleyin. Gerekli ad alanlarını eklemeniz gerekir.using System; using System.Diagnostics; using System.Threading.Tasks; using Windows.Security.Credentials; namespace WindowsHelloLogin.Utils { public static class WindowsHelloHelper { /// <summary> /// Checks to see if Windows Hello is ready to be used. /// /// Windows Hello has dependencies on: /// 1. Having a connected Microsoft Account /// 2. Having a Windows PIN set up for that account on the local machine /// </summary> public static async Task<bool> WindowsHelloAvailableCheckAsync() { bool keyCredentialAvailable = await KeyCredentialManager.IsSupportedAsync(); if (keyCredentialAvailable == false) { // Key credential is not enabled yet as user // needs to connect to a Microsoft Account and select a PIN in the connecting flow. Debug.WriteLine("Windows Hello is not set up!\nPlease go to Windows Settings and set up a PIN to use it."); return false; } return true; } } }Login.xaml.cs dosyasına
WindowsHelloLogin.Utilsad alanına bir başvuru ekleyin. Bu yöntemdekiOnNavigatedTohatayı düzeltecektir.using WindowsHelloLogin.Utils;Uygulamayı derleyin ve çalıştırın. Oturum açma sayfasına gidersiniz ve Windows Hello başlığı Windows Hello kullanılmaya hazır olup olmadığını gösterir. Makinenizde Windows Hello durumunu gösteren yeşil veya mavi başlığı görmeniz gerekir.
Yapmanız gereken bir sonraki şey, oturum açma mantığını oluşturmaktır. project "Models" adlı yeni bir klasör oluşturun.
Models klasöründe "Account.cs" adlı yeni bir sınıf oluşturun. Bu sınıf sizin hesap modeliniz olarak işlev görecektir. Bu örnek bir project olduğundan, yalnızca bir kullanıcı adı içerir. Sınıf kapsamını
publicolarak değiştirin veUsernameözelliğini ekleyin.namespace WindowsHelloLogin.Models { public class Account { public string Username { get; set; } } }Uygulamanın hesapları işlemek için bir yönteme ihtiyacı vardır. Bu uygulamalı laboratuvar için, sunucu veya veritabanı olmadığından, kullanıcıların listesi yerel olarak kaydedilir ve yüklenir. Utils klasörüne sağ tıklayın ve "AccountHelper.cs" adlı yeni bir sınıf ekleyin. Sınıf kapsamını olarak
public staticdeğiştirin. AccountHelper, hesap listesini yerel olarak kaydetmek ve yüklemek için gerekli tüm yöntemleri içeren statik bir sınıftır. Kaydetme ve yükleme, XmlSerializer kullanarak çalışır. Ayrıca kaydettiğiniz dosyayı ve nereye kaydettiğinizi de hatırlamanız gerekir.using System; using System.Collections.Generic; using System.IO; using System.Text; using System.Threading.Tasks; using System.Xml.Serialization; using Windows.Storage; using WindowsHelloLogin.Models; namespace WindowsHelloLogin.Utils { public static class AccountHelper { // In the real world this would not be needed as there would be a server implemented that would host a user account database. // For this tutorial we will just be storing accounts locally. private const string USER_ACCOUNT_LIST_FILE_NAME = "accountlist.txt"; private static string _accountListPath = Path.Combine(ApplicationData.Current.LocalFolder.Path, USER_ACCOUNT_LIST_FILE_NAME); public static List<Account> AccountList = []; /// <summary> /// Create and save a useraccount list file. (Updating the old one) /// </summary> private static async void SaveAccountListAsync() { string accountsXml = SerializeAccountListToXml(); if (File.Exists(_accountListPath)) { StorageFile accountsFile = await StorageFile.GetFileFromPathAsync(_accountListPath); await FileIO.WriteTextAsync(accountsFile, accountsXml); } else { StorageFile accountsFile = await ApplicationData.Current.LocalFolder.CreateFileAsync(USER_ACCOUNT_LIST_FILE_NAME); await FileIO.WriteTextAsync(accountsFile, accountsXml); } } /// <summary> /// Gets the useraccount list file and deserializes it from XML to a list of useraccount objects. /// </summary> /// <returns>List of useraccount objects</returns> public static async Task<List<Account>> LoadAccountListAsync() { if (File.Exists(_accountListPath)) { StorageFile accountsFile = await StorageFile.GetFileFromPathAsync(_accountListPath); string accountsXml = await FileIO.ReadTextAsync(accountsFile); DeserializeXmlToAccountList(accountsXml); } return AccountList; } /// <summary> /// Uses the local list of accounts and returns an XML formatted string representing the list /// </summary> /// <returns>XML formatted list of accounts</returns> public static string SerializeAccountListToXml() { var xmlizer = new XmlSerializer(typeof(List<Account>)); var writer = new StringWriter(); xmlizer.Serialize(writer, AccountList); return writer.ToString(); } /// <summary> /// Takes an XML formatted string representing a list of accounts and returns a list object of accounts /// </summary> /// <param name="listAsXml">XML formatted list of accounts</param> /// <returns>List object of accounts</returns> public static List<Account> DeserializeXmlToAccountList(string listAsXml) { var xmlizer = new XmlSerializer(typeof(List<Account>)); TextReader textreader = new StreamReader(new MemoryStream(Encoding.UTF8.GetBytes(listAsXml))); return AccountList = (xmlizer.Deserialize(textreader)) as List<Account>; } } }Ardından, yerel hesap listesinden hesap eklemenin ve kaldırmanın bir yolunu uygulayın. Bu eylemlerin her biri listeyi kaydeder. Bu uygulamalı laboratuvar için ihtiyacınız olan son yöntem bir doğrulama yöntemidir. Kullanıcı yetkilendirme sunucusu veya veritabanı olmadığından, bu işlem sabit kodlanmış tek bir kullanıcı için doğrulanır. Bu yöntemler AccountHelper sınıfına eklenmelidir.
public static Account AddAccount(string username)
{
    // Create a new account with the username
    var account = new Account() { Username = username };
    // Add it to the local list of accounts
    AccountList.Add(account);
    // SaveAccountList and return the account
    SaveAccountListAsync();
    return account;
}

public static void RemoveAccount(Account account)
{
    // Remove the account from the accounts list
    AccountList.Remove(account);
    // Re save the updated list
    SaveAccountListAsync();
}

public static bool ValidateAccountCredentials(string username)
{
    // In the real world, this method would call the server to authenticate that the account exists and is valid.
    // However, for this tutorial, we'll just have an existing sample user that's named "sampleUsername".
    // If the username is null or does not match "sampleUsername" validation will fail.
    // In this case, the user should register a new Windows Hello user.

    if (string.IsNullOrEmpty(username))
    {
        return false;
    }

    if (!string.Equals(username, "sampleUsername"))
    {
        return false;
    }

    return true;
}
Kullanıcıdan gelen bir oturum açma isteğini işlemekle başlamalısınız. Login.xaml.cs'da, geçerli hesap oturumunu tutacak yeni bir özel değişken oluşturun. Ardından SignInWindowsHelloAsync adlı yeni bir yöntem ekleyin. Bu, AccountHelper.ValidateAccountCredentials yöntemini kullanarak hesap kimlik bilgilerini doğrular. Bu yöntem, girilen kullanıcı adı önceki adımda yapılandırdığınız sabit kodlanmış dize değeriyle aynıysa boole değeri döndürür. Bu örneğin sabit kodlanmış değeri "sampleUsername" şeklindedir.
using WindowsHelloLogin.Models;
using WindowsHelloLogin.Utils;
using System.Diagnostics;
using System.Threading.Tasks;

namespace WindowsHelloLogin.Views
{
    public sealed partial class Login : Page
    {
        private Account _account;

        public Login()
        {
            this.InitializeComponent();
        }

        protected override async void OnNavigatedTo(NavigationEventArgs e)
        {
            // Check if Windows Hello is set up and available on this machine
            if (await WindowsHelloHelper.WindowsHelloAvailableCheckAsync())
            {
            }
            else
            {
                // Windows Hello is not set up, so inform the user
                WindowsHelloStatus.Background = new SolidColorBrush(Windows.UI.Color.FromArgb(255, 50, 170, 207));
                WindowsHelloStatusText.Text = "Windows Hello is not set up!\nPlease go to Windows Settings and set up a PIN to use it.";
                LoginButton.IsEnabled = false;
            }
        }

        private async void LoginButton_Click(object sender, RoutedEventArgs e)
        {
            ErrorMessage.Text = "";
            await SignInWindowsHelloAsync();
        }

        private void RegisterButtonTextBlock_OnPointerPressed(object sender, PointerRoutedEventArgs e)
        {
            ErrorMessage.Text = "";
        }

        private async Task SignInWindowsHelloAsync()
        {
            if (AccountHelper.ValidateAccountCredentials(UsernameTextBox.Text))
            {
                // Create and add a new local account
                _account = AccountHelper.AddAccount(UsernameTextBox.Text);
                Debug.WriteLine("Successfully signed in with traditional credentials and created local account instance!");

                //if (await WindowsHelloHelper.CreateWindowsHelloKeyAsync(UsernameTextBox.Text))
                //{
                //    Debug.WriteLine("Successfully signed in with Windows Hello!");
                //}
            }
            else
            {
                ErrorMessage.Text = "Invalid Credentials";
            }
        }
    }
}
WindowsHelloHelper'da bir yönteme başvuran açıklamalı kodu fark etmiş olabilirsiniz. WindowsHelloHelper.cs'da CreateWindowsHelloKeyAsync adlı yeni bir yöntem ekleyin. Bu yöntem, KeyCredentialManager içindeki Windows Hello API'sini kullanır. RequestCreateAsync çağrısı, accountId ve yerel makineye özgü bir Windows Hello anahtarı oluşturur. Bunu gerçek bir dünya senaryosunda uygulamak istiyorsanız switch deyimindeki yorumları not edin.
/// <summary>
/// Creates a Windows Hello key on the machine using the account ID provided.
/// </summary>
/// <param name="accountId">The account ID associated with the account that we are enrolling into Windows Hello</param>
/// <returns>Boolean indicating if creating the Windows Hello key succeeded</returns>
public static async Task<bool> CreateWindowsHelloKeyAsync(string accountId)
{
    KeyCredentialRetrievalResult keyCreationResult = await KeyCredentialManager.RequestCreateAsync(accountId, KeyCredentialCreationOption.ReplaceExisting);

    switch (keyCreationResult.Status)
    {
        case KeyCredentialStatus.Success:
            Debug.WriteLine("Successfully created key");

            // In the real world, authentication would take place on a server.
            // So, every time a user migrates or creates a new Windows Hello
            // account, details should be pushed to the server.
            // The details that would be pushed to the server include:
            // The public key, keyAttestation (if available),
            // certificate chain for attestation endorsement key (if available),
            // status code of key attestation result: keyAttestationIncluded or
            // keyAttestationCanBeRetrievedLater and keyAttestationRetryType.
            // As this sample has no concept of a server, it will be skipped for now.
            // For information on how to do this, refer to the second sample.

            // For this sample, just return true
            return true;
        case KeyCredentialStatus.UserCanceled:
            Debug.WriteLine("User cancelled sign-in process.");
            break;
        case KeyCredentialStatus.NotFound:
            // User needs to set up Windows Hello
            Debug.WriteLine("Windows Hello is not set up!\nPlease go to Windows Settings and set up a PIN to use it.");
            break;
        default:
            break;
    }

    return false;
}
CreateWindowsHelloKeyAsync yöntemini oluşturduğunuza göre, Login.xaml.cs dosyasına dönün ve SignInWindowsHelloAsync yönteminin içindeki kodun açıklamasını kaldırın.
private async void SignInWindowsHelloAsync()
{
    if (AccountHelper.ValidateAccountCredentials(UsernameTextBox.Text))
    {
        //Create and add a new local account
        _account = AccountHelper.AddAccount(UsernameTextBox.Text);
        Debug.WriteLine("Successfully signed in with traditional credentials and created local account instance!");

        if (await WindowsHelloHelper.CreateWindowsHelloKeyAsync(UsernameTextBox.Text))
        {
            Debug.WriteLine("Successfully signed in with Windows Hello!");
        }
    }
    else
    {
        ErrorMessage.Text = "Invalid Credentials";
    }
}
Uygulamayı derleyin ve çalıştırın. Oturum açma sayfasına yönlendirilirsiniz. Kullanıcı adını "sampleUsername" olarak girin ve oturum aç'a tıklayın. PIN'inizi girmenizi isteyen bir Windows Hello istemi görüntülenir. PIN'inizi doğru girdikten sonra CreateWindowsHelloKeyAsync yöntemi bir Windows Hello anahtarı oluşturabilir. Başarıyı gösteren iletilerin gösterilip gösterilmediğini görmek için çıkış pencerelerini izleyin.
Alıştırma 2: Hoş Geldiniz ve Kullanıcı Seçim Sayfaları
Bu alıştırmada, önceki alıştırmadan devam edin. Kullanıcı başarıyla oturum açtığında, oturumu kapatma veya hesabını silme seçeneklerinin bulunduğu bir hoş geldiniz sayfasına yönlendirilmelidir. Windows Hello her makine için bir anahtar oluşturduğunda, o makinede oturum açmış olan tüm kullanıcıları görüntüleyen bir kullanıcı seçim ekranı oluşturulabilir. Kullanıcı daha sonra bu hesaplardan birini seçebilir ve makineye erişmek için zaten kimliğini doğrulamış olduğundan, parolayı tekrar girmeden doğrudan hoş geldiniz ekranına gidebilir.
Görünümler klasörüne "Welcome.xaml" adlı yeni bir boş sayfa ekleyin. Sayfanın kullanıcı arabirimini tamamlamak için aşağıdaki XAML'yi ekleyin. Bu, bir başlık, oturum açmış kullanıcı adı ve iki düğme görüntüler. Düğmelerden biri bir kullanıcı listesine (daha sonra oluşturacağınız) geri döner ve diğer düğme bu kullanıcıyı unutmayı işler.
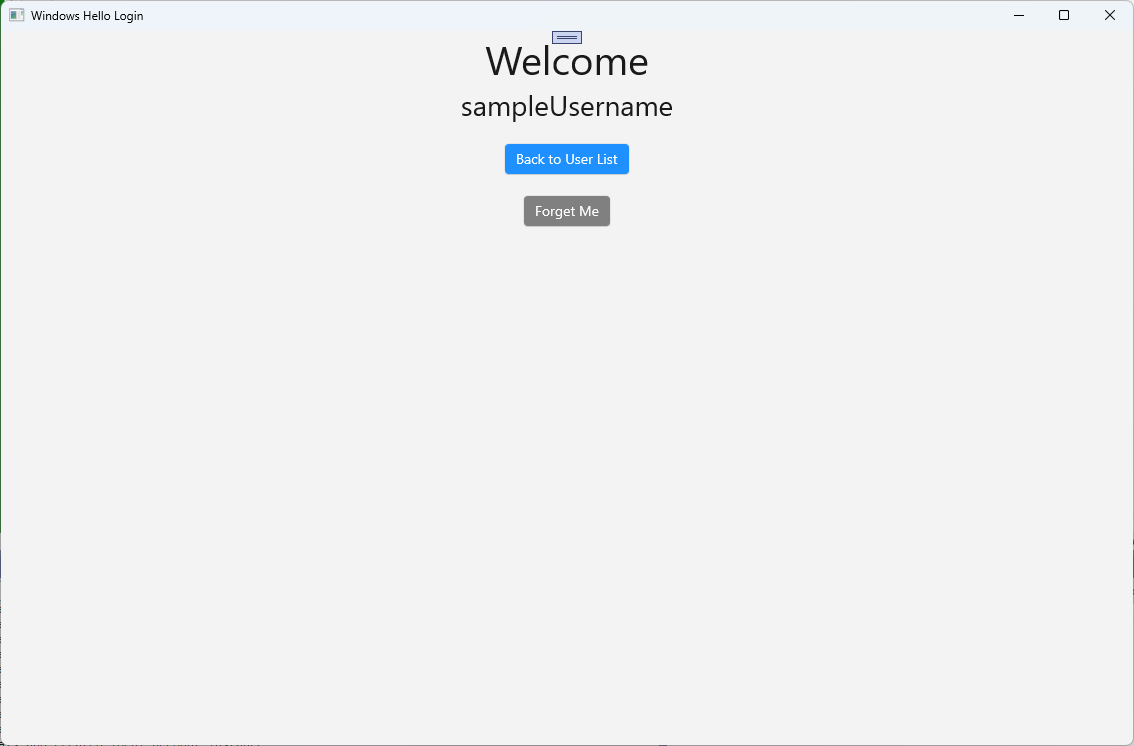
<Grid>
  <StackPanel>
    <TextBlock x:Name="Title" Text="Welcome" FontSize="40" TextAlignment="Center"/>
    <TextBlock x:Name="UserNameText" FontSize="28" TextAlignment="Center"/>

    <Button x:Name="BackToUserListButton" Content="Back to User List" Click="Button_Restart_Click"
            HorizontalAlignment="Center" Margin="0,20" Foreground="White" Background="DodgerBlue"/>

    <Button x:Name="ForgetButton" Content="Forget Me" Click="Button_Forget_User_Click"
            Foreground="White"
            Background="Gray"
            HorizontalAlignment="Center"/>
  </StackPanel>
</Grid>
Welcome.xaml.cs arka planda kod dosyasına, oturum açmış hesabı tutacak yeni bir özel değişken ekleyin. Olayı geçersiz kılmak
OnNavigateToiçin bir yöntem uygulamanız gerekir, bu işlem Hoş Geldiniz sayfasına geçirilen hesabı depolar. XAML'de tanımlanan iki düğme içinClicketkinliğini uygulamanız gerekir.WindowsHelloLogin.ModelsveWindowsHelloLogin.Utilsad alanları için using deyimleri eklemeniz gerekecek.using WindowsHelloLogin.Models; using WindowsHelloLogin.Utils; using System.Diagnostics; namespace WindowsHelloLogin.Views { public sealed partial class Welcome : Page { private Account _activeAccount; public Welcome() { InitializeComponent(); } protected override void OnNavigatedTo(NavigationEventArgs e) { _activeAccount = (Account)e.Parameter; if (_activeAccount != null) { UserNameText.Text = _activeAccount.Username; } } private void Button_Restart_Click(object sender, RoutedEventArgs e) { } private void Button_Forget_User_Click(object sender, RoutedEventArgs e) { // Remove the account from Windows Hello // WindowsHelloHelper.RemoveWindowsHelloAccountAsync(_activeAccount); // Remove it from the local accounts list and re-save the updated list AccountHelper.RemoveAccount(_activeAccount); Debug.WriteLine($"User {_activeAccount.Username} deleted."); } } }Olay işleyicisinde
Button_Forget_User_Clickaçıklama satırı olduğunu fark etmiş olabilirsiniz. Hesap yerel listenizden kaldırılıyor ancak şu anda Windows Hello'dan kaldırılma imkanı yok. WindowsHelloHelper.cs dosyasına, Windows Hello kullanıcı kaldırmayı işleyecek yeni bir metot uygulamanız gerekir. Bu yöntem, hesabı açmak ve silmek için diğer Windows Hello API'lerini kullanır. Gerçek dünyada, bir hesabı sildiğinizde kullanıcı veritabanının geçerli kalması için sunucuya veya veritabanına bildirim gönderilir.WindowsHelloLogin.Modelsnamespace'i referans alan bir using ifadesine ihtiyacınız olacaktır.using WindowsHelloLogin.Models; /// <summary> /// Function to be called when user requests deleting their account. /// Checks the KeyCredentialManager to see if there is a Windows Hello /// account for the current user. /// It then deletes the local key associated with the account. /// </summary> public static async void RemoveWindowsHelloAccountAsync(Account account) { // Open the account with Windows Hello KeyCredentialRetrievalResult keyOpenResult = await KeyCredentialManager.OpenAsync(account.Username); if (keyOpenResult.Status == KeyCredentialStatus.Success) { // In the real world you would send key information to server to unregister //for example, RemoveWindowsHelloAccountOnServer(account); } // Then delete the account from the machine's list of Windows Hello accounts await KeyCredentialManager.DeleteAsync(account.Username); }Welcome.xaml.cs dosyasına geri dönün ve RemoveWindowsHelloAccountAsync'i çağıran satırdaki yorumu kaldırın.
private void Button_Forget_User_Click(object sender, RoutedEventArgs e)
{
    // Remove it from Windows Hello
    WindowsHelloHelper.RemoveWindowsHelloAccountAsync(_activeAccount);

    // Remove it from the local accounts list and re-save the updated list
    AccountHelper.RemoveAccount(_activeAccount);

    Debug.WriteLine($"User {_activeAccount.Username} deleted.");
}
SignInWindowsHelloAsync yönteminde (Login.xaml.cs) CreateWindowsHelloKeyAsync başarılı olduktan sonra Hoş Geldiniz sayfasına gidip Hesabı geçirmesi gerekir.
private async void SignInWindowsHelloAsync()
{
    if (AccountHelper.ValidateAccountCredentials(UsernameTextBox.Text))
    {
        // Create and add a new local account
        _account = AccountHelper.AddAccount(UsernameTextBox.Text);
        Debug.WriteLine("Successfully signed in with traditional credentials and created local account instance!");

        if (await WindowsHelloHelper.CreateWindowsHelloKeyAsync(UsernameTextBox.Text))
        {
            Debug.WriteLine("Successfully signed in with Windows Hello!");
            Frame.Navigate(typeof(Welcome), _account);
        }
    }
    else
    {
        ErrorMessage.Text = "Invalid Credentials";
    }
}
Uygulamayı derleyin ve çalıştırın. "sampleUsername" ile oturum açın ve Oturum Aç'a tıklayın. PIN'inizi girin ve başarılı olursa Hoş Geldiniz ekranına gitmeniz gerekir. kullanıcının silinip silinmediğini görmek için Forget User öğesine tıklayın ve Visual Studio Output penceresini izleyin. Kullanıcı silindiğinde Hoş Geldiniz sayfasında kaldığınıza dikkat edin. Uygulamanın gezinebileceği bir kullanıcı seçim sayfası oluşturmanız gerekir.
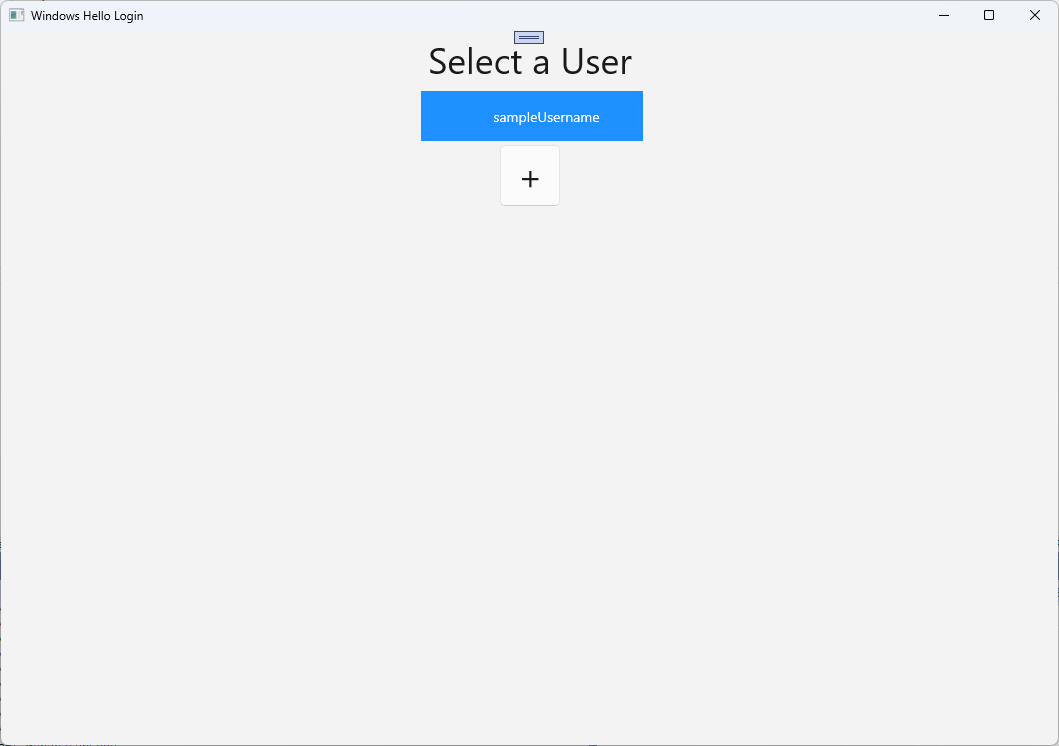
Görünümler klasöründe "UserSelection.xaml" adlı yeni bir boş sayfa oluşturun ve kullanıcı arabirimini tanımlamak için aşağıdaki XAML'yi ekleyin. Bu sayfa, yerel hesaplar listesindeki tüm kullanıcıları görüntüleyen bir ListView ve kullanıcının başka bir hesap eklemesine izin vermek için
Buttonsayfasına giden bir liste içerir.<Grid> <StackPanel> <TextBlock x:Name="Title" Text="Select a User" FontSize="36" Margin="4" TextAlignment="Center" HorizontalAlignment="Center"/> <ListView x:Name="UserListView" Margin="4" MaxHeight="200" MinWidth="250" Width="250" HorizontalAlignment="Center"> <ListView.ItemTemplate> <DataTemplate> <Grid Background="DodgerBlue" Height="50" Width="250" HorizontalAlignment="Stretch" VerticalAlignment="Stretch"> <TextBlock Text="{Binding Username}" HorizontalAlignment="Center" TextAlignment="Center" VerticalAlignment="Center" Foreground="White"/> </Grid> </DataTemplate> </ListView.ItemTemplate> </ListView> <Button x:Name="AddUserButton" Content="+" FontSize="36" Width="60" Click="AddUserButton_Click" HorizontalAlignment="Center"/> </StackPanel> </Grid>UserSelection.xaml.cs dosyasında, yerel listede hesap yoksa
Loadedsayfasına gidilecek olan yöntemini uygulayın. AyrıcaSelectionChangediçinListViewolayını veClickiçin birButtonolayı gerçekleştirin.using System.Diagnostics; using WindowsHelloLogin.Models; using WindowsHelloLogin.Utils; namespace WindowsHelloLogin.Views { public sealed partial class UserSelection : Page { public UserSelection() { InitializeComponent(); Loaded += UserSelection_Loaded; } private void UserSelection_Loaded(object sender, RoutedEventArgs e) { if (AccountHelper.AccountList.Count == 0) { // If there are no accounts, navigate to the Login page Frame.Navigate(typeof(Login)); } UserListView.ItemsSource = AccountHelper.AccountList; UserListView.SelectionChanged += UserSelectionChanged; } /// <summary> /// Function called when an account is selected in the list of accounts /// Navigates to the Login page and passes the chosen account /// </summary> private void UserSelectionChanged(object sender, RoutedEventArgs e) { if (((ListView)sender).SelectedValue != null) { Account account = (Account)((ListView)sender).SelectedValue; if (account != null) { Debug.WriteLine($"Account {account.Username} selected!"); } Frame.Navigate(typeof(Login), account); } } /// <summary> /// Function called when the "+" button is clicked to add a new user. /// Navigates to the Login page with nothing filled out /// </summary> private void AddUserButton_Click(object sender, RoutedEventArgs e) { Frame.Navigate(typeof(Login)); } } }Uygulamada UserSelection sayfasına gitmek istediğiniz birkaç yer vardır. MainPage.xaml.cs içinde, UserSelection sayfasına yönlendirilmelisiniz, Oturum Açma sayfası yerine. MainPage'de yüklü olaydayken, UserSelection sayfasının herhangi bir hesap olup olmadığını denetleyebilmesi için hesaplar listesini yüklemeniz gerekir. Yöntemin
Loadedasenkron olacak şekilde değiştirilmesi veWindowsHelloLogin.Utilsad alanı için bir using ifadesi eklenmesi gerekir.using WindowsHelloLogin.Utils; private async void MainPage_Loaded(object sender, RoutedEventArgs e) { // Load the local account list before navigating to the UserSelection page await AccountHelper.LoadAccountListAsync(); Frame.Navigate(typeof(UserSelection)); }Ardından, uygulamanın Hoş Geldiniz sayfasından UserSelection sayfasına gitmeniz gerekir. Her iki olayda da
ClickUserSelection sayfasına geri dönmeniz gerekir.private void Button_Restart_Click(object sender, RoutedEventArgs e) { Frame.Navigate(typeof(UserSelection)); } private void Button_Forget_User_Click(object sender, RoutedEventArgs e) { // Remove it from Windows Hello WindowsHelloHelper.RemoveWindowsHelloAccountAsync(_activeAccount); // Remove it from the local accounts list and re-save the updated list AccountHelper.RemoveAccount(_activeAccount); Debug.WriteLine($"User {_activeAccount.Username} deleted."); // Navigate back to UserSelection page. Frame.Navigate(typeof(UserSelection)); }Oturum Açma sayfasında, UserSelection sayfasındaki listeden seçilen hesapta oturum açmak için kod gerekir. Gezinti sırasında geçirilen hesabı, olayda
OnNavigatedTodepolayın. Hesabın mevcut bir hesap olup olmadığını belirleyecek yeni bir özel değişken ekleyerek başlayın. ArdındanOnNavigatedToetkinliğini ele alın.namespace WindowsHelloLogin.Views { public sealed partial class Login : Page { private Account _account; private bool _isExistingAccount; public Login() { InitializeComponent(); } /// <summary> /// Function called when this frame is navigated to. /// Checks to see if Windows Hello is available and if an account was passed in. /// If an account was passed in set the "_isExistingAccount" flag to true and set the _account. /// </summary> protected override async void OnNavigatedTo(NavigationEventArgs e) { // Check Windows Hello is set up and available on this machine if (await WindowsHelloHelper.WindowsHelloAvailableCheckAsync()) { if (e.Parameter != null) { _isExistingAccount = true; // Set the account to the existing account being passed in _account = (Account)e.Parameter; UsernameTextBox.Text = _account.Username; await SignInWindowsHelloAsync(); } } else { // Windows Hello is not set up, so inform the user WindowsHelloStatus.Background = new SolidColorBrush(Windows.UI.Color.FromArgb(255, 50, 170, 207)); WindowsHelloStatusText.Text = $"Windows Hello is not set up!{Environment.NewLine}Please go to Windows Settings and set up a PIN to use it."; LoginButton.IsEnabled = false; } } } }Seçili hesapta oturum açmak için SignInWindowsHelloAsync yönteminin güncelleştirilmiş olması gerekir. WindowsHelloHelper hesabı Windows Hello ile açmak için başka bir yöntem gerekir, hesap için zaten bir hesap anahtarı oluşturulmuştur. Windows Hello ile var olan bir kullanıcıda oturum açmak için yeni yöntemi WindowsHelloHelper.cs uygulayın. Kodun her bölümü hakkında bilgi için lütfen kod açıklamalarını okuyun.
/// <summary>
/// Attempts to sign a message using the account key on the system for the accountId passed.
/// </summary>
/// <returns>Boolean representing if creating the Windows Hello authentication message succeeded</returns>
public static async Task<bool> GetWindowsHelloAuthenticationMessageAsync(Account account)
{
    KeyCredentialRetrievalResult openKeyResult = await KeyCredentialManager.OpenAsync(account.Username);
    // Calling OpenAsync will allow the user access to what is available in the app and will not require user credentials again.
    // If you wanted to force the user to sign in again you can use the following:
    // var consentResult = await Windows.Security.Credentials.UI.UserConsentVerifier.RequestVerificationAsync(account.Username);
    // This will ask for the either the password of the currently signed in Microsoft Account or the PIN used for Windows Hello.

    if (openKeyResult.Status == KeyCredentialStatus.Success)
    {
        // If OpenAsync has succeeded, the next thing to think about is whether the client application requires access to backend services.
        // If it does here you would request a challenge from the server. The client would sign this challenge and the server
        // would check the signed challenge. If it is correct, it would allow the user access to the backend.
        // You would likely make a new method called RequestSignAsync to handle all this.
        // For example, RequestSignAsync(openKeyResult);
        // Refer to the second Windows Hello sample for information on how to do this.

        // For this sample, there is not concept of a server implemented so just return true.
        return true;
    }
    else if (openKeyResult.Status == KeyCredentialStatus.NotFound)
    {
        // If the account is not found at this stage. It could be one of two errors.
        // 1. Windows Hello has been disabled
        // 2. Windows Hello has been disabled and re-enabled cause the Windows Hello Key to change.
        // Calling CreateWindowsHelloKeyAsync and passing through the account will attempt to replace the existing Windows Hello Key for that account.
        // If the error really is that Windows Hello is disabled then the CreateWindowsHelloKeyAsync method will output that error.
        if (await CreateWindowsHelloKeyAsync(account.Username))
        {
            // If the Hello Key was again successfully created, Windows Hello has just been reset.
            // Now that the Hello Key has been reset for the account retry sign in.
            return await GetWindowsHelloAuthenticationMessageAsync(account);
        }
    }

    // Can't use Windows Hello right now, try again later
    return false;
}
Mevcut hesabı işlemek için Login.xaml.cs'daki SignInWindowsHelloAsync yöntemini güncelleştirin. Bu, WindowsHelloHelper.cs yeni yöntemini kullanır. Başarılı olursa hesap oturum açar ve kullanıcı Hoş Geldiniz sayfasına gider.
private async Task SignInWindowsHelloAsync()
{
    if (_isExistingAccount)
    {
        if (await WindowsHelloHelper.GetWindowsHelloAuthenticationMessageAsync(_account))
        {
            Frame.Navigate(typeof(Welcome), _account);
        }
    }
    else if (AccountHelper.ValidateAccountCredentials(UsernameTextBox.Text))
    {
        //Create and add a new local account
        _account = AccountHelper.AddAccount(UsernameTextBox.Text);
        Debug.WriteLine("Successfully signed in with traditional credentials and created local account instance!");

        if (await WindowsHelloHelper.CreateWindowsHelloKeyAsync(UsernameTextBox.Text))
        {
            Debug.WriteLine("Successfully signed in with Windows Hello!");
            Frame.Navigate(typeof(Welcome), _account);
        }
    }
    else
    {
        ErrorMessage.Text = "Invalid Credentials";
    }
}
Uygulamayı derleyin ve çalıştırın. "sampleUsername" ile oturum açın. PIN'inizi yazın; başarılı olursa Hoş Geldiniz sayfasına gidersiniz. Kullanıcı listesine geri tıklayın. Şimdi listede bir kullanıcı görmeniz gerekir. Buna tıklarsanız, WindowsHello herhangi bir parolayı yeniden girmek zorunda kalmadan yeniden oturum açmanıza olanak tanır.
Alıştırma 3: Yeni bir Windows Hello kullanıcı kaydetme
Bu alıştırmada, Windows Hello ile yeni bir hesap oluşturabilen yeni bir sayfa oluşturacaksınız. Bu, Oturum Açma sayfasının çalışma şekline benzer şekilde çalışır. Login sayfası, Windows Hello kullanmak üzere geçişte olan mevcut bir kullanıcı için uygulanır. WindowsHelloRegister sayfası yeni bir kullanıcı için Windows Hello kaydı oluşturur.
Görünümler klasöründe "WindowsHelloRegister.xaml" adlı yeni bir boş sayfa oluşturun. Kullanıcı arabirimini ayarlamak için XAML'de aşağıdakileri ekleyin. Bu sayfadaki arabirim , Oturum Açma sayfasına benzer.
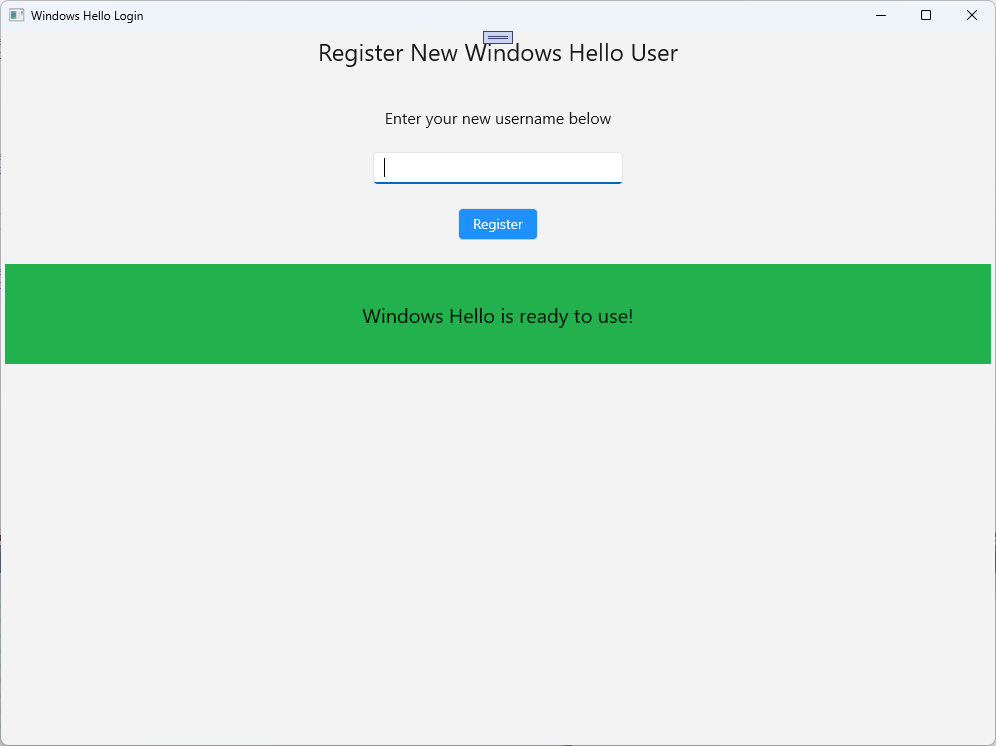
<Grid>
  <StackPanel>
    <TextBlock x:Name="Title" Text="Register New Windows Hello User" FontSize="24" Margin="4" TextAlignment="Center"/>

    <TextBlock x:Name="ErrorMessage" Text="" FontSize="20" Margin="4" Foreground="Red" TextAlignment="Center"/>

    <TextBlock Text="Enter your new username below" Margin="0,0,0,20"
               TextWrapping="Wrap" Width="300"
               TextAlignment="Center" VerticalAlignment="Center" FontSize="16"/>

    <TextBox x:Name="UsernameTextBox" Margin="4" Width="250"/>

    <Button x:Name="RegisterButton" Content="Register" Background="DodgerBlue" Foreground="White"
            Click="RegisterButton_Click_Async" Width="80" HorizontalAlignment="Center" Margin="0,20"/>

    <Border x:Name="WindowsHelloStatus" Background="#22B14C" Margin="4" Height="100">
      <TextBlock x:Name="WindowsHelloStatusText" Text="Windows Hello is ready to use!" FontSize="20"
                 Margin="4" TextAlignment="Center" VerticalAlignment="Center"/>
    </Border>
  </StackPanel>
</Grid>
Kodun arka planı WindowsHelloRegister.xaml.cs dosyasında özel bir
Accountdeğişken ve kayıt butonu için birClickolay tanımlayın. Bu işlem yeni bir yerel hesap ekler ve bir Windows Hello anahtarı oluşturur.using Microsoft.UI.Xaml.Controls; using Microsoft.UI.Xaml; using WindowsHelloLogin.Models; using WindowsHelloLogin.Utils; namespace WindowsHelloLogin.Views { public sealed partial class WindowsHelloRegister : Page { private Account _account; public WindowsHelloRegister() { InitializeComponent(); } private async void RegisterButton_Click_Async(object sender, RoutedEventArgs e) { ErrorMessage.Text = ""; // In the real world, you would validate the entered credentials and information before // allowing a user to register a new account. // For this sample, we'll skip that step and just register an account if the username is not null. if (!string.IsNullOrEmpty(UsernameTextBox.Text)) { // Register a new account _account = AccountHelper.AddAccount(UsernameTextBox.Text); // Register new account with Windows Hello await WindowsHelloHelper.CreateWindowsHelloKeyAsync(_account.Username); // Navigate to the Welcome page. Frame.Navigate(typeof(Welcome), _account); } else { ErrorMessage.Text = "Please enter a username"; } } } }Kaydolunca Oturum Aç sayfasından bu sayfaya gitmeniz gerekir.
private void RegisterButtonTextBlock_OnPointerPressed(object sender, PointerRoutedEventArgs e)
{
    ErrorMessage.Text = "";
    Frame.Navigate(typeof(WindowsHelloRegister));
}
Uygulamayı derleyin ve çalıştırın. Yeni bir kullanıcı kaydetmeyi deneyin. Ardından kullanıcı listesine dönün ve bu kullanıcıyı seçip oturum açabildiğinizi doğrulayın.
Bu laboratuvarda, mevcut kullanıcıların kimliğini doğrulamak ve yeni kullanıcılar için hesap oluşturmak üzere yeni Windows Hello API'sini kullanmak için gereken temel becerileri öğrendiniz. Bu yeni bilgiyle, kullanıcıların uygulamanıza yönelik parolaları anımsama gereksinimini ortadan kaldırmaya başlayabilir, ancak uygulamalarınızın kullanıcı kimlik doğrulamasıyla korunduğundan emin olabilirsiniz. Windows, biyometrik oturum açma seçeneklerini desteklemek için Windows Hello'nin yeni kimlik doğrulama teknolojisini kullanır.
İlgili konular
GitHub'da bizimle işbirliği yapın
Bu içeriğin kaynağı GitHub'da bulunabilir; burada ayrıca sorunları ve çekme isteklerini oluşturup gözden geçirebilirsiniz. Daha fazla bilgi için katkıda bulunan kılavuzumuzu inceleyin.

Windows developer