Not
Bu sayfaya erişim yetkilendirme gerektiriyor. Oturum açmayı veya dizinleri değiştirmeyi deneyebilirsiniz.
Bu sayfaya erişim yetkilendirme gerektiriyor. Dizinleri değiştirmeyi deneyebilirsiniz.
Tek projeli MSIX, ayrı bir paketleme projesine gerek kalmadan paketlenmiş bir WinUI 3 masaüstü uygulaması oluşturmanıza olanak tanıyan bir özelliktir. WinUI 3 uygulaması, kullanıcı arabirimi (UI) için WinUI 3 çerçevesini kullanan uygulamadır; ve Windows Uygulama SDK'sını kullanır. WinUI 3 uygulaması olmayan
Tek projeli MSIX özelliği, şu senaryolar için kullanabileceğiniz bir Visual Studio uzantısı olarak kullanılabilir:
- Windows Uygulama SDK'sı ile birlikte gelen Boş Uygulama, Paketlenmiş (Masaüstünde WinUI 3) Visual Studio proje şablonunu kullanarak yeni WinUI 3 masaüstü uygulaması oluşturun. Bu proje, ayrı bir paketleme projesine gerek kalmadan uygulamanızı bir MSIX paketinde derlemek üzere yapılandırılır.
- Ayrı bir paketleme projesi kullanan mevcut bir WinUI 3 masaüstü uygulamasını değiştirin. Değişiklik, aşağıdaki çizimde gösterildiği gibi ayrı paketleme projesinin kaldırılmasını içerir.

Genel Bakış
Bu bölümde, tek projeli MSIX özelliği hakkında bazı önemli ayrıntılar sunulmaktadır.
Fayda -ları
Tek projeli MSIX özelliğinin tanıtılmasından önce, paketlenmiş bir WinUI 3 masaüstü uygulaması oluşturmak istiyorsanız, çözümünüzde uygulama projeniz ve ek bir Windows Uygulama Paketleme Projesi bulunması gerekiyordu (bkz. Visual Studio'da MSIX paketlemesi için masaüstü uygulamanızı ayarlama). Tek projeli MSIX özelliği, uygulamanızı yalnızca uygulamanız için bir proje kullanarak geliştirmenize ve oluşturmanıza olanak tanır. Bu, daha temiz bir proje yapısı ve daha basit bir geliştirme deneyimi sağlar. Örneğin, artık başlangıç projeniz olarak ayrı paketleme projesini seçmeniz gerekmez.
Desteklenen proje türleri
Tek projeli MSIX özelliği, Windows Uygulama SDK'sı için Visual Studio'da WinUI 3 şablonlarını (C# ve C++) destekler.
Sınırlamalar
Tek projeli MSIX, oluşturulan MSIX paketinde yalnızca tek bir yürütülebilir dosyayı destekler. Birden çok yürütülebilir dosyayı tek bir MSIX paketinde birleştirmeniz gerekiyorsa, çözümünüzde bir Windows Uygulama Paketleme Projesi kullanmaya devam etmeniz gerekir.
Tek projeli MSIX paketleme araçlarını yükleme
Tek projeli MSIX paketleme araçları, yeni paketlenmiş WinUI 3 masaüstü uygulamaları oluşturmak için kullanabileceğiniz Visual Studio proje şablonlarını içerir. Bu araçlar Visual Studio için Windows Uygulama SDK uzantısına dahildir. Windows Uygulama SDK'sı yükleme yönergeleri için bkz. Windows Uygulama SDK'sı için yükleme araçları.
Windows Uygulama SDK 0.8 ve C# sürüm 1.0 Önizleme 3: Tek projeli MSIX paketleme araçları, Windows Uygulama SDK'sı sürüm 0.8 için Visual Studio için Windows Uygulama SDK uzantısına veya Windows Uygulama SDK 1.0'ın Önizleme 3'e kadar olan C# projelerine dahil değil. Bu nedenle bu sürümleri kullanıyorsanız tek projeli MSIX paketleme araçlarını açıkça yüklemeniz
Visual Studio 2022 sürüm 17.1 ve üzeri: Visual Studio 2022 VSIX için Tek projeli MSIX Paketleme Araçları uzantısı Visual Studio 2022 sürüm 17.1 ve sonraki sürümlerde yerleşik olarak bulunur.
Visual Studio 2022 sürüm 17.1'den önce: Visual Studio 2022 VSIX için Tek Proje MSIX Paketleme Araçları uzantısınıyükleyin.
Visual Studio 2019: Visual Studio 2019 VSIX uzantısıiçinTek projeli MSIX Paketleme Araçları'nı yükleyin. Uzantı için Visual Studio 2019 sürüm 16.10.x veya üzeri gerekir.
Ardından Visual Studio'da uzantının yüklü olduğunu onaylayabilirsiniz. Tüm
Yeni proje oluşturma
Windows Uygulama SDK'sı 1.0 Preview 2 veya sonraki bir sürümünü kullanıyorsanız, Boş Uygulama, Paketlenmiş (Masaüstünde WinUI 3) şablonunu kullanarak tek projeli MSIX desteği içeren yeni bir WinUI 3 tabanlı uygulama oluşturabilirsiniz. Daha fazla bilgi için bkz. İlk WinUI 3 projenizi oluşturma.
Mevcut projeyi değiştirme
Ayrı bir paketleme projesi kullanan mevcut WinUI 3 tabanlı uygulamayı değiştirmek için bu bölümdeki adımları izleyin. Adımlar, paket bildirimini (ve MSIX paketi oluşturmak için gereken diğer desteği) uygulama projesine taşımayı ve ardından ayrı paketleme projesini kaldırmayı içerir.
1. Adım: Mevcut paketleme projelerini oluşturma veya açma
Windows Uygulama Paketleme Projesi içeren bir WinUI 3 masaüstü uygulaması (bkz. Visual Studio'da WinUI 3 şablonları) için zaten bir çözümünüz varsa (bkz. Visual Studio'da MSIX paketlemesi için masaüstü uygulamanızı ayarlama) bu çözümü şimdi Visual Studio'da açın.
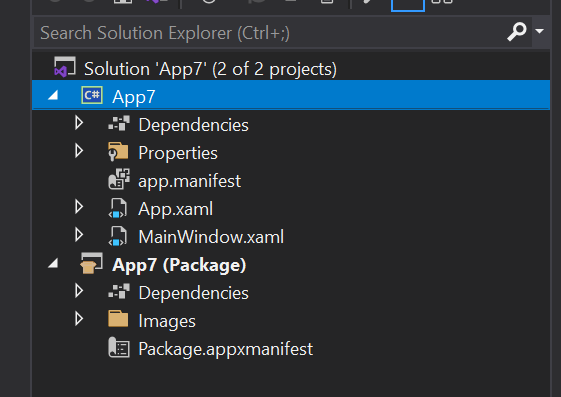
Aksi takdirde, Windows Uygulama Paketleme Projesi ile Paketlenmiş Boş Uygulama (Masaüstünde WinUI 3) şablonunu kullanarak Visual Studio'da yeni bir WinUI 3 masaüstü uygulaması oluşturun. Çözümünüz aşağıdaki ekran görüntüsüne benzer olacaktır.
2. Adım: Uygulama projesi ayarlarını düzenleme
Ardından, tek projeli MSIX özelliğini kullanmak için bazı yapılandırma ayarlarını düzenleyin. Proje türünüz ve Visual Studio sürümünüze bağlı olarak farklı yönergeler vardır.
Çözüm Gezgini'nde, .csproj dosyasını XML düzenleyicisinde açmak için uygulamanızın proje düğümüne çift tıklayın. Main <PropertyGroup> öğesine aşağıdaki XML'yi ekleyin.
<EnableMsixTooling>true</EnableMsixTooling>
<PublishProfile>Properties\PublishProfiles\win10-$(Platform).pubxml</PublishProfile>
İşiniz bittiğinde PropertyGroup<> öğesi şuna benzer görünmelidir.
<Project Sdk="Microsoft.NET.Sdk">
  <PropertyGroup>
    <OutputType>WinExe</OutputType>
    <TargetFramework>net8.0-windows10.0.19041.0</TargetFramework>
    ...
    <UseWinUI>true</UseWinUI>
    <EnableMsixTooling>true</EnableMsixTooling>
    <PublishProfile>Properties\PublishProfiles\win10-$(Platform).pubxml</PublishProfile>
  </PropertyGroup>
Değişikliklerinizi kaydedin ve .csproj dosyasını kapatın.
Visual Studio sürümünüze bağlı olarak aşağıdaki yordamlardan birini gerçekleştirin.
Visual Studio 2022 veya üzeri için :
Çözüm Gezgini 'nde, uygulamanızın proje düğümü altındakiÖzellikler klasörüne sağ tıklayın ve yeniEkle... seçin. Metin Dosyası'nı seçin, yeni dosyayı launchSettings.jsonadlandırın ve Ekle'ye tıklayın. Yeni dosyanın uygulama projenizin Özellikler klasöründe olduğundan emin olun.
Aşağıdaki ayarları yeni dosyaya kopyalayın. Senaryonuz için gerekli olan değerleri değiştirebilirsiniz. MyApp değeri herhangi bir dize olabilir; uygulamanızın adıyla eşleşmesi gerekmez.
{
    "profiles": {
        "MyApp": {
            "commandName": "MsixPackage",
            "commandLineArgs": "", /* Command line arguments to pass to the app. */
            "alwaysReinstallApp": false, /* Uninstall and then reinstall the app. All information about the app state is deleted. */
            "remoteDebugEnabled": false, /* Indicates that the debugger should attach to a process on a remote machine. */
            "allowLocalNetworkLoopbackProperty": true, /* Allow the app to make network calls to the device it is installed on. */
            "authenticationMode": "Windows", /* The authentication scheme to use when connecting to the remote machine. */
            "doNotLaunchApp": false, /* Do not launch the app, but debug my code when it starts. */
            "remoteDebugMachine": "", /* The name of the remote machine. */
            "nativeDebugging": false /* Enable debugging for managed and native code together, also known as mixed-mode debugging. */
        }
    }
}
launchSettings.json dosyasını kaydedin ve kapatın.
Visual Studio 2019için
: Çözüm Gezgini'nde uygulamanızın proje düğümüne sağ tıklayın ve Özellikler'i seçin.
Hata Ayıklama sekmesini seçin ve Başlat özelliğini MsixPackageolarak ayarlayın. İlk denemede geri döndürülürse bunu iki kez seçmeniz gerekebilir.

Değişikliklerinizi kaydedin.

3. Adım: Dosyaları uygulama projesine taşıma
Ardından, birkaç önemli dosyayı uygulama projesine taşıyın. Proje türünüze bağlı olarak farklı yönergeler vardır.
- Dosya Gezgini'ndePackage.appxmanifest dosyasını ve Images klasörünü paketleme projenizden uygulama projenize taşıyın. Bu dosya ve klasörü uygulama projesinin klasör hiyerarşisinin en üst düzeyine yerleştirin.
- Visual Studio'da , Çözüm Gezgini'ndeGörüntüler klasörünün içindeki tüm görüntüleri çoklu seçin. Özellikler penceresinde, Oluşturma Eylemi'ni İçerikolarak ayarlayın.
- Paketleme projesini çözümünüzden kaldırın.

4. Adım: Configuration Manager'da dağıtımı etkinleştirme
- Build>Configuration Manageröğesini seçin.
-
Configuration Manager'nde, her yapılandırma ve platform kombinasyonu için Dağıt onay kutusuna tıklayın (örneğin, Hata Ayıklama ve x86, Hata Ayıklama ve arm64, Yayın ve x64ve daha fazlası).
Uyarı
Etkin çözüm yapılandırması ve Etkin çözüm platformu açılır listelerini, Yapılandırma ve Platform açılır listelerinin yerine, Yayımla onay kutusuyla aynı sırada kullanmanız gerektiğinden emin olun.

5. Adım: Uygulamanızı dağıtma
Uygulama projenizi derleyin ve dağıtın. Visual Studio uygulamanızı bir MSIX paketinde derleyecek, paketi yükleyecek ve ardından uygulamanızı çalıştıracaktır.
6. Adım: Uygulamanızı yayımlamak üzere paketleme
Uygulamanızı Microsoft Store'da yayımlamak üzere paketlemek için Visual Studio'da Paketle ve Yayımla komutunu kullanın.
Tek projeli MSIX uygulamanızı derlemeyi ve paketlemeyi otomatikleştirme
Tek projeli MSIX uygulamanızı derlemek ve paketlemek için kullanabilir msbuild ve böylece iş akışını otomatikleştirmenizi sağlayabilirsiniz. Tek projeli çözümün tekniği ve komut satırı, windows uygulama paketleme projesi
Tek projeli bir çözüm için önemli derleme komutu seçeneği /p:GenerateAppxPackageOnBuild=true. Bu seçenek olmadan proje derlenir, ancak MSIX paketi alamazsınız. Bu seçeneği dahil edin; bu da MSIX paketinin oluşturulmasına neden olur.
biçiminde WinUI 3 tek projeli bir çözüm oluşturan bir GitHub eylemiiçin tam bir örnek vardır.
Uyarı
Tek projeli MSIX şu anda MSIX demetleri oluşturmayı desteklememektedir (bkz. MSIX demetleme). Yalnızca tek bir MSIX üretir. Ancak .msix GitHub Action'ı kullanarak dosyaları bir MSIX paketinde paketleyebilirsiniz.
Paketlenmiş masaüstü uygulaması Windows'da nasıl çalışır?
Masaüstü uygulamanız için bir Windows uygulama paketi oluşturduğunuzda dosyalara ve kayıt defteri girişlerine ne olduğu hakkında daha ayrıntılı bilgi için bkz. Paketlenmiş masaüstü uygulamalarının Windows'ta nasıl çalıştığını anlama.
Geri bildirimde bulunun
Bize geri bildirim göndermek, sorun bildirmek veya tek projeli MSIX özelliği hakkında sorular sormak için , Windows Uygulama SDK'sı GitHub deposunda bir tartışma veya sorun gönderin.
GitHub'da bizimle işbirliği yapın
Bu içeriğin kaynağı GitHub'da bulunabilir; burada ayrıca sorunları ve çekme isteklerini oluşturup gözden geçirebilirsiniz. Daha fazla bilgi için katkıda bulunan kılavuzumuzu inceleyin.

Windows developer