Add multiple languages for your surveys
Requesting feedback from customers is an important aspect for organizations to learn, grow, and continue improving on customer service. Providing personalized surveys is achievable by using Dynamics 365 Customer Voice. Another aspect to consider is organizations that have customers who speak different languages. This company might be global, or it could be based in a single country/region but with clients who speak a language other than the default language that surveys are created in.
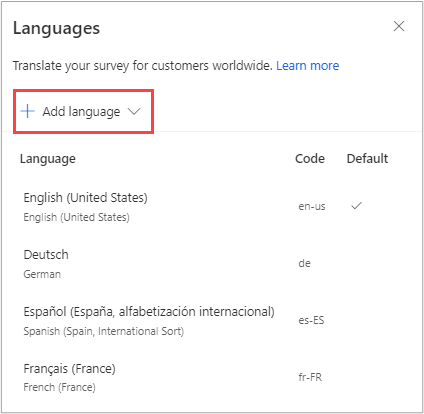
Dynamics 365 Customer Voice provides support for translating surveys into other languages. When surveys are created, they exist in the root language, which is the language that is tied to the Dynamics 365 environment. After a survey has been created, you can add more languages as necessary. Adding languages is a straightforward process, with over 40 languages available out of the box. Moreover, you can add custom languages by defining the display name code that should be used. You can add up to 86 languages to a survey. You can access the Languages menu from the Customization menu on the right side of a survey. Search for and select the required language, and then select Add language so that the survey will include it in the list of languages.
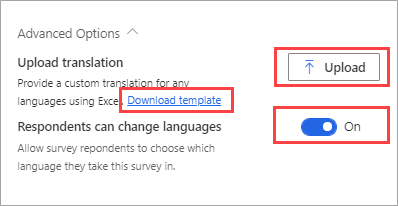
Translations for the survey questions must be done by someone who is fluent in the language; they aren't translated by Dynamics 365 Customer Voice automatically. Customer Voice includes translations on elements such as the text on the Next, Back, and Submit buttons. You can translate languages one-by-one by selecting the name of the language and then entering the new translated text. When you select each question on the survey, the root language will be displayed. As a result, knowing which text will need translation is easier, and then you can paste in the new text. However, for speed and efficiency, the Advanced Options section contains a link for you to download a translation template.
This template contains the root language with all survey content and a column for each selected language that you want to add to the survey. The column headers contain a code, known as the locale or language code, to denote each one. Examples of this code include de for German, fr-FR for French, and en-US for American English. After you have completed the template with all translations, you can upload the file from the Advanced Options area. A setting exists in the Advanced Options area where you can turn off the ability for a respondent to change the language in which they take the survey.
The original root language will be flagged as the default, meaning that it's the language in which the survey will be displayed if no translated language is available for the respondent who is viewing the survey. The default can be changed if needed.
Respondents can use several different ways to view the survey in a specific language:
They can use Power Automate to set the locale value (de for German or fr-FR for French) through a flow. When you send a survey invitation, the survey will create the correct link to make sure that the right language is displayed.
They can create custom survey links to pass the language value through by appending &lang= with the code for the language to the end of the survey URL. This method will force that language to be displayed automatically.
If a respondent’s browser language setting matches one of the languages on the survey, the translated version will display automatically.
If the setting to allow respondents to change languages is turned on, they can use the language control from the top of the survey to select their preferred language in which to view and complete the survey.
Watch the following video for a quick demonstration of the process.


