Exercise - Create tables, bulk import, and query data
The university currently stores their data in a series of comma-delimited files. You need to migrate this data to Azure SQL Database.
In this exercise, you create a database server and a single database by using the SQL Database service. Next, you create tables and import data into the database. Finally, you use the query editor and the sqlcmd utility to query the data.
Examine the existing comma-delimited data
In Azure Cloud Shell, run the following command to download the data files and application code for the university system.
git clone https://github.com/MicrosoftDocs/mslearn-develop-app-that-queries-azure-sql educationRun the following commands to move the sample data to its own folder and list the files in the folder.
mv ~/education/data ~/educationdata
cd ~/educationdata
ls
This folder contains three files: courses.csv, modules.csv, and studyplans.csv.
View the contents of the courses.csv file.
cat courses.csvThis file contains the following comma-separated data. It includes a course name and ID for each course that the university offers.
ID,Course
1,Computer Science
2,Maths with Computing
3,Maths with Physics
4,Computer Science with Physics
5,Maths with Chemistry
6,Physics with Chemistry
7,Maths
8,Physics
9,Chemistry
View the contents of the modules.csv file.
cat modules.csvThis file lists the various modules that students can take to fulfill the requirements of the courses. Each module has an identifying code and a name.
Module Code,Title
CS101,Introduction to Computer Science
CS102,Java Programming
CS103,Distributed Applications
CS104,Cloud-based systems
MA101,Foundations of Applied Maths
MA102,Advanced Calculus
MA103,Number Theory
MA104,String Theory
PH101,Foundations of Physics
PH102,Basic Experimental Phyics
PH103,Basic Theoretical Physics
PH104,Subatomic Physics
CH101,Elements of Chemistry
CH102,Basic Inorganic Chemistry
CH103,Basic Organic Chemistry
CH104,Chemical Engineering
View the contents of the studyplans.csv file.
cat studyplans.csvThis file contains the data that specifies which modules a student must pass to complete a course successfully. The Sequence column shows the order in which the student should take each module. For example, for course 1 (Computer Science), the student must take module CS101 before module MA101. Part of the data is shown here.
Course ID,Module Code,Sequence
1,CS101,1
1,MA101,2
1,CS102,3
1,CS103,4
1,CS104,5
2,MA101,1
2,MA102,2
2,CS101,3
2,CS102,4
2,CS103,5
3,MA101,1
3,MA102,2
3,PH101,3
3,PH102,4
3,PH103,5
...
Create a database server and database by using SQL Database
Let's create the database and server to store the data for the app.
Sign in to the Azure portal by using the account that you used to activate the sandbox.
From the Azure portal menu, under Azure services, select Create a resource.
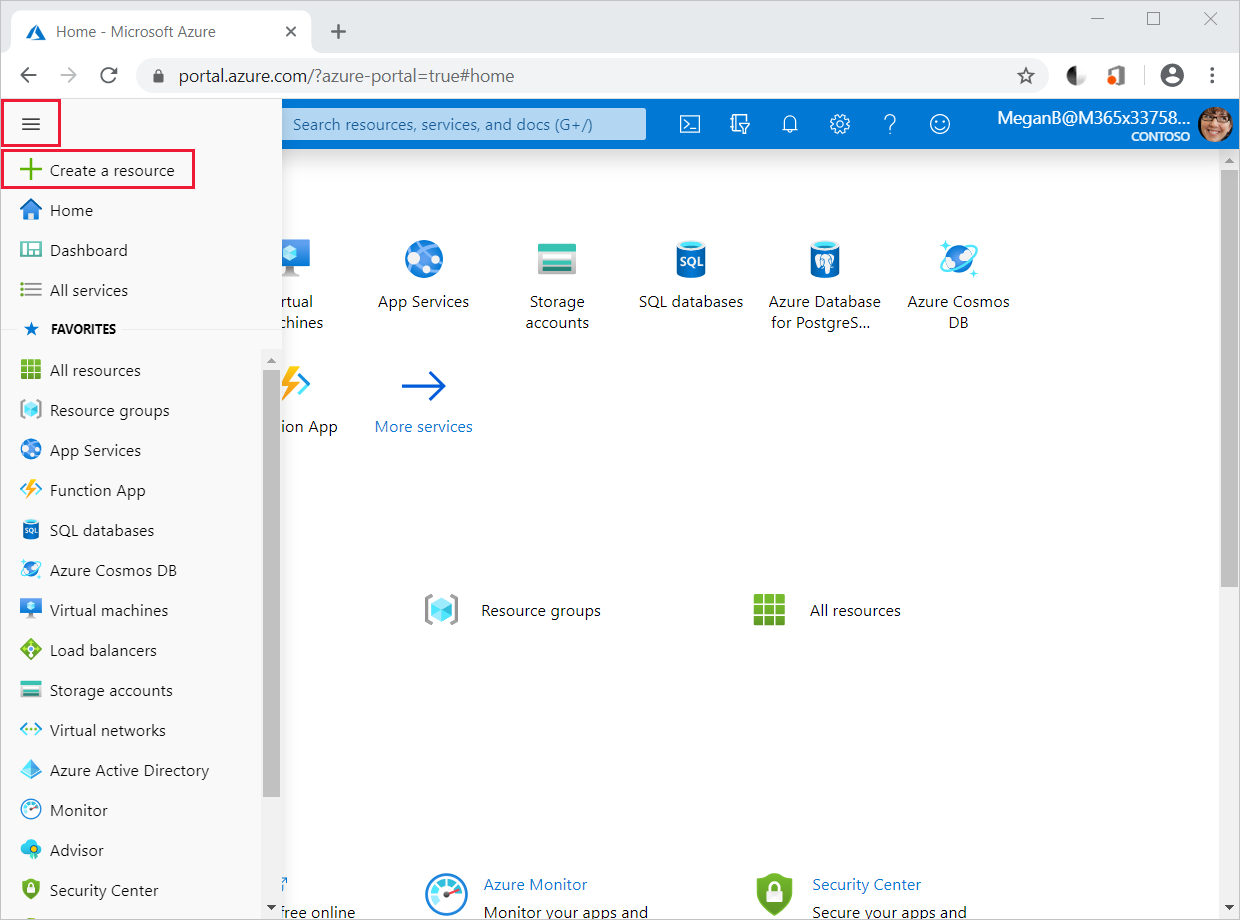
The Create a resource pane appears.
In the left menu pane, select Databases, and under Popular Azure services, select SQL Database.
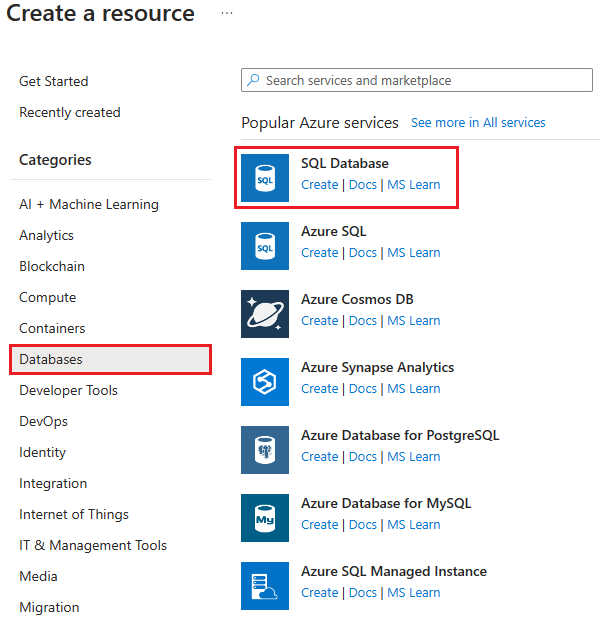
The Create SQL Database pane appears.
On the Basics tab, enter the following values for each setting.
Setting Value Projects details Subscription Concierge Subscription Resource Group [Sandbox resource group] Database details Database name The database must have a unique name. We suggest using something like coursedatabaseNNN, where NNN is a random number. Server Select the Create new link, and in the New server panel, enter the details that are in the following table. Want to use SQL elastic pool? No Compute + storage General purpose For the server, enter the following values for each setting.
Setting Value Server name courseserverNNN, where NNN is the same number that you selected for the database Server admin login azuresql Password Enter a password that meets the requirements. Confirm password Confirm your password. Location Central US Select OK.
Select Next : Networking.
On the Networking tab, enter the following values for each setting.
Setting Value Network connectivity Connectivity method Public endpoint Firewall rules Allow Azure services and resources to access this server Yes Add current client IP address Yes Select Review + create.
Select Create. Wait for the server and database to be created before you continue.
Create the tables
You can now create the tables to store the data from the .csv files.
Select Go to resource. Your SQL database for coursedatabaseNNN appears.
In the left menu pane, select Query editor (preview).
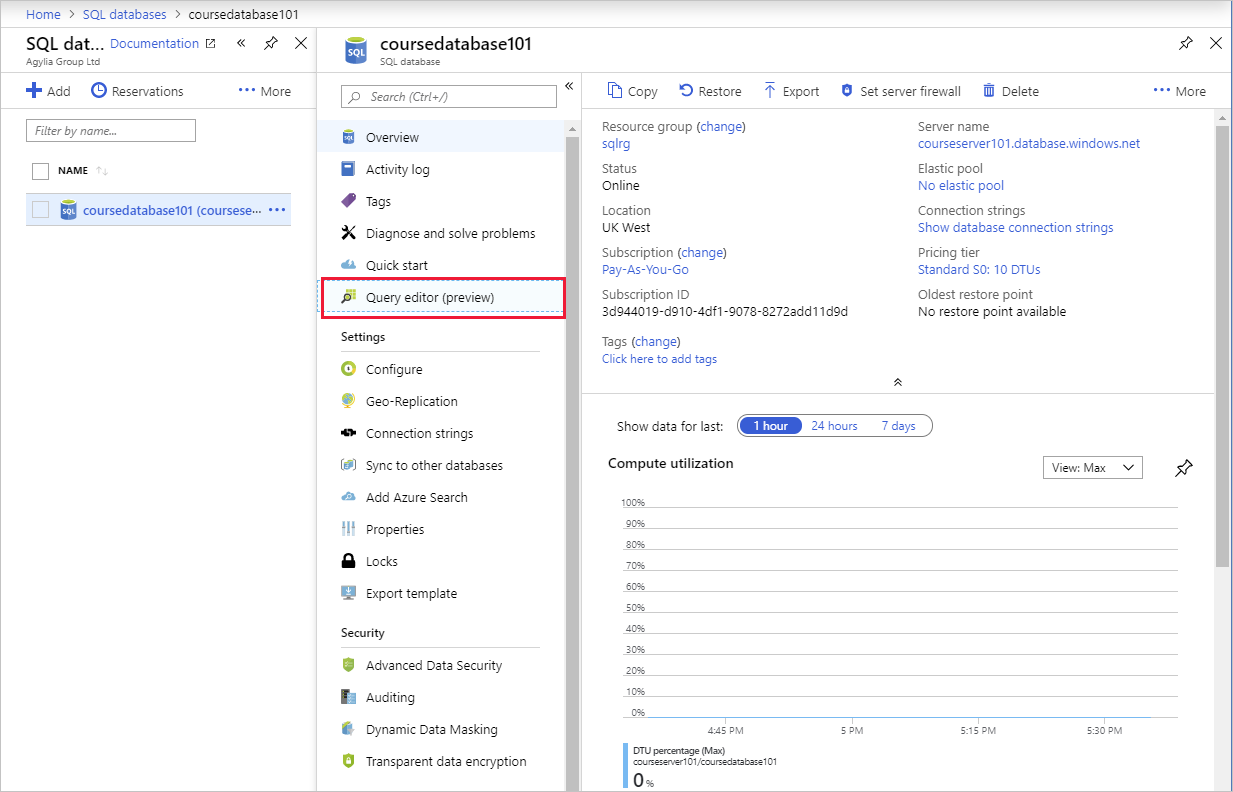
The Query editor pane for coursedatabaseNNN appears.
Enter the following values for each setting.
Setting Value SQL server authentication Login azuresql Password Specify the password that you used when you created this user. Note
If you get an error signing in to the database, check the IP listed in the error, and make sure it is what was added as the client IP. You can do this by selecting Overview > Set server firewall.
Select OK to connect to the database service.
In the Query 1 pane, enter the following Transact-SQL (T-SQL) statement, and then select Run. This statement creates a new table to hold the course information. Verify that the statement runs without any errors.
CREATE TABLE Courses
(
    CourseID INT NOT NULL PRIMARY KEY,
    CourseName VARCHAR(50) NOT NULL
)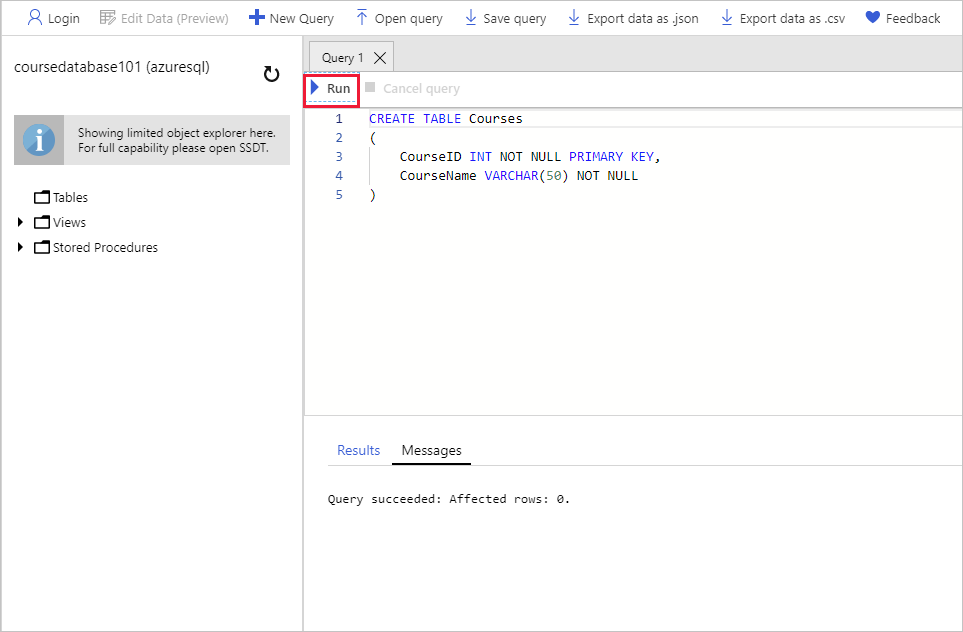
Overwrite the existing statement with the following statement that creates a table to hold the modules. Select Run, and then verify that the statement runs without any errors.
CREATE TABLE Modules
(
    ModuleCode VARCHAR(5) NOT NULL PRIMARY KEY,
    ModuleTitle VARCHAR(50) NOT NULL
)
Change the statement to create a table named
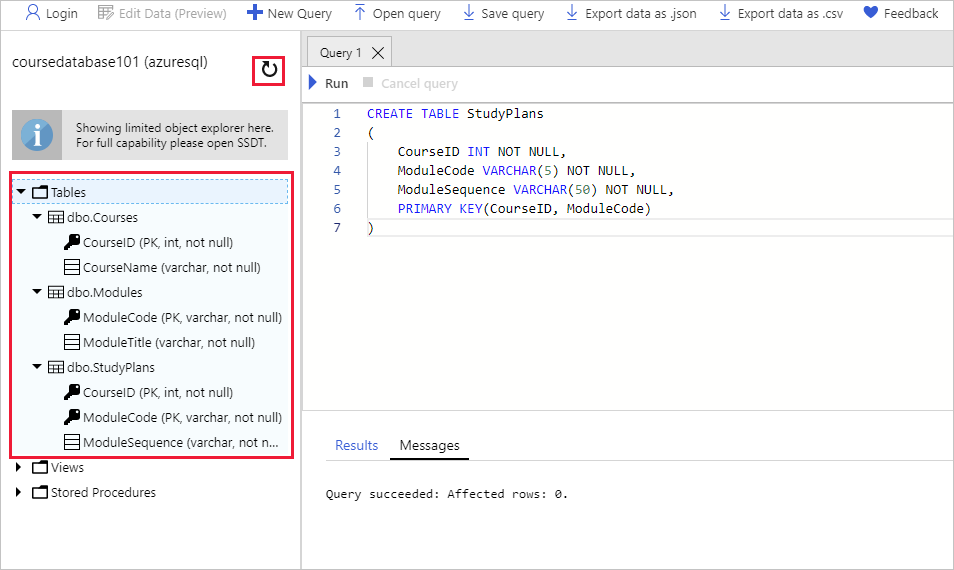
StudyPlans, and then select Run.CREATE TABLE StudyPlans ( CourseID INT NOT NULL, ModuleCode VARCHAR(5) NOT NULL, ModuleSequence INT NOT NULL, PRIMARY KEY(CourseID, ModuleCode) )In the database window, select the Refresh icon on the toolbar. Expand Tables, and then expand each table in turn. You should see the three tables (
dbo.Courses,dbo.Modules, anddbo.StudyPlans), together with the columns and primary key for each table.Note
dbo stands for database owner. It's the default schema in the database. All three tables were created in this schema.
Import the data
Return to Cloud Shell, and make sure that you're in the
educationdatafolder.cd ~/educationdataCreate the variables that you use in the later steps. Replace
NNNwith the number that you used for your database and server.export DATABASE_NAME=coursedatabaseNNN export DATABASE_SERVER=courseserverNNN export AZURE_USER=azuresql export AZURE_PASSWORD=[enter your password]Run the
bcputility to create a format file from the schema of thedbo.Coursestable in the database. The format file specifies that the data is in character format (-c) and separated by commas (-t,).bcp "[$DATABASE_NAME].[dbo].[courses]" format nul -c -f courses.fmt -t, -S "$DATABASE_SERVER.database.windows.net" -U $AZURE_USER -P $AZURE_PASSWORDIn the code editor, open
courses.fmt. The format file generated by the previous command.code courses.fmtThe file should look like this:
14.0
2
1       SQLCHAR             0       12      ","    1     CourseID                                     ""
2       SQLCHAR             0       50      "\n"   2     CourseName                                   SQL_Latin1_General_CP1_CI_AS
Review the file. The data in the first column of the comma-separated file goes into the
CourseIDcolumn of thedbo.Coursestable. The second field goes into theCourseNamecolumn. The second column is character-based and has a collation that's associated with it. The fields separator in the file is expected to be a comma. The row terminator (after the second field) should be a newline character. In a real-world scenario, your data might not be organized so neatly. You might have different field separators and fields in a different order from the columns. In that situation, you can edit the format file to change these items on a field-by-field basis. Press Ctrl+Q to close the editor.Run the following command to import the data in the
courses.csvfile in the format specified by the amendedcourses.fmtfile. The-F 2flag directs thebcputility to start importing data from line 2 in the data file. The first line contains headers.bcp "[$DATABASE_NAME].[dbo].[courses]" in courses.csv -f courses.fmt -S "$DATABASE_SERVER.database.windows.net" -U $AZURE_USER -P $AZURE_PASSWORD -F 2Verify that
bcputility imports nine rows and doesn't report any errors.Run the following sequence of operations to import the data for the
dbo.Modulestable from themodules.csvfile.Generate a format file.
bcp "[$DATABASE_NAME].[dbo].[modules]" format nul -c -f modules.fmt -t, -S "$DATABASE_SERVER.database.windows.net" -U $AZURE_USER -P $AZURE_PASSWORDImport the data from the
modules.csvfile into thedbo.Modulestable in the database.bcp "[$DATABASE_NAME].[dbo].[modules]" in modules.csv -f modules.fmt -S "$DATABASE_SERVER.database.windows.net" -U $AZURE_USER -P $AZURE_PASSWORD -F 2Verify that this command imports 16 rows.
Perform the following sequence of operations to import the data for the
dbo.StudyPlanstable from thestudyplans.csvfile.Generate a format file.
bcp "[$DATABASE_NAME].[dbo].[studyplans]" format nul -c -f studyplans.fmt -t, -S "$DATABASE_SERVER.database.windows.net" -U $AZURE_USER -P $AZURE_PASSWORDImport the data from the
studyplans.csvfile into thedbo.StudyPlanstable in the database.bcp "[$DATABASE_NAME].[dbo].[studyplans]" in studyplans.csv -f studyplans.fmt -S "$DATABASE_SERVER.database.windows.net" -U $AZURE_USER -P $AZURE_PASSWORD -F 2Verify that this command imports 45 rows.
Query the data in the database
Return to the Azure portal.
On the Azure portal menu, select SQL databases.
On the SQL databases pane, select coursedatabaseNNN. The coursedatabaseNNN pane appears.
In the left menu pane, select Query editor. The Query editor pane for coursedatabaseNNN appears.
Enter the following values for each setting.
Setting Value SQL server authentication Login azuresql Password Enter the password for this user. Select OK to connect to the database service.
In the Query 1 pane, enter the following T-SQL statement, and then select Run.
SELECT * FROM dbo.CoursesThis statement retrieves the data from the
dbo.Coursestable. The results window should display nine rows.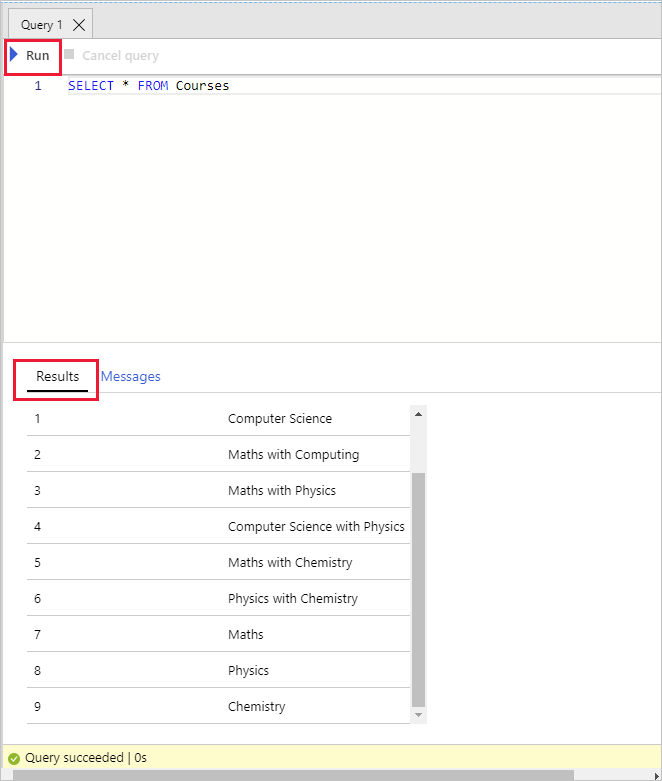
Change the query as follows, and then select Run.
SELECT * FROM dbo.ModulesThis time you should see the modules in the Results window. There are 16 rows.
Return to Cloud Shell, and run the following command to connect to the database.
sqlcmd -S "$DATABASE_SERVER.database.windows.net" -d "$DATABASE_NAME" -U $AZURE_USER -P $AZURE_PASSWORDAt the
1>prompt, run the following T-SQL command to fetch the data from thedbo.StudyPlanstable.SELECT * FROM StudyPlans; GOThis query should return 45 rows.
At the
1>prompt, enterexitto close the sqlcmd utility.
You created a single database by using SQL Database. Next, you used the query editor in the Azure portal to create tables. You then used the bcp utility to upload data from a series of comma-delimited data files. Finally, you ran queries against the tables in the database from the query editor in the Azure portal and from the sqlcmd utility in Cloud Shell.