Enable archive mailboxes in Microsoft 365
Archiving in Microsoft 365 provides users with more mailbox storage space. This unit examines how to enable and disable an archive mailbox in the Exchange admin center or by using PowerShell. You also learn how to run an automated diagnostic check on a user's archive mailbox to identify any problems and suggested resolutions.
You must assign a user the Mail Recipients role in Exchange Online before they can enable or disable archive mailboxes. By default, the system assigned this role to the Recipient Management and Organization Management role groups.
Enable an archive mailbox
In Microsoft 365, an administrator can enable a user's archive mailbox using the Exchange admin center (EAC) or Exchange Online PowerShell. The user can contact their administrator or IT department and request that they enable their archive mailbox. In some cases, the administrator might choose to delegate the ability to enable archive mailboxes to certain users or groups within the organization.
Note
When you enable a user's archive mailbox, the system compares the archiving policy assigned to the user's mailbox with the items stored in the mailbox. The system then moves any items older than the archiving policy to the user's new archive mailbox. The default archive policy that is part of the retention policy assigned to Exchange Online mailboxes moves items to the archive mailbox two years after the date the system delivered the item to the mailbox or two years after the user created the item.
As a Microsoft 365 Administrator, you should complete the following steps to enable an archive mailbox in the EAC:
- In the Microsoft 365 admin center, in the left-hand navigation pane under the Admin centers section, select Exchange.
- In the Exchange admin center, the Manage mailboxes window appears by default. Select the user whose mailbox you want to enable for archive.
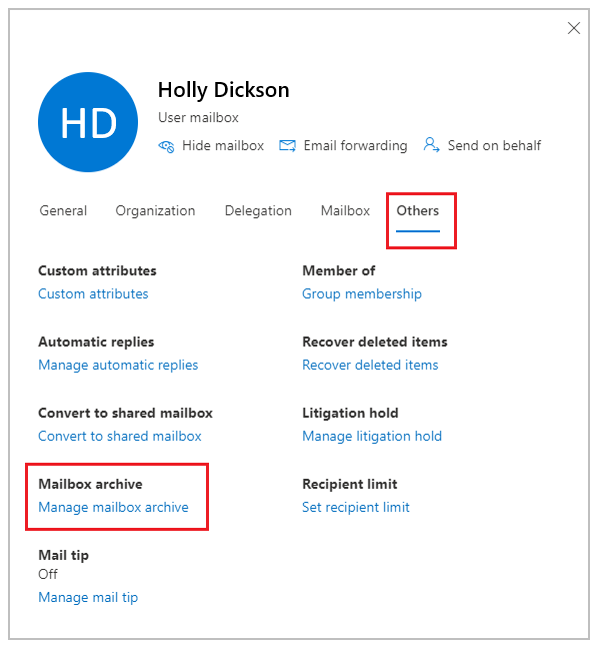
- In the user's pane that appears, select the Others tab. In the Mailbox archive section, select Manage mailbox archive.
- In the Manage mailbox archive pane that appears, select the toggle switch for Mailbox archive status to change it to Enabled. Select Save and then close the pane.
- It might take a few moments to create the archive mailbox. When the system creates the mailbox, it displays Active in the Archive status column for the selected user. You might need to refresh the page to see the change of status.
Disable an archive mailbox
You can also disable an archive mailbox for a user. The process is similar to how you enabled it in the Exchange admin center. This time, turn off the Mailbox archive option in the EAC.
Note
After you disable an archive mailbox, you can reconnect it to the user's primary mailbox within 30 days of disabling it. In this case, the system restores the original contents of the archive mailbox. After 30 days, the system permanently deletes the contents of the original archive mailbox. It can't recover this deleted content. So if you re-enable the archive more than 30 days after disabling it, the system creates a new archive mailbox.
The default archive policy assigned to a user's mailbox moves items to the archive mailbox two years after the date the system delivered the item. If you disable a user's archive mailbox, the system takes no action on mailbox items. Instead, they remain in the user's primary mailbox.
Use Exchange Online PowerShell to enable or disable archive mailboxes
Administrators can also use Exchange Online PowerShell to enable archive mailboxes.
Tip
The primary reason to use PowerShell is that you can quickly enable the archive mailbox for all users in your organization.
When using PowerShell, you must first Connect to Exchange Online PowerShell. After you connect to the Exchange Online PowerShell module, you can run the commands in the following sections to enable or disable archive mailboxes.
Enable archive mailboxes
Run the following command to enable the archive mailbox for a single user.
Enable-Mailbox -Identity <username> -Archive
Run the following command to enable the archive mailbox for all users in your organization with disabled archive mailboxes.
Get-Mailbox -Filter {ArchiveGuid -Eq "00000000-0000-0000-0000-000000000000" -AND RecipientTypeDetails -Eq "UserMailbox"} | Enable-Mailbox -Archive
Disable archive mailboxes
Run the following command to disable the archive mailbox for a single user.
Disable-Mailbox -Identity <username> -Archive
Run the following command to disable the archive mailbox for all users in your organization with enabled archive mailboxes.
Get-Mailbox -Filter {ArchiveGuid -Ne "00000000-0000-0000-0000-000000000000" -AND RecipientTypeDetails -E
Run diagnostics on archive mailboxes
It's vital that administrators be able to quickly diagnose and resolve issues in Exchange Online and Outlook. In the past, Microsoft 365 provided diagnostics through text analytics. While these diagnostics couldn't make automatic changes to an organization's tenant without its consent, they did offer insights into known issues. They also provided instructions on how to quickly fix those issues. Microsoft improved this diagnostic experience by providing a new set of queries. These queries are designed to make it easier for organizations to quickly diagnose and resolve problems.
Note
You must be a Microsoft 365 Global Administrator to use the archive mailbox diagnostic check. Also, this feature isn't available in Microsoft 365 Government clouds, Microsoft 365 operated by 21Vianet, or Microsoft 365 Germany.
To run these diagnostics on archive mailboxes, complete the following steps:
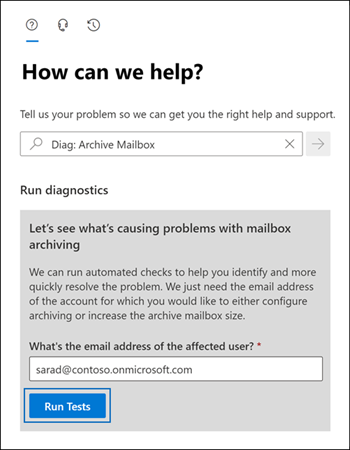
Go to the Microsoft 365 admin center and sign in if necessary.
On the Microsoft 365 admin center, select the question mark (Help) icon in the upper right corner of the screen, next to the user icon.
In the How can we help window that appears, enter Diag: Archive Mailbox in the Search field and then select the forward arrow.
In the Run diagnostics section that appears, enter the email address of the mailbox you want to check and then select Run Tests.