Add organizational branding to encrypted email messages
You can apply your company branding to customize the look of your organization's email messages and the encryption portal. To do so, you must first apply Global Administrator permissions to your Microsoft 365 account before you can get started. Once you have these permissions, use the Get-OMEConfiguration and Set-OMEConfiguration Windows PowerShell cmdlets to customize these parts of encrypted email messages:
- Introductory text.
- Disclaimer text.
- URL for Your organization's privacy statement.
- Text in the message encryption portal.
- Logo that appears in the email message and encryption portal, or whether to use a logo at all.
- Background color in the email message and encryption portal.
You can also revert back to the default look and feel at any time.
If you'd like more control, use Microsoft Purview Advanced Message Encryption to create multiple templates for encrypted emails originating from your organization. Use these templates to control parts of the end-user experience. For example, specify whether recipients can use Google, Yahoo, and Microsoft Accounts to sign-in to the encryption portal. Use templates to fulfill several use cases, such as:
- Individual departments, such as Finance, Sales, and so on.
- Different products.
- Different geographical regions or countries.
- You want to revoke emails.
- You want emails sent to external recipients to expire after a specified number of days.
Once you create the templates, you can apply them to encrypted emails by using Exchange mail flow rules. If you have Microsoft Purview Advanced Message Encryption, you can use these templates to revoke any email that you branded.
Work with Microsoft Purview Message Encryption branding templates
You can modify several features within a branding template. You can modify, but not remove, the default template. If you have Microsoft Purview Advanced Message Encryption, you can also create, modify, and remove custom templates.
To work with one branding template at a time, use the following Windows PowerShell cmdlets:
- Set-OMEConfiguration. Modify the default branding template or a custom branding template that you created.
- New-OMEConfiguration. Create a new branding template.
- Remove-OMEConfiguration. Remove a custom branding template. You can't delete the default branding template. This cmdlet only works with Microsoft Purview Advanced Message Encryption.
Modify a Microsoft Purview Message Encryption branding template
Organizations must use Windows PowerShell to modify one branding template at a time. If you have Advanced Message Encryption, you can also create, modify, and remove custom templates. Complete the following steps to modify a branding template:
Using a Microsoft 365 account with Global Administrator permissions, start a Windows PowerShell session and connect to Exchange Online.
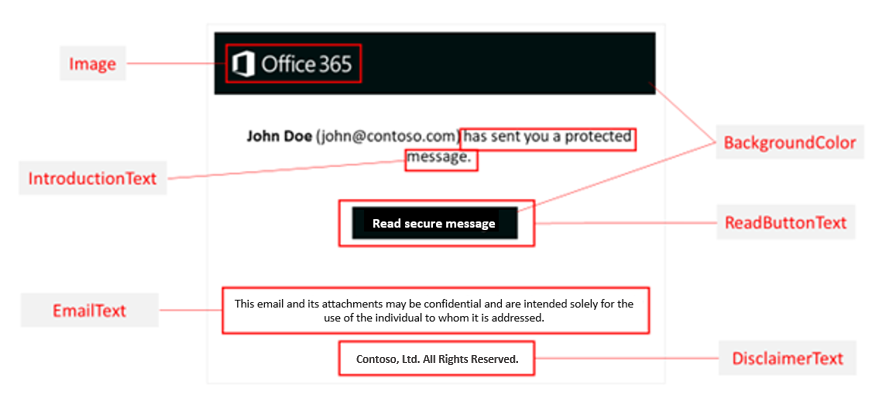
Use the Set-OMEConfiguration cmdlet. Refer to the following graphic and table for guidance on what parameters to include in this command. The parameters are based on the type of customization you want to make.
| To customize this feature of the encryption experience: | Use these PowerShell commands: |
|---|---|
| Background color: | Set-OMEConfiguration -Identity "{OMEConfigurationName}" -BackgroundColor "{#RRGGBB hexadecimal color code or name value}" Example: Set-OMEConfiguration -Identity "Branding Template 1" -BackgroundColor "#ffffff" For more information about background colors, see Background colors. |
| Logo: | Set-OMEConfiguration -Identity "{OMEConfigurationName}" -Image {Byte[]} Example: Set-OMEConfiguration -Identity "Branding Template 1" -Image ([System.IO.File]::ReadAllBytes('C:\Temp\contosologo.png')) Supported file formats: .png, .jpg, .bmp, .tiff Optimal size of logo file: less than 40 KB Optimal size of logo image: 170x70 pixels. If your image exceeds these dimensions, the service resizes your logo for display in the portal. The service doesn't modify the graphic file itself. For best results, use the optimal size. |
| Text next to the sender's name and email address: | Set-OMEConfiguration -Identity "{OMEConfigurationName}" -IntroductionText "{String up to 1024 characters}" Example: Set-OMEConfiguration -Identity "Branding Template 1" -IntroductionText "sent you a secure message." |
| Text that appears on the "Read Message" button: | Set-OMEConfiguration -Identity "{OMEConfigurationName}" -ReadButtonText "{String up to 1024 characters}" Example: Set-OMEConfiguration -Identity "OME Configuration" -ReadButtonText "Read Secure Message" |
| Text that appears below the "Read Message" button: | Set-OMEConfiguration -Identity "{OMEConfigurationName}" -EmailText "{String up to 1024 characters}" Example: Set-OMEConfiguration -Identity "OME Configuration" -EmailText "Encrypted message from ContosoPharma secure messaging system" |
| URL for the Privacy Statement link: | Set-OMEConfiguration -Identity "{OMEConfigurationName}" -PrivacyStatementURL "{URL}" Example: Set-OMEConfiguration -Identity "Branding Template 1" -PrivacyStatementURL "https://contoso.com/privacystatement.html" |
| Disclaimer statement in the email that contains the encrypted message: | Set-OMEConfiguration -Identity "{OMEConfigurationName}" -DisclaimerText "{Disclaimer statement. String of up to 1024 characters.}" Example: Set-OMEConfiguration -Identity "Branding Template 1" -DisclaimerText "This message is confidential for the use of the addressee only." |
| Text that appears at the top of the encrypted mail viewing portal: | Set-OMEConfiguration -Identity "{OMEConfigurationName}" -PortalText "{Text for your portal. String of up to 128 characters.}" Example: Set-OMEConfiguration -Identity "OME Configuration" -PortalText "ContosoPharma secure email portal" |
| To enable or disable authentication with a one-time pass code for this custom template: | Set-OMEConfiguration -Identity "{OMEConfigurationName}" -OTPEnabled {$true|$false} Examples: To enable one-time passcodes for this custom template: Set-OMEConfiguration -Identity "Branding Template 1" -OTPEnabled $true To disable one-time passcodes for this custom template: Set-OMEConfiguration -Identity "Branding Template 1" -OTPEnabled $false |
| To enable or disable authentication with Microsoft, Google, or Yahoo identities for this custom template: | Set-OMEConfiguration -Identity "{OMEConfigurationName}" -SocialIdSignIn {$true|$false} Examples: To enable social IDs for this custom template: Set-OMEConfiguration -Identity "Branding Template 1" -SocialIdSignIn $true To disable social IDs for this custom template: Set-OMEConfiguration -Identity "Branding Template 1" -SocialIdSignIn $false |
Create an Exchange mail flow rule that applies your custom branding to encrypted emails
Warning
Third-party applications that scan and modify mail can prevent Microsoft Purview Message Encryption from correctly applying Microsoft Purview Message Encryption branding.
After you either modified the default template or created new branding templates, you can create Exchange mail flow rules to apply your custom branding based on certain conditions. Most importantly, the email must be encrypted. Such a rule applies custom branding in the following scenarios:
- The end user manually encrypted the email using Outlook or Outlook on the web (formerly Outlook Web App).
- An Exchange mail flow rule or a Microsoft Purview Data Loss Prevention policy automatically encrypted the email.
To ensure Microsoft Purview Message Encryption applies your custom branding, set up a mail flow rule to encrypt your email messages. The priority of the encryption rule should be higher than the branding rule. By doing so, Microsoft Purview Message Encryption processes the encryption rule first. By default, if you create the encryption rule before the branding rule, then the encryption rule has a higher priority.
In a web browser, using a Microsoft 365 account with Global Administrator permissions, sign-in to Microsoft 365.
On the Office 365 Home page, select the Admin tile.
In the Microsoft 365 admin center, select Admin centers in the navigation pane, and then select Exchange.
In the Exchange admin center, in the navigation pane, select Mail flow, and then select Rules.
On the Rules page, select New+, then select Create a new rule from the drop-down list.
In the Name field, type a name for the rule, such as Branding for Sales department.
In Apply this rule if, select the condition: The sender is located inside the organization. Then select any other conditions you want from the list of available conditions. For example, you may want to apply a particular branding template to:
- All encrypted emails sent from members of the Finance department.
- Encrypted emails sent with a certain keyword such as External or Partner.
- Encrypted emails sent to a particular domain.
If you previously defined a mail flow rule to apply encryption, skip this step. Otherwise, to configure the mail flow rule to apply encryption, from Do the following, select Modify the message security, and then select Apply Office 365 Message Encryption and rights protection. Select an RMS template from the list and then select add action.
The list of templates includes default templates and options and any custom templates you create. If the list is empty, ensure that you set up Microsoft Purview Message Encryption.
From Do the following, select Modify the message security, then select Apply custom branding to OME messages. From the drop-down list that appears, select a branding template.
Select add action if you want to specify another action, or select Save, and then select OK.
Additional reading. For more information on mail flow rules, see the following links:
- For more information on how to create an Exchange mail flow rule that applies encryption, see Define mail flow rules to encrypt email messages in Office 365.
- For more information on setting the priority of a mail flow rule, see Manage mail flow rules.
Knowledge check
Choose the best response for the following question. Then select “Check your answers.”