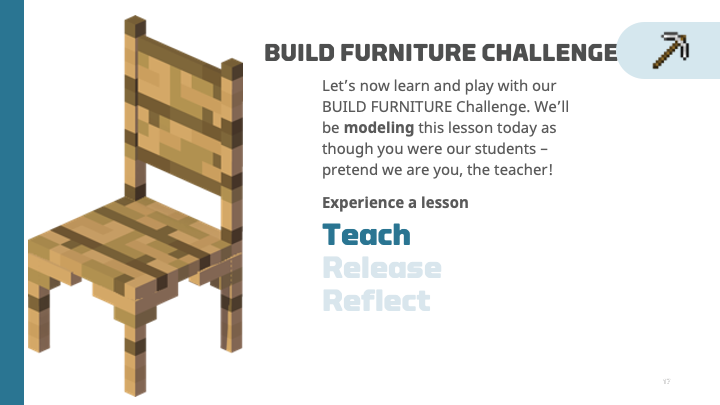
Teach: Build Furniture Challenge
Remember, we're modeling today an actual lesson you can use with your students. You'll build just as your students might and then we'll come together to assess and reflect on your work. You'll then apply to your own classroom using the lesson planner. The first portion of our model is Teach—we'll spend time demonstrating skills before you go off on your own to build in a Minecraft world.
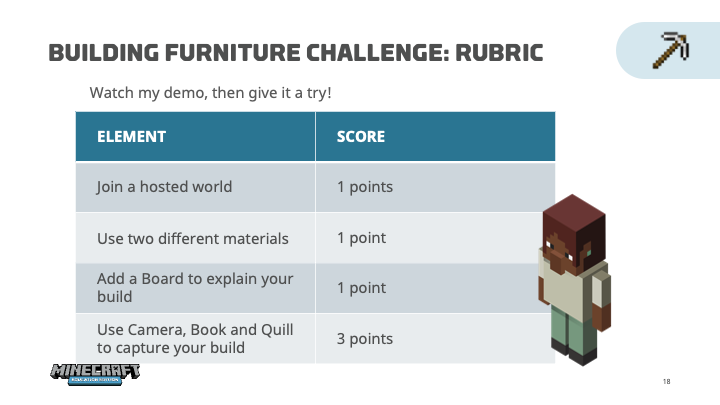
Follow the rubric
Rubrics are helpful to ground your students in what they need to do to master a lesson. As you design your first lesson with your students, you'll want to think of what your rubric will be. We'll demonstrate today how to practice your movement and building skills by building a piece of furniture for the house you built in Minecraft 101. We'll show how to join a multiplayer game and use two different blocks. Think of what kind of furniture you find the comfiest if you could build anything! We'll also modify our build by adding a Board to explain more about our build. At the end, you'll also use Camera and Book and Quill to capture your build showing the completion of this six-point rubric.
- Join a hosted world, 1 point
- Use two different materials, 1 point
- Add a Board to explain your build, 1 point
- Use Camera, Book and Quill to capture your build, 3 points
Join a world
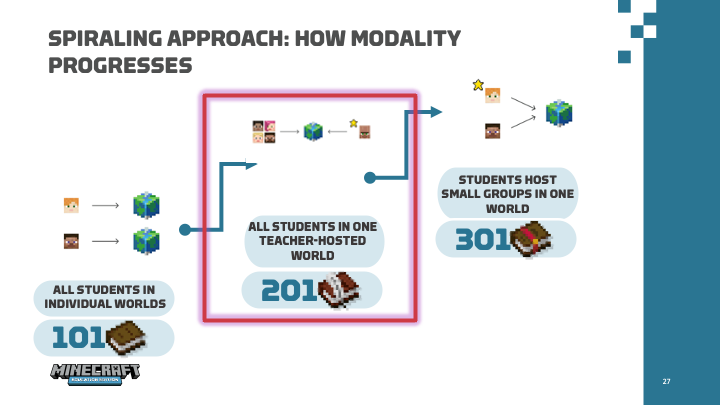
In Minecraft 101, we played Minecraft individually in our own worlds. Today, we’ll show how you can play collaboratively in one world that we, as your teachers, host. This modality is good for when you want to see all of your students' work at once and give feedback on it. This modality also allows students to use collaboration skills.
Multiplayer is one of the most popular and effective ways to leverage Minecraft in the classroom. It's a great way to encourage collaboration, communication, and problem solving as students work together on projects in a shared Minecraft world. A single Minecraft game can host up to 40 players at a time. We recommend this when:
- You have structure and areas for your students to build by themselves
- You want to add collaborative elements
- You want to help facilitate and interact with students
In Minecraft 301, we'll explore what it's like to have small groups of students play together.
Want more information on hosting Multiplayer games for your students? Check out our support article.
Make sure we're on the same version
Make sure that your students all have the most up-to-date version of Minecraft Education on their device. Most people using Windows should be up-to-date automatically. Mac users need to manually install from aka.ms/download. If a Windows user doesn't have the update, they may need to install or reinstall.
Need more support? Check our support article. If someone still can't connect, ask them to join a neighbor and file a support ticket.
Host a multiplayer game for the whole class
Now that everyone is on the same version, we'll model when a teacher hosts a single world for the entire class to join. After the below video, we encourage you to try this as soon as possible with students.
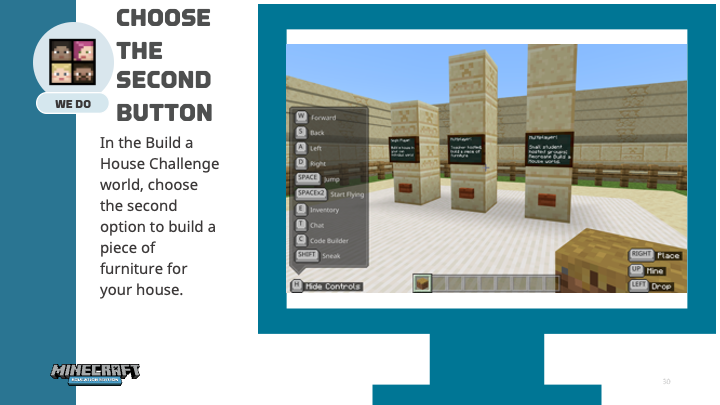
- We'll make sure we are in the world we want to host in. In this case, we'll open the Build a House Challenge World, and we'll choose the second option.
- We'll press Escape, we'll select the right-hand tab, and create a Join Code for students
- Students input this code. Up to 40 can join in this space
Watch: Host a join code (1 minute)
Player permissions
When hosting a multiplayer world, students default join as members indicated by a star next to their name. The teacher is indicated by a crown that means you're the operator and can set player permissions.
- The visitor setting allows joining players to explore the world without interacting with it. Like in a museum, joining players can move around and look, but can't build or destroy.
- The member setting allows joining players to interact in the world allowing them to break and create block, interact with other players, and attack mobs. Most often you'll choose member (co-creators) in the world when working in a collaborative gameplay environment.
- The operator setting allows joining players to have full access and control to the world including player permissions and commands.
You can change player permissions directly from the Join Code menu, or you can change the default at the world-level settings.
![]()
Students join the teacher-hosted world
Now that you have the join code, you need to input it. From the Play Screen, select Join World, then input the code to enter the world. Remember, you aren’t entering your own world, you’re joining the collaborative world for the lesson. This is what your students will do if you're having them join your world.
Watch: How to use a join code (13 seconds)
For the purposes of this practice, you'll move in an individual world, but pretend that you've just joined a world and are building in a collaborative space.
Since you saved the world after Minecraft 101, you should still have that world on your device.
- Go to Play
- View My Worlds
- Open up the Build a House Challenge
- Choose Option
Don't see it or didn't save it? No problem, follow these steps to find the Build a House Challenge in the in-game library and make a new world.
Once in the world, choose the second option in the lobby, Build Furniture Challenge. This will teleport you to a neighborhood with a Non Player Character (NPC) who has instructions for you. The NPC will tell you to select one of the buttons to be teleported to your own build plot. This kind of world is great for multiplayer because there are individual spaces for students to build.
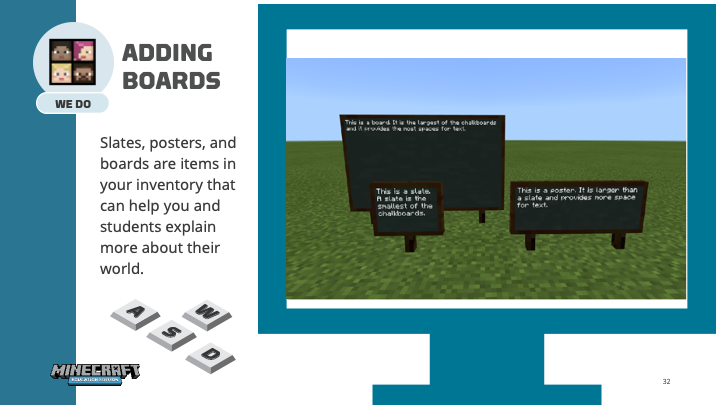
Add Boards to your build
A useful Minecraft Education feature is Boards. Chalkboards come in three sizes, slates, posters, and boards, and can be found in the inventory. The options are distinguished primarily by size which dictates text capacity. This allows the user to choose the size most applicable to the purpose or task.
Chalkboards can be used to provide content, instruction, or elicit feedback. Chalkboards are a great way for students to demonstrate learning in a Minecraft activity. For example, in the Decimal/Fraction Gardens world, students create a garden and use chalkboards to label their garden sections in decimals and fractions. This provides the opportunity for choice and control over how they show what they know. Another example of using chalkboards is in Empathy Village. This is a two-part, social-emotional lesson on ‘putting yourself in someone else’s shoes.’ Students choose homes and use slates to answer various questions about themselves. Then they learn about another person through their answers and present as if they WERE that person.
Watch: Add boards to explain your furniture (45 seconds)
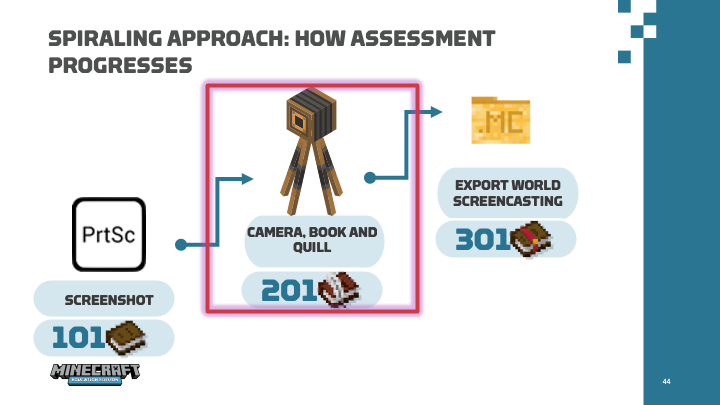
Assess your build: Camera, Book and Quill
There are many ways to assess work in Minecraft. In Minecraft 101, we had you capture your screen and put in a shared drive folder. Now, we’ll use special in-game tools to capture them, the Camera and the Book and Quill which can be used to assess almost anything in Minecraft! In Minecraft 301, we'll look at exporting your entire world for when you want others to completely interact with it.
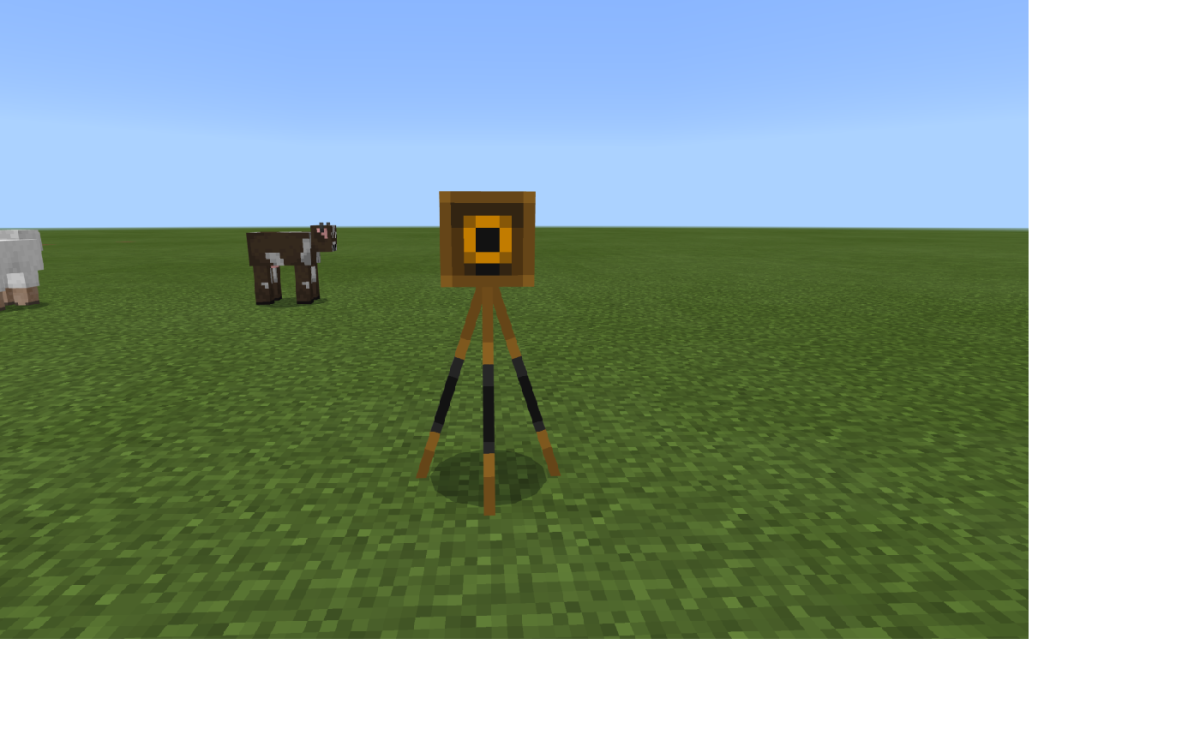
The Camera is a great tool to use for assessment of a build, completion of a challenge, or as a point of reference for future building and documents students’ work during or at the end of a challenge. Challenges in Minecraft are great game-based learning opportunities for students. For example, in the activity Bridge Building Challenge there are six challenges where students can use the camera to document their bridges and store their photos in their Book and Quill for future assessment or discussion.
In the Build a Furniture Challenge, the NPC gives you a Camera and Book and Quill for your inventory, but you can also easily find it by searching for the Camera in your inventory.
You can:
- Right click once you have the Camera in your hotbar to take a picture of your piece of furniture
- Place the camera and take a selfie with your piece of furniture
The photos then can be accessed in your Book and Quill which we'll talk about next.
Watch: Two ways to use camera for assessment (1 minute)
Put it all together with Book and Quill
Once you've taken a picture of your furniture with Camera, it's time to add some writing to it with Book and Quill.
The Book and Quill is a great tool to use with the Camera when looking to assess students on content knowledge or 21st century skills. Think back to the Bridge Building Challenge above. After the students have taken their pictures throughout the activity, they can go into their portfolios and caption each photo. These captions can then assist the teacher in easily assessing the students work once the students have exported the Book and placed it in their learning management system (LMS).
Using Minecraft to assist with writing gives students a wealth of choice and control. It also encourages them to ask questions before beginning their writing. An example is in the Settings for Stories world. The author of this lesson added a “note catcher” document for students to take notes as they explore four settings for narratives. These notes can also easily be done using a Book and Quill. Once students finish their exploration, they can sign the book and export it for the teacher to see. This example uses in-game assessment tools to record student thinking.
And that's exactly what we'll do today! You will:
- Open the Book and Quill in your hotbar by right-clicking to write in it
- Select the Edit button at the bottom of the page
- Select the Photo button to insert the photo you took
- Use your cursor to write about your piece of furniture
- Sign the book when you're done! It will ask you to give the Book a title. This makes it no longer editable, and it will show up as a purple "Signed" book in your hotbar.
- After you sign, you can export the Book. Once you export to PDF, the Book can be uploaded to an LMS or shared drive for assessment.
Watch: Add pictures and descriptions to a Book and Quill and export to PDF (42 seconds)
Next step
Great job! We're now ready to dive into the next phase—release, where you'll finally get a chance to build your furniture and practice Boards, Camera, Book and Quill.