Create Application Gateway resources
You're now ready to create an Application Gateway instance to expose your application to the internet.
When you host your apps or microservices in Azure Spring Apps, you don't always want to publish them directly to the internet. You might want to expose them through a reverse proxy instead. Doing so allows you to place a service in front of your apps where you can define web application firewall (WAF) capabilities to help secure your apps, load balancing, routing, request filtering, and rate limiting.
When you deploy a reverse proxy service like Azure Application Gateway or Azure Front Door in front of Azure Spring Apps, you should ensure that your apps can be reached only through this reverse proxy. This safeguard helps to prevent malicious users from trying to bypass the WAF or circumvent throttling limit.
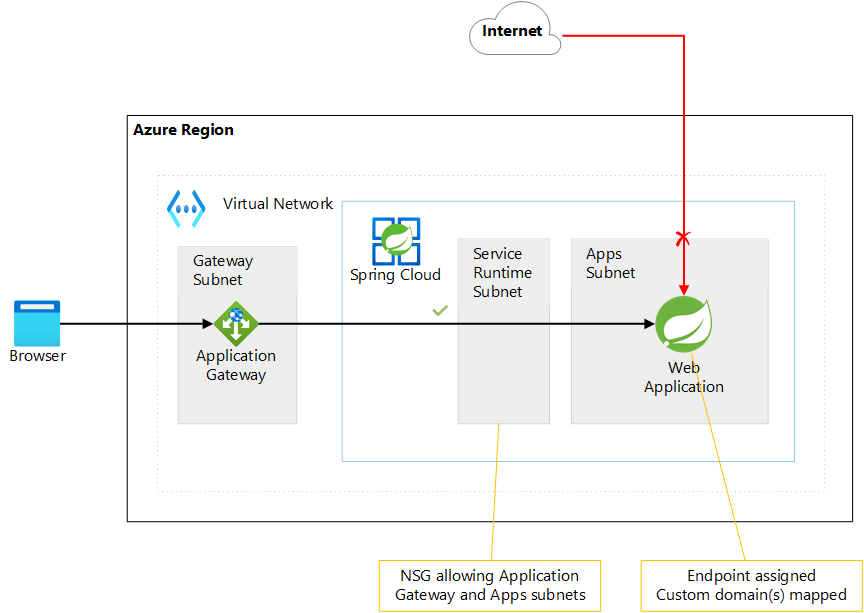
The diagram below shows Application Gateway as the reverse proxy.
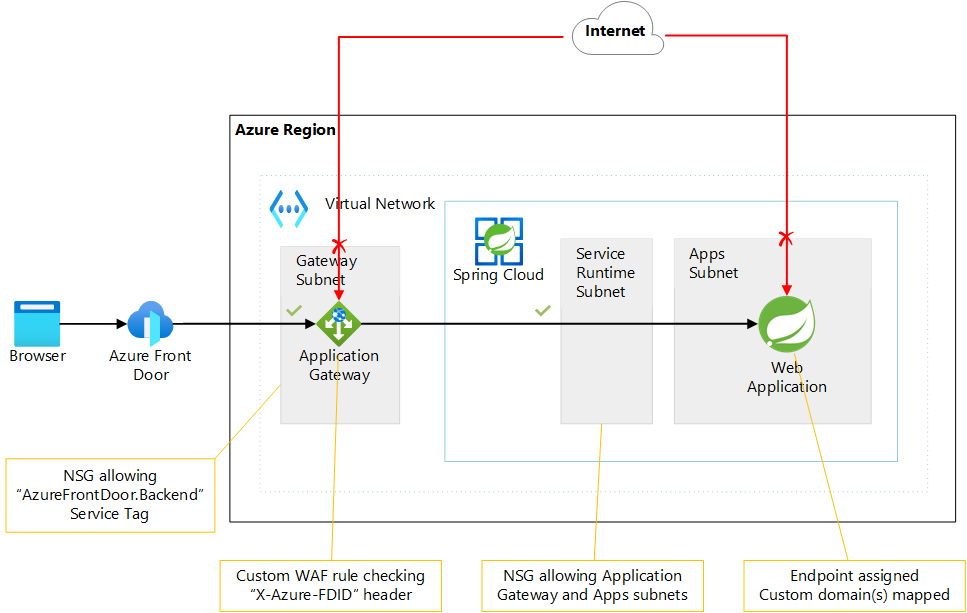
The diagram below shows Azure Front Door and Application Gateway as the reverse proxy.
The recommended way to enforce these restrictions depends on how you deploy your Azure Spring Apps instance and which reverse proxy you use. In this unit you will choose for the Azure Application Gateway and the network locked down.
Note
An Application Gateway resource needs a dedicated subnet to be deployed into, however, you already created this subnet at the beginning of this exercise.
An Application Gateway instance also needs a public IP address, which you'll create next by running the following commands from the Git Bash shell:
APPLICATION_GATEWAY_PUBLIC_IP_NAME=pip-$APPNAME-app-gw
az network public-ip create \
    --resource-group $RESOURCE_GROUP \
    --location $LOCATION \
    --name $APPLICATION_GATEWAY_PUBLIC_IP_NAME \
    --allocation-method Static \
    --sku Standard \
    --dns-name $DNS_LABEL
In addition, an Application Gateway instance also needs to have access to the self-signed certificate in your Key Vault. You'll create a managed identity associated with the Application Gateway instance and retrieve the object ID of this identity.
APPGW_IDENTITY_NAME=msi-appgw-openlab
az identity create \
    --resource-group $RESOURCE_GROUP \
    --name $APPGW_IDENTITY_NAME

APPGW_IDENTITY_CLIENTID=$(az identity show \
    --resource-group $RESOURCE_GROUP \
    --name $APPGW_IDENTITY_NAME \
    --query clientId \
    --output tsv)

APPGW_IDENTITY_OID=$(az ad sp show \
    --id $APPGW_IDENTITY_CLIENTID \
    --query objectId \
    --output tsv)
You can now reference the object ID when granting the get and list permissions to the Key Vault secrets and certificates.
az keyvault set-policy \
    --name $KEYVAULT_NAME \
    --resource-group $RESOURCE_GROUP \
    --object-id $APPGW_IDENTITY_OID \
    --secret-permissions get list \
    --certificate-permissions get list
Note
In order for this implementation to work, the Application Gateway instance requires access to certificate and secrets in the Azure Key Vault instance.
Next, you need to retrieve the ID of the self-signed certificate stored in your Key Vault. You'll use the ID in the following step.
KEYVAULT_SECRET_ID_FOR_CERT=$(az keyvault certificate show \
    --name $CERT_NAME_IN_KV \
    --vault-name $KEYVAULT_NAME \
    --query sid \
    --output tsv)
With all relevant information collected, you can now provision an instance of Application Gateway.
APPGW_NAME=agw-$APPNAME-$UNIQUEID
APIGW_NAME=$SPRING_APPS_SERVICE-api-gateway
SPRING_APP_PRIVATE_FQDN=${APIGW_NAME}.private.azuremicroservices.io
az network application-gateway create \
    --name $APPGW_NAME \
    --resource-group $RESOURCE_GROUP \
       --location $LOCATION \
    --capacity 2 \
    --sku WAF_v2 \
    --frontend-port 443 \
    --http-settings-cookie-based-affinity Disabled \
    --http-settings-port 443 \
    --http-settings-protocol Https \
    --public-ip-address $APPLICATION_GATEWAY_PUBLIC_IP_NAME \
    --vnet-name $VIRTUAL_NETWORK_NAME \
    --subnet $APPLICATION_GATEWAY_SUBNET_NAME \
    --servers $SPRING_APP_PRIVATE_FQDN \
    --key-vault-secret-id $KEYVAULT_SECRET_ID_FOR_CERT \
    --identity $APPGW_IDENTITY_NAME \
    --priority "1" \
    --waf-policy $WAF_POLICY_NAME
To complete the configuration of the instance of Application Gateway, you need to retrieve the public key of the self-signed certificate, which is required to configure the certificate as issued by a trusted certification authority.
az keyvault certificate download \
    --vault-name $KEYVAULT_NAME \
    --name $CERT_NAME_IN_KV \
    --file ./selfsignedcert.crt \
    --encoding DER

az network application-gateway root-cert create \
    --resource-group $RESOURCE_GROUP \
    --cert-file ./selfsignedcert.crt \
    --gateway-name $APPGW_NAME \
    --name MySelfSignedTrustedRootCert
Finally, you can now update the HTTP settings of the Application Gateway instance to configure self-signed certificate as issued by a trusted certification authority.
az network application-gateway http-settings update \
    --resource-group $RESOURCE_GROUP \
    --gateway-name $APPGW_NAME \
    --host-name-from-backend-pool false \
    --host-name $DNS_NAME \
    --name appGatewayBackendHttpSettings \
    --root-certs MySelfSignedTrustedRootCert