Exercise - Create an SPFx ACE with geo-location capabilities
In this exercise, you'll create a SharePoint Framework (SPFx) Adaptive Card Extension (ACE) with the Primary Text Card template that uses the geo location capabilities in Viva Connections.
The scenario you'll implement is a simplified version of a campus shuttle service that a large university or company has to help employees and visitors get between buildings. The ACE is for the diver of a shuttle. The driver will use the ACE to book a trip and indicate they're either on the way to pick up a passenger or deliver a passenger to their destination.
Prerequisites
Developing ACEs for Viva Connections requires a Microsoft 365 tenant, SharePoint Online, and Viva Connections set up in your tenant. Use the following resources to prepare your tenant:
- Viva Connections enabled in the Microsoft 365 tenant
- SharePoint Framework: Set up your Microsoft 365 tenant
You also need the necessary developer tools installed on your workstation:
Important
In most cases, installing the latest version of the following tools is the best option. The versions listed here were used when this module was published and last tested.
- Node.js - v16.*
- Gulp-cli - v2.3.*
- Yeoman - v4.3.*
- Yeoman Generator for SharePoint - v1.17.1
- Visual Studio Code
Create a SharePoint list to store the data
The first step is to create a new SharePoint list to store the data for each campus shuttle driver.
In a browser, navigate to the SharePoint site where you want to test the project you'll create in this exercise.
Select the New and then List from the available options:
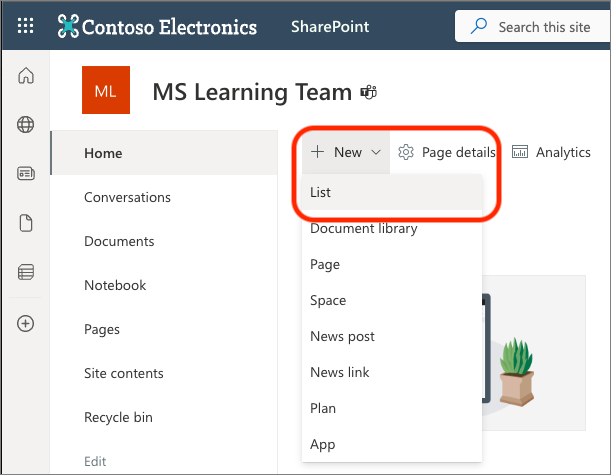
On the Create a list dialog, select Blank list.
Set the Name of the list to Campus Shuttle and select Create.
When the browser refreshes to display the new list, add a few columns to the list. Select Add column, select Text, and then select the Next button. On the Create a column panel, enter the following values and select Save:
- Name: OriginLocation
- Type: Single line of text
Repeat this process using the following values to add a few more columns to the list:
- Column:
- Name: DestinationName
- Type: Single line of text
- Column:
- Name: DestinationLocation
- Type: Single line of text
- Column:
- Name: Status
- Type: Choice
- Choices:
- hired
- en route
- available
With list to store the data for our ACE, we can now create the project.
Create and prepare the SPFx project
Open a command prompt, move to a folder where you want to create the SPFx project. Then, run the SharePoint Yeoman generator by executing the following command:
yo @microsoft/sharepoint
Use the following to complete the prompt that's displayed:
- What is your solution name?: AceCampusShuttle
- Which type of client-side component to create?: Adaptive Card Extension
- Which template would you like to use?: Primary Text Template
- What is your Adaptive Card Extension name?: Campus Shuttle
After provisioning the folders required for the project, the generator will install all the dependency packages by running npm install automatically. When npm completes downloading all dependencies, open the project in Visual Studio Code.
Add sample data
The ACE you'll create will give the shuttle driver the option to either select a destination from a list of known locations, or select a point on a map.
Create a new file ./src/adaptiveCardExtensions/campusShuttle/assets/campus_locations.json in the project and add an array for location objects. Each location should have a name, latitude, and longitude property. Or, you can paste the following JSON in the file that contains a few locations from the University of Florida in Gainesville, Florida, United States.
[
  { "title": "UF: Reitz Student Union", "latitude": 29.6463258, "longitude": -82.3499756 },
  { "title": "UF: The Hub", "latitude": 29.648018, "longitude": -82.345664 },
  { "title": "UF: Department of Computer and Information Science and Engineering", "latitude": 29.6476101, "longitude": -82.3466208 },
  { "title": "UF: Materials Science and Engineering", "latitude": 29.6476101, "longitude": -82.3466208 },
  { "title": "UF: Turlington Hall", "latitude": 29.6476101, "longitude": -82.3466208 },
  { "title": "UF: McCarty Hall A", "latitude": 29.6476101, "longitude": -82.3466208 },
  { "title": "UF: Peabody Hall", "latitude": 29.6502915, "longitude": -82.3433807 },
  { "title": "UF: Norman Hall", "latitude": 29.6486165, "longitude": -82.3398393 },
  { "title": "UF: Warrington College of Business", "latitude": 29.65093, "longitude": -82.3402091 },
  { "title": "UF: Mechanical and Aerospace Engineering Building A", "latitude": 29.6436917, "longitude": -82.3478054 },
  { "title": "UF: New Physics Building (NPB)", "latitude": 29.6439734, "longitude": -82.3506927 },
  { "title": "UF: Murphree Hall", "latitude": 29.6508923, "longitude": -82.3480633 }
]
Add SharePoint REST API service helper
Next, let's add a SharePoint REST service to the project to handle all reading and writing to the SharePoint list you created to store the shuttle driver data.
Create a new file ./src/adaptiveCardExtensions/campusShuttle/sp.service.ts in the project and add the following code to it:
import { AdaptiveCardExtensionContext } from '@microsoft/sp-adaptive-card-extension-base';
import { SPHttpClient } from '@microsoft/sp-http'

export const STATUS_HIRED = 'hired';
export const STATUS_ENROUTE = 'en route';
export const STATUS_AVAILABLE = 'available';

export interface ILocation {
  latitude: number;
  longitude: number;
}

export interface IListItem {
  ['@odata.type']?: string;
  Id?: string;
  Title: string;
  Status: string;
  OriginLocation?: string | ILocation;
  DestinationName?: string;
  DestinationLocation?: string | ILocation;
}

export const fetchListItem = async (spContext: AdaptiveCardExtensionContext, listId: string): Promise<IListItem> => {
  if (!listId) { return Promise.reject('No listId specified.'); }

  const listApiUrl = `${spContext.pageContext.web.absoluteUrl}/_api/web/lists/GetById(id='${listId}')`;
  const user = spContext.pageContext.user.loginName;

  const response: { value: IListItem[] } = await (await spContext.spHttpClient.get(
    `${listApiUrl}/items/?$select=Id,Title,Status,OriginLocation,DestinationName,DestinationLocation&$filter=Title eq '${user}'&$top=1`,
    SPHttpClient.configurations.v1
  )).json();

  if (response.value.length === 0) { return Promise.resolve(undefined); }

  const convertedTrip = response.value[0];

  if (convertedTrip) {
    const origin = convertedTrip.OriginLocation as string;
    convertedTrip.OriginLocation = <ILocation>{
      latitude: Number(origin.split(',')[0]),
      longitude: Number(origin.split(',')[1])
    };
  }
  if (convertedTrip) {
    const destination = convertedTrip.DestinationLocation as string;
    convertedTrip.DestinationLocation = <ILocation>{
      latitude: Number(destination.split(',')[0]),
      longitude: Number(destination.split(',')[1])
    };
  }

  return Promise.resolve(convertedTrip);
}

const getItemEntityType = async (spContext: AdaptiveCardExtensionContext, listApiUrl: string): Promise<string> => {
  const response: { ListItemEntityTypeFullName: string } = await (await spContext.spHttpClient.get(
    `${listApiUrl}?$select=ListItemEntityTypeFullName`,
    SPHttpClient.configurations.v1
  )).json();

  return response.ListItemEntityTypeFullName;
}

const createListItem = async (
  spContext: AdaptiveCardExtensionContext,
  listApiUrl: string,
  listItem: IListItem): Promise<void> => {

  listItem['@odata.type'] = await getItemEntityType(spContext, listApiUrl);

  await spContext.spHttpClient.post(
    `${listApiUrl}/items`,
    SPHttpClient.configurations.v1,
    {
      headers: {
        'ACCEPT': 'application/json; odata.metadata=none',
        'CONTENT-TYPE': 'application/json'
      },
      body: JSON.stringify(listItem)
    }
  );

  return Promise.resolve();
}

export const upsertListItem = async (spContext: AdaptiveCardExtensionContext, listId: string, listItem: IListItem): Promise<void> => {
  if (!listId) { return Promise.reject('No listId specified.'); }

  const listApiUrl = `${spContext.pageContext.web.absoluteUrl}/_api/web/lists/GetById(id='${listId}')`;

  const originLocationObj = (listItem.OriginLocation as ILocation);
  listItem.OriginLocation = `${originLocationObj.latitude},${originLocationObj.longitude}`;
  const destinationLocationObj = (listItem.DestinationLocation as ILocation);
  listItem.DestinationLocation = `${destinationLocationObj.latitude},${destinationLocationObj.longitude}`;

  if (!listItem['@odata.type']) { return createListItem(spContext, listApiUrl, listItem); }

  await spContext.spHttpClient.post(
    `${listApiUrl}/items(${listItem.Id})`,
    SPHttpClient.configurations.v1,
    {
      headers: { 'IF-MATCH': '*', 'X-HTTP-METHOD': 'MERGE' },
      body: JSON.stringify(<IListItem>{
        Title: listItem.Title,
        Status: listItem.Status,
        OriginLocation: listItem.OriginLocation,
        DestinationName: listItem.DestinationName,
        DestinationLocation: listItem.DestinationLocation
      })
    }
  );

  return Promise.resolve();
}

export const deleteListItem = async (spContext: AdaptiveCardExtensionContext, listId: string, listItemId: number): Promise<void> => {
  if (!listId) { return Promise.reject('No listId specified.'); }
  if (!listItemId) { return Promise.reject('No listItemId specified.'); }

  const listApiUrl = `${spContext.pageContext.web.absoluteUrl}/_api/web/lists/GetById(id='${listId}')`;

  await spContext.spHttpClient.post(
    `${listApiUrl}/items(${listItemId})`,
    SPHttpClient.configurations.v1,
    {
      headers: { 'IF-MATCH': '*', 'X-HTTP-METHOD': 'DELETE' }
    }
  );
}
This service exports the following things you'll use throughout the project:
- Three constants () for the status options:
STATUS_AVAILABLESTATUS_ENROUTESTATUS_HIRED
fetchListItem(): This method retrieves the currently signed in driver record (if present).upsertListItem(): This method creates a new, or updates an existing, driver record.deleteListItem(): This method deletes a driver record when they're longer in a trip.
Initialize the project
Now that the project has some core dependencies added, let's now implement the initialization of some core features when the ACE first loads on the page. This involves configuring the state of the ACE and enabling the user to set the ID of the list that contains driver trip details.
Update the ACE to enable the user to set the SharePoint list ID
Locate the ACE class in the file ./src/adaptiveCardExtensions/campusShuttle/CampusShuttleAdaptiveCardExtension.ts and open it in VS Code.
Locate the ICampusShuttleAdaptiveCardExtensionProps interface and add the listId property to store the ID of the SharePoint list that contains the driver status records:
export interface ICampusShuttleAdaptiveCardExtensionProps {
  title: string;
  listId: string;
}
Locate and open the file ./src/adaptiveCardExtensions/campusShuttle/CampusShuttlePropertyPane.ts. Add a new PropertyPaneTextField to the groupFields array to add an option for the user to set the ID of the list that contains the driver status records:
groupFields: [
  PropertyPaneTextField('title', {
    label: strings.TitleFieldLabel
  }),
  PropertyPaneTextField('listId', {
    label: 'List ID (GUID)'
  })
]
Finally, go back to the CampusShuttleAdaptiveCardExtension.ts file and add the following method to the CampusShuttleAdaptiveCardExtension class. The SPFx runtime raises this event when the value of a property in the property pane changes. We want our ACE to use a change in the list's ID to try to initialize the state of the ACE if a driver record is found:
protected onPropertyPaneFieldChanged(propertyPath: string, oldValue: any, newValue: any): void {
  if (propertyPath === 'listId' && newValue !== oldValue) {
    if (newValue) {
      (async () => {
        const trip = await fetchListItem(this.context, this.properties.listId);
        if (trip) { this.setState({ currentTrip: trip }); }
      })();
    }
  }
}
Update the ACE state and initial card view
Add the following import statement after the existing import statements in the file:
import {
  IListItem,
  fetchListItem,
  STATUS_AVAILABLE
} from './sp.service';
Locate the state interface ICampusShuttleAdaptiveCardExtensionState and add the property currentTrip as shown in the following code:
export interface ICampusShuttleAdaptiveCardExtensionState {
  currentTrip: IListItem;
}
Initialize the state property in the existing onInit() method. Replace the existing this.state = { }; with the following code to set the state a placeholder trip for the current driver:
this.state = {
  currentTrip: {
    Title: this.context.pageContext.user.loginName,
    Status: STATUS_AVAILABLE
  }
};
Next, add the following code to the onInit() method, immediately before the return Promise.resolve(); statement to retrieve the current driver's trip record from the SharePoint list. If a matching trip is found, it updates the state of the ACE to this trip, overwriting the empty default trip you created when initializing the state.
if (this.properties.listId) {
  const trip = await fetchListItem(this.context, this.properties.listId);
  if (trip) { this.setState({ currentTrip: trip }); }
}
This code uses the await keyword but the onInit() method signature, while it returns a Promise, it doesn't have the required async keyword. Update the onInit() method declaration to include this keyword:
public async onInit(): Promise<void> { .. }
Remove the existing QuickView and update the initial CardView
The last step before testing our ACE is to remove the current QuickView. Later, we'll add multiple new QuickViews to the ACE.
Start by removing the following lines from the CampusShuttleAdaptiveCardExtension.ts file:
Remove the following
importstatement:import { QuickView } from './quickView/QuickView';Remove the
exportdeclaration of the QuickView ID:export const QUICK_VIEW_REGISTRY_ID: string = 'CampusShuttle_QUICK_VIEW';In the
CampusShuttleAdaptiveCardExtensionclass'onInit()method, remove the following statement that registers the QuickView:this.quickViewNavigator.register(QUICK_VIEW_REGISTRY_ID, () => new QuickView());Delete the following files from the project:
- ./src/adaptiveCardExtensions/campusShuttle/quickView/template/QuickViewTemplate.json
- ./src/adaptiveCardExtensions/campusShuttle/quickView/QuickView.ts
Next, locate and open the CardView: ./src/adaptiveCardExtensions/campusShuttle/cardView/CardView.ts and make the following changes to it:
Locate the existing
importstatement that references values from the@microsoft/sp-adaptive-card-extension-basepackage and remove the following references:- IExternalLinkCardAction
- IQuickViewCardAction
Locate the existing
importstatement that references values from theCampusShuttleAdaptiveCardExtensionmodule and remove the reference to theQUICK_VIEW_REGISTRY_IDconstant.Add the following
importstatement after the existingimportstatements:import { STATUS_AVAILABLE } from '../sp.service';Replace the contents of the
cardButtons()accessor member with the followingswitchstatement. You'll update this switch statement throughout this exercise as you add new functionality to the ACE:
public get cardButtons(): [ICardButton] | [ICardButton, ICardButton] | undefined {
  switch (this.state.currentTrip.Status) {
    default:
      return undefined;
      break;
  }
}
- Update the
data()accessor member to return the properties that will be used for the current card:
public get data(): IPrimaryTextCardParameters {
  return {
    primaryText: strings.PrimaryText,
    description: (this.state.currentTrip.Status === STATUS_AVAILABLE)
      ? `available for hire`
      : `TODO`,
    title: this.properties.title
  };
}
- Remove the existing
onCardSelection()accessor member because our CardView no longer has any buttons on it.
Test the ACE
Now you're ready to test the initial state of our ACE.
In the console, execute the following statement:
gulp serve --nobrowser
In a browser, navigate to the SharePoint hosted workbench in the same site where you created the list to store driver records. For example, if the list URL is https://contoso.sharepoint.com/sites/MSLearningTeam/Lists/Campus%20Shuttle/AllItems.aspx, the URL for the hosted workbench is https://contoso.sharepoint.com/sites/MSLearningTeam/_layouts/15/workbench.aspx.
Select the + icon and then select the Campus Shuttle from the toolbox:
Hover your mouse over the ACE component and select the pencil icon to open the property pane:
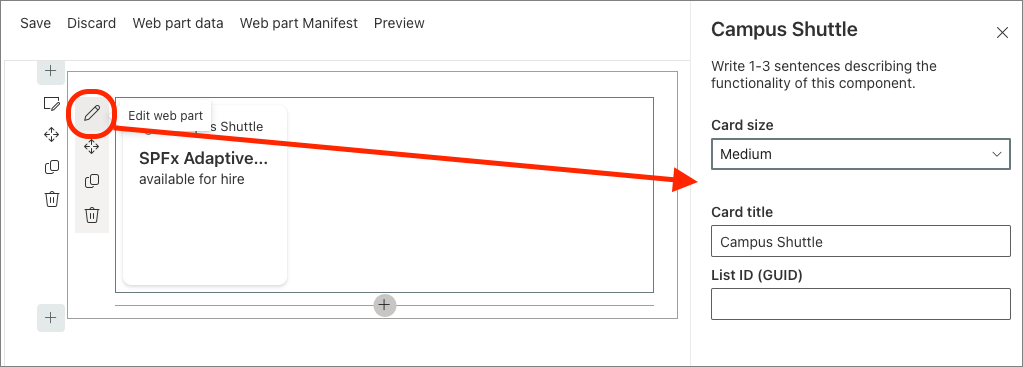
Enter the ID of the SharePoint list in the List ID textbox, then close the property pane by selecting the X icon in the upper right corner.
Tip
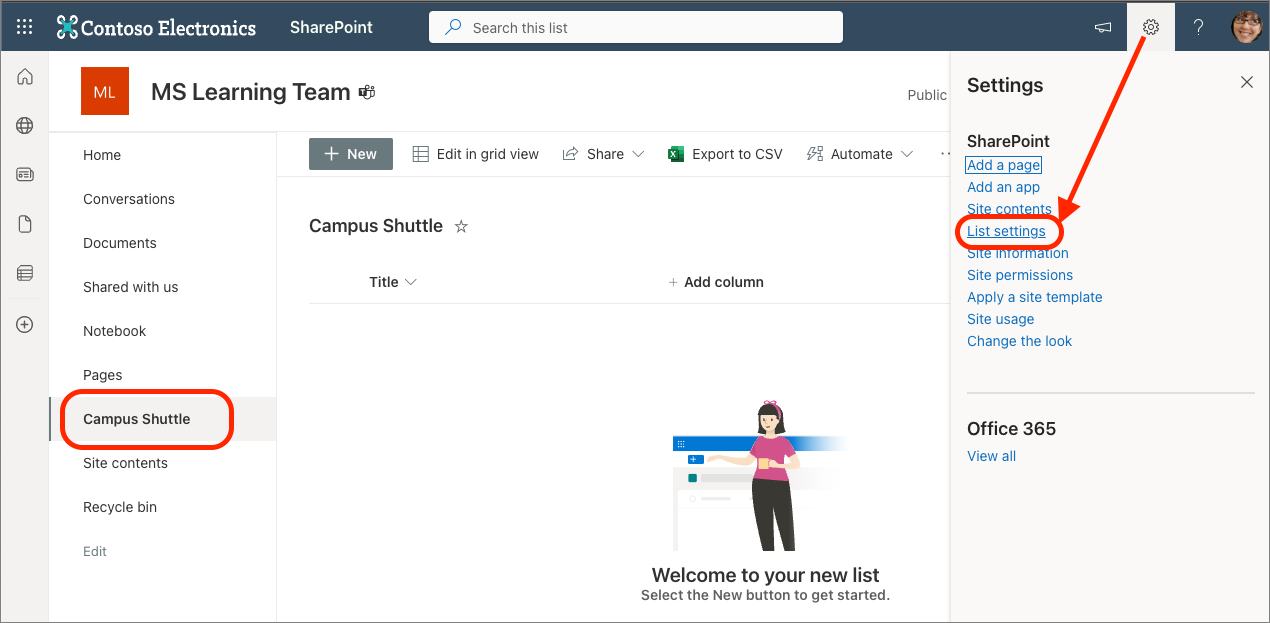
You can obtain the ID of a list from the list's settings page URL.
First browse to the list and then select the gear icon in the suite bar, then select the List settings link.
The query string of the list settings' page contains a List property, such as List=%7B93f11b8b-6201-4199-b263-3ca78408a73b%7D. This is a URL encoded string that contains GUID surrounded by {}. Remove the %7B prefix and %7D suffix to get the list's ID. For example, this list ID is 93f11b8b-6201-4199-b263-3ca78408a73b.
You won't notice a change in the ACE's rendering because there aren't any records in the list yet.
At this point, the minimal project is working. You can start adding interactivity to the ACE with QuickViews.
Add ability to create trips with QuickViews
Now you'll implement functionality to enable the current user to add a new trip using the ACE. When they create a trip, they have three things they need to set:
- origin/start location for the trip
- destination location for the trip
- if the shuttle driver is en route to pick up a passenger from the origin location, or has picked up the passenger and on the way to the destination
To implement this, you'll create multiple QuickViews and use the geo-location capability of ACEs in Viva Connections.
Create the StartTrip QuickView
Start by creating a new file StartTripCard.json in the ./src/adaptiveCardExtensions/campusShuttle/quickView/template folder and add the following JSON to it. This sets the contents of the QuickView using an Adaptive Card.
{
  "$schema": "http://adaptivecards.io/schemas/adaptive-card.json",
  "type": "AdaptiveCard",
  "version": "1.5",
  "body": [
    {
      "type": "TextBlock",
      "text": "Start a trip",
      "size": "Large",
      "weight": "Bolder"
    },
    {
      "type": "TextBlock",
      "text": "Select trip status:",
      "size": "medium",
      "weight": "Bolder"
    },
    {
      "id": "tripType",
      "type": "Input.ChoiceSet",
      "value": "$trip.Status",
      "choices": [
        {
          "title": "en route to pickup",
          "value": "en route"
        },
        {
          "title": "starting trip",
          "value": "hired"
        }
      ]
    },
    {
      "type": "TextBlock",
      "text": "Set trip details:",
      "size": "medium",
      "weight": "Bolder"
    }
  ],
  "actions": [
    {
      "id": "originLocation",
      "type": "Action.Submit",
      "title": "(1) Select trip origin from map"
    },
    {
      "id": "destinationLocation",
      "type": "Action.Submit",
      "title": "(2) Select / set trip destination"
    },
    {
      "id": "save",
      "type": "Action.Submit",
      "title": "Save trip",
      "style": "positive"
    }
  ]
}
Next, create the file StartTrip.ts in the ./src/adaptiveCardExtensions/campusShuttle/quickView folder. This file will contain the class that implements the QuickView.
Add the following code to the file:
import {
  ISPFxAdaptiveCard,
  BaseAdaptiveCardView,
  IActionArguments
} from '@microsoft/sp-adaptive-card-extension-base';
import * as strings from 'CampusShuttleAdaptiveCardExtensionStrings';
import {
  ICampusShuttleAdaptiveCardExtensionProps,
  ICampusShuttleAdaptiveCardExtensionState
} from '../CampusShuttleAdaptiveCardExtension';

import { IListItem, upsertListItem } from '../sp.service';

export interface IStartTripData {
  title: string;
  trip: IListItem;
}

export class StartTrip extends BaseAdaptiveCardView<
  ICampusShuttleAdaptiveCardExtensionProps,
  ICampusShuttleAdaptiveCardExtensionState,
  IStartTripData
> {

  public get data(): IStartTripData {
    return {
      title: strings.Title,
      trip: this.state.currentTrip
    };
  }

  public get template(): ISPFxAdaptiveCard {
    return require('./template/StartTripCard.json');
  }

  public onAction(action: IActionArguments): void {
    if (action.type === 'Submit') {
      if (action.data.tripType) {
        const trip = this.state.currentTrip;
        trip.Status = action.data.tripType;
        this.setState({ currentTrip: trip });
      }

      if (action.id === 'originLocation') {
        // TODO QuickView originLocation
      } else if (action.id === 'destinationLocation') {
        // TODO QuickView destinationLocation
      } else if (action.id === 'save') {
        (async () => {
          await upsertListItem(this.context, this.properties.listId, this.state.currentTrip);
          // TODO QuickView save
        })();
      }
    }
  }

}
The StartTrip class in this file contains three members:
data(): This accessor member returns an object to the Adaptive Card rendering engine that will be used to bind properties to the Adaptive Card used to implement the QuickView.template(): This accessor member returns a JSON object that contains the Adaptive Card definition.onAction(): This method is called when certain actions occur in the Adaptive Card. At this point, the code simply saves the value of the trip type (en route | hired) and contains the placeholders for more QuickView cards you'll add to the project.
To simplify referencing the QuickViews the project will contain, add a new file index.ts to the ./src/adaptiveCardExtensions/campusShuttle/quickView folder with the following code in it:
export * from './StartTrip';
Register and reference the StartTrip QuickView
To use this the new QuickView, you need to register it with the ACE's QuickView navigator. Open the ./src/adaptiveCardExtensions/campusShuttle/CampusShuttleAdaptiveCardExtension.ts file.
Add the following import statement after the existing import statements to import the new QuickView you created:
import {
  StartTrip
} from './quickView';
Locate the constant immediately before the CampusShuttleAdaptiveCardExtension class declaration and add the following declaration:
export const QUICK_VIEW_START_TRIP_REGISTRY_ID: string = 'CampusShuttle_StartTrip_QUICK_VIEW';
Next, in CampusShuttleAdaptiveCardExtension class' onInit() method, locate the following line:
this.cardNavigator.register(CARD_VIEW_REGISTRY_ID, () => new CardView());
Add the following line to register the StartTrip QuickView with the QuickView navigator.
this.quickViewNavigator.register(QUICK_VIEW_START_TRIP_REGISTRY_ID, () => new StartTrip());
Add the StartTrip QuickView to the CardView
The last step is to add the QuickView to our CardView to use it. Locate and open the following file in VS Code: ./src/adaptiveCardExtensions/campusShuttle/cardView/CardView.ts
Locate the import statement that imports the property and state interface from the file that contains the ACE class declaration. Add the constant you added that contains the ID of the StartTrip QuickView to it:
import {
  ICampusShuttleAdaptiveCardExtensionProps,
  ICampusShuttleAdaptiveCardExtensionState,
  QUICK_VIEW_START_TRIP_REGISTRY_ID   // << add this
} from '../CampusShuttleAdaptiveCardExtension';
Next, in the cardButtons() accessor's switch statement, add case statement before the existing default to display a button to book a trip when the current driver's status is available:
switch (this.state.currentTrip.Status) {
  case STATUS_AVAILABLE:
    return [{
      title: 'Book a Trip',
      action: {
        type: 'QuickView',
        parameters: { view: QUICK_VIEW_START_TRIP_REGISTRY_ID }
      }
    }];
    break;
  default:
    return undefined;
    break;
}
Test the ACE to verify the QuickView is working. If you previously stopped the local web server, restart it by executing the following in the console:
gulp serve --nobrowser
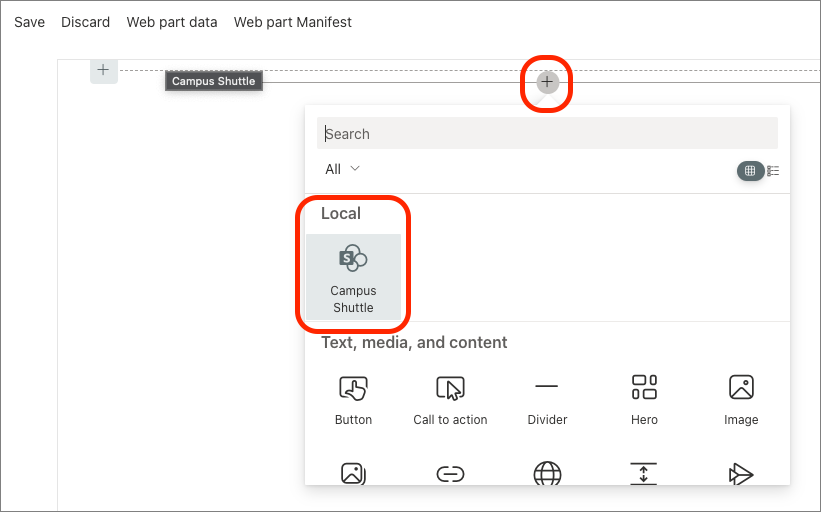
Navigate to the SharePoint hosted workbench to see the Campus Shuttle ACE:
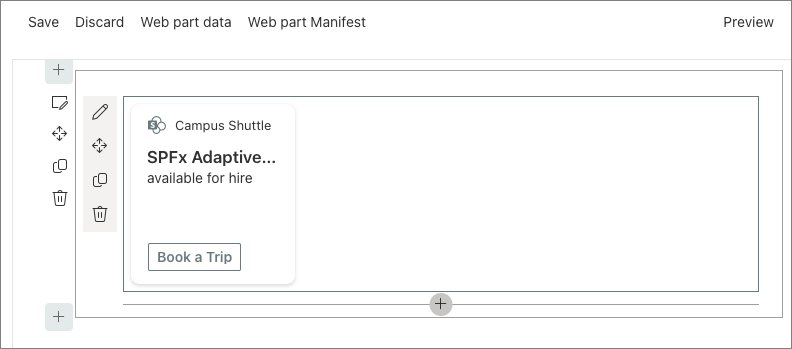
Notice the button Book a trip on the CardView. Test it by selecting the Preview link in the top-right section of the top navigation. This page will switch from the edit mode to display mode where you can select the button:

Let's now implement the functionality of the StartTrip QuickView.
Add functionality to StartTrip QuickView
You'll now add three QuickViews that will be used by the StartTrip QuickView. One handles setting the origin location of the trip, another handles selecting or setting the destination for the trip, and the last one acts as a confirmation notice when you save the trip.
Add a new file SetOriginCard.json to the ./src/adaptiveCardExtensions/campusShuttle/quickView/template folder with the following code:
{
  "$schema": "http://adaptivecards.io/schemas/adaptive-card.json",
  "type": "AdaptiveCard",
  "version": "1.5",
  "body": [
    {
      "type": "TextBlock",
      "weight": "Bolder",
      "size": "large",
      "text": "${title}"
    },
    {
      "type": "TextBlock",
      "text": "${description}",
      "wrap": true
    }
  ],
  "actions": [
    {
      "id": "originLocation",
      "type": "VivaAction.GetLocation",
      "title": "Select location on the map",
      "parameters": {
        "chooseLocationOnMap": true
      }
    }
  ]
}
Notice the single action in this Adaptive Card is set to the type VivaAction.GetLocation. This will prompt the user to select a location from their device and return the coordinates.
Implement the SetOrigin QuickView by adding a new file SetOrigin.ts to the ./src/adaptiveCardExtensions/campusShuttle/quickView folder with the following code:
import {
  ISPFxAdaptiveCard,
  BaseAdaptiveCardView,
  IGetLocationActionArguments
} from '@microsoft/sp-adaptive-card-extension-base';
import {

  ICampusShuttleAdaptiveCardExtensionProps,
  ICampusShuttleAdaptiveCardExtensionState
} from '../CampusShuttleAdaptiveCardExtension';

import { ILocation, IListItem } from '../sp.service';

export interface ISetOriginData {
  title: string;
  description: string;
  trip: IListItem;
}

export class SetOrigin extends BaseAdaptiveCardView<
  ICampusShuttleAdaptiveCardExtensionProps,
  ICampusShuttleAdaptiveCardExtensionState,
  ISetOriginData
> {
  public get data(): ISetOriginData {
    return {
      title: 'Set trip starting location',
      description: 'Select the trip origin location by selecting it on the map.',
      trip: this.state.currentTrip
    };
  }

  public get template(): ISPFxAdaptiveCard {
    return require('./template/SetOriginCard.json');
  }

  public onAction(action: IGetLocationActionArguments): void {
    if (action.type === 'VivaAction.GetLocation'){

      const currentTrip = this.state.currentTrip;
      currentTrip.OriginLocation = <ILocation> {
        latitude: action.location.latitude,
        longitude: action.location.longitude
      };

      this.setState({ currentTrip: currentTrip });

      this.quickViewNavigator.pop();
    }
  }
}
Notice how this code, within the
onAction()event handler, obtains the selected location when the VivaAction.GetLocation is submitted by the Adaptive Card. It sets the selected location on the trip and updates the trip object in the ACE's state. The last call tothis.quickViewNavigator.pop()removes this QuickView from the QuickView stack, which triggers a re-rendering of the next QuickView in the stack.
Now implement a similar QuickView for setting the destination location:
Add a new file SetDestinationCard.json to the ./src/adaptiveCardExtensions/campusShuttle/quickView/template folder with the following code:
{
  "$schema": "http://adaptivecards.io/schemas/adaptive-card.json",
  "type": "AdaptiveCard",
  "version": "1.5",
  "body": [
    {
      "type": "TextBlock",
      "weight": "Bolder",
      "text": "${title}"
    },
    {
      "type": "TextBlock",
      "text": "${description}"
    },
    {
      "type": "TextBlock",
      "text": "Select a known location..."
    },
    {
      "id": "knownDestinationSelection",
      "type": "Input.ChoiceSet",
      "choices": [
        {
          "$data": "${campus_locations}",
          "title": "${title}",
          "value": "${latitude},${longitude}"
        }
      ]
    },
    {
      "type": "TextBlock",
      "text": "... or select a specific location on the map:"
    }
  ],
  "actions": [
    {
      "id": "destinationLocation",
      "type": "VivaAction.GetLocation",
      "title": "Select trip destination from map",
      "parameters": { "chooseLocationOnMap": true }
    },
    {
      "id": "save",
      "type": "Action.Submit",
      "title": "Save destination location",
      "style": "positive"
    }
  ]
}
This Adaptive Card is similar to the one used to the origin location in the way that it allows the user to either select a location on the map, or select from a list of predefined locations. These predefined locations are in the ./src/adaptiveCardExtensions/campusShuttle/assets/campus_locations.json file.
The Adaptive Card also contains another submit action button. Unlike the set origin QuickView, this button will be used to close the set destination QuickView as the user has two options for selecting a trip destination.
Implement the SetDestination QuickView by adding a new file SetDestination.ts to the ./src/adaptiveCardExtensions/campusShuttle/quickView folder with the following code:
import {
  ISPFxAdaptiveCard,
  BaseAdaptiveCardView,
  IActionArguments,
  IGetLocationActionArguments
} from '@microsoft/sp-adaptive-card-extension-base';
import {
  ICampusShuttleAdaptiveCardExtensionProps,
  ICampusShuttleAdaptiveCardExtensionState
} from '../CampusShuttleAdaptiveCardExtension';

import { ILocation, IListItem } from '../sp.service';

import { sortBy } from '@microsoft/sp-lodash-subset';

interface ICampusLocations {
  title: string;
  latitude: number;
  longitude: number;
}

export interface ISetDestinationData {
  title: string;
  description: string;
  campus_locations: ICampusLocations[];
  trip: IListItem;
}

const LOCATIONS = require('../assets/campus_locations.json');

export class SetDestination extends BaseAdaptiveCardView<
  ICampusShuttleAdaptiveCardExtensionProps,
  ICampusShuttleAdaptiveCardExtensionState,
  ISetDestinationData
> {
  public get data(): ISetDestinationData {
    return {
      title: 'Set trip destination location',
      description: 'Pick from a list of known locations, or set the destination by selecting it on the map.',
      campus_locations: sortBy(LOCATIONS, (l) => l.title),
      trip: this.state.currentTrip
    };
  }

  public get template(): ISPFxAdaptiveCard {
    return require('./template/SetDestinationCard.json');
  }

  public onAction(action: IActionArguments | IGetLocationActionArguments): void {
    const currentTrip = this.state.currentTrip;

    // if picked a location on the map...
    if (action.type === 'VivaAction.GetLocation') {
      currentTrip.DestinationLocation = <ILocation>{
        latitude: action.location.latitude,
        longitude: action.location.longitude
      };
      this.setState({ currentTrip: currentTrip });
    } else if (action.type === 'Submit' && action.id === 'save') {
      // else, check if picked location from dropdown and save it
      if (action.data.knownDestinationSelection) {
        currentTrip.DestinationLocation = <ILocation>{
          latitude: Number(action.data.knownDestinationSelection.split(',')[0]),
          longitude: Number(action.data.knownDestinationSelection.split(',')[1])
        };

       const selectedLocation = LOCATIONS.filter((knownLocation: any) => (
          knownLocation.latitude === (currentTrip.DestinationLocation as ILocation).latitude
          && knownLocation.longitude === (currentTrip.DestinationLocation as ILocation).longitude
        ))[0];
        currentTrip.DestinationName = selectedLocation.title;
      }
      this.setState({ currentTrip: currentTrip });
      this.quickViewNavigator.pop();
    }
  }

}
The last step is to add a save confirmation QuickView to the project:
Add a new file SaveTripCard.json to the ./src/adaptiveCardExtensions/campusShuttle/quickView/template folder with the following code:
{
  "schema": "http://adaptivecards.io/schemas/adaptive-card.json",
  "type": "AdaptiveCard",
  "version": "1.5",
  "body": [{
    "type": "TextBlock", "text": "${title}"
  }],
  "actions": [{
    "type": "Action.Submit",
    "id": "close",
    "title": "Close"
  }]
}
Implement the SaveTrip QuickView by adding a new file SaveTrip.ts to the ./src/adaptiveCardExtensions/campusShuttle/quickView folder with the following code:
import {
  BaseAdaptiveCardView,
  IActionArguments,
  ISPFxAdaptiveCard
 } from '@microsoft/sp-adaptive-card-extension-base';
import {
  ICampusShuttleAdaptiveCardExtensionProps,
  ICampusShuttleAdaptiveCardExtensionState
} from '../CampusShuttleAdaptiveCardExtension';

export interface ISaveTripData {
  title: string;
}

export class SaveTrip extends BaseAdaptiveCardView<
  ICampusShuttleAdaptiveCardExtensionProps,
  ICampusShuttleAdaptiveCardExtensionState,
  ISaveTripData
> {
  public get data(): ISaveTripData {
    return {
      title: 'Trip saved successfully.'
    };
  }

  public get template(): ISPFxAdaptiveCard {
    return require('./template/SaveTripCard.json');
  }

  public onAction(action: IActionArguments): void {
    if (action.id === 'close') {
      this.quickViewNavigator.close();
    }
  }
}
To use these three new QuickViews, you need to register them:
Open the ./src/adaptiveCardExtensions/campusShuttle/quickView/index.ts file and export the new QuickViews:
export * from './StartTrip';
export * from './SetOrigin';      // << add
export * from './SetDestination'; // << add
export * from './SaveTrip';       // << add
Open the ./src/adaptiveCardExtensions/campusShuttle/CampusShuttleAdaptiveCardExtension.ts file.
Update the existing
importstatement you added to import the StartTrip QuickView to reference the three new QuickViews:import { StartTrip, SetOrigin, SetDestination, SaveTrip } from './quickView';Locate the constants that declare the IDs of the CardView and QuickViews and add the following IDs for the new QuickViews:
export const QUICK_VIEW_SET_ORIGIN_REGISTRY_ID: string = 'CampusShuttle_SetOrigin_QUICK_VIEW';
export const QUICK_VIEW_SET_DESTINATION_REGISTRY_ID: string = 'CampusShuttle_SetDestination_QUICK_VIEW';
export const QUICK_VIEW_SAVE_TRIP_REGISTRY_ID: string = 'CampusShuttle_SaveTrip_QUICK_VIEW';
Within the
onInit()method in theCampusShuttleAdaptiveCardExtensionclass, add the following code after the existing call to thethis.quickViewNavigator.register()statement that registered the StartTrip QuickView:this.quickViewNavigator.register(QUICK_VIEW_SET_ORIGIN_REGISTRY_ID, () => new SetOrigin()); this.quickViewNavigator.register(QUICK_VIEW_SET_DESTINATION_REGISTRY_ID, () => new SetDestination()); this.quickViewNavigator.register(QUICK_VIEW_SAVE_TRIP_REGISTRY_ID, () => new SaveTrip());
The last step is to wire up the QuickViews to the existing StartTrip QuickView.
Locate and open the ./src/adaptiveCardExtensions/campusShuttle/quickView/StartTrip.ts file.
Locate the existing
importstatement that references the property and state interfaces in theCampusShuttleCopilotAdaptiveCardExtensionmodule. Update it to import the three constants for the three new QuickViews:import { ICampusShuttleCopilotAdaptiveCardExtensionProps, ICampusShuttleCopilotAdaptiveCardExtensionState, QUICK_VIEW_SET_ORIGIN_REGISTRY_ID, QUICK_VIEW_SET_DESTINATION_REGISTRY_ID, QUICK_VIEW_SAVE_TRIP_REGISTRY_ID } from '../CampusShuttleAdaptiveCardExtension';Implement the SetOrigin QuickView by replacing the comment
// TODO QuickView originLocationin theonAction()method with the following:this.quickViewNavigator.push(QUICK_VIEW_SET_ORIGIN_REGISTRY_ID);Implement the SetDestination QuickView by replacing the comment
// TODO QuickView destinationLocationin theonAction()method with the following:this.quickViewNavigator.push(QUICK_VIEW_SET_DESTINATION_REGISTRY_ID);Implement the SaveTrip QuickView by replacing the comment
// TODO QuickView savein theonAction()method with the following:this.quickViewNavigator.push(QUICK_VIEW_SAVE_TRIP_REGISTRY_ID);
Notice each of these calls are pushing a QuickView onto the navigator. This triggers a re-rendering of the QuickView using the new item on the stack. Recall that previously, we were popping QuickViews off the stack.
The last step is to update the CardView display when a trip has been booked.
Locate and open the ./src/adaptiveCardExtensions/campusShuttle/cardView/CardView.ts file.
Replace the existing
importstatement,import { STATUS_AVAILABLE } from '../sp.service';, with the following code:import { ILocation, STATUS_AVAILABLE, STATUS_ENROUTE, STATUS_HIRED } from '../sp.service';Update the
switchstatement in thecardButtons()method to the following code.switch (this.state.currentTrip.Status) { case STATUS_AVAILABLE: return [{ title: 'Book a Trip', action: { type: 'QuickView', parameters: { view: QUICK_VIEW_START_TRIP_REGISTRY_ID } } }]; break; case STATUS_ENROUTE: return [ { title: 'View pickup location', action: { type: 'VivaAction.ShowLocation', parameters: { locationCoordinates: { latitude: (this.state.currentTrip.OriginLocation as ILocation).latitude, longitude: (this.state.currentTrip.OriginLocation as ILocation).longitude } } } } ]; break; case STATUS_HIRED: return [ { title: 'View dropoff location', action: { type: 'VivaAction.ShowLocation', parameters: { locationCoordinates: { latitude: (this.state.currentTrip.DestinationLocation as ILocation).latitude, longitude: (this.state.currentTrip.DestinationLocation as ILocation).longitude } } } } ]; break; default: return undefined; break; }These changes will conditionally display different buttons and text depending on the state of the current shuttle driver. Notice we're now using the action
VivaAction.ShowLocationfrom the CardView to display the specified origin and destination locations.Finally, update the
returnstatement in thedata()method to the following code.return { primaryText: strings.PrimaryText, description: (this.state.currentTrip.Status === STATUS_AVAILABLE) ? `available for hire` : (this.state.currentTrip.Status === STATUS_ENROUTE) ? `Booked - ${STATUS_ENROUTE} to pickup...` : (this.state.currentTrip.DestinationName) ? `Hired - driving passenger to ${this.state.currentTrip.DestinationName}...` : `Hired - driving passenger to destination...`, title: this.properties.title };Notice this will change the conditional message based on the shuttle driver's trip status.
Test trip creation experience
At this point you can test the complete trip creation experience in the browser.
If you previously stopped the local web server, restart it by executing the following in the console:
gulp serve --nobrowser
Navigate to the SharePoint hosted workbench to see the Campus Shuttle ACE.
ACEs will only show one button on the CardView when the card size is set to Medium. While the page is in edit mode, open the property pane and change the size of the card to Large so both our buttons will appear on the CardView.
Next, select the Preview button the top-right of the toolbar.
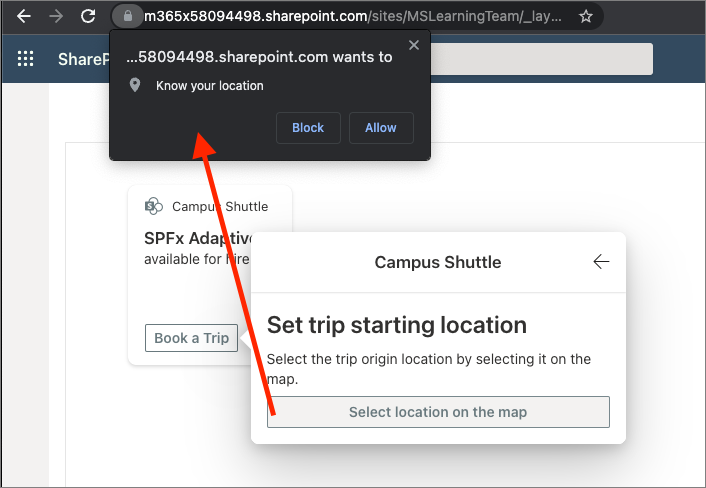
Start by selecting the Book a trip button on the initial CardView. That displays the Start a trip QuickView you previously tested.
Select the (1) Select trip origin from map button to load the SetOrigin QuickView. Now select the Select location on the map button. If you haven't granted your browser access to your location, you'll be prompted to do so. You must approve this request for the VivaAction.GetLocation action to work:
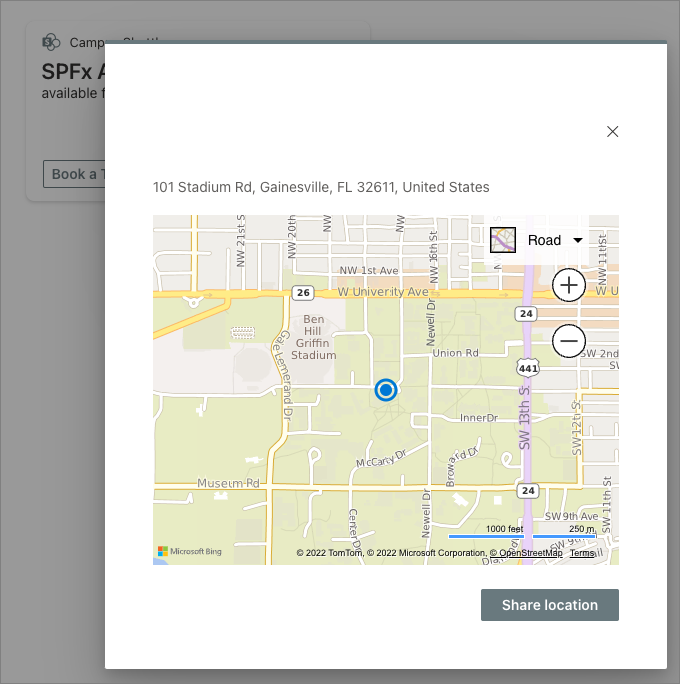
After granting the browser access to your location, a dialog with a map will appear. Center the map on the location for the pickup location for the trip and select the pickup and select the Share Location button.
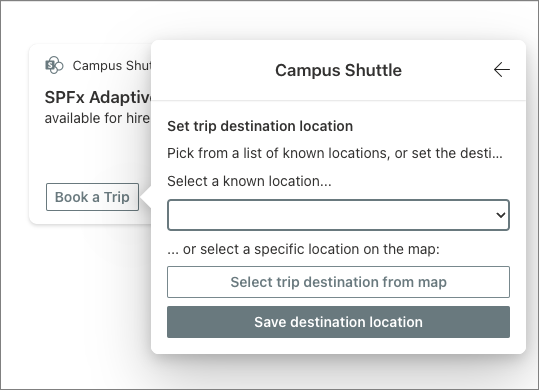
Select the (2) Select/set trip destination button to load the SetDestination QuickView. This time, select from one of the known locations in the drop-down box and select the Save destination location button.
Finally, select the trip status to en route to pickup and select the Save trip button.
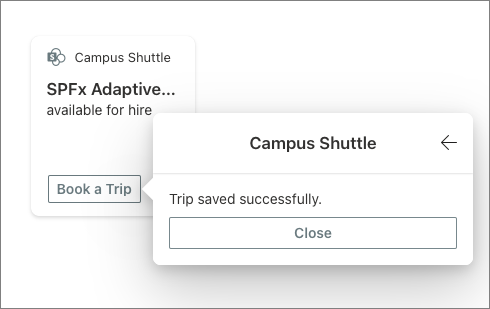
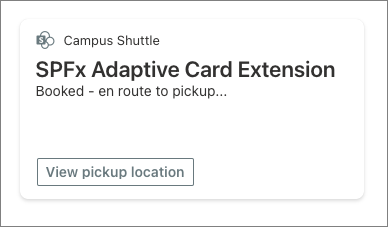
With the trip saved, notice the CardView is now displaying different buttons and text based on the current context.
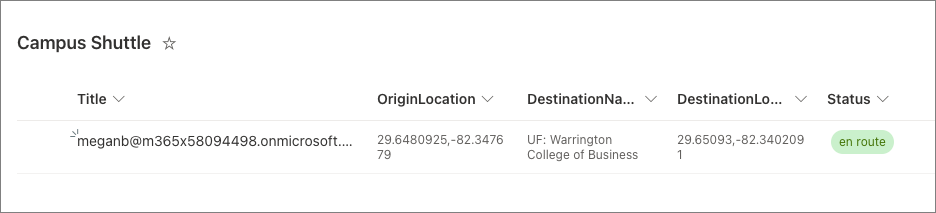
Finally, browse to the list that contains the trip data to see how the data is stored for our test trip:
The Campus Shuttle ACE is in good shape for trip creation. The last two steps are to implement the scenarios when the driver is en route to pick up a passenger and driving the passenger to their destination.
Add functionality when en route to passenger pickup
Now let's implement the scenario when the driver is en route to pick up a passenger.
Add a new file UpdateTripCard.json to the ./src/adaptiveCardExtensions/campusShuttle/quickView/template folder with the following code:
{
  "schema": "http://adaptivecards.io/schemas/adaptive-card.json",
  "type": "AdaptiveCard",
  "version": "1.5",
  "body": [
    {
      "type": "TextBlock",
      "weight": "Bolder",
      "text": "${title}"
    }
  ],
  "actions": [
    {
      "id": "cancel",
      "type": "Action.Submit",
      "title": "Cancel Current Trip"
    },
    {
      "id": "pickup",
      "type": "Action.Submit",
      "title": "Pickup Passenger",
      "style": "positive"
    }
  ]
}
Implement the UpdateTrip QuickView by adding a new file UpdateTrip.ts to the ./src/adaptiveCardExtensions/campusShuttle/quickView folder with the following code:
import {
  IActionArguments,
  ISPFxAdaptiveCard,
  BaseAdaptiveCardView
} from '@microsoft/sp-adaptive-card-extension-base';
import {
  ICampusShuttleAdaptiveCardExtensionProps,
  ICampusShuttleAdaptiveCardExtensionState
} from '../CampusShuttleAdaptiveCardExtension';

import {
  STATUS_HIRED,
  upsertListItem
} from '../sp.service';

export interface IUpdateTripData {
  title: string;
}

export class UpdateTrip extends BaseAdaptiveCardView<
  ICampusShuttleAdaptiveCardExtensionProps,
  ICampusShuttleAdaptiveCardExtensionState,
  IUpdateTripData
> {
  public get data(): IUpdateTripData {
    return {
      title: 'Update the existing trip'
    };
  }

  public get template(): ISPFxAdaptiveCard {
    return require('./template/UpdateTripCard.json');
  }

  public onAction(action: IActionArguments): void {
    if (action.type !== 'Submit') { return; }

    switch (action.id) {
      case 'cancel':
        // TODO QuickView cancelTrip
        break
      case 'pickup':
        // update current item status
        const trip = this.state.currentTrip;
        trip.Status = STATUS_HIRED;

        // save to list
        (async () => {
          await upsertListItem(this.context, this.properties.listId, trip);
        })();

        // update ACE
        this.setState({ currentTrip: trip });

        this.quickViewNavigator.close();
        break
      default:
        return;
    }
  }

}
Our project needs a confirmation step if the driver wants to delete a trip, either by canceling it or by delivering a passenger. To implement this, we'll use a single confirmation QuickView that will dynamically handle both cases.
Add a new file ConfirmationCard.json to the ./src/adaptiveCardExtensions/campusShuttle/quickView/template folder with the following code:
{
  "schema": "http://adaptivecards.io/schemas/adaptive-card.json",
  "type": "AdaptiveCard",
  "version": "1.5",
  "body": [
    {
      "type": "TextBlock",
      "text": "${title}",
      "size": "Large"
    },
    {
      "type": "TextBlock",
      "text": "${description}"
    }
  ],
  "actions": [
    {
      "id": "confirm",
      "type": "Action.Submit",
      "title": "${title}",
      "style": "positive"
    }
  ]
}
Implement the confirmation QuickView by adding a new file ConfirmationQuickView.ts to the ./src/adaptiveCardExtensions/campusShuttle/quickView folder with the following code:
import {
  IActionArguments,
  ISPFxAdaptiveCard,
  BaseAdaptiveCardView
} from '@microsoft/sp-adaptive-card-extension-base';
import {
  ICampusShuttleAdaptiveCardExtensionProps,
  ICampusShuttleAdaptiveCardExtensionState
} from '../CampusShuttleAdaptiveCardExtension';

import {
  deleteListItem,
  STATUS_AVAILABLE
} from '../sp.service';

export interface IConfirmationQuickViewData {
  title: string;
  description: string;
}

export class ConfirmationQuickView extends BaseAdaptiveCardView<
  ICampusShuttleAdaptiveCardExtensionProps,
  ICampusShuttleAdaptiveCardExtensionState,
  IConfirmationQuickViewData
> {
  constructor(private confirmType: 'cancel' | 'complete') {
    super();
  }

  public get data(): IConfirmationQuickViewData {
    return {
      title: `${this.confirmType.substring(0,1).toUpperCase()}${this.confirmType.substring(1,this.confirmType.length)} Trip`,
      description: `Are you sure you want to ${this.confirmType} the trip?`
    };
  }

  public get template(): ISPFxAdaptiveCard {
    return require('./template/ConfirmationCard.json');
  }

  public onAction(action: IActionArguments): void {
    if (action.type === 'Submit' && action.id === 'confirm') {
      (async () => {
        // delete list item
        await deleteListItem(this.context, this.properties.listId, Number(this.state.currentTrip.Id));
      })();

      // update state to initial value
      this.setState({
        currentTrip: {
          Title: this.context.pageContext.user.loginName,
          Status: STATUS_AVAILABLE
        }
      });

      // close
      this.quickViewNavigator.close();
    }
  }
}
To use these three new QuickViews, you need to register them:
Open the ./src/adaptiveCardExtensions/campusShuttle/quickView/index.ts file and export the new QuickViews:
// .. existing export statements
export * from './UpdateTrip';
export * from './ConfirmationQuickView';
Open the ./src/adaptiveCardExtensions/campusShuttle/CampusShuttleAdaptiveCardExtension.ts file.
Update the existing
importto import the QuickViews to reference the new QuickViews:import { StartTrip, SetOrigin, SetDestination, SaveTrip, UpdateTrip, // << add ConfirmationQuickView // << add } from './quickView';Locate the constants that declare the IDs of the CardView and QuickViews and add the following IDs for the new QuickViews:
export const QUICK_VIEW_CANCEL_TRIP_REGISTRY_ID: string = 'CampusShuttleCopilot_CancelTrip_QUICK_VIEW';
export const QUICK_VIEW_COMPLETE_TRIP_REGISTRY_ID: string = 'CampusShuttleCopilot_CompleteTrip_QUICK_VIEW';
export const QUICK_VIEW_UPDATE_TRIP_REGISTRY_ID: string = 'CampusShuttleCopilot_UpdateTrip_QUICK_VIEW';
Notice how the first two constants don't reference the confirmation QuickView? That's because we're going to create two implementations of the same QuickView.
Within the
onInit()method in theCampusShuttleAdaptiveCardExtensionclass, add the following code after the existing call to thethis.quickViewNavigator.register()statement that registered the StartTrip QuickView:this.quickViewNavigator.register(QUICK_VIEW_CANCEL_TRIP_REGISTRY_ID, () => new ConfirmationQuickView('cancel')); this.quickViewNavigator.register(QUICK_VIEW_COMPLETE_TRIP_REGISTRY_ID, () => new ConfirmationQuickView('complete')); this.quickViewNavigator.register(QUICK_VIEW_UPDATE_TRIP_REGISTRY_ID, () => new UpdateTrip());
The last step is to wire up the QuickViews to the existing CardView and QuickViews.
Locate and open the ./src/adaptiveCardExtensions/campusShuttle/cardView/CardView.ts file.
Locate the existing
importstatement that references the property and state interfaces in theCampusShuttleCopilotAdaptiveCardExtensionmodule. Update it to import the three constants for the update and complete new QuickViews:import { ICampusShuttleAdaptiveCardExtensionProps, ICampusShuttleAdaptiveCardExtensionState, QUICK_VIEW_START_TRIP_REGISTRY_ID, QUICK_VIEW_UPDATE_TRIP_REGISTRY_ID, // << add QUICK_VIEW_COMPLETE_TRIP_REGISTRY_ID // << add } from '../CampusShuttleAdaptiveCardExtension';In the
cardButton()accessor method, update the switch statement to add more buttons:Add the following button to the
case STATUS_ENROUTEreturnstatement:{ title: 'Update Trip', action: { type: 'QuickView', parameters: { view: QUICK_VIEW_UPDATE_TRIP_REGISTRY_ID } } }Add the following button to the
case STATUS_HIREDreturnstatement:{ title: 'Complete Trip', action: { type: 'QuickView', parameters: { view: QUICK_VIEW_COMPLETE_TRIP_REGISTRY_ID } } }
Locate and open the ./src/adaptiveCardExtensions/campusShuttle/quickView/UpdateTrip.ts file.
Locate the existing
importstatement that references the property and state interfaces in theCampusShuttleCopilotAdaptiveCardExtensionmodule. Update it to import the three constants for the update and complete new QuickViews:import { ICampusShuttleAdaptiveCardExtensionProps, ICampusShuttleAdaptiveCardExtensionState, QUICK_VIEW_CANCEL_TRIP_REGISTRY_ID // << add } from '../CampusShuttleAdaptiveCardExtension';
Implement the SetOrigin QuickView by replacing the comment
// TODO QuickView cancelTripin theonAction()method with the following:this.quickViewNavigator.push(QUICK_VIEW_CANCEL_TRIP_REGISTRY_ID);
Test trip management experience
At this point you can test the trip management experience in the browser.
If you previously stopped the local web server, restart it by executing the following in the console:
gulp serve --nobrowser
Navigate to the SharePoint hosted workbench to see the Campus Shuttle ACE and select the Preview button the top-right of the toolbar.
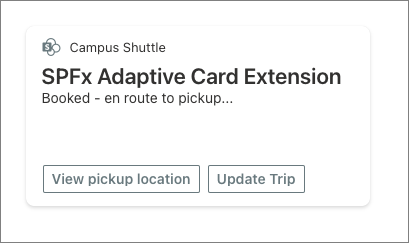
Notice the CardView now contains a Update Trip button.
Select the Update Trip button and notice there are two options to either cancel or pick up a passenger.
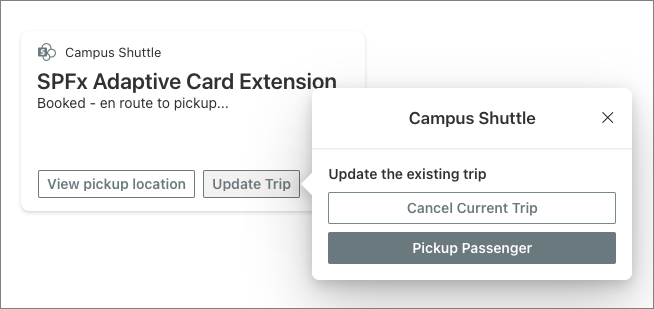
Selecting the Cancel Current Trip button will reset the ACE state and delete the driver's record from the SharePoint list. Selecting the Pickup Passenger button will update the trip, in both the ACE state and SharePoint list item, to change the state of the trip from en route to hired.
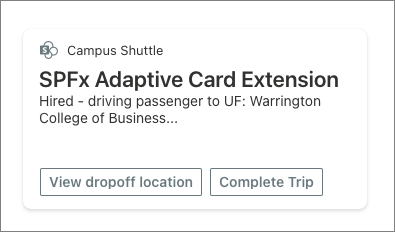
Select the Pickup Passenger button. Notice the CardView context and buttons change to indicate the change to the trip status:
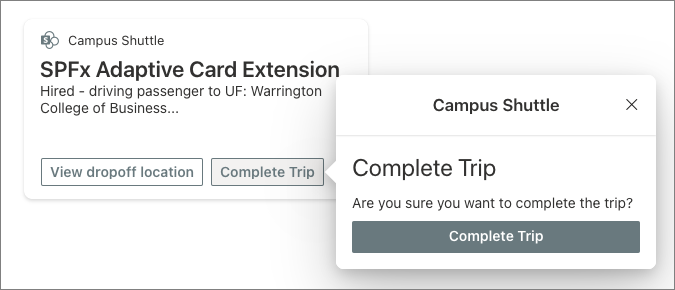
Finally, select the Complete Trip button to view the confirmation QuickView, then select the Complete Trip button to confirm. This will complete the trip.
In this exercise, you created a SPFx ACE with the Primary Text Card option that uses the geo location capabilities in Viva Connections.