Tutorial: Send notifications to Universal Windows Platform apps using Azure Notification Hubs
In this tutorial, you create a notification hub to send push notifications to a Universal Windows Platform (UWP) app. You create a blank Windows Store app that receives push notifications by using the Windows Push Notification Service (WNS). Then, you use your notification hub to broadcast push notifications to all devices that are running your app.
Note
You can find the completed code for this tutorial on GitHub.
You take the following steps:
- Create an app in Windows Store
- Create a notification hub
- Create a sample Windows app
- Send test notifications
Prerequisites
- Azure subscription. If you don't have an Azure subscription, create a free Azure account before you begin.
- Microsoft Visual Studio 2017 or later. The example in this tutorial uses Visual Studio 2019.
- UWP app-development tools installed
- An active Windows Store account
- Confirm that Get notifications from apps and other senders setting is enabled.
- Launch Settings window on your computer.
- Select the System tile.
- Select Notifications & actions from the left menu.
- Confirm that the Get notifications from apps and other senders setting is enabled. If it isn't enabled, enable it.
Completing this tutorial is a prerequisite for all other Notification Hubs tutorials for UWP apps.
Create an app in Windows Store
Note
Microsoft Push Notification Service (MPNS) has been deprecated and is no longer supported.
To send push notifications to UWP apps, associate your app to the Windows Store. Then, configure your notification hub to integrate with WNS.
Navigate to the Windows Dev Center, sign in with your Microsoft account, and then select Create a new app.

Type a name for your app, and then select Reserve product name. Doing so creates a new Windows Store registration for your app.

Expand Product management, and then select Product Identity. Take note of the Package SID, Package/Identity/Name, Package/Identity/Publisher, and Package/Properties/PublisherDisplayName values.

Under Product management, select WNS/MPNS, and then select App Registration portal. Sign in to your Microsoft account. The application registration page opens in a new tab.

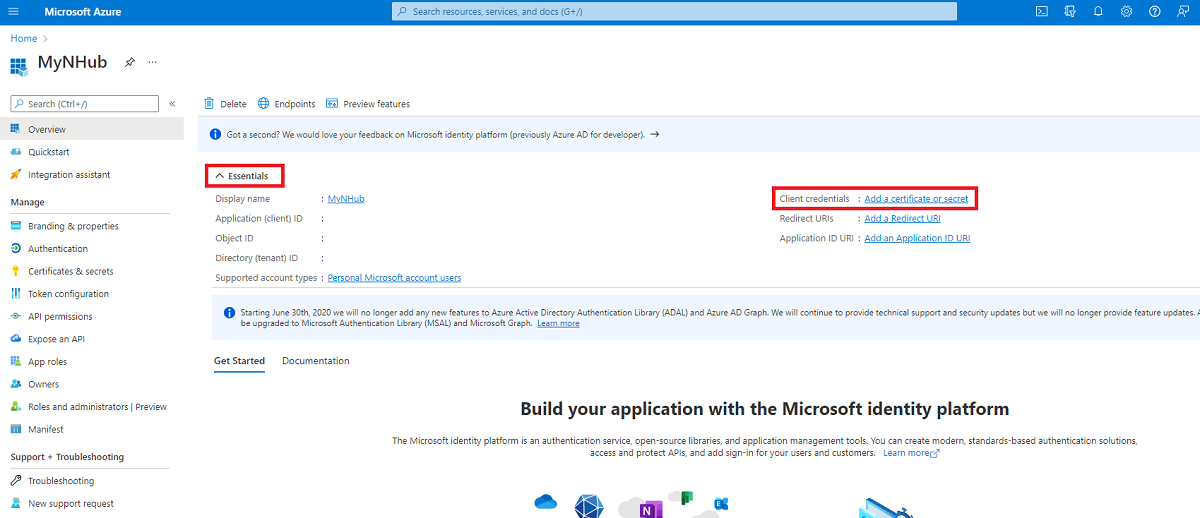
Under Essentials, select Client credentials: Add a certificate or secret.

On the Certificates & secrets page, under Client secrets, select New client secret. After you create a client secret (also called an application secret), take note of it before you leave the page.
Warning
You can only view client secret (application secret) values immediately after creating them. Make sure to save the secret before leaving the page.

Warning
The application secret and package SID are important security credentials. Do not share these values with anyone or distribute them with your app.
Create a Notification Hub
Sign in to the Azure portal.
Select All services on the left menu.

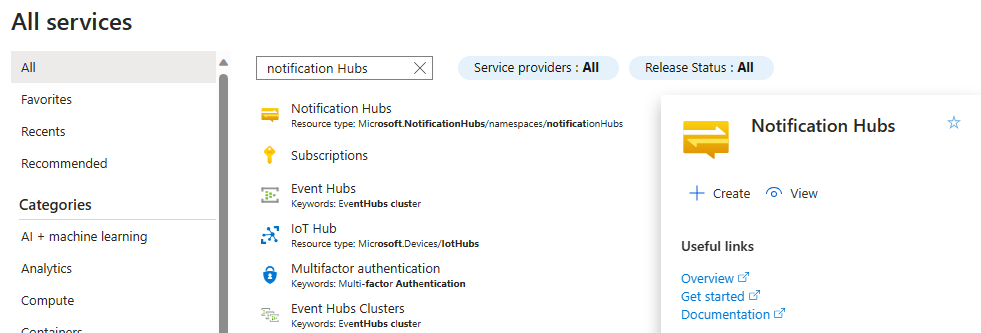
Type Notification Hubs in the Filter services text box. Select the star icon next to the service name to add the service to the FAVORITES section on the left menu. Select Notification Hubs.

On the Notification Hubs page, select Create on the toolbar.

In the Basics tab on the Notification Hub page, do the following steps:
In Subscription, select the name of the Azure subscription you want to use, and then select an existing resource group, or create a new one.
Enter a unique name for the new namespace in Namespace Details.
A namespace contains one or more notification hubs, so type a name for the hub in Notification Hub Details.
Select a value from the Location drop-down list box. This value specifies the location in which you want to create the hub.
Review the Availability Zones option. If you chose a region that has availability zones, the check box is selected by default. Availability Zones is a paid feature, so an additional fee is added to your tier.
Choose a Disaster recovery option: None, Paired recovery region, or Flexible recovery region. If you choose Paired recovery region, the failover region is displayed. If you select Flexible recovery region, use the drop-down to choose from a list of recovery regions.
Select Create.
When the deployment is complete select Go to resource.
Configure WNS settings for the hub
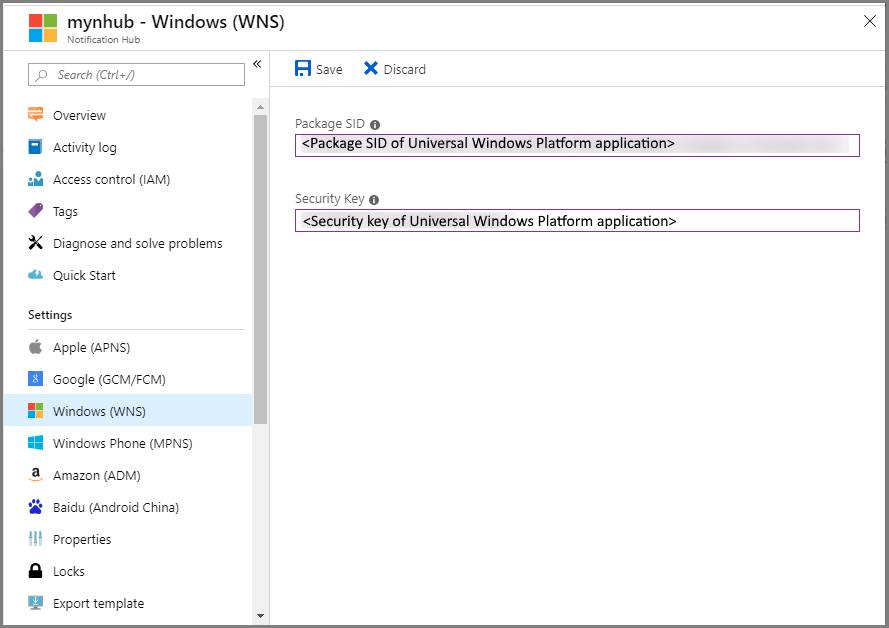
In the NOTIFICATION SETTINGS category, select Windows (WNS).
Enter values for Package SID (like this "ms-app://
<Your Package SID>") and Security Key (the Application Secret) you noted from the previous section.Click Save on the toolbar.

Your notification hub is now configured to work with WNS. You have the connection strings to register your app and send notifications.
Create a sample Windows app
In Visual Studio, open the File menu, select New, and then select Project.
In the Create a new project dialog, complete the following steps:
In the search box at the top, type Windows Universal.
In the search results, select Blank App (Universal Windows), and then select Next.

In the Configure your new project dialog, enter a Project name, and a Location for the project files.
Select Create.
Accept the defaults for the target and minimum platform versions, and select OK.
In Solution Explorer, right-click the Windows Store app project, select Publish, and then select Associate App with the Store. The Associate Your App with the Windows Store wizard appears.
In the wizard, sign in with your Microsoft account.
Select the app that you registered in step 2, select Next, and then select Associate. Doing so adds the required Windows Store registration information to the application manifest.
In Visual Studio, right-click the solution, and then select Manage NuGet Packages. The Manage NuGet Packages window opens.
In the search box, enter WindowsAzure.Messaging.Managed, select Install, and accept the terms of use.

This action downloads, installs, and adds a reference to the Azure Notification Hubs library for Windows by using the Microsoft.Azure.NotificationHubs NuGet package.
Open the
App.xaml.csproject file, and add the following statements:using Windows.Networking.PushNotifications; using Microsoft.WindowsAzure.Messaging; using Windows.UI.Popups;In the project's
App.xaml.csfile, locate theAppclass, and add the followingInitNotificationsAsyncmethod definition. Replace<your hub name>with the name of the notification hub you created in the Azure portal, and replace<Your DefaultListenSharedAccessSignature connection string>with theDefaultListenSharedAccessSignatureconnection string from the Access Polices page of your notification hub:private async void InitNotificationsAsync() { var channel = await PushNotificationChannelManager.CreatePushNotificationChannelForApplicationAsync(); var hub = new NotificationHub("<your hub name>", "<Your DefaultListenSharedAccessSignature connection string>"); var result = await hub.RegisterNativeAsync(channel.Uri); // Displays the registration ID so you know it was successful if (result.RegistrationId != null) { var dialog = new MessageDialog("Registration successful: " + result.RegistrationId); dialog.Commands.Add(new UICommand("OK")); await dialog.ShowAsync(); } }This code retrieves the channel URI for the app from WNS, and then registers that channel URI with your notification hub.
Note
Replace the
hub nameplaceholder with the name of the notification hub that appears in the Azure portal. Also replace the connection string placeholder with theDefaultListenSharedAccessSignatureconnection string that you obtained from the Access Polices page of your notification hub in a previous section.At the top of the
OnLaunchedevent handler inApp.xaml.cs, add the following call to the newInitNotificationsAsyncmethod:InitNotificationsAsync();This action guarantees that the channel URI is registered in your notification hub each time the application launches.
Right-click
Package.appxmanifestand select View Code (F7). Locate<Identity .../>and replace the Name value with the Package/Identity/Name, and replace its Publisher value with the Package/Identity/Publisher value from the app you created earlier.To run the app, press the keyboard's F5 key. A dialog box containing the registration key will display. To close the dialog, click OK.

Your app is now ready to receive toast notifications.
Send test notifications
You can quickly test receiving notifications in your app by sending notifications in the Azure portal.
In the Azure portal, switch to the Overview tab, and select Test Send on the toolbar.

In the Test Send window, do the following actions:
For Platforms, select Windows.
For Notification Type, select Toast.
Select Send.

See the result of the Send operation in the Result list at the bottom of the window. You also see an alert message.

You see the notification message: Test message on your desktop.

Next steps
You have sent broadcast notifications to all your Windows devices by using the portal or a console app. To learn how to push notifications to specific devices, advance to the following tutorial:

