Provisioning users into SQL based applications
The following documentation provides configuration and tutorial information demonstrating how the generic SQL connector and the Extensible Connectivity(ECMA) host can be used with a SQL Server.
This document describes the steps you need to perform to automatically provision and deprovision users from Microsoft Entra ID into an SQL database.
For important details on what this service does, how it works, and frequently asked questions, check out the Automate user provisioning and deprovisioning to SaaS applications with Microsoft Entra ID and on-premises application provisioning architecture articles.
The following video provides an overview of on-premises provisioning.
Prerequisites for provisioning to a SQL Database
On-premises prerequisites
The application relies upon an SQL database, in which records for users can be created, updated, and deleted. The computer that runs the provisioning agent should have:
- Windows Server 2016 or a later version.
- Connectivity to the target database system, and with outbound connectivity to login.microsoftonline.com, other Microsoft Online Services and Azure domains. An example is a Windows Server 2016 virtual machine hosted in Azure IaaS or behind a proxy.
- At least 3 GB of RAM.
- .NET Framework 4.7.2.
- The ODBC driver for the SQL database.
Configuration of the connection to the application's database is done via a wizard. Depending on the options you select, some of the wizard screens might not be available and the information might be slightly different. Use the following information to guide you in your configuration.
Supported databases
- Microsoft SQL Server and Azure SQL
- IBM DB2 9.x
- IBM DB2 10.x
- IBM DB2 11.5
- Oracle 10g and 11g
- Oracle 12c and 18c
- MySQL 5.x
- MySQL 8.x
- Postgres
Cloud requirements
A Microsoft Entra tenant with Microsoft Entra ID P1 or Premium P2 (or EMS E3 or E5).
Using this feature requires Microsoft Entra ID P1 licenses. To find the right license for your requirements, see Compare generally available features of Microsoft Entra ID.
The Hybrid Identity Administrator role for configuring the provisioning agent and the Application Administrator or Cloud Application Administrator roles for configuring provisioning in the Azure portal.
The Microsoft Entra users to be provisioned to the database must already be populated with any attributes that will be required by the database schema and that are not generated by the database itself.
Prepare the sample database
In this article, you'll configure the Microsoft Entra SQL connector to interact with your application's relational database. Typically, applications manage access with a table in their SQL database, with one row in the table per user. If you already have an application with a database, then continue at the next section.
If you don't already have a database with a suitable table, then for demonstration purposes, you should create one which Microsoft Entra ID can be permitted to use. If you're using SQL Server, then run the SQL script found in Appendix A. This script creates a sample database with the name CONTOSO, containing a single table Employees. This database table that you'll be provisioning users into.
| Table Column | Source |
|---|---|
| ContosoLogin | Microsoft Entra user principal name |
| FirstName | Microsoft Entra given name |
| LastName | Microsoft Entra surname |
| Exchange Online email address | |
| InternalGUID | Generated by the database itself |
| AzureID | Microsoft Entra object ID |
| textID | Microsoft Entra ID mail nickname |
Determine how the Microsoft Entra SQL Connector will interact with your database
You'll need to have a user account in the SQL instance with the rights to make updates to data in the database's tables. If your SQL database is managed by someone else, contact them to obtain the account name, and password for Microsoft Entra ID to use to authenticate to the database. If the SQL instance is installed on a different computer, you'll also need to ensure that the SQL database allows incoming connections from the ODBC driver on the agent computer.
If you have an already existing database for your application, then you'll need to determine how Microsoft Entra ID should interact with that database: direct interaction with tables and views, via stored procedures already present in the database, or via SQL statements you provide for query and updates. This setting is because a more complex application might have in its database other auxiliary tables, require paging for tables with thousands of users, or could require Microsoft Entra ID to call a stored procedure that performs extra data processing, such as encryption, hashing or validity checks.
When you create the configuration for the connector to interact with an application's database, you'll configure first an approach for how the connector host reads the schema of your database, and then configure the approach the connector should use on an ongoing basis, via run profiles. Each run profile specifies how the connector should generate SQL statements. The choice of run profiles, and the method within a run profile, depends on what your database engine supports and the application requires.
After configuration, when the provisioning service starts, it will automatically perform the interactions configured in the Full Import run profile. In this run profile, the connector will read in all the records for users from the application's database, typically using a SELECT statement. This run profile is necessary so that later, if Microsoft Entra ID needs to make a change for a user, Microsoft Entra ID will know to update an existing record for that user in the database, rather than create a new record for that user.
Each time changes are made in Microsoft Entra ID, such as to assign a new user to the application or update an existing user, the provisioning service will perform the SQL database interactions configured Export run profile. In the Export run profile, Microsoft Entra ID will issue SQL statements to insert, update and delete records in the database, in order to bring the contents of the database in sync with Microsoft Entra ID.
If your database supports it, you can also optionally configure a Delta Import run profile. In this run profile, Microsoft Entra ID will read in changes that were made in the database, other than by Microsoft Entra ID, since the last full or delta import. This run profile is optional since it requires the database to be structured to allow changes to be read.
In the configuration of each run profile of the connector, you'll specify whether the Microsoft Entra connector should generate its own SQL statements for a table or view, call your stored procedures, or use custom SQL queries you provide. Typically you'll use the same method for all run profiles in a connector.
- If you select the Table or View method for a run profile, then the Microsoft Entra connector will generate the necessary SQL statements, SELECT, INSERT, UPDATE and DELETE, to interact with the table or view in the database. This method is the simplest approach, if your database has a single table or an updatable view with few existing rows.
- If you select the Stored Procedure method, then your database will need to have four stored procedures: read a page of users, add a user, update a user and delete a user, you'll configure the Microsoft Entra connector with the names and parameters of those stored procedures to call. This approach requires more configuration in your SQL database and would typically only be needed if your application requires more processing for each change to a user, of for paging through large result sets.
- If you select the SQL Query method, then you'll type in the specific SQL statements you want the connector to issue during a run profile. You'll configure the connector with the parameters that the connector should populate in your SQL statements, such as to page through result sets during an import, or to set the attributes of a new user being created during an export.
This article illustrates how to use the table method to interact with the sample database table Employees, in the Export and Full Import run profiles. To learn more about configuring the Stored Procedure or SQL Query methods, see the Generic SQL configuration guide that provides more details and specific requirements.
Choose the unique identifiers in your application's database schema
Most applications will have a unique identifier for each user of the application. If you're provisioning into an existing database table, you should identify a column of that table that has a value for each user, where that value is unique and doesn't change. This column will be the Anchor, which Microsoft Entra ID uses to identify existing rows to be able to update or delete them. For more information on anchors, see About anchor attributes and distinguished names.
If your application's database already exists, has users in it, and you want to have Microsoft Entra ID keep those users up to date, then you'll need to have an identifier for each user that is the same between the application's database and the Microsoft Entra schema. For example, if you assign a user to the application in Microsoft Entra ID, and that user is already in that database, then changes to that user in Microsoft Entra ID should update an existing row for that user, rather than add a new row. Since Microsoft Entra ID likely doesn't store an application's internal identifier for that user, you'll want to select another column for querying the database. The value of this column could be a user principal name, or an email address, employee ID, or other identifier that is present in Microsoft Entra ID on each user that is in scope of the application. If the user identifier that the application uses isn't an attribute stored in the Microsoft Entra representation of the user, then you don't need to extend the Microsoft Entra user schema with an extension attribute, and populate that attribute from your database. You can extend the Microsoft Entra schema and set extension values using PowerShell.
Map attributes in Microsoft Entra ID to the database schema
When Microsoft Entra ID has established a link between a user in Microsoft Entra ID and a record in the database, either for a user already in the database or a new user, then Microsoft Entra ID can provision attribute changes from the Microsoft Entra user into the database. In addition to the unique identifiers, inspect your database to identify if there are any other required properties. If there are, then ensure that the users who will be provisioned into the database have attributes that can be mapped onto the required properties.
You can also configure deprovisioning behavior. If a user that is assigned to the application is deleted in Microsoft Entra ID, then Microsoft Entra ID will send a delete operation to the database. You may also wish to have Microsoft Entra ID update the database when a user goes out of scope of being able to use the application. If a user is unassigned from an app, soft-deleted in Microsoft Entra ID, or blocked from sign-in, then you can configure Microsoft Entra ID to send an attribute change. If you're provisioning into an existing database table, then you'll want to have a column of that table to map to isSoftDeleted. When the user goes out of scope, Microsoft Entra ID will set the value for that user to True.
1. Install the ODBC driver
The Windows Server where you'll be installing the provisioning agent requires an ODBC driver for your target database. If you're planning to connect to SQL Server or Azure SQL database, then you should download the ODBC driver for SQL Server (x64) and install that on the Windows Server. For other SQL databases, please refer to the guidance by the independent software vendor on how to install the ODBC driver.
2. Create a DSN connection file
The generic SQL connector requires a Data Source Name (DSN) file to connect to the SQL endpoint. First, you need to create a file with the ODBC connection information.
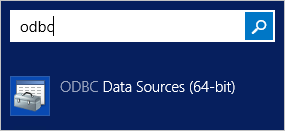
Start the ODBC management utility on your server. Use the 64-bit version.
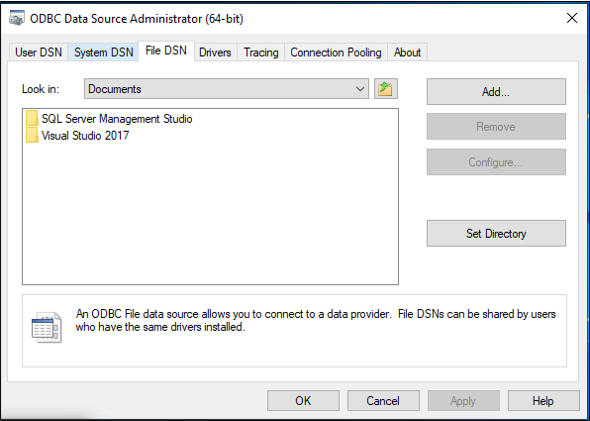
Select the File DSN tab, and select Add.
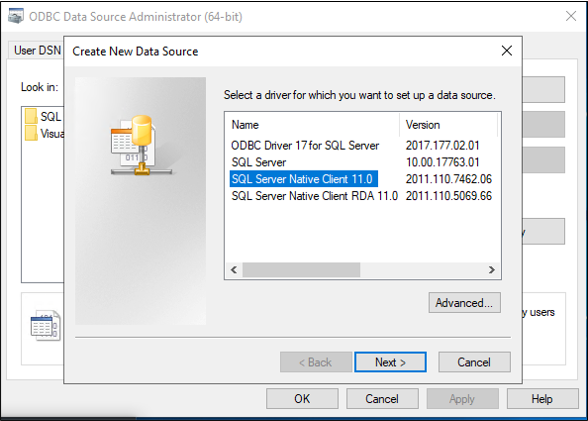
If you're using SQL Server or Azure SQL, select SQL Server Native Client 11.0 and select Next. If you're using another database, select its ODBC driver.
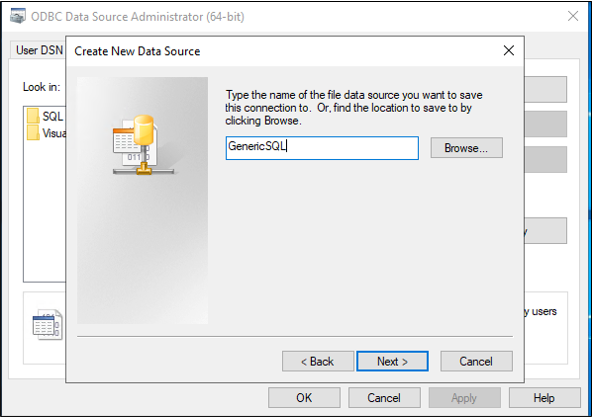
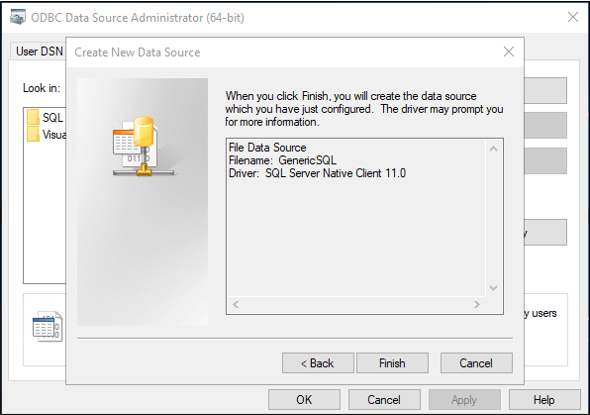
Give the file a name, such as GenericSQL, and select Next.
Select Finish.
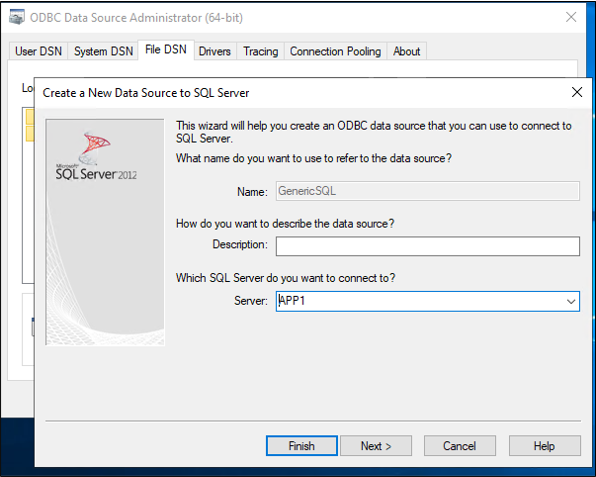
Now configure the connection. The following steps will differ depending upon which ODBC driver you're using. This illustration assumes you're using the driver to connect to SQL Server. If the SQL Server is located on a different server computer, then enter the name of the server. Then, select Next.
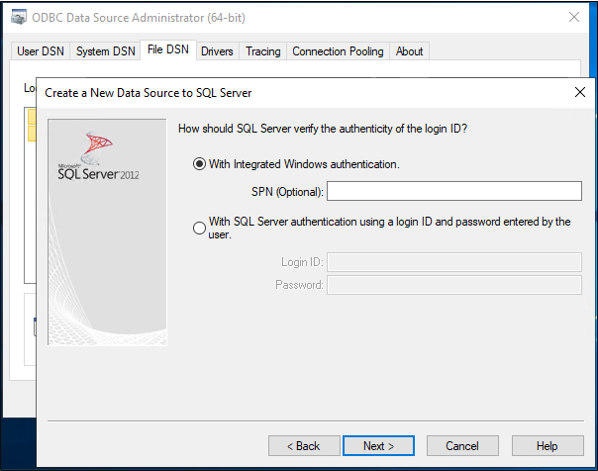
If the user you're running this step as has permissions to connect to the database, then keep Windows authentication selected. If the SQL Server administrator requires a SQL local account, then provide those credentials instead. Then select Next.
Enter the name of the database, which in this sample is CONTOSO.
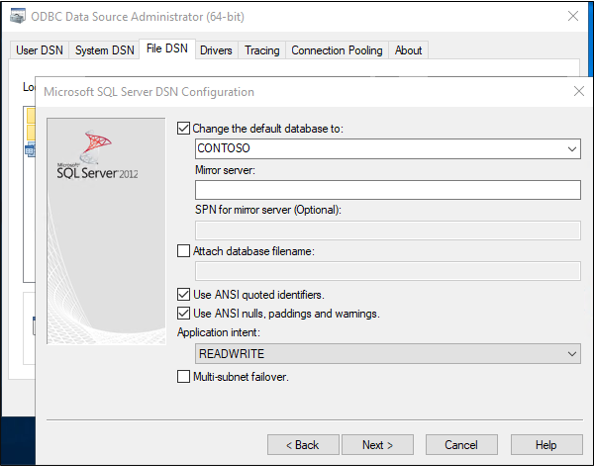
Keep everything default on this screen, and select Finish.
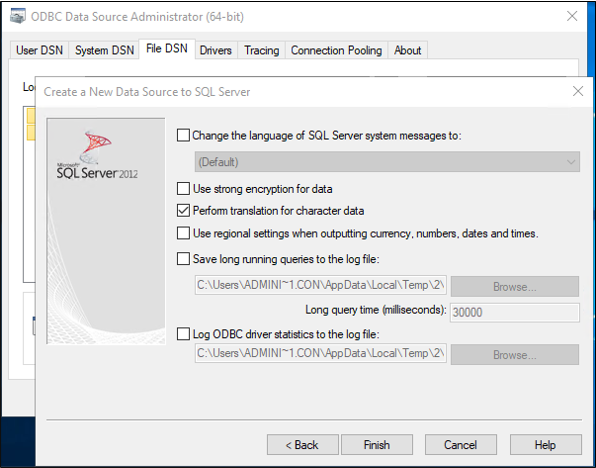
To check everything is working as expected, select Test Data Source.
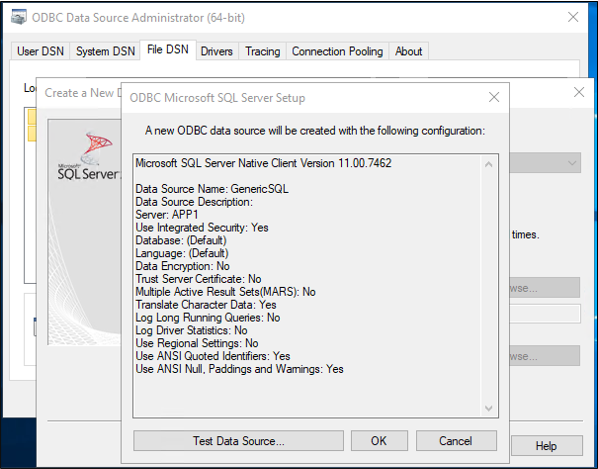
Make sure the test is successful.
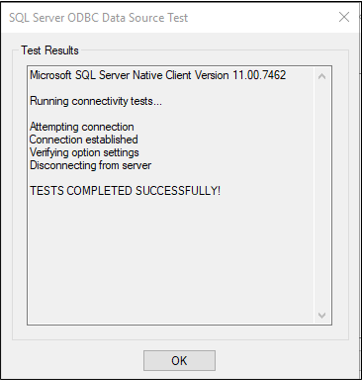
Select OK twice. Close the ODBC Data Source Administrator. The DSN connection file is saved by default to your Documents folder.
3. Install and configure the Microsoft Entra Connect Provisioning Agent
If you have already downloaded the provisioning agent and configured it for another on-premises application, then continue reading in the next section.
- Sign in to the Azure portal.
- Go to Enterprise applications and select New application.
- Search for the On-premises ECMA app application, give the app a name, and select Create to add it to your tenant.
- From the menu, navigate to the Provisioning page of your application.
- Select Get started.
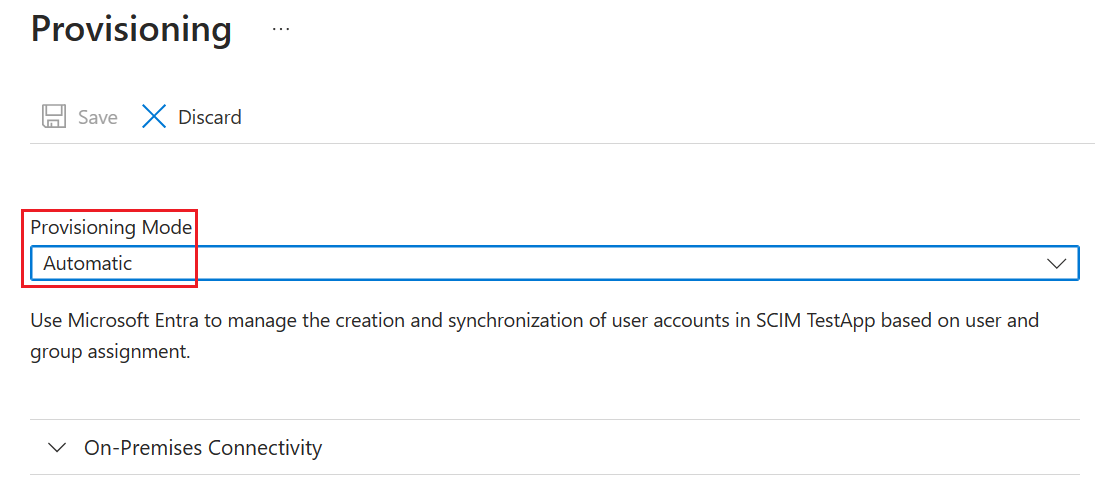
- On the Provisioning page, change the mode to Automatic.
- Under On-premises Connectivity, select Download and install, and select Accept terms & download.
- Leave the portal and run the provisioning agent installer, agree to the terms of service, and select Install.
- Wait for the Microsoft Entra provisioning agent configuration wizard and then select Next.
- In the Select Extension step, select On-premises application provisioning and then select Next.
- The provisioning agent will use the operating system's web browser to display a popup window for you to authenticate to Microsoft Entra ID, and potentially also your organization's identity provider. If you are using Internet Explorer as the browser on Windows Server, then you may need to add Microsoft web sites to your browser's trusted site list to allow JavaScript to run correctly.
- Provide credentials for a Microsoft Entra administrator when you're prompted to authorize. The user is required to have at least the Hybrid Identity Administrator role.
- Select Confirm to confirm the setting. Once installation is successful, you can select Exit, and also close the Provisioning Agent Package installer.
4. Configure the On-premises ECMA app
Back in the portal, on the On-Premises Connectivity section, select the agent that you deployed and select Assign Agent(s).
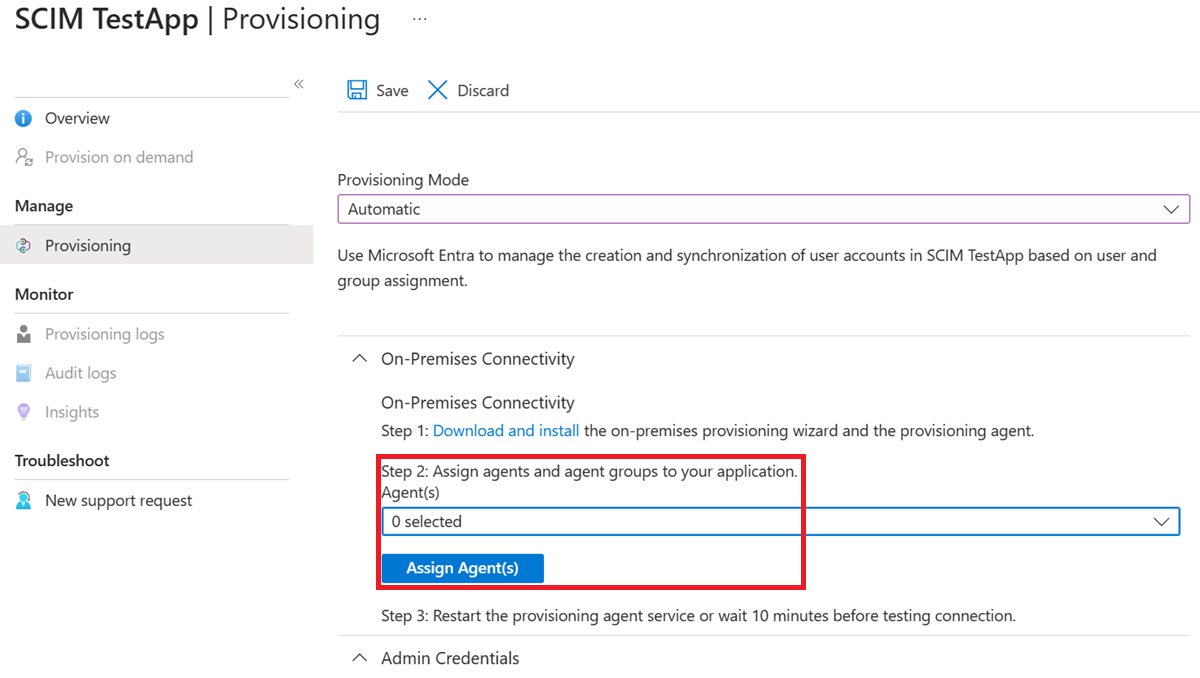
Keep this browser window open, as you complete the next step of configuration using the configuration wizard.
5. Configure the Microsoft Entra ECMA Connector Host certificate
On the Windows Server where the provisioning agent is installed, right click the Microsoft ECMA2Host Configuration Wizard from the start menu, and run as administrator. Running as a Windows administrator is necessary for the wizard to create the necessary Windows event logs.
After the ECMA Connector Host Configuration starts, if it's the first time you have run the wizard, it will ask you to create a certificate. Leave the default port 8585 and select Generate certificate to generate a certificate. The autogenerated certificate will be self-signed as part of the trusted root. The certificate SAN matches the host name.
Select Save.
Note
If you have chosen to generate a new certificate, please record the certificate expiration date, to ensure that you schedule to return to the configuration wizard and re-generate the certificate before it expires.
6. Create a generic SQL connector
In this section, you create the connector configuration for your database.
6.1 Configure the SQL connection
To create a generic SQL connector, follow these steps:
Generate a secret token that will be used for authenticating Microsoft Entra ID to the connector. It should be 12 characters minimum and unique for each application.
If you haven't already done so, launch the Microsoft ECMA2Host Configuration Wizard from the Windows Start menu.
Select New Connector.
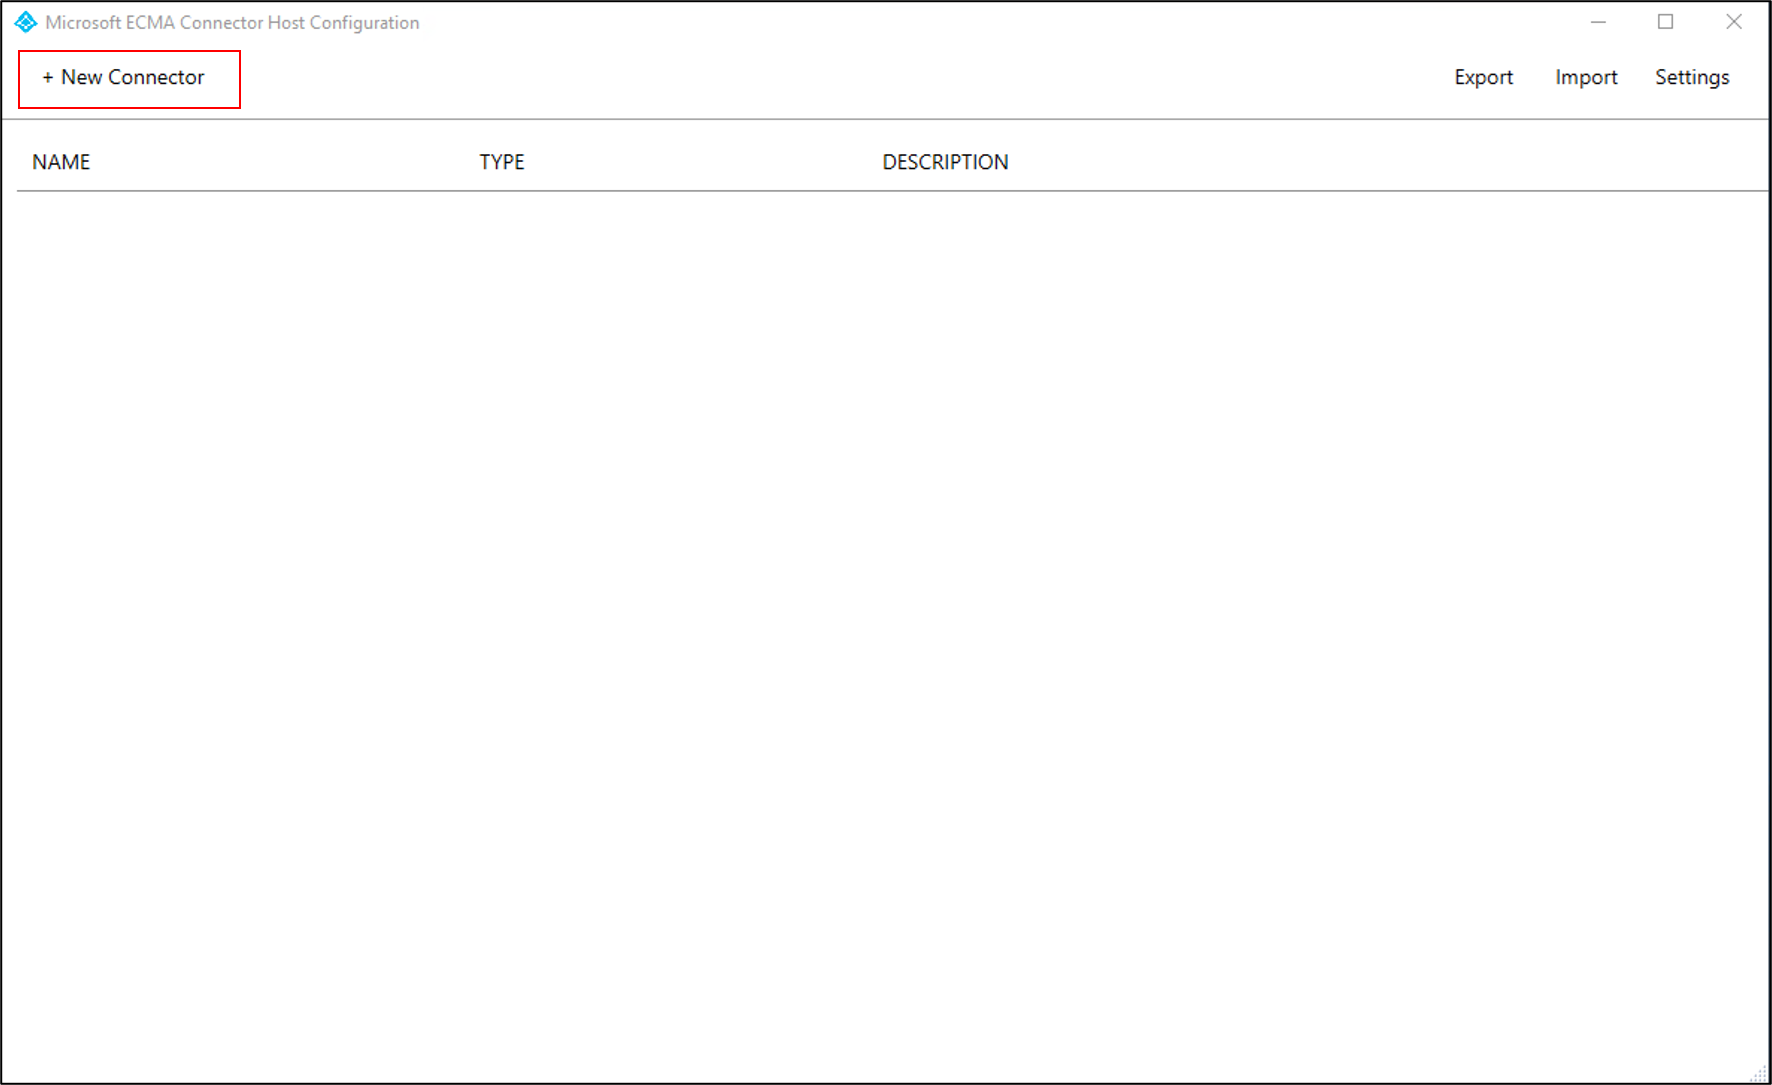
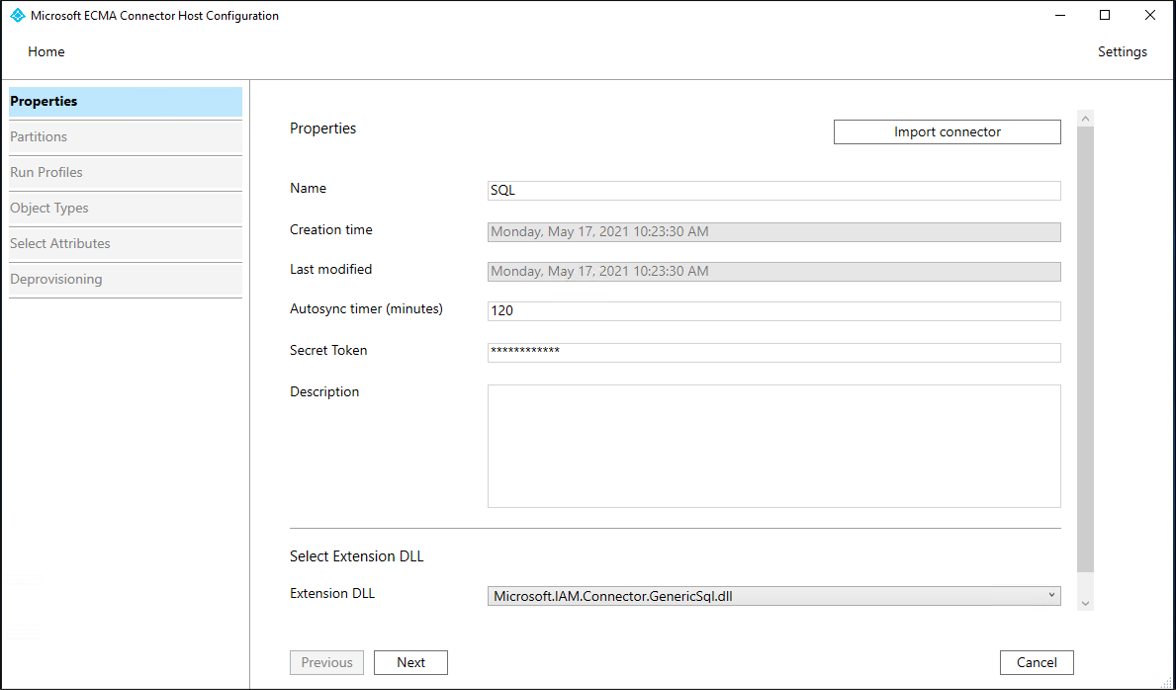
On the Properties page, fill in the boxes with the values specified in the table that follows the image and select Next.
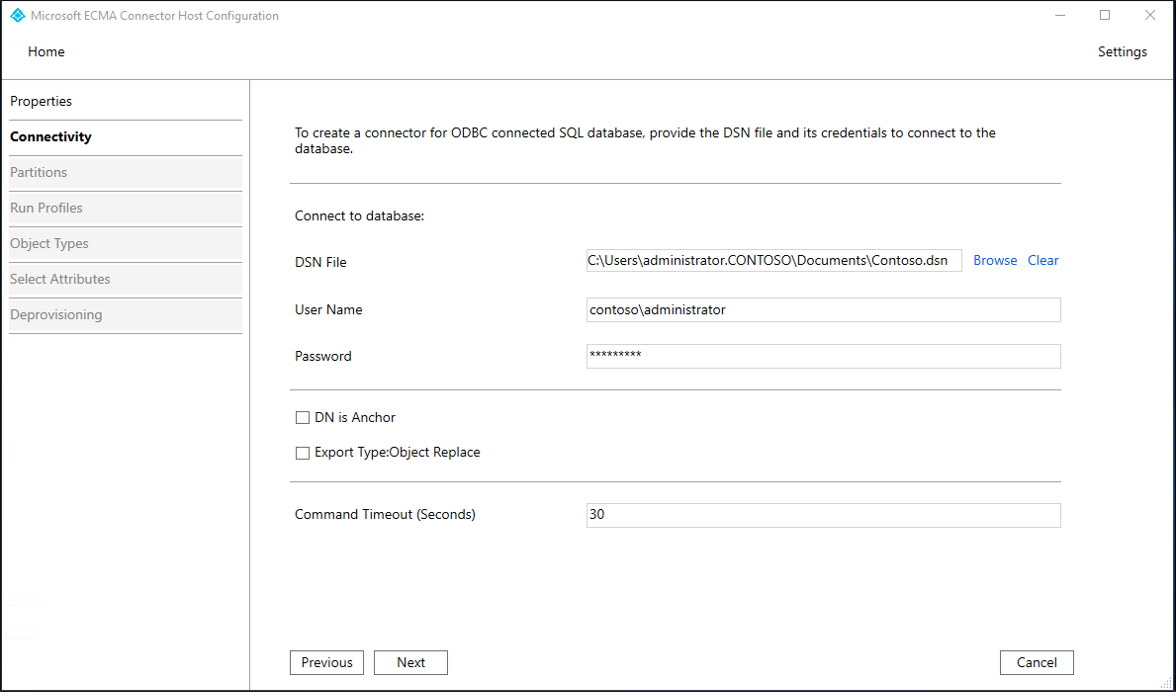
Property Value Name The name you chose for the connector, which should be unique across all connectors in your environment. For example, if you only have one SQL database, SQL.Autosync timer (minutes) 120 Secret Token Enter the secret token you generated for this connector. The key should be 12 characters minimum. Extension DLL For the generic SQL connector, select Microsoft.IAM.Connector.GenericSql.dll. On the Connectivity page, fill in the boxes with the values specified in the table that follows the image and select Next.
Property Description DSN File The Data Source Name file you created in the previous step, which is used to connect to the SQL instance. User Name The username of an account with rights to make updates to the table in the SQL instance. If the target database is SQL Server and you're using Windows authentication, the user name must be in the form of hostname\sqladminaccount for standalone servers or domain\sqladminaccount for domain member servers. For other databases, the user name will be a local account in the database. Password The password of the username provided. DN is Anchor Unless your environment is known to require these settings, don't select the DN is Anchor and Export Type:Object Replace checkboxes.
6.2 Retrieve the schema from the database
After having provided credentials, the ECMA Connector Host will be ready to retrieve the schema of your database. Continue with the SQL connection configuration:
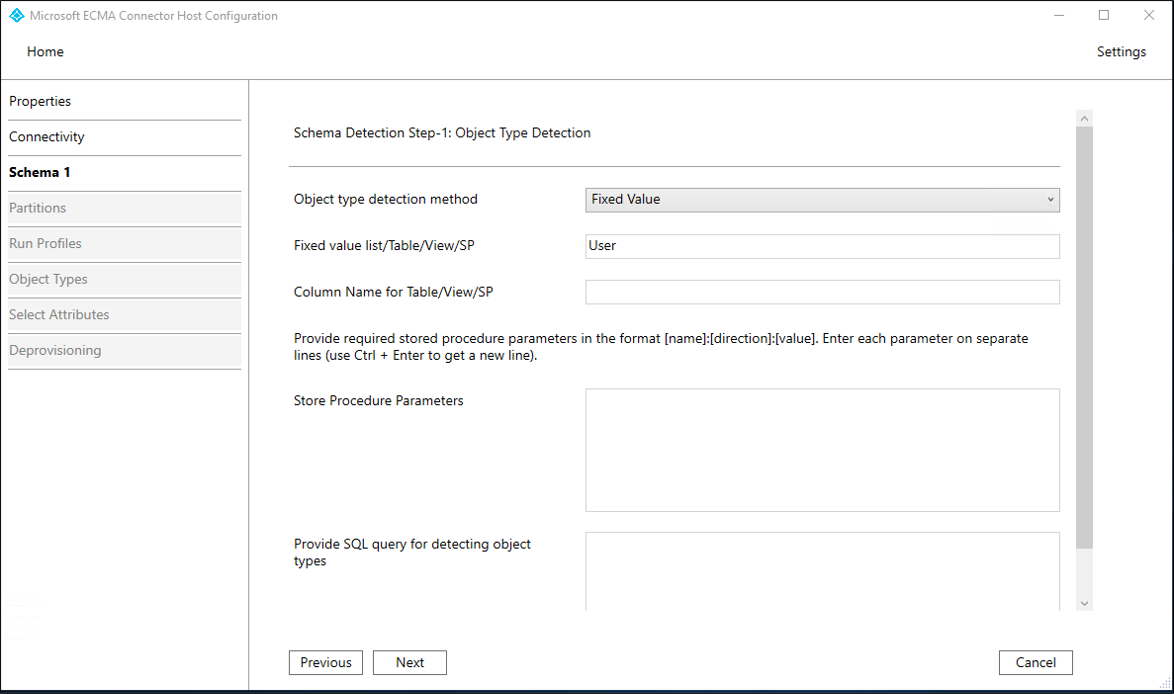
On the Schema 1 page, you'll specify the list of object types. In this sample, there's a single object type,
User. Fill in the boxes with the values specified in the table that follows the image and select Next.Property Value Object type detection method Fixed Value Fixed value list/Table/View/SP User Once you select Next, the next page will automatically appear, for the configuration of the
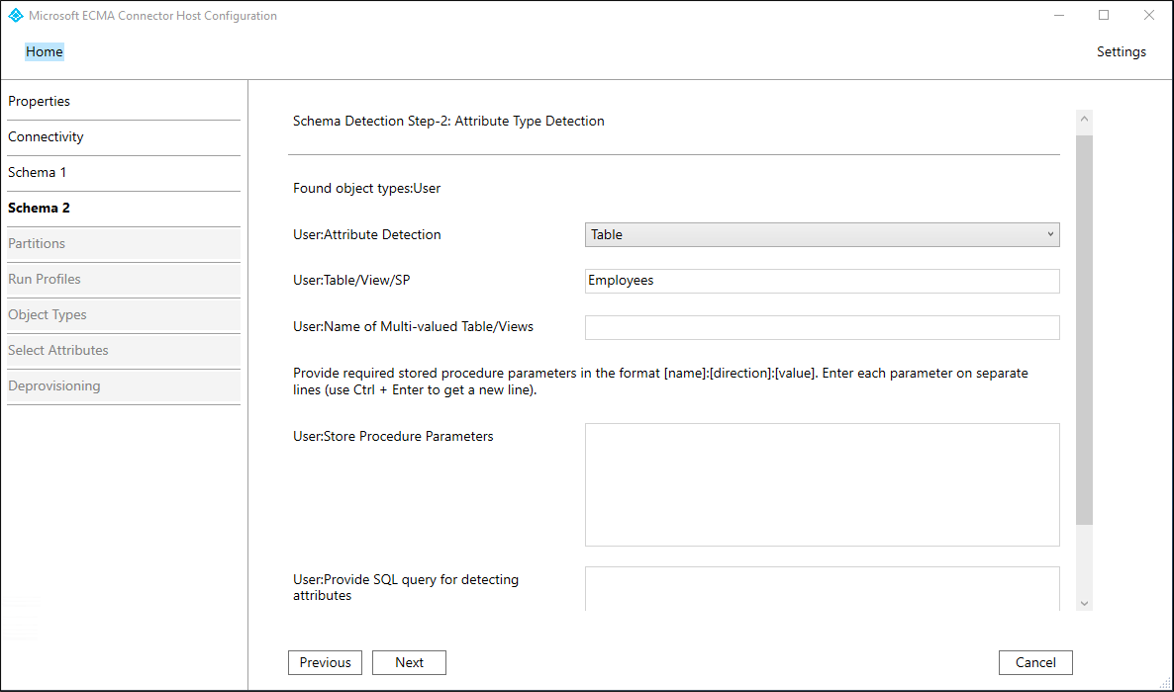
Userobject type. On the Schema 2 page, you'll indicate how users are represented in your database. In this sample, it's a single SQL table, namedEmployees. Fill in the boxes with the values specified in the table that follows the image and select Next.Property Value User:Attribute Detection Table User:Table/View/SP The name of the table in your database, such as EmployeesNote
If an error occurs, check your database configuration to ensure that the user you specified on the Connectivity page has read access to the database's schema.
Once you select Next, the next page will automatically appear, for you to select the columns of the table you specified earlier, such as the
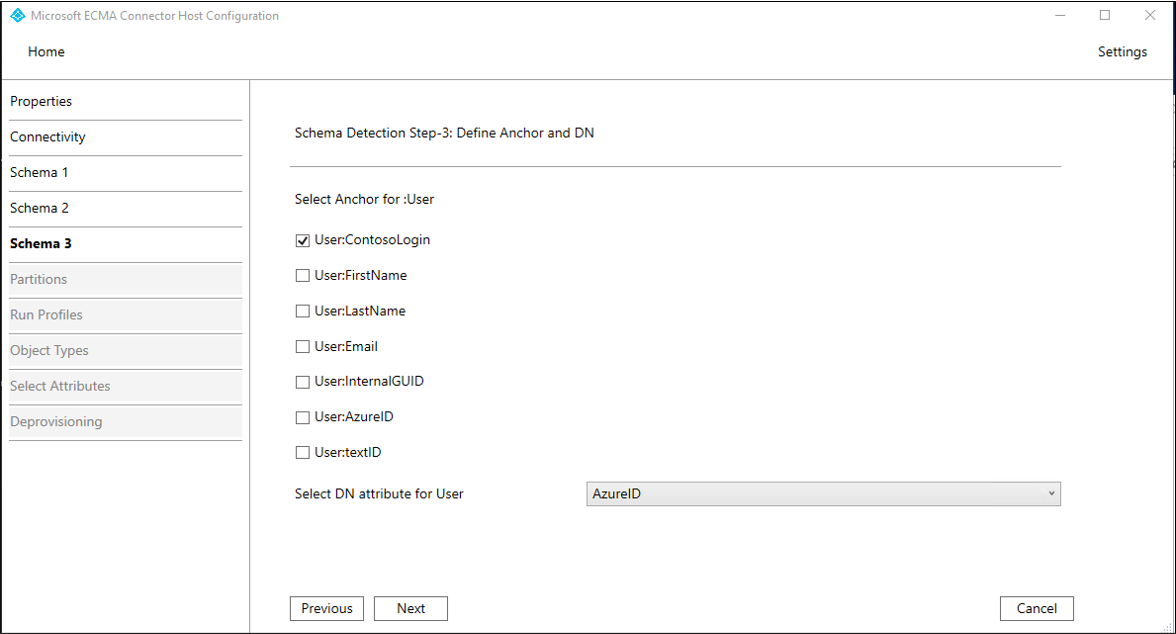
Employeestable in this sample, that are to be used as theAnchorandDNof users. These columns contain unique identifiers in your database. You can use the same or different columns, but ensure that any rows already in this database have unique values in these columns. On the Schema 3 page, fill in the boxes with the values specified in the table that follows the image and select Next.Property Description Select Anchor for: User The column of the database table to be used for the anchor, such as User:ContosoLoginSelect DN attribute for User The column of the database to be used for the DN attribute, such as AzureIDOnce you select Next, the next page will automatically appear, for you to confirm the data type of each of the columns of the
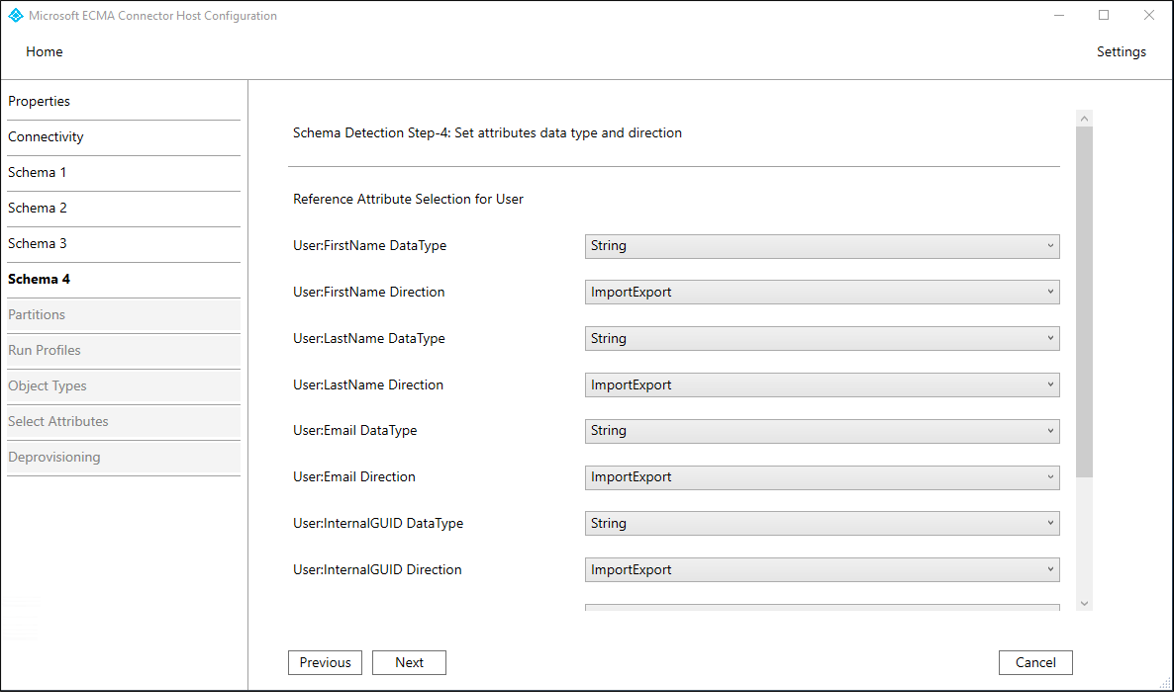
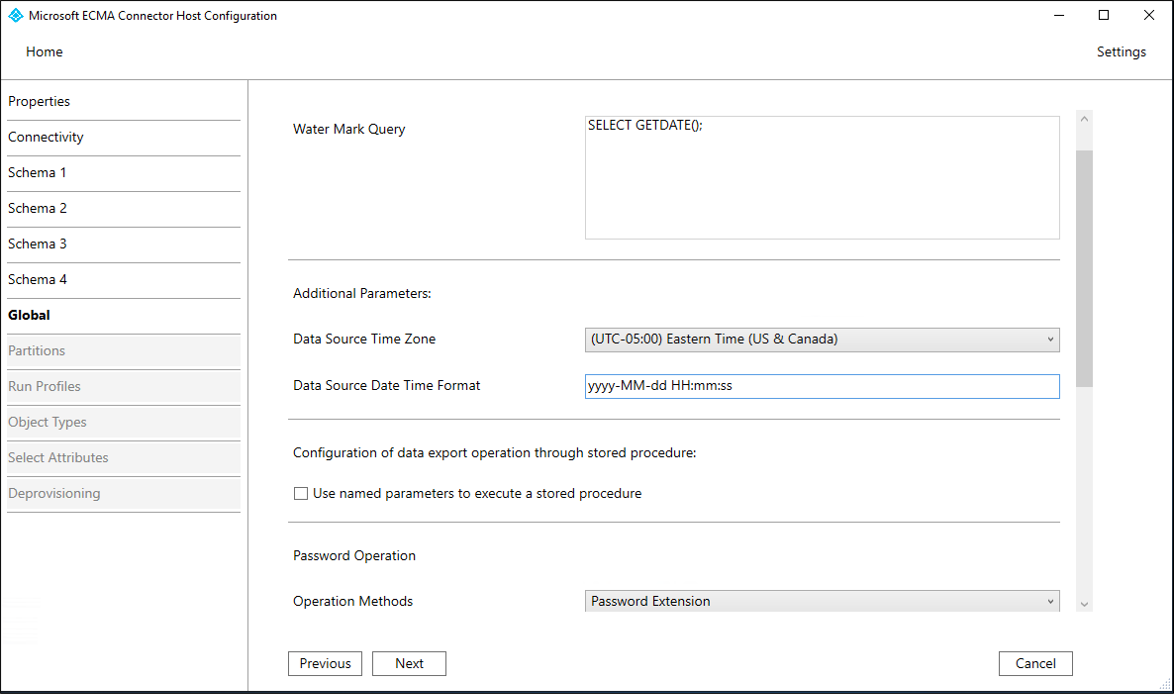
Employeetable, and whether the connector should import or export them. On the Schema 4 page, leave the defaults and select Next.On the Global page, fill in the boxes and select Next. Use the table that follows the image for guidance on the individual boxes.
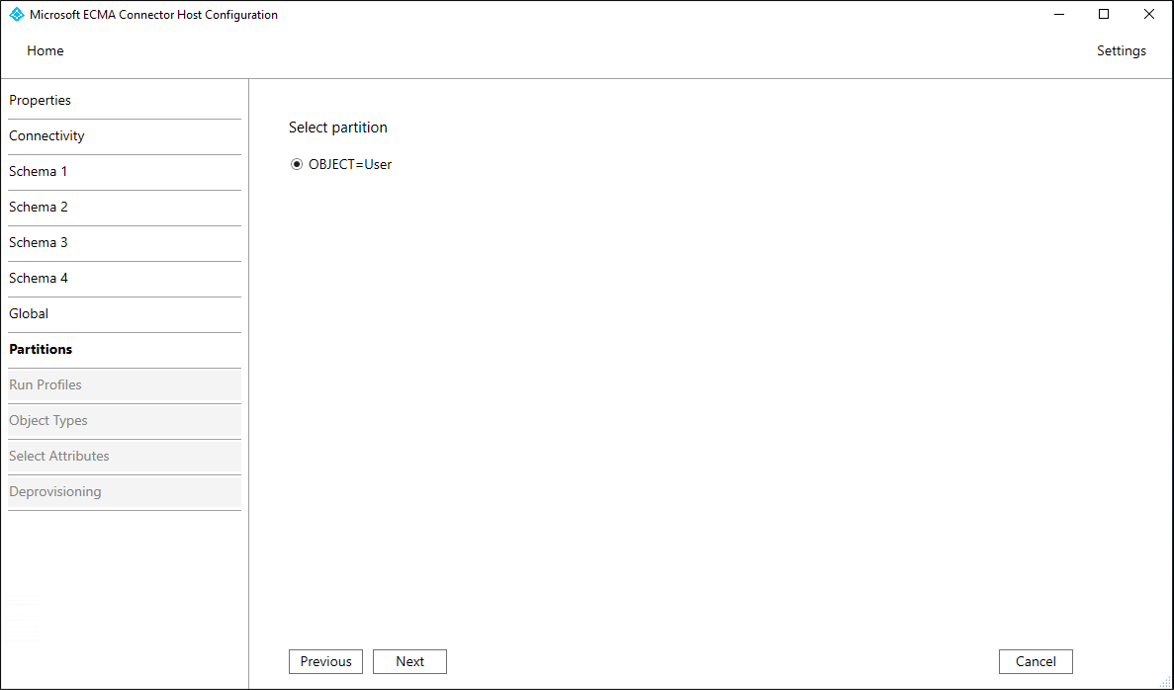
Property Description Delta Strategy For IBM DB2, select NoneWater Mark Query For IBM DB2, type SELECT CURRENT TIMESTAMP FROM SYSIBM.SYSDUMMY1;Data Source Date Time Format For SQL Server, yyyy-MM-dd HH:mm:ssand for IBM DB2,YYYY-MM-DDOn the Partitions page, select Next.
6.3 Configure the run profiles
Next, you'll configure the Export and Full import run profiles. The Export run profile will be used when the ECMA Connector host needs to send changes from Microsoft Entra ID to the database, to insert, update and delete records. The Full Import run profile will be used when the ECMA Connector host service starts, to read in the current content of the database. In this sample, you'll use the Table method in both run profiles, so that the ECMA Connector Host will generate the necessary SQL statements.
Continue with the SQL connection configuration:
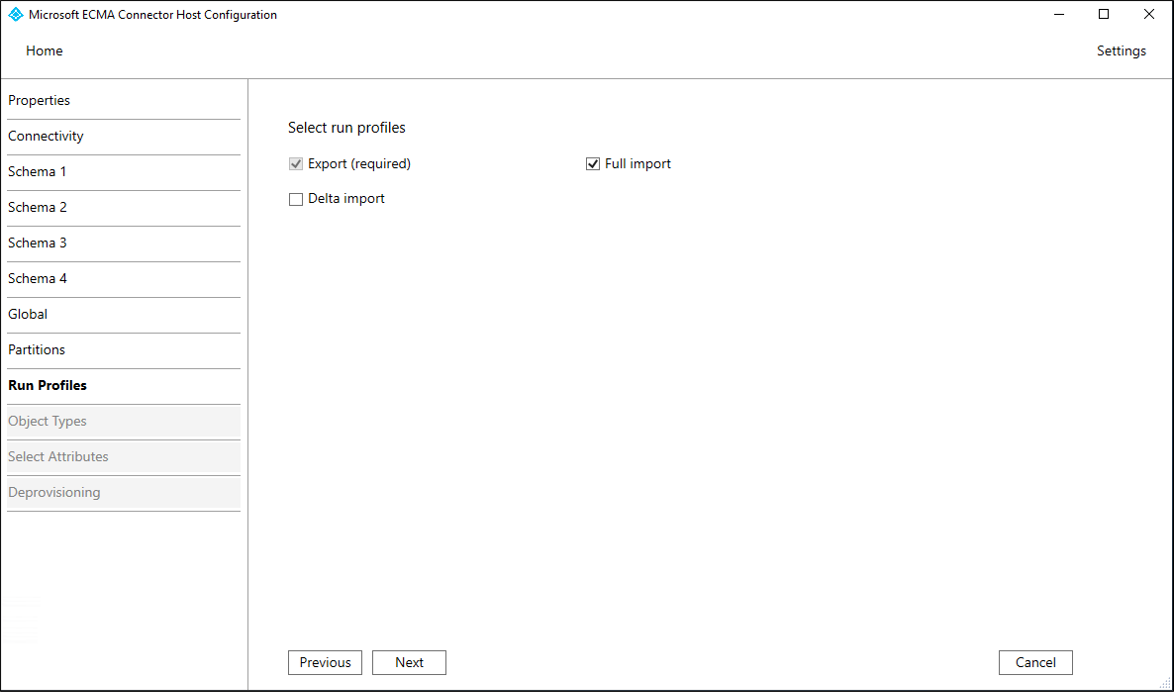
On the Run Profiles page, keep the Export checkbox selected. Select the Full import checkbox and select Next.
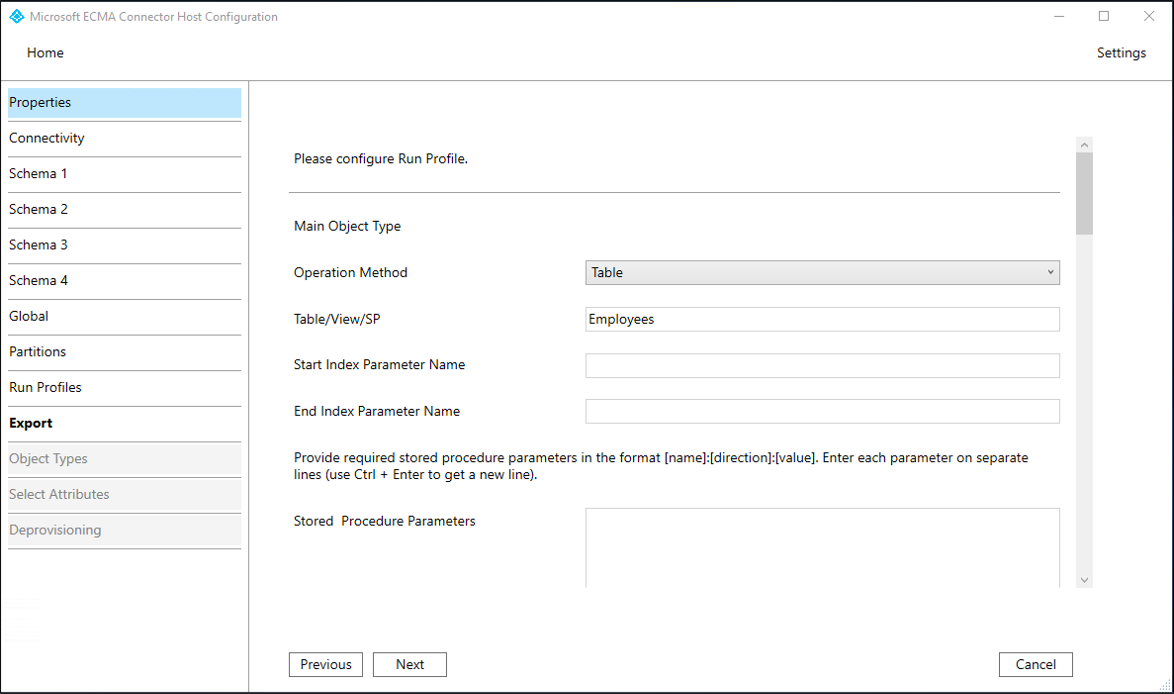
Property Description Export Run profile that will export data to SQL. This run profile is required. Full import Run profile that will import all data from SQL sources specified earlier. Delta import Run profile that will import only changes from SQL since the last full or delta import. Once you select Next, the next page will automatically appear, for you to configure the method for the Export run profile. On the Export page, fill in the boxes and select Next. Use the table that follows the image for guidance on the individual boxes.
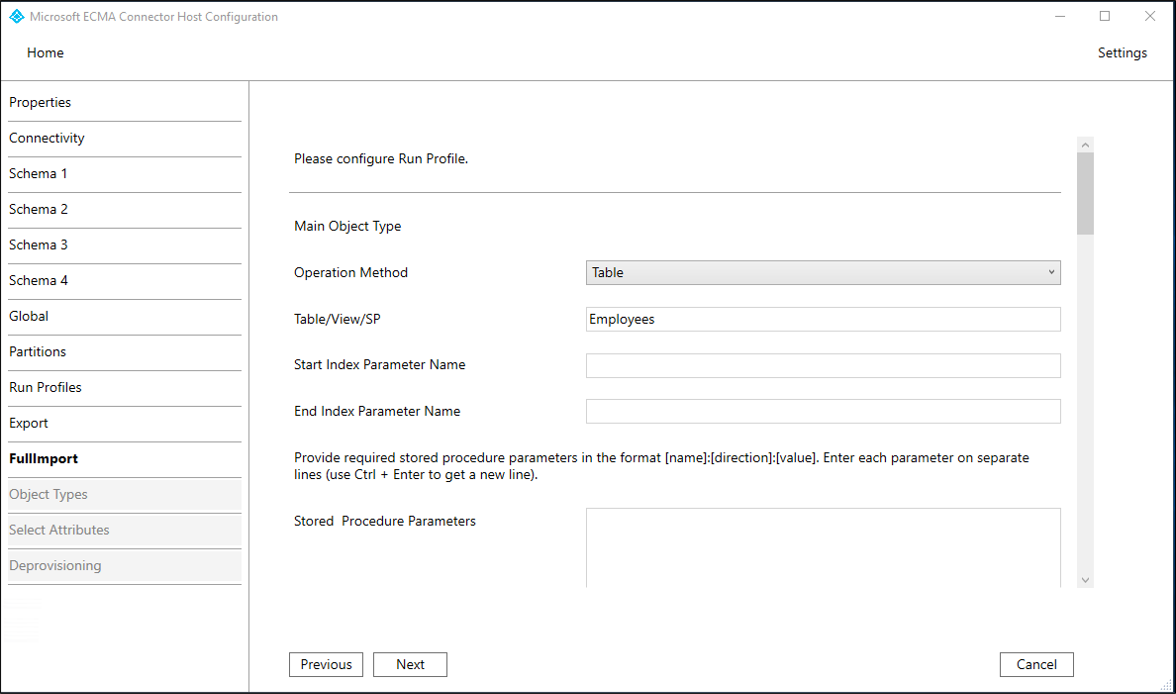
Property Description Operation Method Table Table/View/SP The same table as configured on the Schema 2 tab, such as EmployeesOn the Full Import page, fill in the boxes and select Next. Use the table that follows the image for guidance on the individual boxes.
Property Description Operation Method Table Table/View/SP The same table as configured on the Schema 2 tab, such as Employees
6.4 Configure how attributes are surfaced in Microsoft Entra ID
In the last step of the SQL connection settings, configure how attributes are surfaced in Microsoft Entra ID:
On the Object Types page, fill in the boxes and select Next. Use the table that follows the image for guidance on the individual boxes.
- Anchor: The values of this attribute should be unique for each object in the target database. The Microsoft Entra provisioning service will query the ECMA connector host by using this attribute after the initial cycle. This anchor value should be the same as the anchor column you configured earlier on the Schema 3 page.
- Query Attribute: This attribute should be the same as the Anchor.
- DN: The Autogenerated option should be selected in most cases. If it isn't selected, ensure that the DN attribute is mapped to an attribute in Microsoft Entra ID that stores the DN in this format:
CN = anchorValue, Object = objectType. For more information on anchors and the DN, see About anchor attributes and distinguished names.
Property Description Target object User Anchor The column configured in Schema 3 tab, such as ContosoLoginQuery Attribute The same column as the Anchor, such as ContosoLoginDN The same column as configured in the Schema 3 tab, such as ContosoLoginAutogenerated Checked The ECMA connector host discovers the attributes supported by the target database. You can choose which of those attributes you want to expose to Microsoft Entra ID. These attributes can then be configured in the Azure portal for provisioning. On the Select Attributes page, add all the attributes in the dropdown list one at a time.
The Attribute dropdown list shows any attribute that was discovered in the target database and wasn't chosen on the previous Select Attributes page. Once all the relevant attributes have been added, select Next.
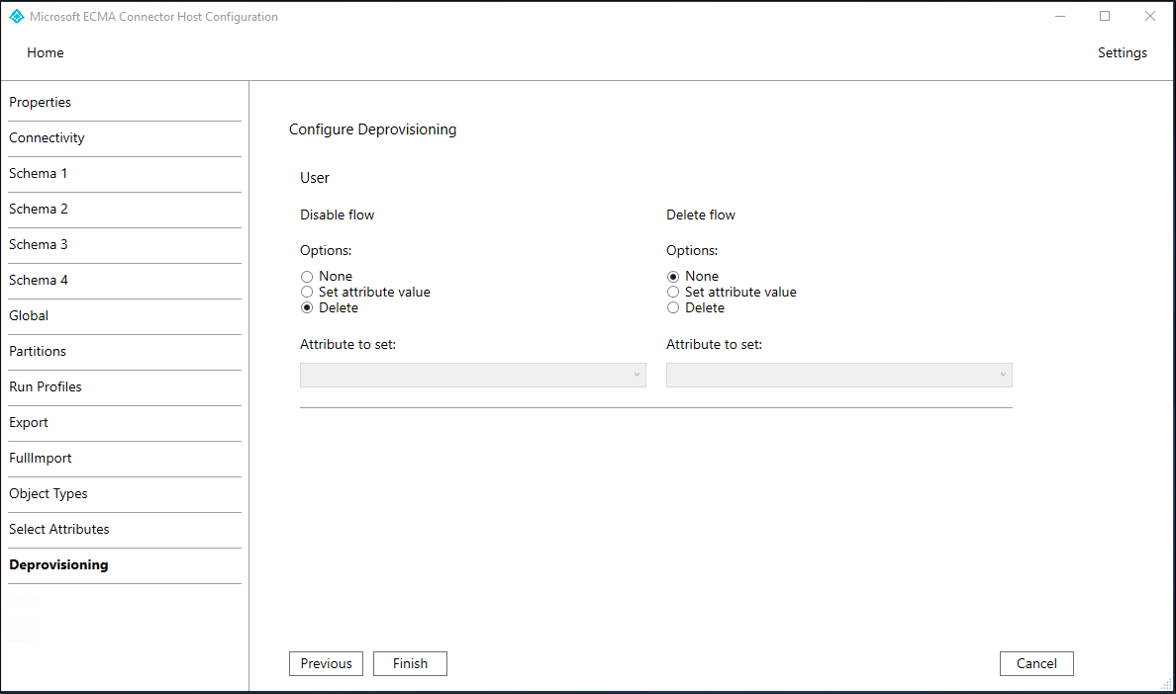
- On the Deprovisioning page, under Disable flow, select Delete. The attributes selected on the previous page won't be available to select on the Deprovisioning page. Select Finish.
Note
If you use the Set attribute value be aware that only boolean values are allowed.
7. Ensure the ECMA2Host service is running
On the server the running the Microsoft Entra ECMA Connector Host, select Start.
Enter run and enter services.msc in the box.
In the Services list, ensure that Microsoft ECMA2Host is present and running. If not, select Start.
If you are connecting to a new database or one that is empty and has no users, then continue at the next section. Otherwise, follow these steps to confirm that the connector has identified existing users from the database.
- If you have recently started the service, and have many user objects in the database, then wait several minutes for the connector to establish a connection with the database.
8. Configure the application connection in the Azure portal
Return to the web browser window where you were configuring the application provisioning.
Note
If the window had timed out, then you will need to re-select the agent.
- Sign in to the Azure portal.
- Go to Enterprise applications and the On-premises ECMA app application.
- Select on Provisioning.
- If Get started appears, then change the mode to Automatic, on the On-Premises Connectivity section, select the agent that you deployed and select Assign Agent(s). Otherwise go to Edit Provisioning.
Under the Admin credentials section, enter the following URL. Replace the
{connectorName}portion with the name of the connector on the ECMA connector host, such as SQL. The connector name is case sensitive and should be the same case as was configured in the wizard. You can also replacelocalhostwith your machine hostname.Property Value Tenant URL https://localhost:8585/ecma2host_{connectorName}/scimEnter the Secret Token value that you defined when you created the connector.
Note
If you just assigned the agent to the application, please wait 10 minutes for the registration to complete. The connectivity test won't work until the registration completes. Forcing the agent registration to complete by restarting the provisioning agent on your server can speed up the registration process. Go to your server, search for services in the Windows search bar, identify the Microsoft Entra Connect Provisioning Agent Service, right-click the service, and restart.
Select Test Connection, and wait one minute.
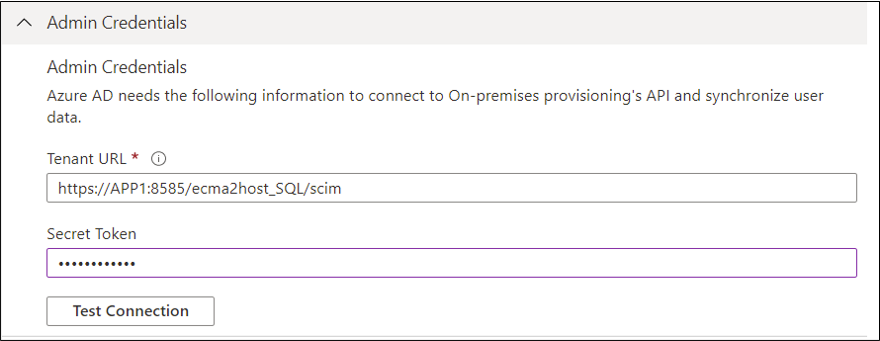
After the connection test is successful and indicates that the supplied credentials are authorized to enable provisioning, select Save.

9. Configure attribute mappings
Now you need to map attributes between the representation of the user in Microsoft Entra ID and the representation of a user in the on-premises application's SQL database.
You'll use the Azure portal to configure the mapping between the Microsoft Entra user's attributes and the attributes that you previously selected in the ECMA Host configuration wizard.
Ensure that the Microsoft Entra schema includes the attributes that are required by the database. If the database requires users to have an attribute, such as
uidNumber, and that attribute is not already part of your Microsoft Entra schema for a user, then you will need to use the directory extension feature to add that attribute as an extension.In the Microsoft Entra admin center, under Enterprise applications, select the On-premises ECMA app application, and then the Provisioning page.
Select Edit provisioning, and wait 10 seconds.
Expand Mappings and select the Provision Microsoft Entra ID Users mapping. If this is the first time you've configured the attribute mappings for this application, this will be the only mapping present, for a placeholder.
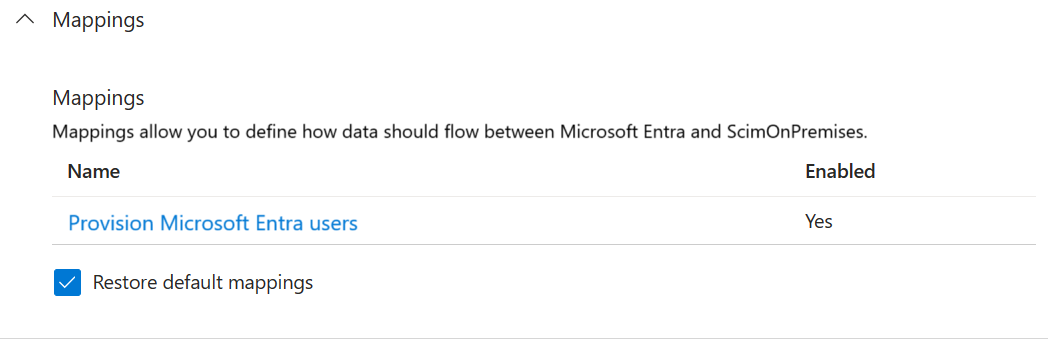
To confirm that the schema of the database is available in Microsoft Entra ID, select the Show advanced options checkbox and select Edit attribute list for ScimOnPremises. Ensure that all the attributes selected in the configuration wizard are listed. If not, then wait several minutes for the schema to refresh, and then reload the page. Once you see the attributes listed, close the page to return to the mappings list.
Now, click on the userPrincipalName PLACEHOLDER mapping. This mapping is added by default when you first configure on-premises provisioning.
 Change the attribute's values to match the following:
| Mapping type | Source attribute | Target attribute |
|---|---|---|
| Direct | userPrincipalName | urn:ietf:params:scim:schemas:extension:ECMA2Host:2.0:User:ContosoLogin |
Now select Add New Mapping, and repeat the next step for each mapping.
Specify the source and target attributes for each of the mappings in the following table.
Mapping type Source attribute Target attribute Direct userPrincipalName urn:ietf:params:scim:schemas:extension:ECMA2Host:2.0:User:ContosoLogin Direct objectId urn:ietf:params:scim:schemas:extension:ECMA2Host:2.0:User:AzureID Direct mail urn:ietf:params:scim:schemas:extension:ECMA2Host:2.0:User:Email Direct givenName urn:ietf:params:scim:schemas:extension:ECMA2Host:2.0:User:FirstName Direct surname urn:ietf:params:scim:schemas:extension:ECMA2Host:2.0:User:LastName Direct mailNickname urn:ietf:params:scim:schemas:extension:ECMA2Host:2.0:User:textID Once all of the mappings have been added, select Save.
10. Assign users to an application
Now that you have the Microsoft Entra ECMA Connector Host talking with Microsoft Entra ID, and the attribute mapping configured, you can move on to configuring who's in scope for provisioning.
Important
If you were signed in using a Hybrid Identity Administrator role, you need to sign-out and sign-in with an account that has the at least the Application Administrator role for this section. The Hybrid Identity Administrator role doesn't have permissions to assign users to applications.
If there are existing users in the SQL database, then you should create application role assignments for those existing users. To learn more about how to create application role assignments in bulk, see governing an application's existing users in Microsoft Entra ID.
Otherwise, if there are no current users of the application, then select a test user from Microsoft Entra who will be provisioned to the application.
Ensure that the user has all the properties that will be mapped to the required attributes of the database schema.
In the Azure portal, select Enterprise applications.
Select the On-premises ECMA app application.
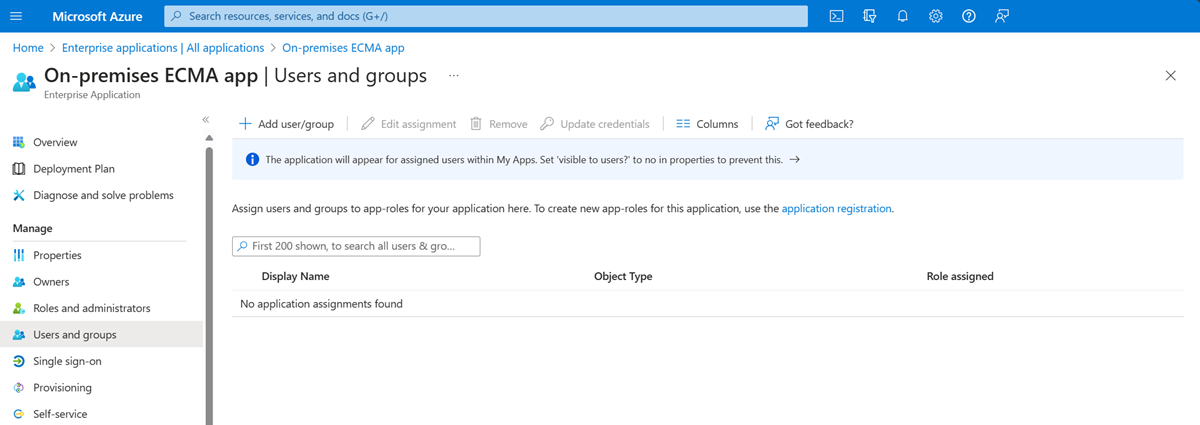
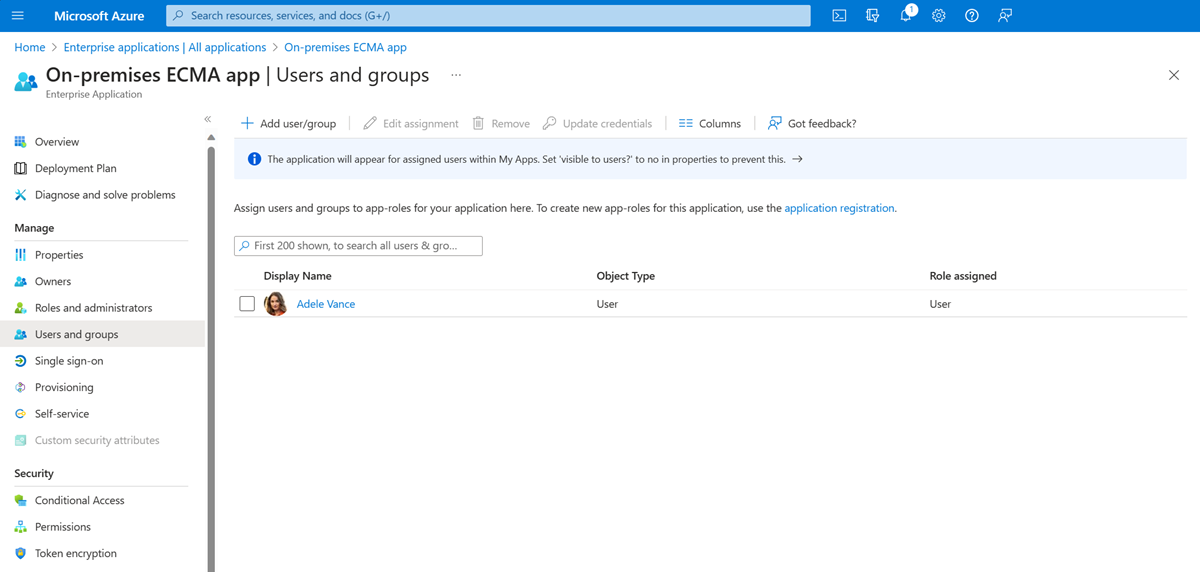
On the left, under Manage, select Users and groups.
Select Add user/group.
Under Users, select None Selected.
Select users from the right and select the Select button.
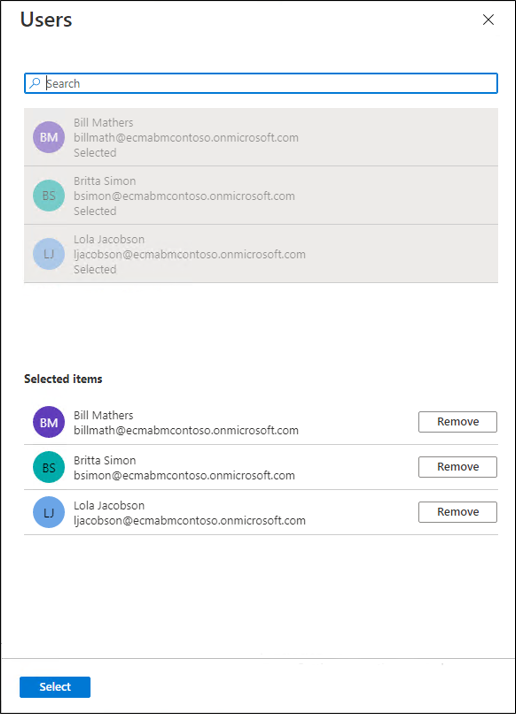
Now select Assign.
11. Test provisioning
Now that your attributes are mapped and users are assigned, you can test on-demand provisioning with one of your users.
In the Azure portal, select Enterprise applications.
Select the On-premises ECMA app application.
On the left, select Provisioning.
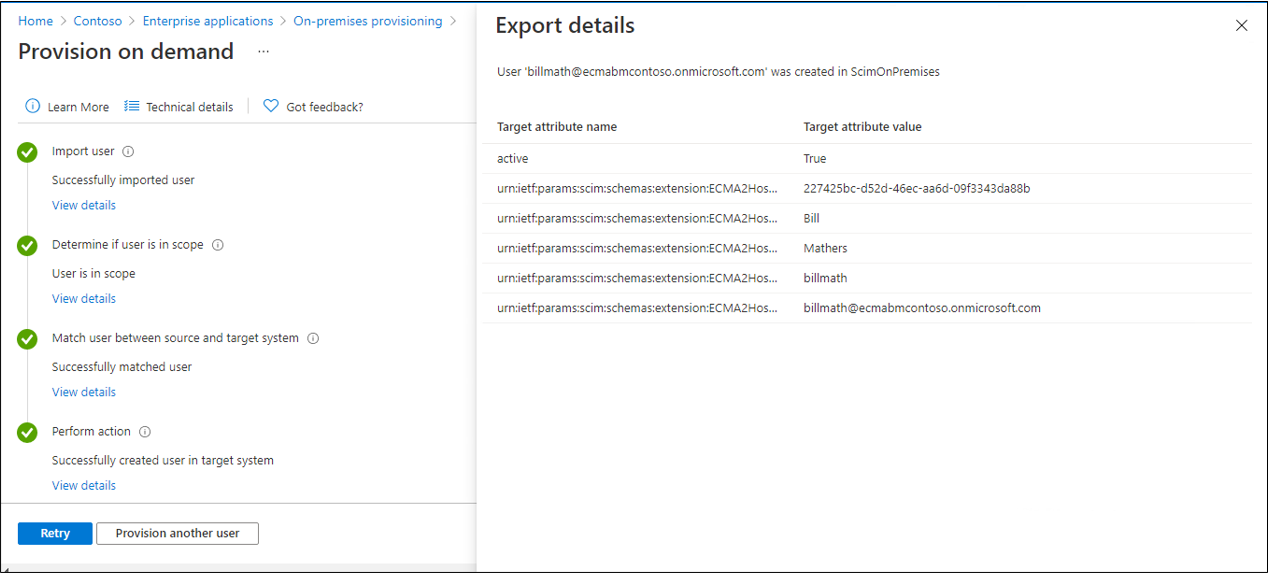
Select Provision on demand.
Search for one of your test users, and select Provision.
After several seconds, then the message Successfully created user in target system will appear, with a list of the user attributes.
12. Start provisioning users
After on-demand provisioning is successful, change back to the provisioning configuration page. Ensure that the scope is set to only assigned users and groups, turn provisioning On, and select Save.
Wait several minutes for provisioning to start. It might take up to 40 minutes. After the provisioning job has been completed, as described in the next section, if you're done testing, you can change the provisioning status to Off, and select Save. This action stops the provisioning service from running in the future.
Troubleshooting provisioning errors
If an error is shown, then select View provisioning logs. Look in the log for a row in which the Status is Failure, and select on that row.
If the error message is Failed to create User, then check the attributes that are shown against the requirements of the database schema.
For more information, change to the Troubleshooting & Recommendations tab. If the ODBC driver returned a message, it could be displayed here. For example, the message ERROR [23000] [Microsoft][ODBC SQL Server Driver][SQL Server]Cannot insert the value NULL into column 'FirstName', table 'CONTOSO.dbo.Employees'; column does not allow nulls. is an error from the ODBC driver. In this case, the column does not allow nulls might indicate that the FirstName column in the database is mandatory but the user being provisioned didn't have a givenName attribute, so the user couldn't be provisioned.
Check that users were successfully provisioned
After waiting, check the SQL database to ensure users are being provisioned.
Appendix A
If you're using SQL Server, you can use the following SQL script to create the sample database.
---Creating the Database---------
Create Database CONTOSO
Go
-------Using the Database-----------
Use [CONTOSO]
Go
-------------------------------------

/****** Object:  Table [dbo].[Employees]    Script Date: 1/6/2020 7:18:19 PM ******/
SET ANSI_NULLS ON
GO

SET QUOTED_IDENTIFIER ON
GO

CREATE TABLE [dbo].[Employees](
	[ContosoLogin] [nvarchar](128) NULL,
	[FirstName] [nvarchar](50) NOT NULL,
	[LastName] [nvarchar](50) NOT NULL,
	[Email] [nvarchar](128) NULL,
	[InternalGUID] [uniqueidentifier] NULL,
	[AzureID] [uniqueidentifier] NULL,
	[textID] [nvarchar](128) NULL
) ON [PRIMARY]
GO

ALTER TABLE [dbo].[Employees] ADD  CONSTRAINT [DF_Employees_InternalGUID]  DEFAULT (newid()) FOR [InternalGUID]
GO
