IoT Project for Anyone – Windows 10 IoT Core Installation
IoT Project for Anyone Blog Series:
This is one of a series of blogs developed as part of an overall IoT implementation project for beginners. The project will walk through the hardware needed, operating system installation, data collection and a Power BI dashboard to view the data. These blogs can be reviewed in sequence as part of the overall project or on their own if looking for information on a particular IoT topic.
Project Blog Index:
IoT for Anyone - Materials and Connections
IoT for Anyone - Windows 10 IoT Core Operating System Installation (this blog)
IoT for Anyone - Raspbian Operating System Installation
IoT for Anyone - Power BI Streaming Dataset Setup
IoT for Anyone - Collecting and Streaming Data from Windows 10 IoT (coming soon)
IoT for Anyone - Collecting and Streaming Data from Raspbian Operating System
IoT for Anyone - Designing IoT Microsoft Power BI Dashboard
Introduction:
This blog will walk through the installation process of Windows 10 IoT Core on a MicroSD card. The initial installation will be done on a desktop or laptop running Microsoft Windows. The MicroSD card with the operating system installed will then be inserted into the Raspberry Pi and booted. Where needed, I have inserted screen captures for additional explanation of the steps.
Windows IoT Operating System Installation:
The site www.windowsondevices.com will always have the latest information for running Windows 10 IoT.
Windows 10 IoT Core Installation procedure:
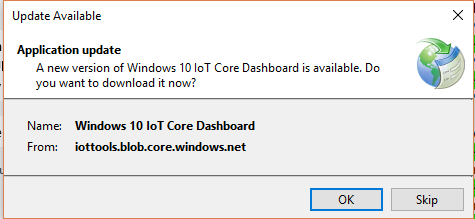
Download and install the Windows 10 IoT Dashboard program from the link below. There is no customization needed for the installation.
The Windows 10 IoT Dashboard initial download will be the latest version. However, when launching the dashboard in the future it will always check for newer versions. If a new update is found, be sure to install it.
Launch the Windows IoT Dashboard. If prompted with a Windows Firewall prompt, be sure to enable the domain and private network options for your lab testing.

- Within the IoT Dashboard, on the left click the option to "Set up a new device."
- The options are very straight forward in the dashboard. Below are a few setup tips:
- When the MicroSD card is inserted, it will appear in the Drive area with a drive letter.
- Enter and confirm the Administrator password
- De-select the Wi-Fi Network Connection. To keep your setup simple at first, used a wired ethernet connection. A Wi-Fi profile may be setup at a later time from within Windows 10 IoT.
- The default computer name is "minwinpc" that can be used or changed. Make note of the computer name because it is needed for logon.

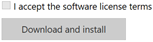
In the lower right, check the option to accept the software licensing terms. Then click Download and Install to begin the installation. The installation of Windows 10 IoT core will take about five minutes to complete.
Once the installation is complete, a successful notice will appear with instructions to insert the MicroSD card into the IoT device to continue.
Windows 10 IoT Core First Boot:
Do not power on the Raspberry Pi 3 until instructed.
With the MicroSD card now flashed with Windows 10 IoT Core, insert it into the hard drive slot on the bottom of the Raspberry Pi 3. The card label will be facing down, away from the Raspberry Pi 3 board.
Plug in an ethernet connection to the Raspberry Pi 3.
Optionally, plug in an HDMI connected monitor and a USB keyboard and mouse to the Raspberry Pi 3.
Note: A monitor, USB keyboard and mouse are not needed for operation. Not using this equipment is called a headless IoT board. We can remotely control everything from the Windows 10 IoT Dashboard once it is operational. Initially, you may want to use a monitor to view the boot process.
With the hardware now ready, insert the power cable that came with your Raspberry Pi 3.
The Raspberry Pi with a Class 10 MicroSD card will take about four minutes to boot the first time while it installs drivers for the new environment. Sequential boots will take one minute. During the boot, you will periodically see the hard drive activity light flashing.
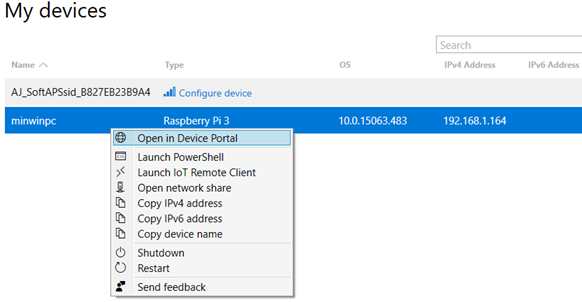
With the Windows IoT Dashboard open, click on the My Devices option on the left. Once the Raspberry Pi boot completes, it will be listed in the My Devices area for more management. We can then begin to manage and customize the new IoT environment.
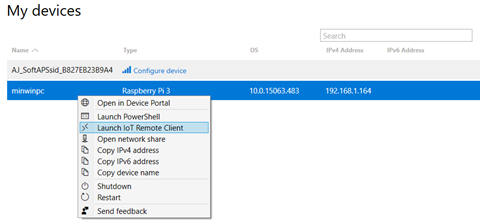
Once your new Windows 10 IoT Raspberry Pi 3 appears in the My Devices area, right click on it and choose to "Open in Device Portal."
Note: You may notice your Raspberry Pi appears twice under My Devices (see picture below). Once with the ethernet connection and once with the Wi-Fi option. Even though you de-selected the Wi-Fi option during the initial build, it may still be listed. Use only the ethernet connection for now.
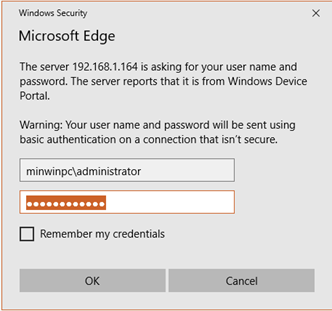
On the connection page that now appears in your web browser, enter the username and password.
Note: The default username is administrator. To logon, it must be entered along with the IoT Device Name that you specified when building the operating system parameters. The default name (if you kept it) is minwinpc. Below is the format that must be used for the logon.
At this point, you should now be successfully logged into Windows 10 IoT on your Raspberry Pi. Explore all of the many options available. Congratulations!
Some items you may want to adjust as you learn your way around the interface are:
- TimeZone
- Apply Windows 10 IoT Core updates
- Enable Windows IoT Remote Server
- Change the device name
- Change the password
- There is also a tutorial within the interface.
Setting up the Windows IoT Remote Control Console:
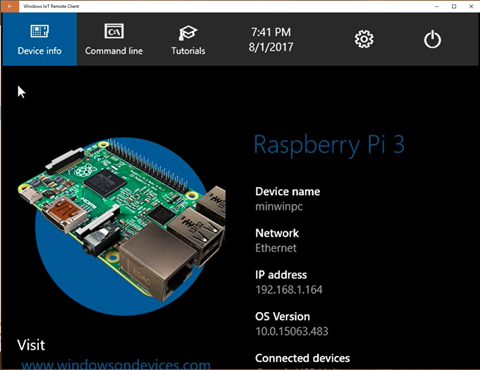
You may have already connected an HDMI cable to display the output of the new Windows 10 IoT operating system on your Raspberry Pi 3. Instead of a direct connection, Windows 10 IoT core can display its console by using a free application called "Windows IoT Remote Client." This application is available in the Windows 10 Store. Below are installation and usage instructions, along with a troubleshooting step.
Install the Windows IoT Remote Client
- Open the Windows store on your desktop/laptop. Or enter "Windows Store" on the Cortana search option.
- In the Windows Store, locate the application and select the Install option (my screen shows installed already below).

- Launch the new application.
Enable the Windows IoT Remote Server:
On the Windows 10 IoT Core operating system, there is an option to enable the Windows IoT Remote Server. This is disabled by default. Follow the steps below to enable this feature.
- Using the steps above, logon to the web interface of the Raspberry Pi running Windows 10 IoT Core.
- On the left option menu, scroll to the bottom and select the "Remote" option.
- In the Remote area, the Windows IoT Remote Server is shown. Select the checkbox to "Enable Windows IoT Remote Server."
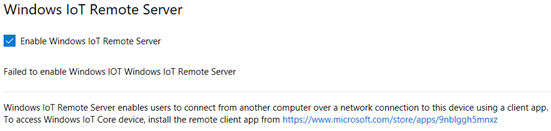
- If you receive the error below when enabling this feature, see the troubleshooting section at the end of this blog. The site says… Failed to enable Windows IoT Remote Server. Don't let this page create more messages.

Connect to Windows IoT using the Windows IoT Remote Client:
With the Windows IoT Remote Client now installed and the Windows IoT Remote Server now enabled, you will be able to remotely access the display on your Windows 10 IoT device (Raspberry Pi or other device). Follow the steps below to make the connection.
- In the Windows IoT Remote Client, click on the drop down box labeled "Select a discovered device." Your device should be listed here. If not, enter the IP address in the optional field. Do not have both fields populated.

- Click Connect and within a few seconds the screen being actively displayed on your Windows IoT device will be seen.
- Alternatively, from the Windows IoT Dashboard, you can right click on your device and select to Launch IoT Remote Client. This will then launch the Windows IoT Remote Client and enable the remote display.
Troubleshoot Windows IoT Remote Server:
While logged into the Windows Device Portal to your Raspberry Pi 3 (or other device), you may receive an error when selecting the option to "Enable Windows IoT Remote Server." The error received is below:

It is unknown what causes this error, but there is a work around to enable this function. Follow the steps below to use PowerShell to create, schedule, and enter a command to start the Windows IoT Remote Server:
With the Windows IoT Dashboard open, click on the My Devices option on the left. Locate your Raspberry Pi or other IoT unit running Windows 10 IoT core in the list.
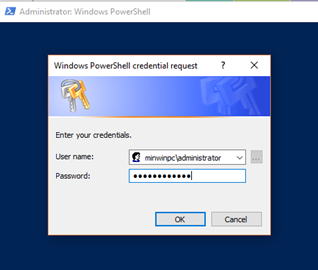
Once your new Windows 10 IoT device appears in the My Devices area, right click on it and choose to "Launch PowerShell"
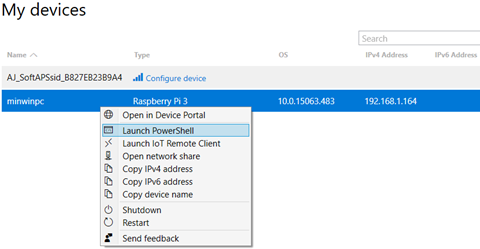
When the PowerShell window appears, logon using the credentials minwinpc\administrator and the password you defined when building the systems. Minwinpc is the default pc name and needs replaced if you have defined a different system name.
Within the PowerShell window, enter:
schtasks.exe /create /sc onstart /tn \microsoft\windows\nanordp\start /tr %systemroot%\\system32\\nanordpserver.exe /ru defaultaccount /F

Within the same PowerShell window, enter:
schtasks.exe /run /tn \microsoft\windows\nanordp\start

Back in the Windows Device Portal site, verify that the Enable Windows IoT Remote Server option is now checked. Also verify below this option that it says "Windows IoT Remote Server is enabled at boot and currently running."

The Windows IoT remote console capabilities should now be accessible from the Windows IoT Remote Client. Use this portal, as well as the remote PowerShell and Windows Device Portal site to administer the Windows 10 IoT device.