Adding a native boot VHD to Windows 7 – Part 3
At this point, you have a native boot VHD created from Part 1 and the OS image applied from Part 2. Next, you need to add the VHD to the boot menu so you can boot to it.
Add the VHD to the Boot Menu
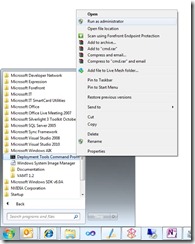
1. Click Start >> All Programs >> Microsoft Windows AIK >> Deployment Tools Command Prompt , right-click and select Run as Administrator to launch a Command Prompt that has access to all the AIK tools with elevated privileges.
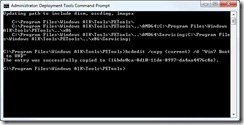
2. Type the following command to create a copy of the host OS boot entry for the VHD and give it a description that you’ll recognize in the boot menu:
bcdedit /copy {current} /d "Win7 Boot to VHD"
The command will return a GUID that you’ll use in the next few commands.
3. Use Edit >> Mark and Edit >> Copy to copy the GUID so it’s easy to insert into the remaining commands.
In the example below, the GUID that represents the boot entry of the VHD is {16bde0ca-8d10-11de-8997-da4aa4476c8e}.
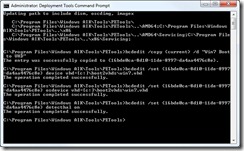
4. Type the following commands to add the device and osdevice boot entry options to point to the VHD and to direct the loader to detect the right HAL to load upon first boot:
bcdedit /set {16bde0ca-8d10-11de-8997
-da4aa4476c8e} device vhd=[c:]\boot2vhds\win7.vhd
bcdedit /set {16bde0ca-8d10-11de-8997
-da4aa4476c8e} osdevice vhd=[c:]\boot2vhds\win7.vhd
bcdedit /set {16bde0ca-8d10-11de-8997
-da4aa4476c8e} detecthal on
The results for this example look like the following:
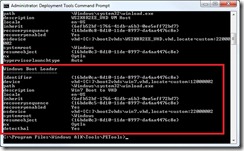
5. Confirm your entry to the boot loader by typing the following command to list all the entries:
bcdedit /v
You can find the entry based on the GUID and description we used when creating the boot loader entries. The results in our example are below:
6. Copy the VHD file to another drive and add a readme.txt file that describes the build and the current state of the VHD so you always have a pristine VHD backed up. When you need to “roll back”, just copy the file VHD and overwrite the old file.
7. Reboot your machine.
8. When prompted for what OS to boot to, select the VHD you created by identifying it by the description (in our case “Win7 Boot to VHD”).
9. On first boot, you see messages as the OS is configured for the first time.
With native boot to VHD, you can create VHDs for different OS workloads (such as having a server to run Hyper-V on your computer) or to run pre-release bits without destabilizing your work environment.
For more, check out the following resources:
Understanding Virtual Hard Disks with Native Boot – New to native booting to a VHD? This provides a quick explanation.
Deploy Windows by Using Windows Setup – You can build a virtual machine in Hyper-V and use the VHD for direct boot.
Capture Images of Hard Disk Partitions by Using ImageX – Optionally, if you have a base image, you can capture it and install it to a VHD.
Deploy Windows on a Virtual Hard Disk with Native Boot – This is the process to configure the VHD for direct boot.
Hope it helps!
Thanks,
Chris
Comments
- Anonymous
September 05, 2012
I've tried your tutorial up to this point. However, I recieve this error when i set the vhd device value: An error has occurred setting the element data. The request is not supported. What should I do?


