Tutorial: Migrate from Azure Database for PostgreSQL - Single Server to Flexible Server with the migration service
APPLIES TO:  Azure Database for PostgreSQL - Flexible Server
Using the Azure portal, you can migrate an instance of Azure Database for PostgreSQL – Single Server to Azure Database for PostgreSQL – Flexible Server. In this tutorial, we perform migration of a sample database from an Azure Database for PostgreSQL single server to a PostgreSQL flexible server using the Azure portal.
- Configure your Azure Database for PostgreSQL Flexible Server
- Configure the migration task
- Monitor the migration
- Cancel the migration
- Post migration
You can migrate using the Azure portal.
Prerequisites (offline)
Before you start your migration with migration service in Azure Database for PostgreSQL, you must fulfill the following prerequisites, which apply to offline migration scenarios.
Verify the source version
Source PostgreSQL version should be >= 9.5. If the source PostgreSQL version is less than 9.5, upgrade the source PostgreSQL version to 9.5 or higher before migration.
Target setup
Azure Database for PostgreSQL flexible server must be deployed and properly configured in Azure before you begin the migration process.
The SKU chosen for the Azure Database for PostgreSQL should correspond with the specifications of the source database to ensure compatibility and adequate performance.
For detailed instructions on creating a new Azure Database for PostgreSQL, refer to the following link: Quickstart: Create server.
Network setup
Network setup is crucial for the migration service to function correctly. Ensure that the source PostgreSQL server can communicate with the target Azure Database for PostgreSQL server. The following network configurations are essential for a successful migration.
For information about network setup, visit Network guide for migration service.
Enable extensions
To ensure a successful migration with the migration service in Azure Database for PostgreSQL, you might need to verify extensions to your source PostgreSQL instance. Extensions provide additional functionality and features that might be required for your application. Make sure to verify the extensions on the source PostgreSQL instance before initiating the migration process.
Enable supported extensions identified in the source PostgreSQL instance on the target Azure Database for PostgreSQL flexible server.
For more information about extensions, visit Extensions in Azure Database for PostgreSQL.
Note
A restart is required when there are any changes to the shared_preload_libraries parameter.
Check the server parameters
These parameters aren't automatically migrated to the target environment and must be manually configured.
Match server parameter values from the source PostgreSQL database to the Azure Database for PostgreSQL by accessing the Server parameters section in the Azure portal and manually updating the values accordingly.
Save the parameter changes and, if necessary, restart the Azure Database for PostgreSQL flexible server to apply the new configuration.
Disable high availability (reliability) and read replicas in the target
Disabling high availability (reliability) and read replicas in the target environment is essential. These features should be enabled only after the migration has been completed.
By following these guidelines, you can help ensure a smooth migration process without the added variables introduced by high availability and read replicas. Once the migration is complete and the database is stable, you can proceed to enable these features to enhance the availability and scalability of your database environment in Azure.
Configure your Azure Database for PostgreSQL flexible server
Create the target flexible server. For guided steps, refer to the quickstart Create an Azure Database for PostgreSQL flexible server using the portal.
Allowlist extensions whose libraries must be loaded at server start. It's essential that the extension is on the allowlist before you initiate a migration.
Check if the data distribution among a database's tables is skewed, with most of the data present in a single (or few) tables. If it's skewed, the migration speed could be slower than expected. In this case, the migration speed can be increased by migrating the large table in parallel.
Configure the migration task
The migration service comes with a simple, wizard-based experience on the Azure portal. Here's how to start:
Open your web browser and go to the portal. To sign in, enter your credentials. The default view is your service dashboard.
Go to your Azure Database for PostgreSQL Flexible Server target.
In the Overview tab of the Flexible Server, on the left menu, scroll down to Migration and select it.
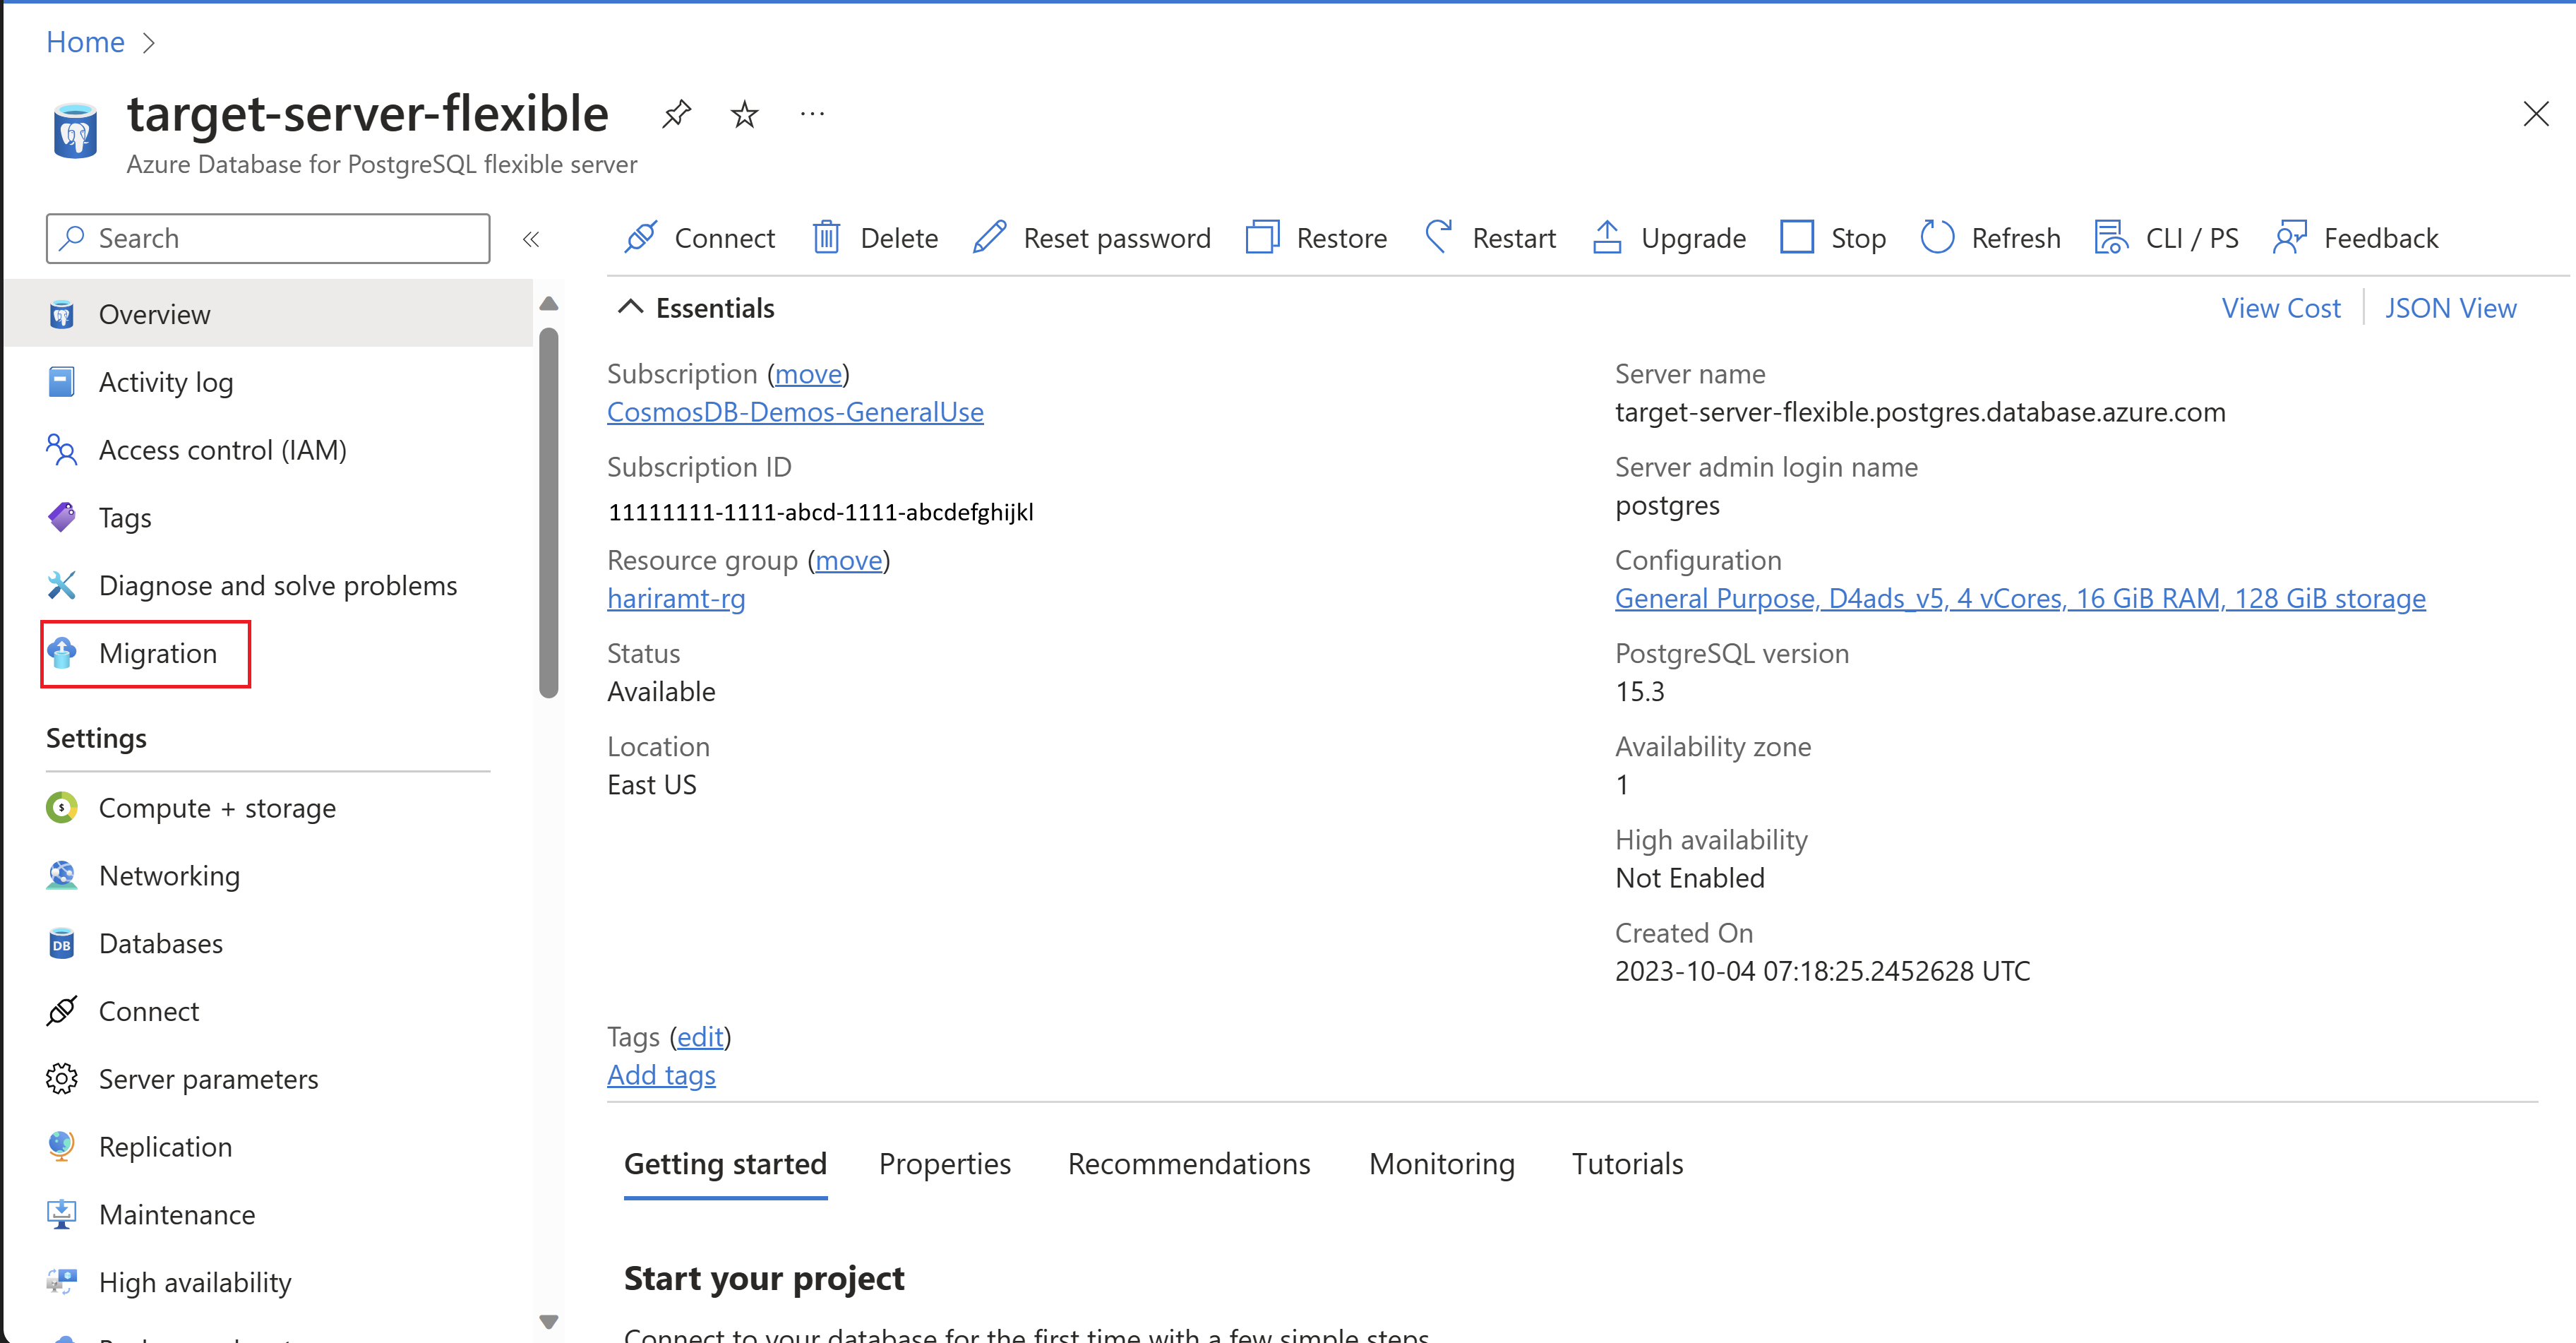
Select the Create button to start a migration from a single server to a flexible server. If this is your first time using the migration service, an empty grid appears with a prompt to begin your first migration.
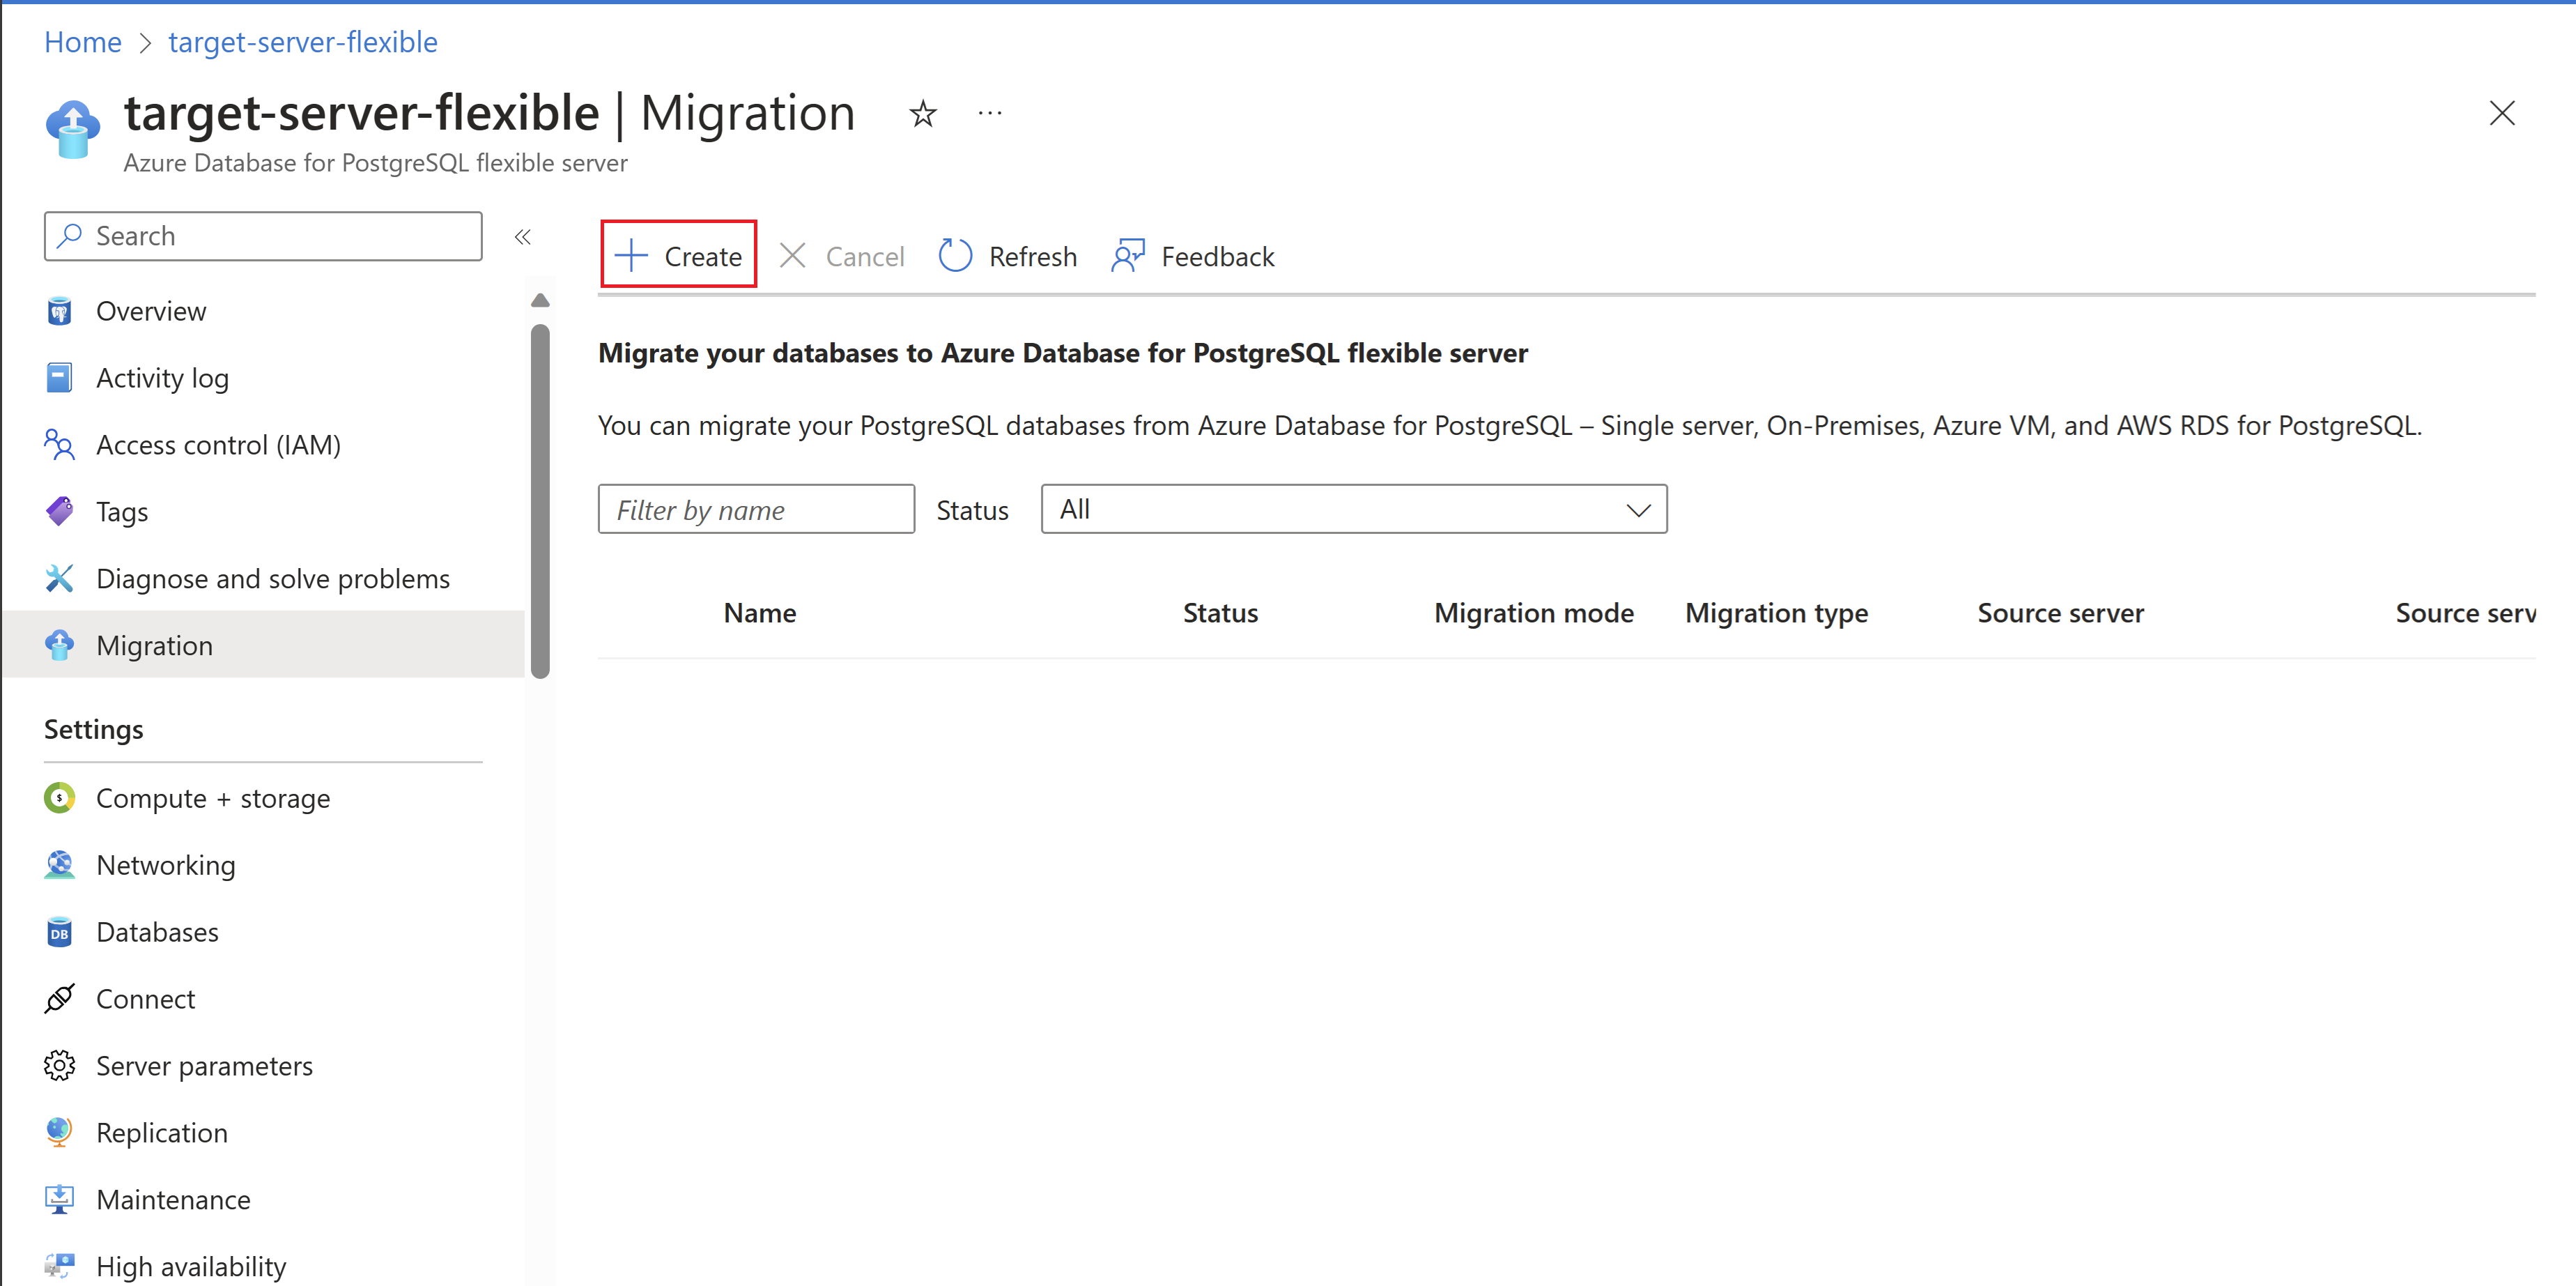
If you've already created migrations to your Flexible Server target, the grid contains information about migrations that were attempted to this target from the Single Server.
You go through a wizard-based series of tabs to create a migration into this Flexible Server target from different possible sources. By default, Source server type is set to Azure Database for PostgreSQL Single Server, which is the one we're interested in this scenario.


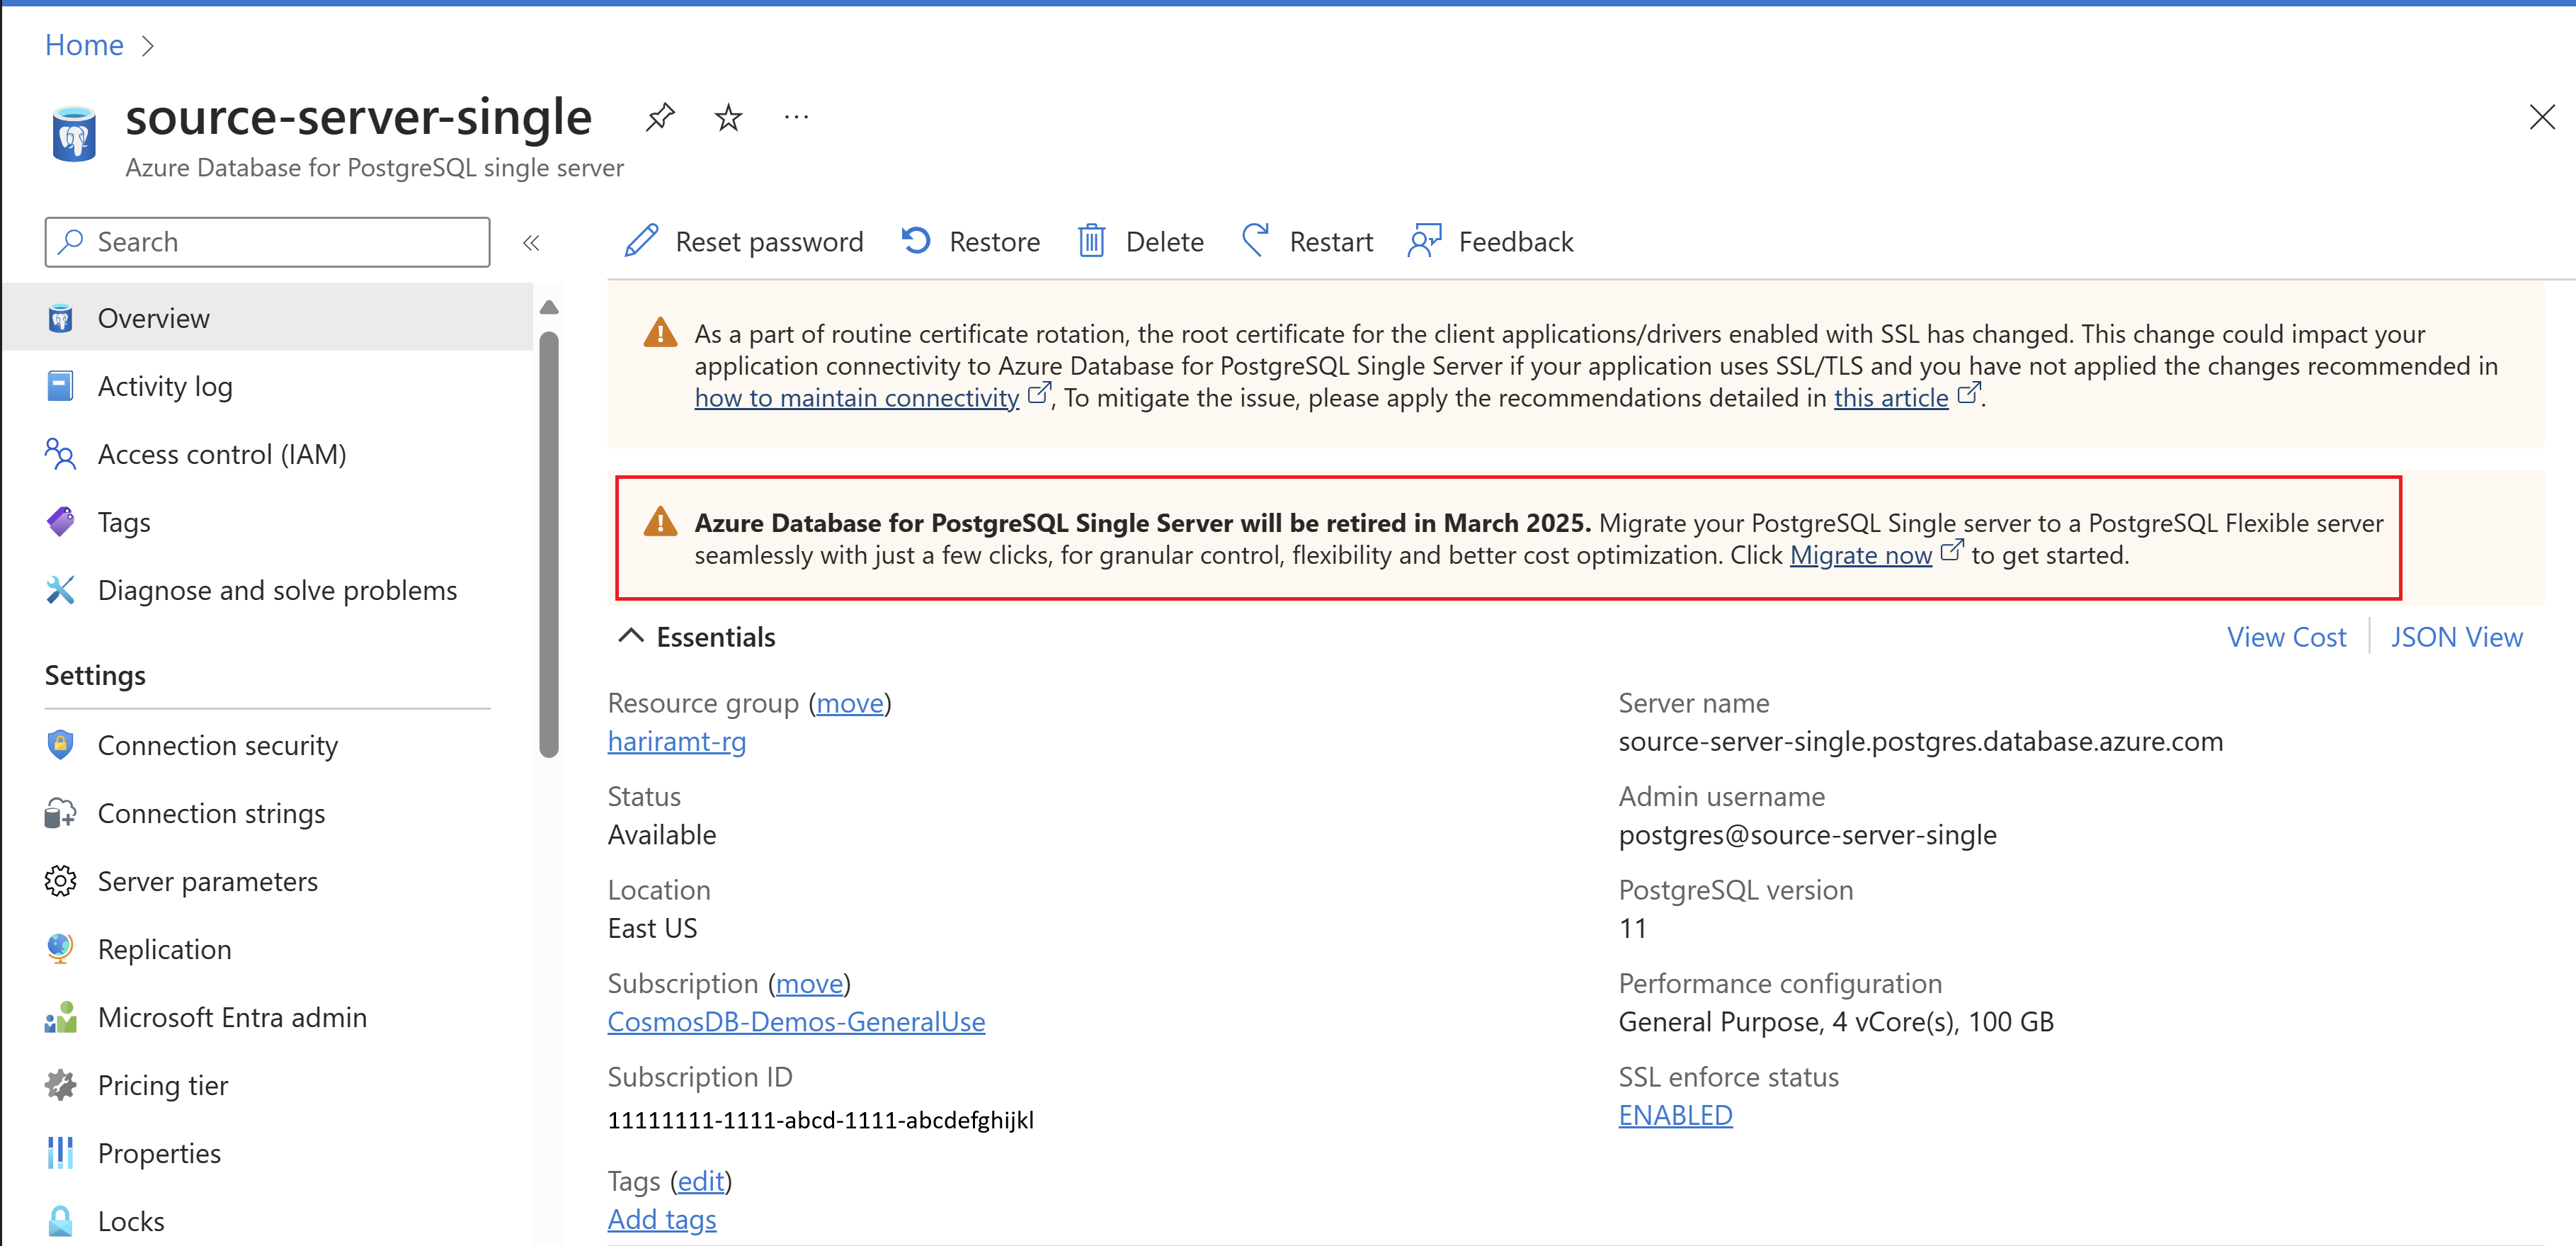
Alternatively, you can initiate the migration process from the Azure Database for PostgreSQL Single Server.
Open your web browser and go to the portal. To sign in, you must enter your credentials. The default view is your service dashboard.
Upon selecting the Single Server, you can observe a migration-related banner in the Overview tab. Select Migrate now to get started.
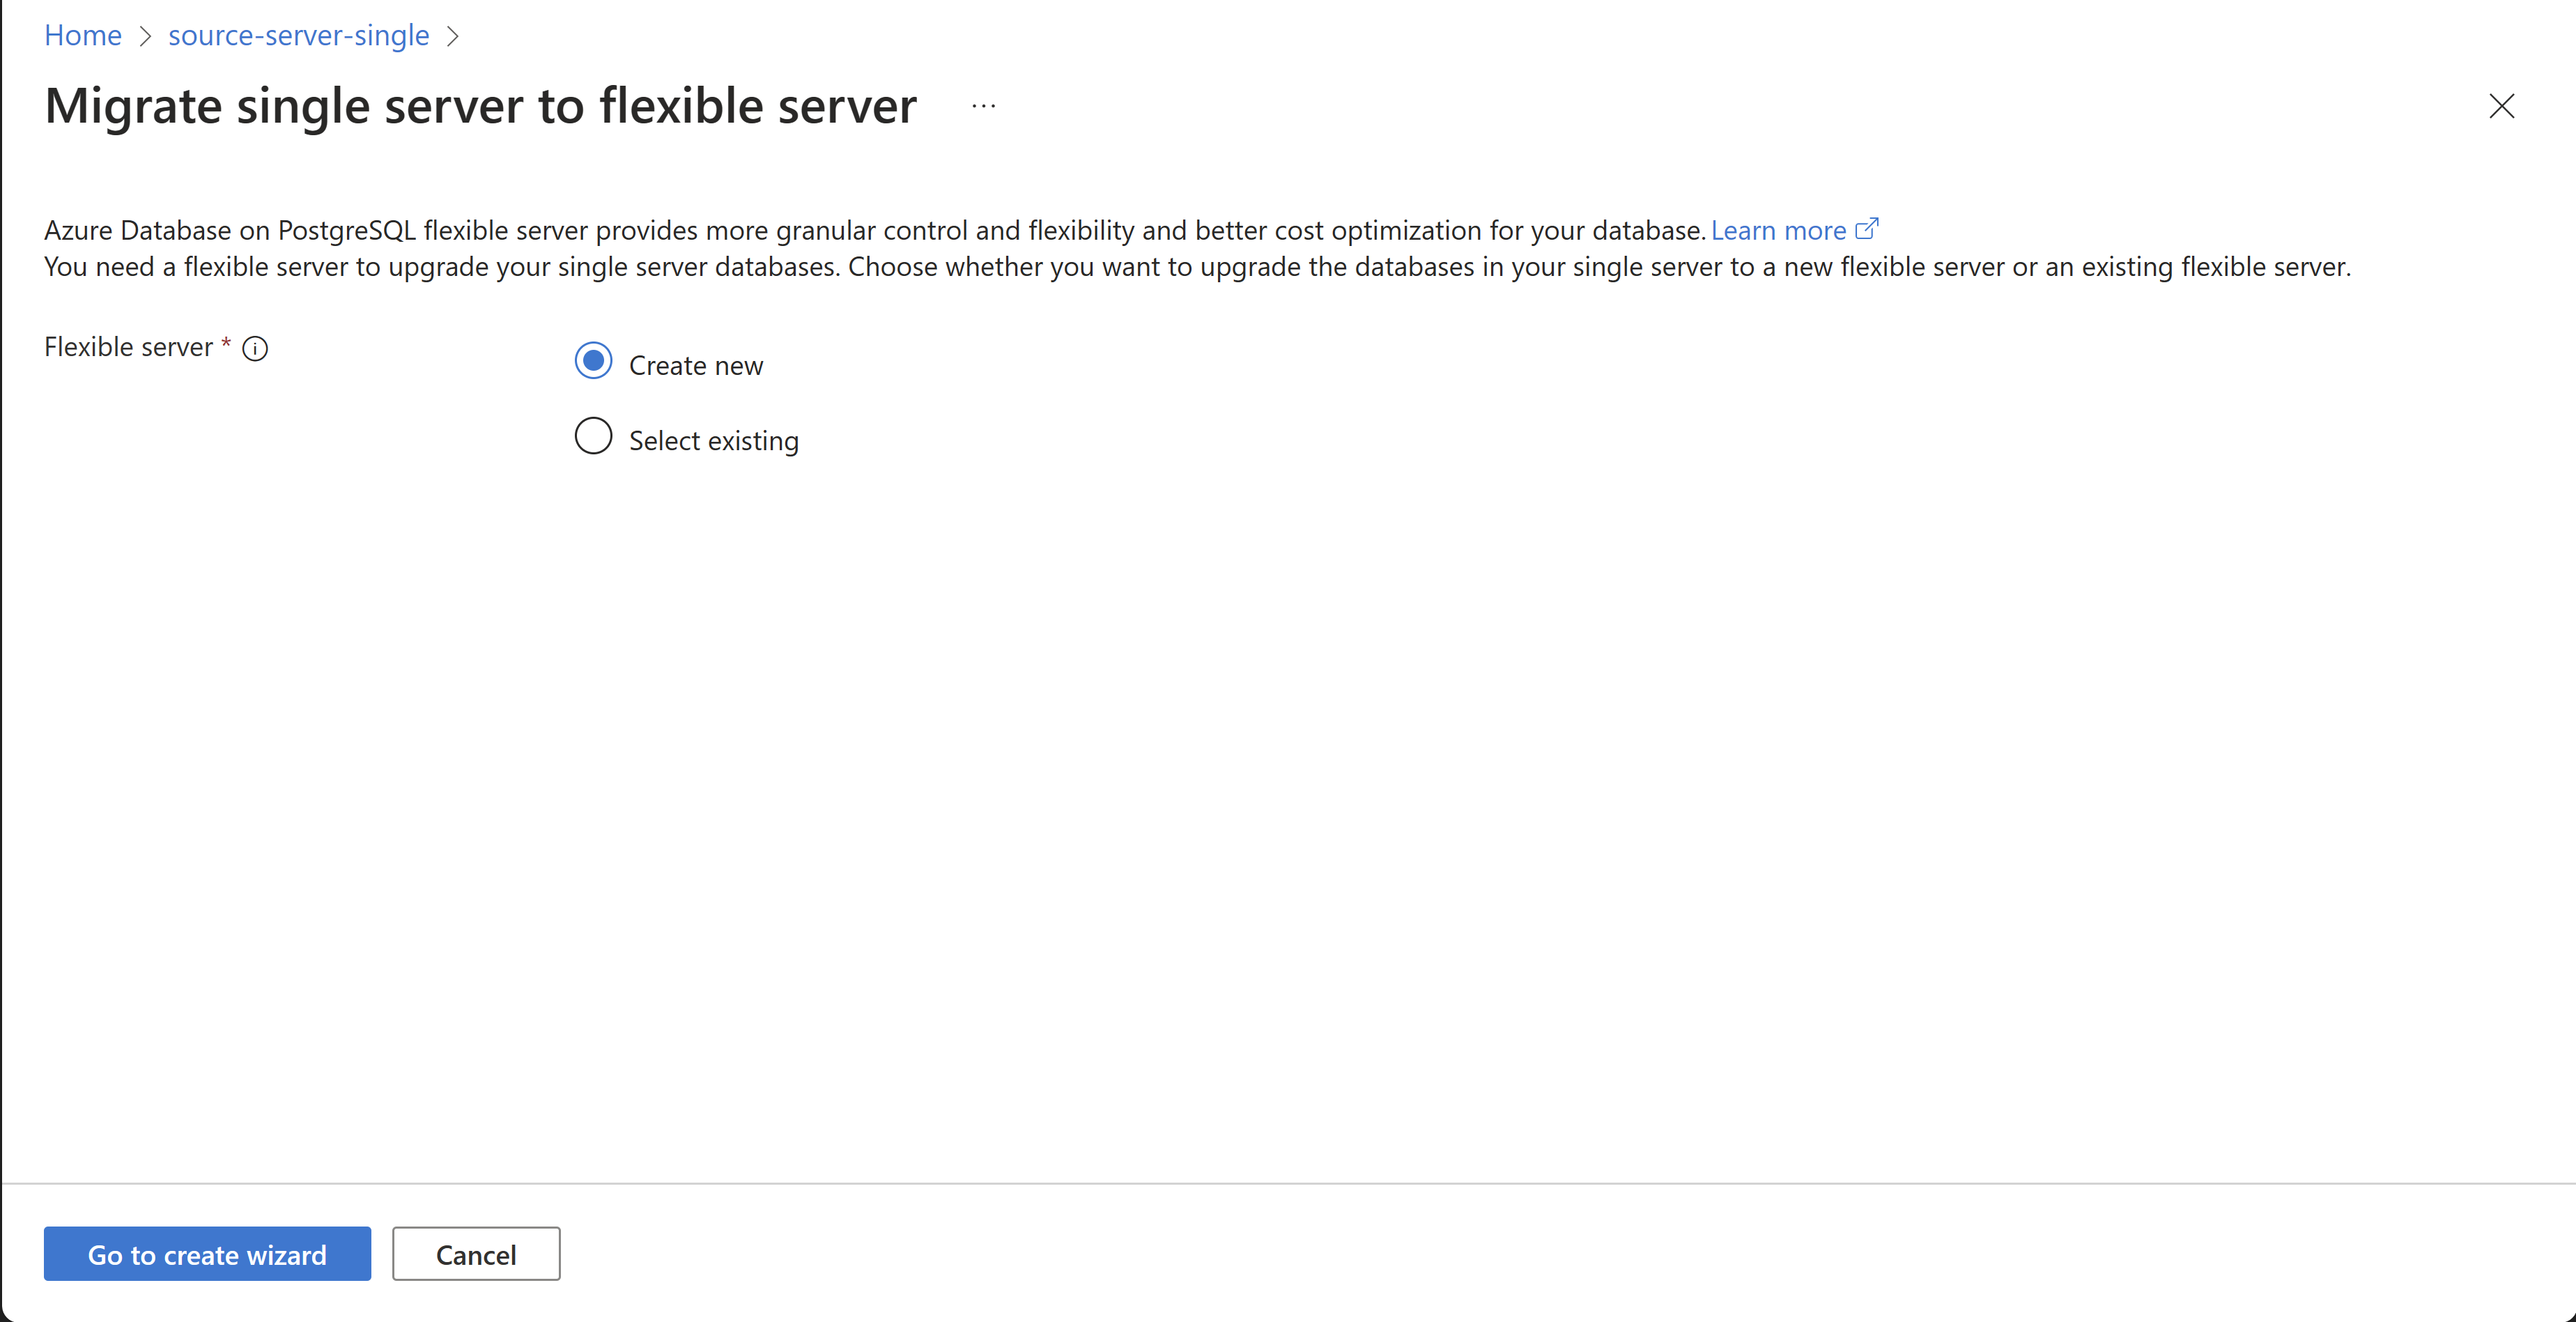
You're taken to a page with two options. If you've already created a Flexible Server and want to use that as the target, choose Select existing, and select the corresponding Subscription, Resource group, and Server name details. Once the selections are made, select Go to migration wizard and follow the instructions under the Setup section.
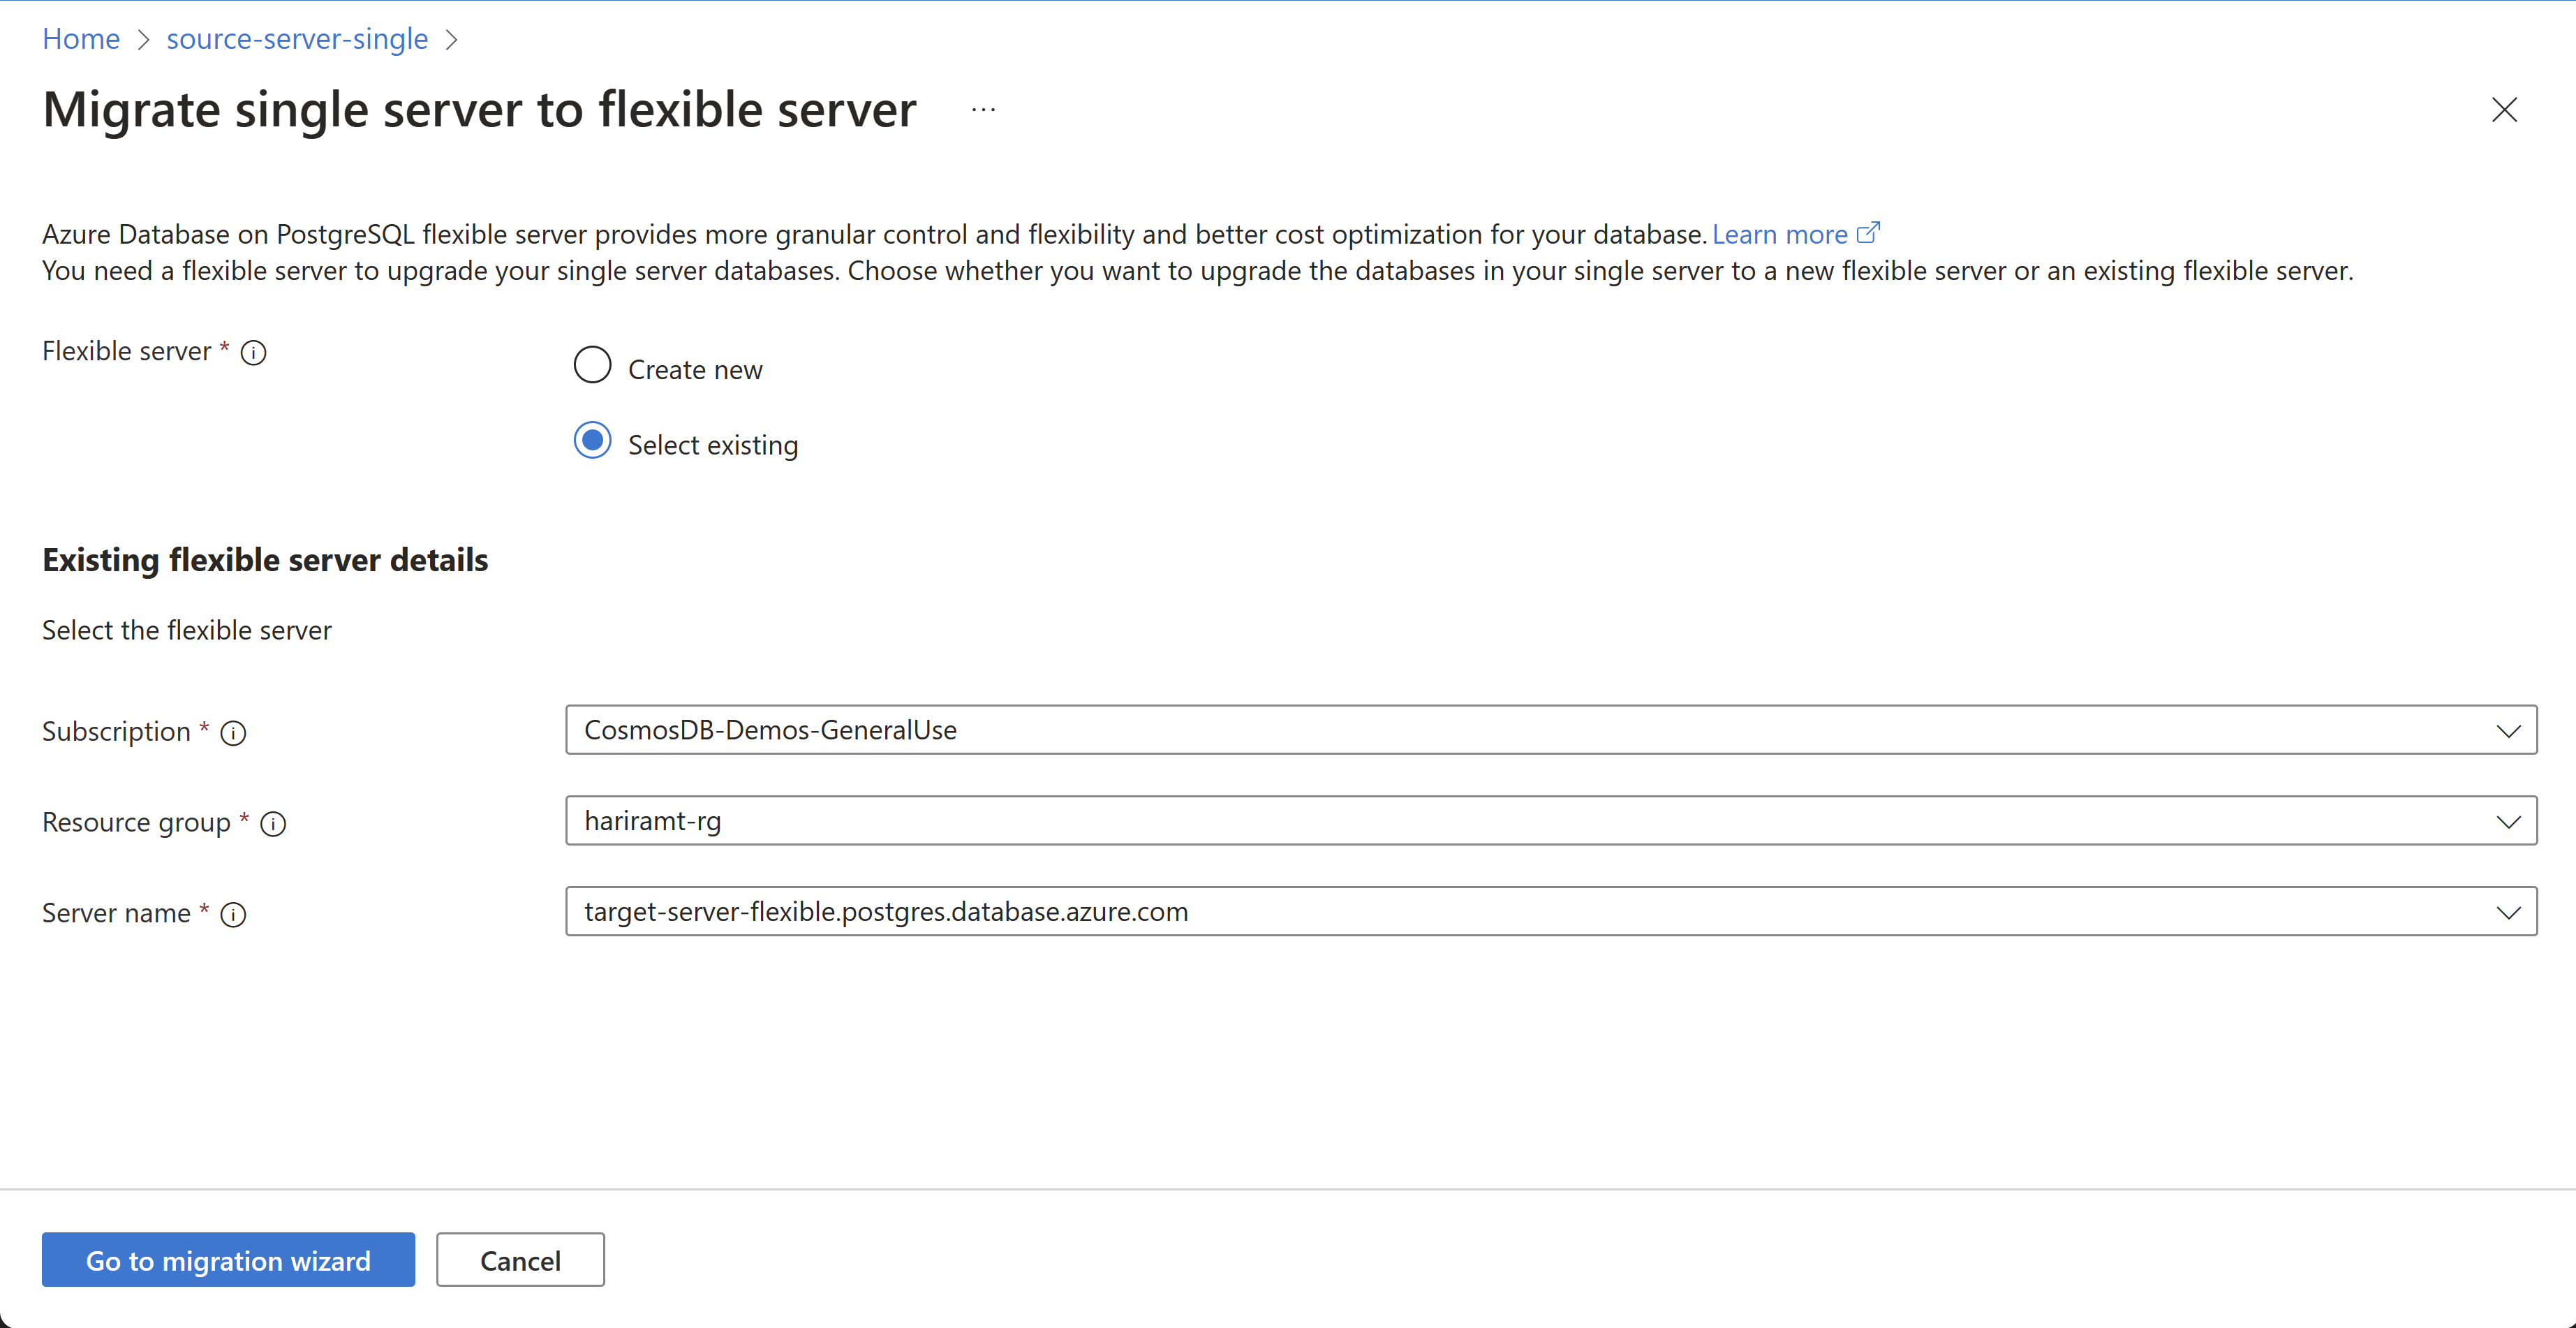
Should you choose to create a new Flexible Server, select Create new and select Go to create wizard. This action takes you through the Flexible Server creation process and deploys the Flexible Server.


After deploying the Flexible Server, follow the steps 3 to 5 under Configure the migration task.
Setup
The first tab is Setup. In case you missed it, allowlist necessary extensions as described in Configure your Azure Database for PostgreSQL flexible server, before you initiate a migration.

Migration name is the unique identifier for each migration to this Flexible Server target. This field accepts only alphanumeric characters and doesn't accept any special characters except for underscore (_) and hyphen (-). The name must start with an alphanumeric character. The name must also be unique for a target server, because no two migrations to the same Flexible Server target can have the same name.
Source server type indicates the source. In this case, it's Azure Database for PostgreSQL Single Server
Migration option allows you to perform validations before triggering a migration. You can pick any of the following options.
- Validate - Checks your server and database readiness for migration to the target.
- Migrate - Skips validations and starts migration.
- Validate and Migrate - Performs validation before triggering a migration. Migration gets triggered only if there are no validation failures.
It's always a good practice to choose Validate or Validate and Migrate option to perform premigration validations before running the migration.
Migration mode allows you to choose between an online and an offline migration, in this case it must be set to Offline.
Select the Next: Select Runtime Server button.
Runtime Server
The Migration Runtime Server is a specialized feature within the migration service in Azure Database for PostgreSQL, designed to act as an intermediary server during migration. It's a separate Azure Database for PostgreSQL - Flexible Server instance that isn't the target server but is used to facilitate the migration of databases from a source environment that is only accessible via a private network.
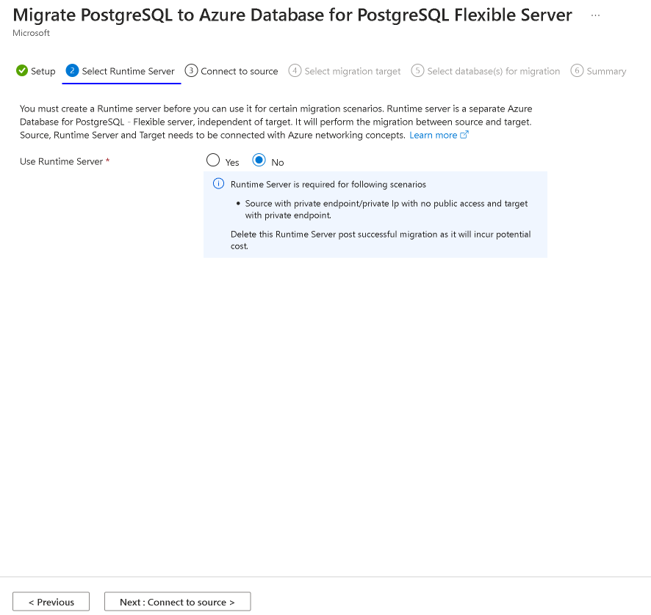
For more information about the Runtime Server, visit the Migration Runtime Server.
Select the Next: Connect to source button.
Connect to source
The Source section prompts you to give details related to the Single Server, which is the source of the databases.
After you make the Subscription and Resource Group selections, the dropdown list for server names shows Single Servers under that resource group across regions. Select the source that you want to migrate databases from. You can migrate databases from a Single Server to a target Flexible Server in the same region. Cross-region migrations are enabled only for India, China, and UAE servers.
After you choose the Single Server source, the Location, and PostgreSQL version boxes are populated automatically. Make sure you provide the credentials of an admin role, since that is required for the migration service to successfuly migrate the databases.
After filling out all the fields, select the Connect to source link. This validates that the source server details entered are correct and that the source server is reachable.

Select the Next: Select migration target button to continue.
Select migration target
The Select migration target section displays metadata for the Flexible Server target, such as Subscription, Resource group, Server name, Location, and PostgreSQL version.

Choose the appropriate values for Authentication method and all authentication related fields. Make sure that the identity provided is that of the administrator user in the target server. After filling all required information, select the Connect to target link. This validates that the target server details entered are correct and target server is reachable.
Select the Next: Select database(s) for migration button to select the databases to migrate.
Select database(s) for migration
Under this tab, there's a list of user databases inside the Single Server. You can select and migrate up to eight databases in a single migration attempt. If there are more than eight user databases, the migration process is repeated between the source and target servers for the next set of databases. Selected databases that exist on the target server with the exact same names are overwritten.

Select the Next: Summary button to review the details.
Summary
The Summary tab summarizes all the details for creating the validation or migration. Review the details and select the Start Validation and Migration button.

Monitor the migration portal
After you start the migration, a notification appears to say that the validation or migration creation is successful. You're redirected automatically to the Migration page of Flexible Server. This has a new entry for the recently created validation or migration.

The grid that displays the migrations has these columns: Name, Status, Migration mode, Migration type, Source server, Source server type, Databases, Start time and Duration. The entries are displayed in the descending order of the start time with the most recent entry on the top.
You can use the Refresh button to refresh the status of the validation or migration.
You can also select the name of one particular migration in the grid to see the associated details.
When the validation or migration is created, it moves to the InProgress state and PerformingPreRequisiteSteps substate. The workflow takes 2-3 minutes to set up the migration infrastructure and network connections.
Let us look at how to monitor migrations for each migration option.
Validate
After the PerformingPreRequisiteSteps substate is completed, the validation moves to the substate of Validation in Progress where checks are done on the source and target server to assess the readiness for migration.
The validation moves to the Succeeded state if all validations are either in Succeeded or Warning state.

The validation grid has the following information:
- Validation details for instance and Validation details for databases sections, representing the validation rules used to check migration readiness.
- Validation Name - The name of each specific validation rule.
- Validation Status - Represents the result for each rule and can have any of the three values:
- Succeeded - If no errors were found.
- Failed - If there are validation errors.
- Warning - If there are validation warnings.
- Duration - Time taken for the validation operation.
- Start time (UTC) and End time (UTC) - Start and end times of the validation operation in UTC.
The Validation status moves to Failed state if there are any errors in the validation. Select the Validation name or Database name validation that has failed, and a fan-out pane gives the details and the corrective action you should take to avoid this error.

Migrate
After the PerformingPreRequisiteSteps substate is completed, the migration moves to the substate of Migrating Data when the cloning/copying of the databases takes place. The time for migration to complete depends on the size and shape of the databases you're migrating. The migration is quick if the data is mostly evenly distributed across all the tables. Skewed table sizes take a relatively longer time.
When you select any of the databases in migration, a fan-out pane appears. It has all the table counts (copied, queued, copying, and errors) and also the database migration status.

The migration moves to the Succeeded state when the Migrating Data state finishes successfully. If there's an issue at the Migrating Data state, the migration moves into a Failed state.

Once the migration moves to the Succeeded state, schema and data migration from your Single Server to your Flexible Server target is complete. You can refresh the page to check the progress.

Validate and Migrate
In this option, validations are performed first before migration starts. After the PerformingPreRequisiteSteps substate is completed, the workflow moves into the substate of Validation in Progress.
- If validation has errors, the migration moves into a Failed state.
- If validation is complete without any error, the migration starts, and the workflow moves into the substate of Migrating Data.
You can see the results of Validate and Migrate once the operation is complete.


Cancel the migration using the portal
You can cancel any ongoing validations or migrations. The workflow must be in the InProgress state to be canceled. You can't cancel a validation or migration that's in the Succeeded or Failed state.
Canceling a validation stops any further validation activity and the validation moves to a Canceled state.
Canceling a migration stops further migration activity on your target server and moves to a Canceled state. The cancel action will roll back all changes made by the migration service on your target server.


Check the migration once complete
After completing the databases, you need to manually validate the data between source and target and verify that all the objects in the target database are successfully created.
After migration, you can perform the following tasks:
Verify the data on your flexible server and ensure it's an exact copy of the source instance.
Post verification, enable the high availability option on your flexible server as needed.
Change the SKU of the flexible server to match the application needs. This change needs a database server restart.
If you change any server parameters from their default values in the source instance, copy those server parameter values in the flexible server.
Copy other server settings like tags, alerts, and firewall rules (if applicable) from the source instance to the flexible server.
Make changes to your application to point the connection strings to a flexible server.
Monitor the database performance closely to see if it requires performance tuning.
Related content
Phản hồi
Sắp ra mắt: Trong năm 2024, chúng tôi sẽ dần gỡ bỏ Sự cố với GitHub dưới dạng cơ chế phản hồi cho nội dung và thay thế bằng hệ thống phản hồi mới. Để biết thêm thông tin, hãy xem: https://aka.ms/ContentUserFeedback.
Gửi và xem ý kiến phản hồi dành cho