Access an app in Azure Spring Apps in a virtual network
Note
Azure Spring Apps is the new name for the Azure Spring Cloud service. Although the service has a new name, you'll see the old name in some places for a while as we work to update assets such as screenshots, videos, and diagrams.
This article applies to: ✔️ Basic/Standard ✔️ Enterprise
This article explains how to access an endpoint for your application in a private network.
When you assign an endpoint on an application in an Azure Spring Apps service instance deployed in your virtual network, the endpoint uses a private fully qualified domain name (FQDN). The domain is only accessible in the private network. Apps and services use the application endpoint. They include the Test Endpoint described in the View apps and deployments section of Set up a staging environment in Azure Spring Apps. Log streaming, described in Stream Azure Spring Apps app logs in real-time, also works only within the private network.
The following two options are available to make the endpoint you assigned accessible:
Create your own private Domain Name Service (DNS) zone and link it to Azure Spring Apps. This method is highly recommended as Azure Spring Apps automatically links the DNS zone with your virtual network and manages DNS record for your application's endpoint.
Create your own private DNS zone and manually manage the virtual network link and DNS records, following instructions for locating the Load Balancer (LB) IP address of your Azure Spring Apps service instance.
Prerequisites
- An Azure subscription. If you don't have a subscription, create a free account before you begin.
- (Optional) Azure CLI version 2.45.0 or higher.
- An existing application in an Azure Spring Apps service instance deployed to a virtual network. For more information, see Deploy Azure Spring Apps in a virtual network.
Create a private DNS zone
Use the following steps to create a private DNS zone for an application in the private network:
Open the Azure portal. Using the search box, search for Private DNS zones. Select Private DNS zones from the search results.
On the Private DNS zones page, select Add.
Fill out the form on the Create Private DNS zone page. For Name, enter private.azuremicroservices.io.
Select Review + Create.
Select Create.
It might take a few minutes to create the zone.
Configure your private DNS zone to automatically manage endpoints
After creating a private DNS zone, you can use Azure Spring Apps to manage your private DNS zones. This approach simplifies the process of handling virtual network links and DNS records. This approach is especially useful in environments with multiple instances within a single virtual network or in environments that use virtual network peerings. Azure Spring Apps automates the management of virtual network links and the dynamic addition or removal of DNS "A" records as endpoints are assigned or unassigned.
Note
Azure Spring Apps doesn't automatically manage endpoints assigned before the addition of the private DNS zone. To enable DNS record management for these endpoints, unassign and then reassign the endpoints.
Grant permission to the private DNS zone
Use the following steps to grant permission:
Select the private DNS zone resource you created - for example, private.azuremicroservices.io.
Select Access control (IAM), and then select Add > Add role assignment.
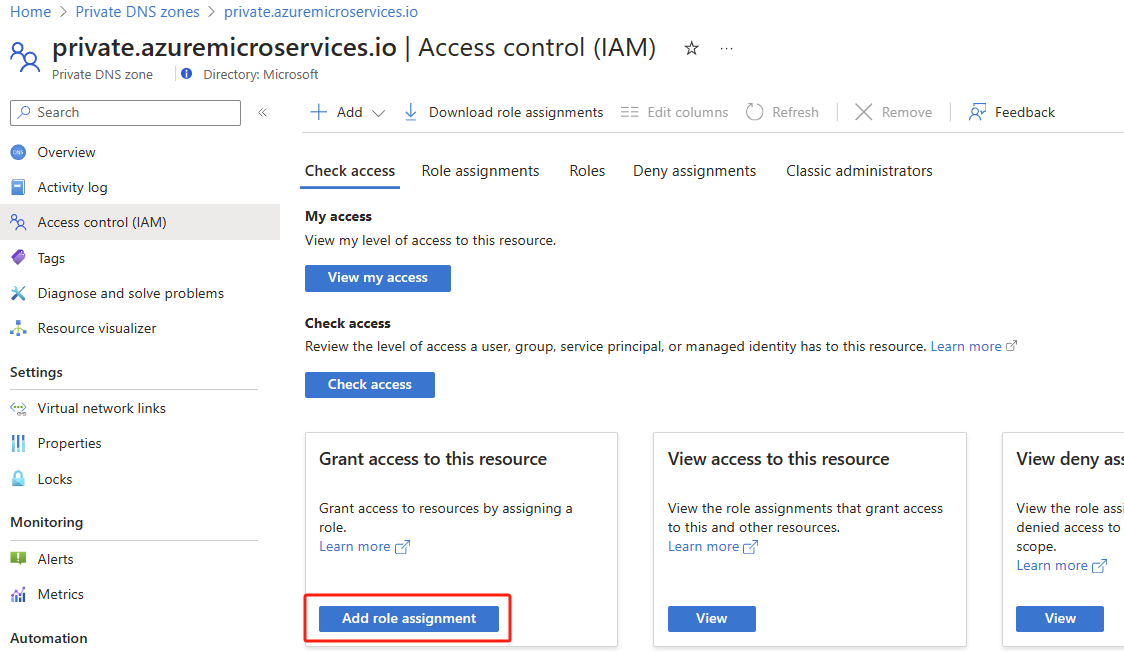
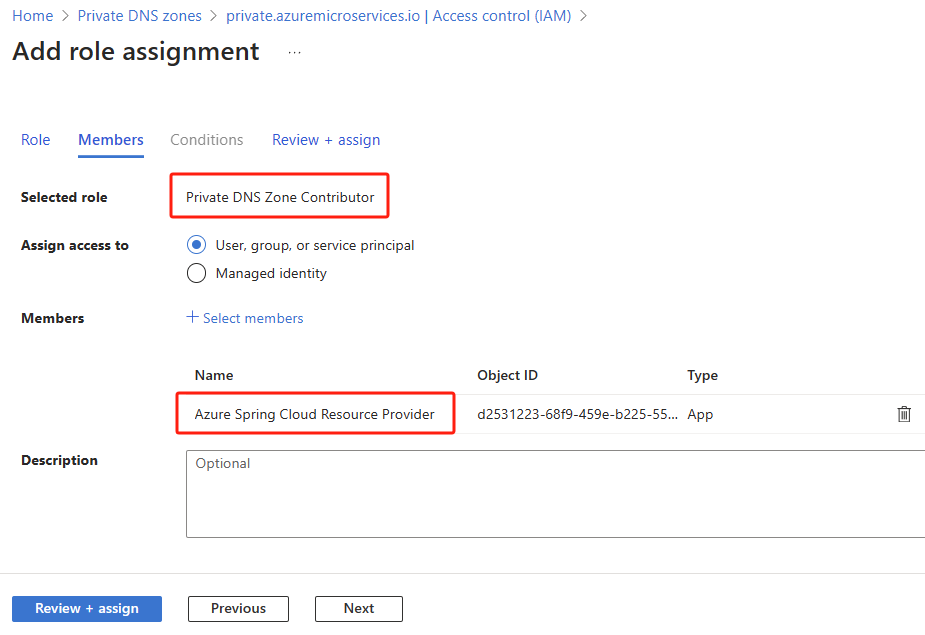
Assign the
Private DNS Zone Contributorrole to the Azure Spring Apps Resource Provider. For more information, see Assign Azure roles using the Azure portal.Note
If you don't find Azure Spring Apps Resource Provider, search for Azure Spring Cloud Resource Provider.


Link the private DNS zone with Azure Spring Apps
To link the private DNS zone with your Azure Spring Apps service instance, use the Azure CLI. This step involves specifying your resource group, the Azure Spring Apps instance name, and the resource ID of the private DNS zone.
Use the following command to configure the private DNS zone with Azure Spring Apps. This configuration enables Azure Spring Apps to automatically create a virtual network link in the private DNS zone and manage the addition or removal of DNS "A" records as endpoints are assigned or unassigned.
az spring private-dns-zone add \
    --resource-group $RESOURCE_GROUP \
    --service $AZURE_SPRING_APPS_INSTANCE_NAME \
    --zone-id $PRIVATE_DNS_ZONE_RESOURCE_ID
If you wish to unlink your Azure Spring Apps instance from the private DNS zone and stop the automatic management of DNS "A" records, you can clean the configuration. Use the following command to clean the private DNS zone configured with Azure Spring Apps:
az spring private-dns-zone clean \
    --resource-group $RESOURCE_GROUP \
    --service $AZURE_SPRING_APPS_INSTANCE_NAME
Configure your private DNS zone manually
If you prefer to have full control over your private DNS zone, the following sections show you how to manually configure it.
Find the IP address for your application
Use the following steps to find the IP address for your application:
Go to the Azure Spring Apps service Networking page.
Select the Vnet injection tab.
In the General info section, find Endpoint and copy the IP Address value. The example in the following screenshot uses the IP address
10.0.1.6: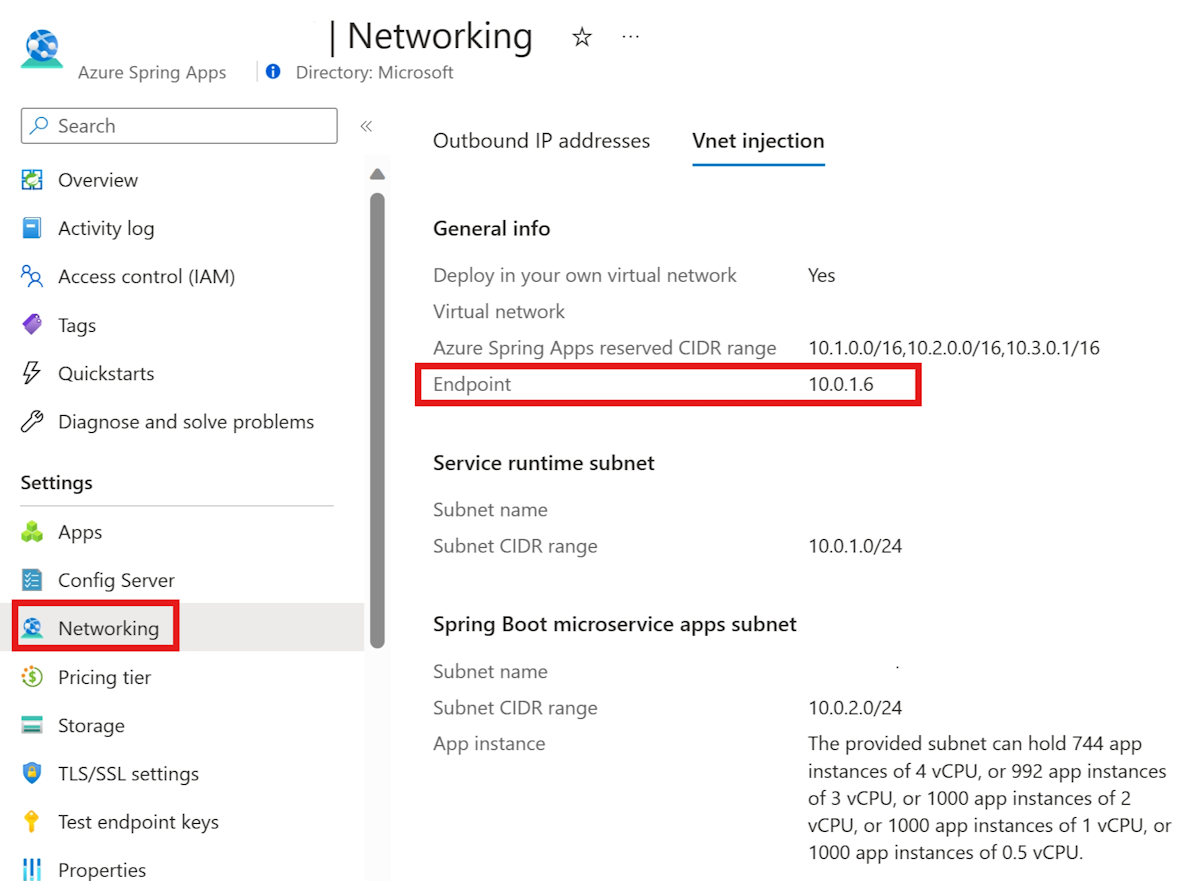

Add a DNS for the IP address
If you have your own DNS solution for your virtual network, like Active Directory Domain Controller, Infoblox, or another, you need to point the domain *.private.azuremicroservices.io to the IP address. Otherwise, use the following instructions to create an Azure Private DNS Zone in your subscription to translate/resolve the private FQDN to its IP address.
Note
If you're using Microsoft Azure operated by 21Vianet, be sure to replace private.azuremicroservices.io with private.microservices.azure.cn in this article. For more information, see the Check Endpoints in Azure section of the Azure China developer guide.
Create the DNS record
You must create an "A" type record in the private DNS zone.
Use the following steps to use the private DNS zone to translate/resolve DNS:
Select the private DNS zone resource you created - for example, private.azuremicroservices.io.
Select Record set.
In Add record set, enter or select the following information:
Setting Value Name Enter *. Type Select A. TTL Enter 1. TTL unit Select Hours. IP address Enter the IP address. The following screenshot uses the IP address 10.1.0.7. 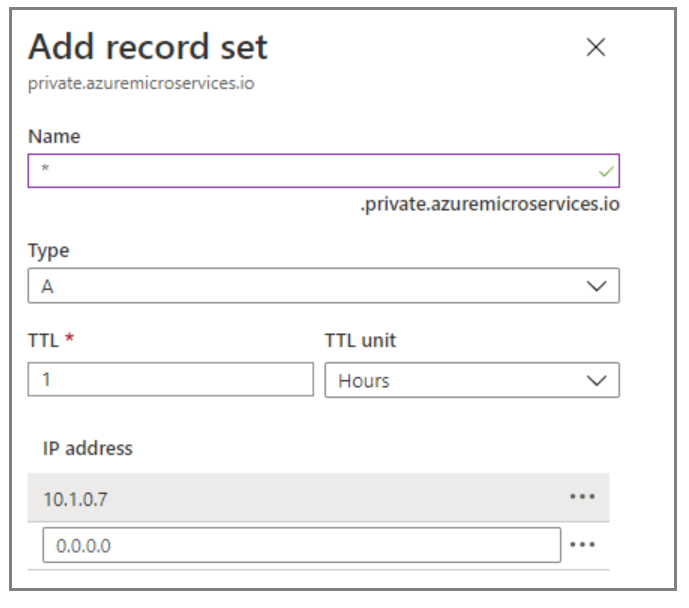
Select OK.

Link the private DNS zone to a virtual network
To link the private DNS zone to the virtual network, you need to create a virtual network link.
Use the following steps to link the private DNS zone you created to the virtual network holding your Azure Spring Apps service:
Select the private DNS zone resource you created - for example, private.azuremicroservices.io.
Select Virtual network links, and then select Add.
For Link name, enter azure-spring-apps-dns-link.
For Virtual network, select the virtual network you created previously.
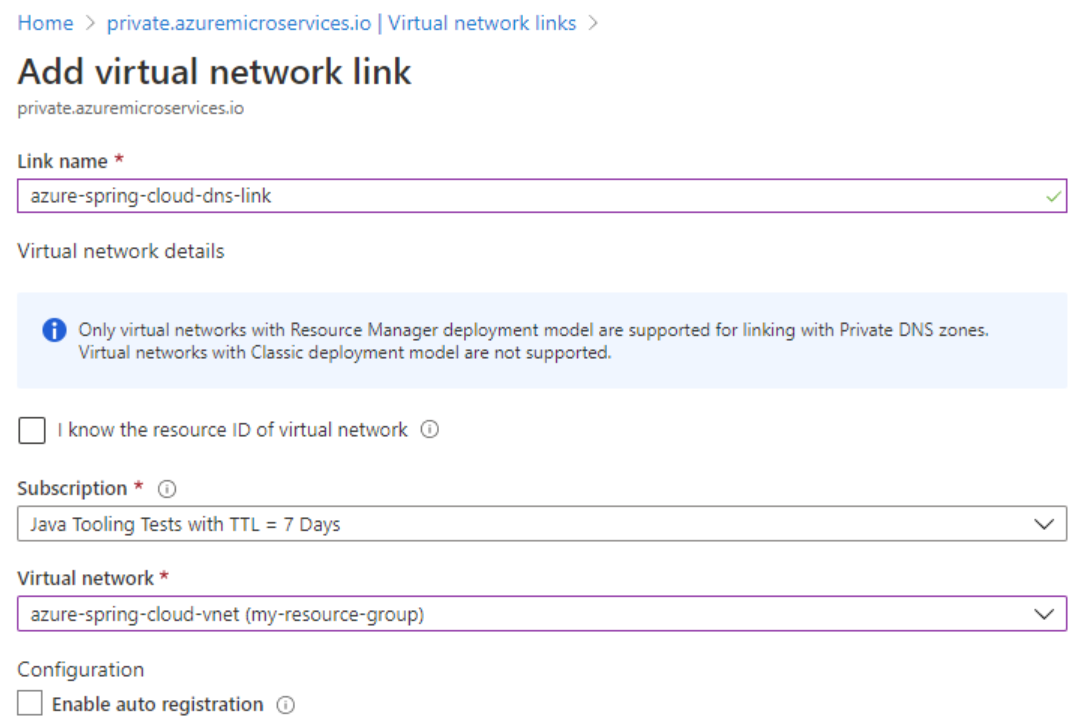
Select OK.

Assign a private FQDN for your application
After you configure your Private DNS Zone and deploy Azure Spring Apps in a virtual network, you can assign a private FQDN for your application. For more information, see Deploy Azure Spring Apps in a virtual network.
Use the following steps to assign a private FQDN:
Select the Azure Spring Apps service instance deployed in your virtual network, and open the Apps tab.
Select the application to open the Overview page.
Select Assign Endpoint to assign a private FQDN to your application. Assigning an FQDN can take a few minutes.
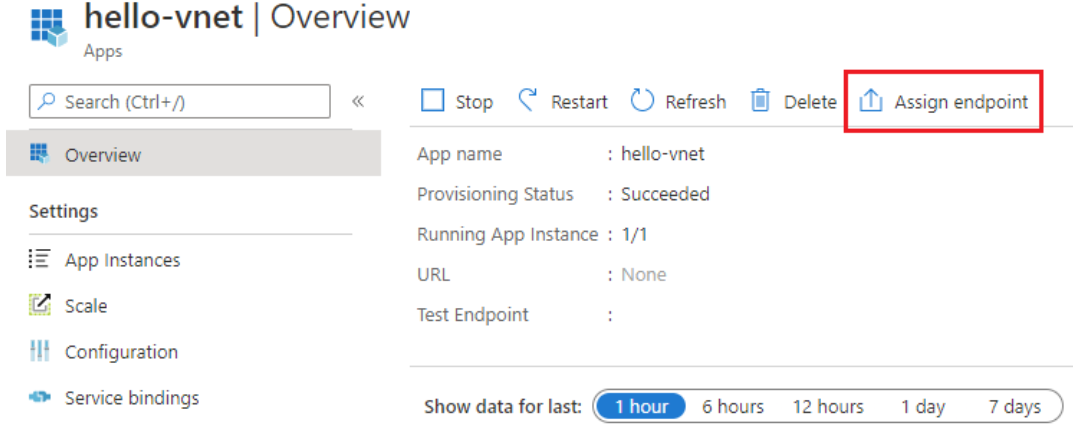
The assigned private FQDN (labeled URL) is now available. You can only access the URL within the private network, but not on the internet.

Access the application's private FQDN
After the assignment, you can access the application's private FQDN in the private network. For example, you can create a jumpbox machine in the same virtual network or in a peered virtual network. Then, on that jumpbox or virtual machine, you can access the private FQDN.

Clean up resources
If you plan to continue working with subsequent articles, you might want to leave these resources in place. When you no longer need them, delete the resource group, which deletes the resources in the resource group. To delete the resource group by using the Azure CLI, use the following command:
az group delete --name $RESOURCE_GROUP
Next steps
Phản hồi
Sắp ra mắt: Trong năm 2024, chúng tôi sẽ dần gỡ bỏ Sự cố với GitHub dưới dạng cơ chế phản hồi cho nội dung và thay thế bằng hệ thống phản hồi mới. Để biết thêm thông tin, hãy xem: https://aka.ms/ContentUserFeedback.
Gửi và xem ý kiến phản hồi dành cho