快速入門:開始使用 Azure Machine Learning
適用於: Python SDK azure-ai-ml v2 (目前)
本教學課程是 Azure Machine Learning 服務一些最常使用功能的簡介。 在其中,您將會建立、註冊和部署模型。 本教學課程將協助您熟悉 Azure Machine Learning 的核心概念及其最常見的使用方式。
您將會了解如何在可調整的計算資源上執行定型作業,然後加以部署,最後測試部署。
您將會建立定型指令碼來處理資料準備、定型和註冊模型。 擁有模型之後,您可將其部署為端點,然後呼叫端點進行推斷。
您將要採取的步驟如下:
- 設定 Azure Machine Learning 工作區的控制代碼
- 建立您的定型指令碼
- 建立可調整的計算資源、計算叢集
- 建立並執行命令作業,以在計算叢集上執行定型指令碼,並使用適當的作業環境進行設定
- 檢視訓練指令碼的輸出
- 將新定型的模型部署為端點
- 呼叫 Azure Machine Learning 端點以進行推斷
如需本快速入門步驟的概觀,請觀看這段影片。
必要條件
-
若要使用 Azure Machine Learning,您必須先有工作區。 如果您沒有工作區,請完成建立要開始使用所需要的資源以建立工作區,並深入了解其使用方式。
-
登入 Studio,如果工作區尚未開啟,請選取您的工作區。
-
在工作區開啟或建立筆記本:
- 如果您想要將程式碼複製/貼到資料格中,請建立新筆記本。
- 或者,從工作室的 [範例] 區段開啟 tutorials/get-started-notebooks/quickstart.ipynb。 然後選取 [複製] 以將筆記本新增至 [檔案]。 (查看可在哪裡找到範例。)
設定核心
在開啟的筆記本上方的頂端列上,如果您還沒有計算執行個體,請建立計算執行個體。

如果計算執行個體已停止,請選取 [啟動計算],並等到其執行為止。

確定位於右上方的核心是
Python 3.10 - SDK v2。 如果不是,則使用下拉式清單選取此核心。
如果您看到橫幅指出您需要進行驗證,請選取 [驗證]。


重要
本教學課程的其餘部分包含教學課程筆記本的儲存格。 將其複製/貼入您的新筆記本中,或立即切換至您複製的筆記本。
建立工作區的控制代碼
在深入探討程式碼之前,您需要可參考工作區的方法。 工作區是 Azure Machine Learning 的最上層資源,其提供一個集中位置來處理您在使用 Azure Machine Learning 時建立的所有成品。
您會建立 ml_client 以獲得工作區的控制代碼。 接著,您會使用 ml_client 來管理資源和作業。
在下一個資料格中,輸入您的訂用帳戶識別碼、資源群組名稱和工作區名稱。 若要尋找這些值:
- 在右上方的 Azure Machine Learning 工作室工具列中,選取您的工作區名稱。
- 將工作區、資源群組和訂閱識別碼的值複製到程式碼。
- 您必須複製一個值、關閉區域並貼上,然後返回處理下一個值。

from azure.ai.ml import MLClient
from azure.identity import DefaultAzureCredential

# authenticate
credential = DefaultAzureCredential()

SUBSCRIPTION="<SUBSCRIPTION_ID>"
RESOURCE_GROUP="<RESOURCE_GROUP>"
WS_NAME="<AML_WORKSPACE_NAME>"
# Get a handle to the workspace
ml_client = MLClient(
    credential=credential,
    subscription_id=SUBSCRIPTION,
    resource_group_name=RESOURCE_GROUP,
    workspace_name=WS_NAME,
)
注意
建立 MLClient 時不會連線至工作區。 用戶端初始化有延遲性,會等到第一次需要進行呼叫時才開始 (這會在下一個程式碼資料格發生)。
# Verify that the handle works correctly.
# If you ge an error here, modify your SUBSCRIPTION, RESOURCE_GROUP, and WS_NAME in the previous cell.
ws = ml_client.workspaces.get(WS_NAME)
print(ws.location,":", ws.resource_group)
建立訓練指令碼
讓我們從建立訓練指令碼開始 - main.py Python 檔案。
首先,建立指令碼的來源資料夾:
import os

train_src_dir = "./src"
os.makedirs(train_src_dir, exist_ok=True)
此指令碼會處理資料的前置處理,並將其分割成測試和訓練資料。 然後,取用此資料來訓練樹狀模型,並傳回輸出模型。
MLFlow 會在管線執行期間用來記錄參數和計量。
下列資料格會使用 IPython magic 將定型指令碼寫入您剛才建立的目錄中。
%%writefile {train_src_dir}/main.py
import os
import argparse
import pandas as pd
import mlflow
import mlflow.sklearn
from sklearn.ensemble import GradientBoostingClassifier
from sklearn.metrics import classification_report
from sklearn.model_selection import train_test_split

def main():
    """Main function of the script."""

    # input and output arguments
    parser = argparse.ArgumentParser()
    parser.add_argument("--data", type=str, help="path to input data")
    parser.add_argument("--test_train_ratio", type=float, required=False, default=0.25)
    parser.add_argument("--n_estimators", required=False, default=100, type=int)
    parser.add_argument("--learning_rate", required=False, default=0.1, type=float)
    parser.add_argument("--registered_model_name", type=str, help="model name")
    args = parser.parse_args()

    # Start Logging
    mlflow.start_run()

    # enable autologging
    mlflow.sklearn.autolog()

    ###################
    #<prepare the data>
    ###################
    print(" ".join(f"{k}={v}" for k, v in vars(args).items()))

    print("input data:", args.data)

    credit_df = pd.read_csv(args.data, header=1, index_col=0)

    mlflow.log_metric("num_samples", credit_df.shape[0])
    mlflow.log_metric("num_features", credit_df.shape[1] - 1)

    train_df, test_df = train_test_split(
        credit_df,
        test_size=args.test_train_ratio,
    )
    ####################
    #</prepare the data>
    ####################

    ##################
    #<train the model>
    ##################
    # Extracting the label column
    y_train = train_df.pop("default payment next month")

    # convert the dataframe values to array
    X_train = train_df.values

    # Extracting the label column
    y_test = test_df.pop("default payment next month")

    # convert the dataframe values to array
    X_test = test_df.values

    print(f"Training with data of shape {X_train.shape}")

    clf = GradientBoostingClassifier(
        n_estimators=args.n_estimators, learning_rate=args.learning_rate
    )
    clf.fit(X_train, y_train)

    y_pred = clf.predict(X_test)

    print(classification_report(y_test, y_pred))
    ###################
    #</train the model>
    ###################

    ##########################
    #<save and register model>
    ##########################
    # Registering the model to the workspace
    print("Registering the model via MLFlow")
    mlflow.sklearn.log_model(
        sk_model=clf,
        registered_model_name=args.registered_model_name,
        artifact_path=args.registered_model_name,
    )

    # Saving the model to a file
    mlflow.sklearn.save_model(
        sk_model=clf,
        path=os.path.join(args.registered_model_name, "trained_model"),
    )
    ###########################
    #</save and register model>
    ###########################

    # Stop Logging
    mlflow.end_run()

if __name__ == "__main__":
    main()
如您在此指令碼中所見,在模型訓練好後,模型檔案就會儲存並註冊到工作區。 現在,您可以在推斷端點中使用已註冊的模型。
您可能需要選取 [重新整理],才能在 [檔案] 中看到新的資料夾和指令碼。

設定命令
有了可執行所需工作的指令碼及執行指令碼的計算叢集後,您即可使用可執行命令列動作的一般用途命令。 此命令列動作可直接呼叫系統命令或執行指令碼。
此時,您將建立輸入變數以指定輸入資料、分割比例、學習速率和已註冊的模型名稱。 命令指令碼將會:
- 使用環境,其定義定型指令碼所需的軟體和執行階段程式庫。 Azure Machine Learning 提供許多策劃好或現成的環境,適用於常見的定型和推斷案例。 您將會在這裡使用其中一個環境。 在教學課程:在 Azure Machine Learning 中定型模型,您將會了解如何建立自訂環境。
- 設定命令列動作本身 - 本例中為
python main.py。 您可透過${{ ... }}標記法在命令中存取輸入/輸出。 - 在此範例中,我們會從網際網路上的檔案存取資料。
- 由於未指定計算資源,指令碼會在自動建立的無伺服器計算叢集上執行。
from azure.ai.ml import command
from azure.ai.ml import Input

registered_model_name = "credit_defaults_model"

job = command(
    inputs=dict(
        data=Input(
            type="uri_file",
            path="https://azuremlexamples.blob.core.windows.net/datasets/credit_card/default_of_credit_card_clients.csv",
        ),
        test_train_ratio=0.2,
        learning_rate=0.25,
        registered_model_name=registered_model_name,
    ),
    code="./src/",  # location of source code
    command="python main.py --data ${{inputs.data}} --test_train_ratio ${{inputs.test_train_ratio}} --learning_rate ${{inputs.learning_rate}} --registered_model_name ${{inputs.registered_model_name}}",
    environment="AzureML-sklearn-1.0-ubuntu20.04-py38-cpu@latest",
    display_name="credit_default_prediction",
)
提交作業
接著即可提交作業,以在 Azure Machine Learning 中執行。 這次,您會對 ml_client 使用 create_or_update。
ml_client.create_or_update(job)
檢視作業輸出並等候作業完成
選取上一個資料格輸出中的連結,以檢視 Azure Machine Learning 工作室中的作業。
此作業的輸出在 Azure Machine Learning 工作室中看起來會像這樣。 探索索引標籤以取得各種詳細資料,例如計量、輸出等。完成後,作業會在您的工作區中註冊模型,作為定型的結果。

重要
請等到作業狀態完成後,再返回此筆記本繼續作業。 作業執行時間約需 2 到 3 分鐘。 如果計算叢集已縮小至零個節點,且自訂環境仍在建置中,所需時間可能更長 (最多 10 分鐘)。
將模型部署為線上端點
現在,將您的機器學習模型部署為 Azure 雲端中的 Web 服務,亦即online endpoint。
若要部署機器學習服務,您要使用您註冊的模型。
建立新的線上端點
現在,您已有註冊的模型,接下來即可建立線上端點。 端點名稱在整個 Azure 區域中必須是唯一的。 在本教學課程中,您將使用 UUID 建立唯一的名稱。
import uuid

# Creating a unique name for the endpoint
online_endpoint_name = "credit-endpoint-" + str(uuid.uuid4())[:8]
建立端點:
# Expect the endpoint creation to take a few minutes
from azure.ai.ml.entities import (
    ManagedOnlineEndpoint,
    ManagedOnlineDeployment,
    Model,
    Environment,
)

# create an online endpoint
endpoint = ManagedOnlineEndpoint(
    name=online_endpoint_name,
    description="this is an online endpoint",
    auth_mode="key",
    tags={
        "training_dataset": "credit_defaults",
        "model_type": "sklearn.GradientBoostingClassifier",
    },
)

endpoint = ml_client.online_endpoints.begin_create_or_update(endpoint).result()

print(f"Endpoint {endpoint.name} provisioning state: {endpoint.provisioning_state}")
注意
建立端點預計要幾分鐘的時間。
建立端點之後,您可以如下所示擷取端點:
endpoint = ml_client.online_endpoints.get(name=online_endpoint_name)

print(
    f'Endpoint "{endpoint.name}" with provisioning state "{endpoint.provisioning_state}" is retrieved'
)
將模型部署至端點
端點建立後,請使用輸入指令碼來部署模型。 每個端點可有多個部署。 且可以使用規則指定這些部署的直接流量。 在此,您將建立單一部署,處理 100% 的連入流量。 我們為部署選擇了色彩名稱 (例如藍色、綠色、紅色部署),此名稱可任選。
您可以在 Azure Machine Learning 工作室中查看 [模型] 頁面,以識別已註冊模型的最新版本。 或者,下列程式碼會擷取最新版本號碼讓您使用。
# Let's pick the latest version of the model
latest_model_version = max(
    [int(m.version) for m in ml_client.models.list(name=registered_model_name)]
)
print(f'Latest model is version "{latest_model_version}" ')
部署最新版的模型。
# picking the model to deploy. Here we use the latest version of our registered model
model = ml_client.models.get(name=registered_model_name, version=latest_model_version)

# Expect this deployment to take approximately 6 to 8 minutes.
# create an online deployment.
# if you run into an out of quota error, change the instance_type to a comparable VM that is available.
# Learn more on https://azure.microsoft.com/pricing/details/machine-learning/.
blue_deployment = ManagedOnlineDeployment(
    name="blue",
    endpoint_name=online_endpoint_name,
    model=model,
    instance_type="Standard_DS3_v2",
    instance_count=1,
)

blue_deployment = ml_client.begin_create_or_update(blue_deployment).result()
注意
完成此部署約需要 6 到 8 分鐘的時間。
部署完成時,您已準備好進行測試。
使用範例查詢進行測試
一旦模型部署至端點,您可以用來執行推斷。
在評分指令碼的 run 方法中,依照預期的設計建立範例要求檔案。
deploy_dir = "./deploy"
os.makedirs(deploy_dir, exist_ok=True)
%%writefile {deploy_dir}/sample-request.json
{
  "input_data": {
    "columns": [0,1,2,3,4,5,6,7,8,9,10,11,12,13,14,15,16,17,18,19,20,21,22],
    "index": [0, 1],
    "data": [
            [20000,2,2,1,24,2,2,-1,-1,-2,-2,3913,3102,689,0,0,0,0,689,0,0,0,0],
            [10, 9, 8, 7, 6, 5, 4, 3, 2, 1, 10, 9, 8, 7, 6, 5, 4, 3, 2, 1, 10, 9, 8]
        ]
  }
}
# test the blue deployment with some sample data
ml_client.online_endpoints.invoke(
    endpoint_name=online_endpoint_name,
    request_file="./deploy/sample-request.json",
    deployment_name="blue",
)
清除資源
如果您不打算使用端點,請將其刪除以停止使用資源。 刪除端點之前,請確定沒有其他部署在使用端點。
注意
完整刪除約需 20 分鐘的時間。
ml_client.online_endpoints.begin_delete(name=online_endpoint_name)
停止計算執行個體
如果現在不打算使用,請停止計算執行個體:
- 在工作室的左側導覽區域中,選取 [計算]。
- 在頂端索引標籤中,選取 [計算執行個體]
- 選取清單中的計算執行個體。
- 在頂端工具列中,選取 [停止]。
刪除所有資源
重要
您所建立的資源可用來作為其他 Azure Machine Learning 教學課程和操作說明文章的先決條件。
如果不打算使用您建立的任何資源,請刪除以免產生任何費用:
在 Azure 入口網站中,選取最左邊的 [資源群組]。
從清單中,選取您所建立的資源群組。
選取 [刪除資源群組]。
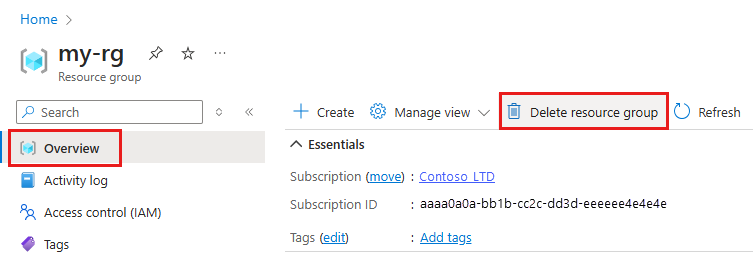
輸入資源群組名稱。 接著選取刪除。
下一步
現在您對於定型和部署模型所涉及的項目已經有概念,接下來請深入了解這些教學課程中的程序:
| 教學課程 | 描述 |
|---|---|
| 在 Azure Machine Learning 中上傳、存取及探索資料 | 將大型資料儲存在雲端中,可從筆記本和指令碼擷取 |
| 雲端工作站上的模型開發 | 開始原型設計和開發機器學習模型 |
| 在 Azure Machine Learning 中為模型定型 | 深入探討為模型定型的詳細資料 |
| 將模型部署為線上端點 | 深入了解部署模型的詳細資料 |
| 建立生產機器學習管線 | 將完整的機器學習工作分割成多步驟工作流程。 |
意見反應
即將登場:在 2024 年,我們將逐步淘汰 GitHub 問題作為內容的意見反應機制,並將它取代為新的意見反應系統。 如需詳細資訊,請參閱:https://aka.ms/ContentUserFeedback。
提交並檢視相關的意見反應