Troubleshooting Windows Azure Pack and Gallery Items (Part 2)
Hello Readers
Following up from the previous blog post (Troubleshooting Windows Azure Pack and Gallery Items (Part 1)) it's now time to talk about potential challenges you might run into when configuring and deploying Gallery Items (VM Roles) using Windows Azure Pack (WAP) and Virtual Machine Manager (VMM).
After I have installed the Windows Azure Pack solution end to end several times, I ran into different challenges which I will explain below, with a solution to the problems.
To make it easier to follow, I'm going to spend a few lines describing my environment as well as the scenario.
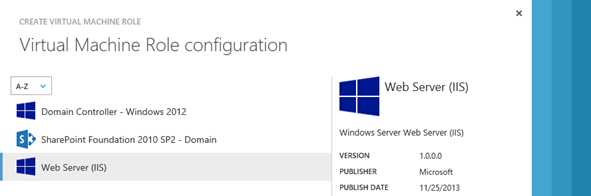
Figure 1: VM Roles offered via a Plan in the WAP Tenant Portal
Environment:
My setup is fairly simple with one WAP server (express install), and Service Provider Foundation (SPF) server installed on a separate server, and lastly Virtual Machine Manager (VMM) server managing one Hyper-V server. The environment looks the following:
VMM Server |
VMM01.fabrikam.com |
SPF Server |
SPF01.fabrikam.com |
WAP Server |
WAP01.fabrikam.com |
VMM Library |
\\MSSCVMMLibrary |
Cloud |
Contoso |
Plans |
Contoso.com Tenant Plan |
User Account |
Admins@contoso.com |
WinOS VHD |
WindowsBase2012R2.vhdx |
Data VHD |
Data Disk.vhdx |
Release: |
1.0.0.0 |
Scenario:
The following components are already configured:
- Windows Azure Pack (WAP)
- Service Provider Foundation (SPF)
- Virtual Machine Manager (VMM)
- Windows Server 2012 R2 Sysprep image in VMM Library
- Data Disk loaded in the VMM Library (a 127 GB dynamic expanding disk with no OS set, this will be explained later under Data disk)
In this scenario I will use the "Internet Information Server (IIS) in Windows Server 2012 Gallery Resource" which can be found in the WEB Platform Installer or downloaded directly from here.
I have downloaded the Gallery Item to "C:\Gallery Resources" on the WAP01 and VMM01 server (by default called WS2012_IIS_VMRole_Pkg).
I have imported the Resource Definition Package into WAP by doing the following:
- Start the WAP Console as WAP Administrator on the server where Gallery Item was downloaded (e.g. https://wap01.fabrikam.com:30091).
- Click on WAP Clouds and select Gallery.
- Click on Import and go to "C:\Gallery Resources\WS2012_IIS_VMRole_Pkg"
- Select WS2012WebServer.resdefpkg and click OK to import.
As with previous blog posts it's mostly issues with not reading the manual or things that I forgot to do. This time it's not so much about missing credentials or not running with the right account, but dealing with settings and configurations.
The following are potential issues you might run into using WAP and Gallery Items:
- Gallery Items display as imported but cannot be added to a plan.
- Unexpected Error showing (second window) when filling in VM Role input in the Tenant Portal.
- Blank Windows showing (second window) when filling in VM Role input in the Tenant Portal.
- Windows Azure Pack gives an error when deploying a VM Role to VMM.
- Error (31371) :VHD tags are not consistent on all the equivalent VHDs with the same family name (xxx) and Release (y.y.y.y) shows in VMM Job log
- Provisioning a VM to a Hyper-V Cluster fails.
- A Data Disk won't show in the Tenant Portal for a Gallery Item
Gallery Items display as imported but cannot be added to a plan.
Error: Gallery Item is showing under Gallery Items, but cannot be added to a plan.
Cause: The Gallery Item (Resource Definition Package) has been imported into Windows Azure Portal but the import of the Resource Extension Package into VMM has not been done or has failed.
To validate if this is what is causing the challenge, do the following:
Login to WAP as an Administrator.
Click on VM Clouds and Select Gallery.
Check the list of Gallery Items.
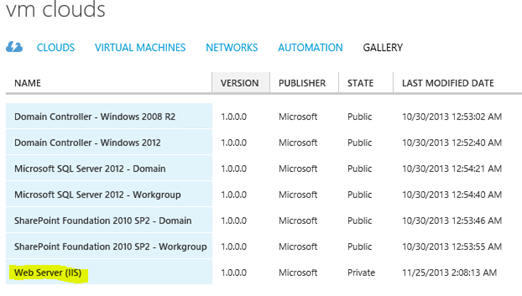
Figure 2: This shows the full gallery list that are imported on the WAP Admin Portal
Click on Plans in the main menu and select a plan (e.g. Contoso.com Tenant Plan).
Select Virtual Machine Cloud and scroll down to gallery.
Select Add gallery items.
Check if any plans are missing in the list compared to the list of Gallery Items from VM Clouds.
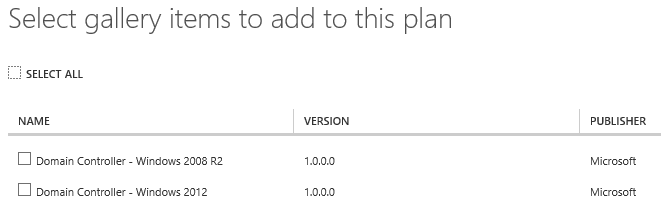
Figure 3: List of Gallery Items that can be added to Contoso Plan
As it's shown above it's clear that not all Gallery Items can be added to the Contoso plan compared to the Gallery Item list under VM Clouds.
Login to VMM Server as Administrator.
Start Virtual Machine Manager PowerShell Prompt from the start menu.
Type Get-CloudResourceExtension |select name and press Enter.
Verify that IIS Server is not showing in the list.

Solution: Import IIS Webserver Resource Extension Packageinto VMM.
We need to import the IIS Webserver Resource Extension Packageinto VMM Resource Library.
The description can be found here on how to do this end to end. Below I will provide a specific example based on the Web Server Gallery Item:
Logon to the VMM Server as Administrator.
Start Virtual Machine Manger Command Shell as "Run as Administrator" from start menu.
Run the following commands:
$libraryShare = Get-SCLibraryShare | Where-Object {$_.Name -eq 'MSSCVMMLibrary'}
$resextpkg = $Env:SystemDrive + "\GalleryResources\My-VMRole-Pkg\MyVMRole.resextpkg"
Import-CloudResourceExtension –ResourceExtensionPath $resextpkg -SharePath $libraryShare
Example using the environment values from above marked in blue:
$libraryShare = Get-SCLibraryShare | Where-Object {$_.Name -eq 'MSSCVMMLibrary'}
$resextpkg = $Env:SystemDrive + "\Gallery Resources\WS2012_IIS_VMRole_Pkg\WS2012WebServer.resextpkg"
Import-CloudResourceExtension –ResourceExtensionPath $resextpkg -SharePath $libraryShare
Output from PowerShell should look similar to below:

Figure 4: Shows the above command executed in the Fabrikam Environment
Run the following command to verify that the import was successful.
Get-CloudResourceExtension |select name
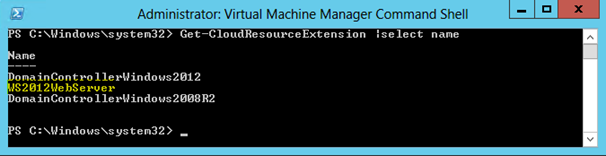
Figure 5: Shows the above command executed in the Fabrikam Environment
Note: Verify that the WS2012WebServer has been added to the list.
Normally we would have verified that the VHD we want to use with the VM Role is configure correctly, in this case we are going to see what happens if it's not configured correctly.
Now let's go back to WAP and see if we can add IIS Server to a plan. To do this do the following:
Open WAP Admin portal as administrator. (e.g. https://wap01.fabrikam.com:30091)
Select Plan from the main menu.
Select a plan to which you want to add an IIS Server Gallery Item (e.g. Contoso.com Tenant Plan).
Select Virtual Machine Manager as Plan service.
Scroll down to gallery and click "Add gallery items".
Verify the Web Server (ISS) now shows in the list.
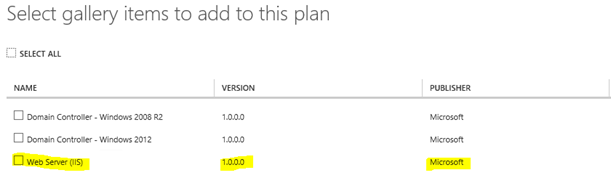
Figure 6: Shows the list of Gallery Items that can be added to a plan
Add the new gallery item to the plan and save the plan.
Login into the WAP Tenant Portal with a subscription User that has access to the plan which was just updated with IIS Server Gallery Item. (e.g. admins@contoso.com @ https://wap01.fabrikam.com:30081)
Click

Select Virtual Machine Role.
Select Web Server from Gallery and click next.
Specify a name for the IIS Server and click next.
Notify that an unexpected error shows.
Please see the next troubleshooting item for details.
Unexpected Error showing (second window) when filling in VM Role input in the Tenant Portal.
Error: Unexpected Error showing (second window) when filling in VM Role input in the Tenant Portal.
Cause: The Gallery Item does not have a VHD that matches the attributes requited by the Gallery Item.
To reproduce the error do the following:
Login into the WAP Tenant Portal with a subscription that has access to the plan that was just updated with IIS Server Gallery Item. (e.g. admins@contoso.com @ https://wap01.fabrikam.com:30081)
Click New.
Select Virtual Machine Role.
Select From Gallery.
Select Web Server and click next.
Give a name for the Web Server (e.g. IIS01).
Click Next.
You should now see an error: Unexpected Error:

Figure 7: Showing an unexpected error in the WAP Tenant Portal
Solution: Modify one or more VHDs in the VMM Library to contain the needed attributes for a Gallery Item.
The solution here is to verify that there is a VHD in the VMM Library that has the needed attributes for a Gallery Item, as required in the readme file. In this case it throws an error because it can't find a VHD to use that matches Release, OS, Family name and tags.
Stephen Baron has created this great blog post that describes how you can set attributes for a VHD.
Application Management - Virtual Hard Disk Requirements of Windows Azure Pack Gallery Items
To make it easier I will use the above attributes and follow Stephens's blog post. I'm not going to explain why I do it as Stephen has already done this.
A pre-requisite is that you have downloaded the "Internet Information Server (IIS) in Windows Server 2012 Gallery Resource" to c:\Gallery Items\ as described above under the Scenario section.
To do this, do the following:
Logon to the VMM Server as Administrator.
Open File Explorer and go to "C:\Gallery Resources\WS2012_IIS_VMRole_Pkg" .
Open the WS2012WebServer-Readme file.
Notice the Operating System Virtual Hard Disk table:
We are going to use the following values for our VHD:
Operating System: Windows Server 2012 R2 Standard
Family name: Windows Server 2012 R2 Standard
Tags: WindowsServer2012, .NET3.5
Version: 1.0.0.0
Open Virtual Machine Manager Console.
Select Library > [Library Name] > VHDs.
Select a VHD that has Windows Server 2012 R2 installed with .Net 3.5 enabled (e.g. Win2012R2Base.vhdx).
Double click on the VHD.
Specify Windows Server 2012 R2 Standard for Family (you can type in the field).
Specify 1.0.0.0 for Release (you can type in the field).
Select Windows Server 2012 R2 Standard from the drop down list for the Operating System.
The VHD should now look similar to the following:
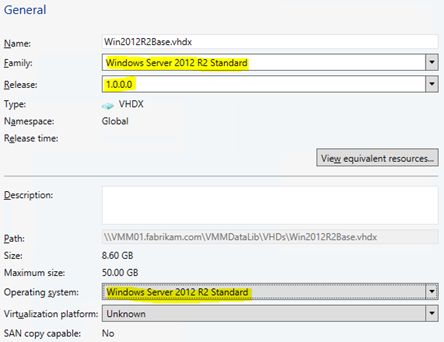
Figure 8: Picture of VHD Properties in the GUI
Click OK to save the setting to the VHDX file.
We need to tag the VHDX file, which can't be done from the GUI, to do this do the following:
The following Tags should be added to the VHDX:
WindowsServer2012R2
.NET3.5
Start Virtual Machine Manager Command Prompt from the start menu.
Run the following commands:
$myVHD = Get-SCVirtualHardDisk | where {$_.Name –eq 'Win2012R2Base.vhdx'}
$tags = $myVHD.Tag
if ( $tags -cnotcontains "WindowsServer2012R2" ) { $tags += @("WindowsServer2012") }
Set-scvirtualharddisk –virtualharddisk $myVHD –Tag $tags
Output should look similar to below:

Figure 9: PowerShell commands to add tags to a VHD
As we need to add another "Tag" we will run the command again with the following:
$tags = $myVHD.Tag
if ( $tags -cnotcontains ".NET3.5" ) { $tags += @(".NET3.5") }
Set-scvirtualharddisk –virtualharddisk $myVHD –Tag $tags
Output should look similar to below:

Figure 10: PowerShell commands to add tags to a VHD
Verify that the two tags have been added by running this command:
Get-SCVirtualHardDisk |where {$_.Name -eq 'Win2012R2Base.vhdx'} |select Name, FamilyName, OperatingSystem, Version, Tag
This will give you an overview for the settings that have been applied to the VHDX File in the VMM Library.
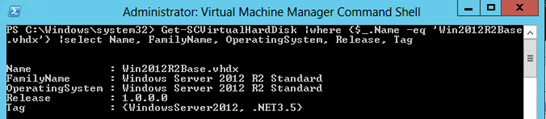
Figure 11: Output from running Get-SCVirtualHardDisk
Now we have set the needed attributes for a VHDX, let's go and check if it worked.
Logout of the WAP Tenant Portal.
Login into the WAP Tenant Portal with a subscription that has access to the plan that was just updated with IIS Server Gallery Item. (e.g. admins@contoso.com @ https://wap01.fabrikam.com:30081).
Click New.
Select Virtual Machine Role.
Select From Gallery.
Select Web Server and click Next.
Give a name for the Web Server (e.g. IIS01) and Click Next.
Verify that the second input screen shows.

Figure 12: VM Role (Web Server) in WAP Admin Portal
Blank Windows showing (second window) when filling in VM Role input in the Tenant Portal
Error: Blank white Windows showing (second window) when filling in VM Role input in the Tenant Portal.
Cause: The VMM Library that hosts the VHDX files is not part of the VMM Cloud to which a VM Role is distributed.
To reproduce the error do the following:
Login into the WAP Tenant Portal with a subscription that has access to the plan that was just updated with IIS Server Gallery Item. (e.g. admins@contoso.com @ https://wap01.fabrikam.com:30081)
Click New.
Select Virtual Machine Role.
Select From Gallery.
Select Web Server and click Next.
Give a name for the Web Server (e.g. IIS01) and click Next.
You should now see a blank screen:

Figur 13: Blank WAP Form in WAP Tenant Portal
Solution: Add Library to the VMM Cloud
Logon to the VMM Server as Administrator.
Open Virtual Machine Manager Console.
Select VMs and Services.
Right Click on the Cloud that the Plan in WAP is using and select Properties (e.g. Contoso).
Select Library in the left menu and click Add.
Select the library that hosts the VHDX files for the VM Roles (e.g. MSSCMVVLibrary) and Click OK.
Close VMM Console.
Login into the WAP Tenant Portal with a subscription that has access to the plan that was just updated with IIS Server Gallery Item. (e.g. admins@contoso.com @ https://wap01.fabrikam.com:30081).
Click New.
Select Virtual Machine Role.
Select From Gallery.
Select Web Server and click Next.
Give a name for the Web Server (e.g. IIS01) and click Next.
Verify that the second input screen shows.
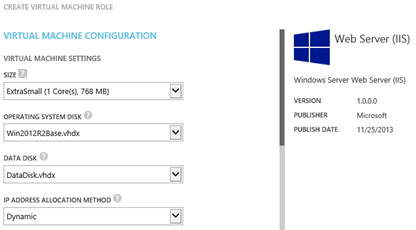
Figure 14: VM Role form in WAP Tenant Portal
Windows Azure Pack gives an error when deploying a VM Role to VMM
Error: Windows Azure Pack gives an error when deploying a VM Role to VMM.
Cause: The Capability Profile for the VMM Cloud has been set to one or more profiles.
Solution: Unselect all Capability Profiles for a VMM Cloud being used by WAP.
- Logon to the VMM Server as Administrator.
- Open Virtual Machine Manager Console.
- Select VMs and Services.
- Right Click on the Cloud that the Plan in WAP is using and select Properties (e.g. Contoso).
- Select the Capability Profiles.
- Unselect all Capability Profiles and Click OK.
- Retry the VM Deployment operation to verify it works.
VHD tags are not consistent on all the equivalent VHDs with the same family name shows in VMM Job log
Error: An error shows for a job in VMM after a VM Role deployment fails with error: Error (31371) :VHD tags are not consistent on all the equivalent VHDs with the same family name (xxx) and Release (y.y.y.y) shows in VMM Job log.

Figure 15: Error in WAP Tenant Portal
Cause: Two VHD's with same Family and Release, but with different tags resides in the VMM Library.
Do the following to verify the problem.
- Login to Virtual Machine Manager as Administrator.
- Start Virtual Machine Manager Console.
- Select Library.
- Select Library Servers > [Library Server name] > [Library Share] > VHDs.
- Look for any VHDs with same Family, OS and Release.
Solution: Two VHDs with same Family, OS and Release, must have the same tag. There are two solutions: First solution is to use one VHD and add tags from the other VHDs with same OS, Family and Release to one VHD in the VMM Library and remove the other VHDs with the same Family, OS and Release from the library. Second option is to change Family and Release for a VHD so it does not match other VHDs in the library.
There a two ways to fix this issue:
Merge the tags into one VHD file and remove the other VHD from the library (preferred solution)
Take note of the VHD names with similar Family and Release attributes found from the steps above.
Open Virtual Machine Manager Command Shell as Administrator.
Run the following command to see tags for a VHD.
Get-SCVirtualHardDisk -name '<VHD File>'} |select Name, FamilyName, OperatingSystem, Version, Tag
Example:
Get-SCVirtualHardDisk -name 'Win2012R2Base.vhdx' |select Name, FamilyName, OperatingSystem, Version, Tag
The output will look similar to this:

Figure 16: Output from a Virtual Hard disk in VMM Library
Find the similar VHD and add the tags from VHD output from the above command.
$myVHD = Get-SCVirtualHardDisk | where {$_.Name –eq '<VHD File>'}
$tags = $myVHD.Tag
if ( $tags -cnotcontains "<TAG1>" ) { $tags += @("<TAG1>") }
if ( $tags -cnotcontains "<TAG2>" ) { $tags += @("<TAG2>") }
Set-scvirtualharddisk –virtualharddisk $myVHD –Tag $tags
Example:
$myVHD = Get-SCVirtualHardDisk | where {$_.Name –eq 'Win2012R2Base.vhdx'}
$tags = $myVHD.Tag
if ( $tags -cnotcontains "SQL2012" ) { $tags += @("SQL2012") }
if ( $tags -cnotcontains ".NET4.5" ) { $tags += @(".NET4.5") }
Set-scvirtualharddisk –virtualharddisk $myVHD –Tag $tags
Check that the tag has been applied by running the Get-SCVirtualHardDisk from above again.

Figure 17: Output from a Virtual Hard disk in VMM Library
Go back to VMM Library in VMM Console.
Right Click on the VHD where TAG's were moved to the other VHD and click delete.
Close the VMM Console.
Redeploy the VM Role to verify the solution works.
Change Family name or Release for one of the VHDs.
- Open one of the VHDs with a similar Family and Release.
- Change the Family name to another value that matches the VM Role readme specifications, click Ok to modify the VHD.
- Redeploy the VM Role to verify the solution works.
Provisioning a VM to a VMM Cloud with Hyper-V Cluster fails
Error: Windows Azure Pack gives an error when deploying a VM Role to VMM Cloud that hosts a Hyper-v Cluster.
Cause: The attributeCreateHighlyAvailableVmRoles is not set for the cluster and therefor the provision fails for a VM Role to a cloud that includes a Hyper-V cluster.
Solution: VM cloud must have a custom property called CreateHighlyAvailableVmRoles with its value set to true in order for the virtual machines to be configured as highly available.
- Logon to the VMM Server as Administrator.
- Open Virtual Machine Manager Console.
- Select VMs and Services.
- Right Click on the Cloud that the Plan in WAP is using and select Properties (e.g. Contoso).
- Select the Custom Properties tab.
- Click Manage Custom Properties.
- Select Cloud for Object Type.
- Click Create to create a new property .
- Name the property CreateHighlyAvailableVmRoles, and Click OK .
- Select the new property and click Add.
- Click OK.
- Type true for the property value.
- Click OK.
A Data Disk won't show in the Tenant Portal for a Gallery Item.
Error: No Data Disk is showing for a VM Role when deploying to a Cloud.
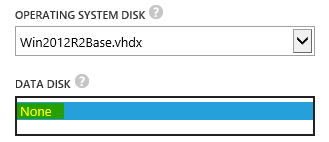
Figure 18: VM Role Form in WAP Tenant Portal
Cause: The needed attributes for the Data VHD is not set correctly.
Solution: The VHD in the VMM Library must have family name and release set and operating system set to none. To do this do the following:
Open Virtual Machine Manager Console.
Select Library > <Library Name> > VHDs.
Select a VHD that should be used as a Data Disk for a VM Role (e.g. Data Disk.vhdx).
Double click on the VHD.
Set the Family Name and Release fields to the same as the OS Disk for the VM Role (e.g. Windows Server 2012 Standard, Release: 1.0.0.0).
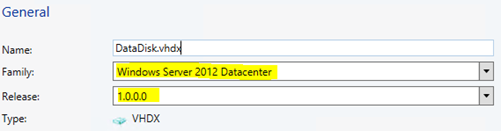
Figure 19: VHD Properties in VMM Console
Verify that the Data Disk Operating system is set to None.
Click OK.
Close VMM Console.
Re-do steps to verify the fix.
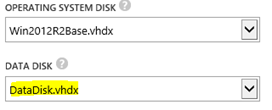
Figure 20: VM Role form in WAP Tenant Portal
I hope these list of possible challenges will better help you implement Windows Azure Pack and Gallery Items.
I would like to thank Stephen Baron for helping putting this blog post together.
Please let me know if you have any comments or let me know about other challenges you have experienced.
Until next time have fun with Windows Azure Pack and Gallery Items.