Writer: Cephas Lin (Microsoft)
Contributors: Oleg Bulanyy (Microsoft), Jimmy May (Microsoft)
NOTE: SQL Server Failover Clustering has been renamed AlwaysOn Failover Cluster Instances (FCI) in SQL Server 2012. For simplicity, the term FCI in this paper applies to either SQL Server Failover Clustering in SQL Server 2008 R2 or AlwaysOn FCI in SQL Server 2012.
This blog series is a follow-up to my whitepaper Migration Guide: Migrating to SQL Server 2012 Failover Clustering and Availability Groups from Prior Clustering and Mirroring Deployments. In this series, I will walk you through the following end-to-end migration scenario inside a test environment:
- From a SQL Server 2008 R2 solution: SQL Server Failover Clustering for high availability and database mirroring for disaster recovery
- To a SQL Server 2012 solution: AlwaysOn Failover Cluster Instances for high availability and AlwaysOn Availability Groups for disaster recovery
Before I go further, l want to refer you to a whitepaper AlwaysOn Architecture Guide: Building a High Availability and Disaster Recovery Solution by Using Failover Cluster Instances and Availability Groups. This is a great architectural guide for anyone who is interested about the end-to-end deployment of the AlwaysOn scenario I'm discussing in this blog.
How to Use This Blog Series
Giving direct, step-by-step migration guidance on an HADR solution is inherently dangerous because there are too many variations of SQL Server HADR scenarios in real-life production systems, and each presents unique pitfalls and require unique recommendations. Therefore, for production systems, Migration Guide: Migrating to SQL Server 2012 Failover Clustering and Availability Groups from Prior Clustering and Mirroring Deployments gives you the prescriptive guidance on the migration process without diving into the nuances. However, if you have already read that whitepaper, and still need help walking through the paces of migration in your test environment, then this blog can hopefully help you avoid many issues that can trip you up along the way. Once you can successfully migrate to SQL Server AlwaysOn in the test environment, the next natural step is to determine the tweaks you must make in order to migrate your production SQL Server deployment to SQL Server AlwaysOn.
A more severe way of saying the same thing is: DO NOT apply these migration steps blindly to your production system. To minimize the risks of your actual migration to SQL Server AlwaysOn, test these steps thoroughly against every aspect of your SQL Server deployment (I repeat, in a test environment) and incorporate all the necessary tweaks to accommodate your specific scenario.
Migration Walkthrough Overview
You will walk through the migration procedures as covered in the Migration With Intermediate Hardware section in Migration Guide: Migrating to SQL Server 2012 Failover Clustering and Availability Groups from Prior Clustering and Mirroring Deployments. The whitepaper presents a separate migration approach: Migration Without Intermediate Hardware. I suggest that you read through the two options and decide which approach is best suited for your needs.
Table 1 summarizes the solution characteristics between the starting point and the end point of the migration walkthrough.
Start |
Migration Strategy |
End |
|
|
|
Table 1 Solution Characteristics Between Migration End Points
At this point, it is useful to elaborate on what exactly you will do. The migration procedures are divided into the following sections. Step 0 shows you how to set up the pre-migration solution, and Step 1 is the beginning of the migration steps.
- Step 0: Set up Base Configuration as the Starting Point (Part 1)
- Step 1: Deploy FCI3 as Intermediate FCI (Part 2)
- Step 2: Redirect Database Mirroring to FCI3 (Part 2)
- Step 3: Reconfigure FCI2 with SQL Server 2012 (Part 2)
- Step 4: Make FCI3 the New Primary FCI and Create Availability Group (Part 2)
- Step 5: Reconfigure FCI1 and Join It to Availability Group (Part 3)
- Step 6: Remove Temporary FCI (Part 3)
If you build the base configuration I prescribe here, you will find a clear path to success in the migration procedure. Once you know what success looks like using the prescribed base configuration, you can determine the necessary deviations to address the needs of your HADR solution. You can instead use your existing HADR solution as the base configuration, but just realize that I cannot guarantee that my migration steps will work as-is with your HADR solution. In all likelihood, you will need to tweaks as you follow along. Make sure that you test the migration steps thoroughly before attempting the same steps on your production environment.
As client connectivity is an important part of the migration scenario, you will simulate a client workload on the database system to test the HADR capabilities of the system before, during, and after the migration process. In addition, the client workload is used to demonstrate how to configure client applications to work with AlwaysOn Availability Groups. If you choose to use your specific HADR solution as the starting point, you can likewise use your own client applications if you like.
Simplifications
Because the migration walkthrough is designed for a test environment, I oversimplify some important aspects of an FCI deployment. If you are keen, you will realize that I don't follow three industry best practices:
- Hyper-V In earlier testing cycles of a migration deployment, Hyper-V makes a convenient technology choice to quickly create and destroy SQL Server installations. In most production mission-critical applications, it does not perform as well as physical server blades.
- SAN Storage Production systems that utilize FCI for high availability require the performance and data security offered by a full storage area network (SAN) solution with fibre channel. Instead, the walkthrough asks you to use iSCSI Software Target to simulate SAN storage. You should fully understand that iSCSI is not practical for most real-life tier-1 environments.
- Network Redundancy Hardware redundancy is crucial on the physical network for a production environment to circumvent outages due to network anomalies. You are not asked to abide by this rule in the walkthrough, but you are advised to follow best practices in your production environment.
The walkthrough steps are the same whether you use physical hardware or simulate them in Hyper-V. Moreover, if you have access to SAN hardware and redundant network cards for your test environment, you are welcome to follow the steps using them instead of accepting the simplifications outlined above. As an alternative, you can introduce the hardware after you have successfully performed the migration steps without them.
Success Criteria
This walkthrough attempts to balance between a real-life migration environment and requirements and the generalized use case. While it does not possess the complexity of a real-life scenario, I have included a few common migration criteria.
- Maintain separation of roles, where applicable (domain administrator, database administrator, application developer)
- Minimize downtime during migration
- During migration, approximate the HADR capabilities of the pre-migration solution
Prerequisites
To implement the base configuration described in this whitepaper, you need following hardware and/or software. You can instead use your existing HADR solution as the base configuration as long as the solution characteristics are the same as the characteristics outlined in the Start column of Table 1.
- Hardware to implement the network topology in Figure 1, including servers, switches, and so on. You can also implement the network topology virtually using Hyper-V.
- Windows Server 2008 R2
- iSCSI Software Target 3.3
- SQL Server 2008 R2
- Visual Studio
- Windows 7
To perform the migration, you need the following additional hardware and/or software:
- Two server machines, physical or virtual, to use as intermediary hardware
- SQL Server 2012
- KB 976097
- KB 2494036
Step 0: Set up Base Configuration as the Starting Point
Finally, we are ready to start!
First, you implement the network topology shown in the diagram below and the SQL Server configuration outlined in the Start column of Table 1. The two subnets simulate the two sites in Contoso Corporation. The client machine will simulate write access to the SQL Server instances during the migration process. If you intend to use your existing HADR solution to test the migration steps, skip the rest of the steps in this blog and see Part 2.

Figure 1 Network Topology for Base Configuration
The walkthrough steps will focus on the software configuration on the server nodes and not on the implementation of the network topology.
Set up the Domain Controller and Accounts
Role: Domain Administrator
Set up the domain controller using the following steps:
- Set up the domain controller (DC) with the domain specifications as shown in the table below.
Domain Name |
CORP |
FQDN |
corp.contoso.com |
- Create the domain user accounts as shown in the table below:
Domain Administrator |
CORP\Administrator |
SQL Installation |
CORP\Install |
Database Administrator |
CORP\DBAdmin |
Client Application |
CORP\SQLClient |
SQL Service Accounts |
CORP\SQLSvc1 CORP\SQLSvc2 CORP\SQLSvc3 CORP\SQLAgent1 CORP\SQLAgent2 CORP\SQLAgent3 |
Deploy SQL Server 2008 R2 FCIs
Role: Database Administrator
Following the procedures at Quickly Setup SQL Server AlwaysOn Failover Cluster Instance (FCI) in Hyper-V, deploy the FCIs for the primary site and for the remote site using the specifications in the table below. The steps in the blog post can be applied to both physical and Hyper-V environments.
FCI Name |
FCI1 |
FCI2 |
WSFC Cluster Name |
Cluster1 |
Cluster2 |
SQL Server Version |
SQL Server 2008 R2 |
SQL Server 2008 R2 |
FCI Network Name |
FCI1 |
FCI2 |
Instance Name |
LIVE_INST |
LIVE_INST |
Machine Names |
PRIMARY1 PRIMARY2 |
REMOTE1 REMOTE2 |
File Server Name |
FILE1 |
FILE2 |
Cluster Service IP Address |
10.1.1.111 |
10.2.2.222 |
SQL Service Account |
CORP\SQLSvc1 |
CORP\SQLSvc2 |
SQL Agent Account |
CORP\SQLAgent1 |
CORP\SQLAgent2 |
The steps given in the blog post shows you how to setup your FCIs with the Node and Disk Majority quorum model. This quorum model preserves the high availability of your FCI in a single-node failure. Figure 2 and Figure 3 show the details of the two FCIs you created, as viewed in Failover Cluster Manager.
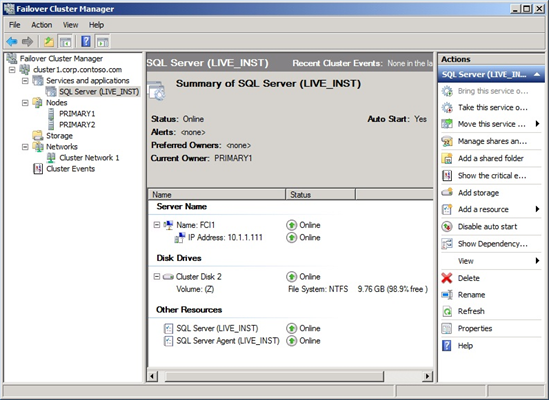
Figure 2 FCI1 in Base Configuration as Shown in Failover Cluster Manager

Figure 3 FCI2 in Base Configuration as Shown in Failover Cluster Manager
Create Databases and Configure Database Mirroring
Role: Database Administrator
Perform the following steps to create the databases and configure database mirroring sessions.
In SQL Server Management Studio (SSMS), connect to FCI1\LIVE_INST and create two databases, named DB1 and DB2.
Create a table in both DB1 and DB2, called, table1, using the following script:
CREATE TABLE dbo.table1(col1 nchar(10), col2 nchar(10))
Prepare the mirror databases for DB1 and DB2 in FCI2\LIVE_INST.
Establish the database mirroring sessions on the two databases using the specification shown in the table below.
Principal Role |
FCI1\LIVE_INST |
Principal Service Account |
CORP\SQLSvc1 |
Principal Endpoint |
TCP://fci1.corp.contoso.local:5022 |
Mirror Role |
FCI2\LIVE_INST |
Mirror Service Account |
CORP\SQLSvc2 |
Mirror Endpoint |
TCP://fci2.corp.contoso.local:5022 |
Operating Mode |
High performance (asynchronous) |
Figure 4 shows the view in the Mirroring tab of the Database Properties dialog after you have successfully set up database mirroring for DB1.
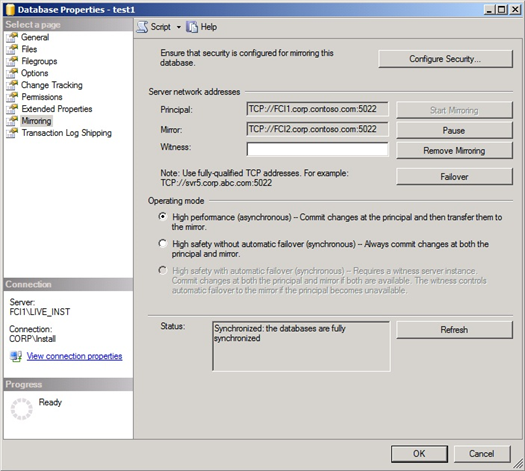
Figure 4 Database Properties View for Database Mirroring of DB1
Configure Access for the Client Application
Role: Database Administrator
You next set up a client workload to test the HADR capabilities of your HADR solution. First, you must make sure that the account used for client access (in this case, CORP\SQLClient) can access both the principal and mirror databases in the database mirroring configuration.
Perform the following steps in SSMS:
- In FCI1\LIVE_INST, add CORP\SQLClient as a login, and give it the following database memberships for both DB1 and DB2:
- db_datareader
- db_datawriter
- Perform a manual database mirroring failover for both DB1 and DB2 to FCI2\LIVE_INST.
- In FCI2\LIVE_INST, add CORP\SQLClient as a login, and give it the following database memberships for both DB1 and DB2:
- db_datareader
- db_datawriter
- Perform a manual database mirroring failover back to FCI1\LIVE_INST.
You will use CORP\SQLClient to connect to the databases from the client application. If a failure happens during your migration process, you have ensured that clients have access to FCI2\LIVE_INST.
Role: Application Developer
You are now ready to simulate the client workload. On CLIENT, perform the following steps to run the client application.
Install Windows 7.
Join the machine to the corp.contoso.com domain using the CORP\Administrator account.
Logout and login as CORP\Install.
Install SQL Server 2008 R2 Management Studio.
Start SSMS and connect to FCI1\LIVE_INST and FCI2\LIVE_INST to verify that the FCIs can accept remote connections.
Install Visual Studio.
Logout and login as CORP\SQLClient.
Create a console application (named ConsoleApplication1 by default), and then replace the code in Program.cs with the code below. This code continually attempts to connect to DB1 and insert a record. Each connection attempt has three retries and a 5-second interval between each retry. The connection logic is taken from Implementing Application Failover with Database Mirroring.
using System;
using System.Data;
using System.Data.SqlClient;
using System.Threading;
namespace ConsoleApplication1
{
class Program
{
const string connString = @"Server=FCI1\LIVE_INST;Failover Partner=FCI2\LIVE_INST;Initial Catalog=DB1;Integrated Security=True";
static bool ExecuteSQLWithRetry_NoResults(string strConn, string strCmd, int iRetryInterval, int iMaxRetries)
{
SqlConnection conn = null;
SqlCommand cmd = null;
for (int iRetryCount = 0; iRetryCount < iMaxRetries; iRetryCount++)
{
try
{
conn = new SqlConnection(strConn);
conn.Open();
if (null != conn && ConnectionState.Open == conn.State)
{
cmd = new SqlCommand(strCmd, conn);
cmd.ExecuteNonQuery();
return true;
}
}
catch (Exception ex) { }
finally
{
try
{
if (null != cmd)
cmd.Dispose();
if (null != conn && ConnectionState.Closed != conn.State)
conn.Close();
}
catch (Exception ex) { }
}
if (iRetryCount < iMaxRetries)
Thread.Sleep(iRetryInterval * 1000);
}
return false;
}
static void Main(string[] args)
{
while (true)
{
Random rand = new Random();
string cmdString = "Insert into table1 values (N'" + rand.Next() + "',N'" + rand.Next() + "')";
if (ExecuteSQLWithRetry_NoResults(connString, cmdString, 5, 3))
Console.WriteLine("Success: " + cmdString);
else Console.WriteLine("Error: " + cmdString);
}
}
}
}
Run the application by opening the Debug menu and clicking Start Debugging.
You have now finished setting up the base configuration and are ready to start the migration scenario to the SQL Server AlwaysOn solution in SQL Server 2012.
But wait, this blog has gotten too long already! In the next installment, you will actually start the migration steps. Stay tuned!
Comments
- Anonymous
November 10, 2014
The comment has been removed