ASP.NET Core 上的 Identity 简介
ASP.NET Core Identity:
- 一个 API,它支持用户界面 (UI) 登录功能。
- 管理用户、密码、配置文件数据、角色、声明、令牌、电子邮件确认等等。
用户可使用存储在 Identity 中的登录信息创建帐户,或者可使用外部登录提供程序。 支持的外部登录提供程序包括 Facebook、Google、Microsoft 帐户和 Twitter。
有关如何全局要求所有用户进行身份验证的信息,请参阅需要通过身份验证的用户。
GitHub 上提供了 Identity 源代码。 Scaffold Identity 和查看生成的文件,以查看与 Identity 的模板交互。
Identity 通常使用 SQL Server 数据库进行配置,以存储用户名、密码和配置文件数据。 或者,可使用其他持久性存储,例如 Azure 表存储。
在本主题中,你将学习如何使用 Identity 来注册、登录和注销用户。 注意:模板会将用户的用户名和电子邮件看做是相同的。 若要更详细了解如何创建使用 Identity 的应用,请参阅后续步骤。
ASP.NET Core Identity 与 Microsoft identity 平台无关。 Microsoft identity 平台是:
- Azure Active Directory (Azure AD) 开发人员平台的演变。
- 用于在 ASP.NET Core 应用中进行身份验证和授权的备用 identity 解决方案。
ASP.NET Core Identity 将用户界面 (UI) 登录功能添加到 ASP.NET Core Web 应用。 若要保护 Web API 和 SPA,请使用以下项之一:
- Microsoft Entra ID
- Azure Active Directory B2C (Azure AD B2C)
- Duende Identity Server
Duende Identity Server 是适用于 ASP.NET Core 的 OpenID Connect 和 OAuth 2.0 框架。 Duende Identity Server 支持以下安全功能:
- 身份验证即服务 (AaaS)
- 跨多个应用程序类型的单一登录/注销 (SSO)
- API 的访问控制
- Federation Gateway
重要事项
Duende Software 可能会要求你为 Duende Identity Server 的生产使用支付许可证费用。 有关详细信息,请参阅从 ASP.NET Core 5.0 迁移到 6.0。
有关详细信息,请参阅 Duende Identity Server 文档(Duende Software 网站)。
创建使用身份验证的 Web 应用
使用个人用户帐户创建“ASP.NET Core Web 应用程序”项目。
- 选择“ASP.NET Core Web 应用”模板。 将项目命名为 WebApp1,使其命名空间与项目下载项相同。 单击“确定”。
- 在“身份验证类型”输入中,选择“个人用户帐户”。
生成的项目提供 ASP.NET Core Identity 作为 Razor 类库。 IdentityRazor 类库公开具有 Identity 区域的终结点。 例如:
- /Identity/Account/Login
- /Identity/Account/Logout
- /Identity/Account/Manage
应用迁移
应用迁移以初始化数据库。
在包管理器控制台 (PMC) 中运行以下命令:
Update-Database
测试注册和登录
运行应用并注册用户。 根据屏幕大小,你可能需要选择导航切换按钮来查看“注册”和“登录”链接。
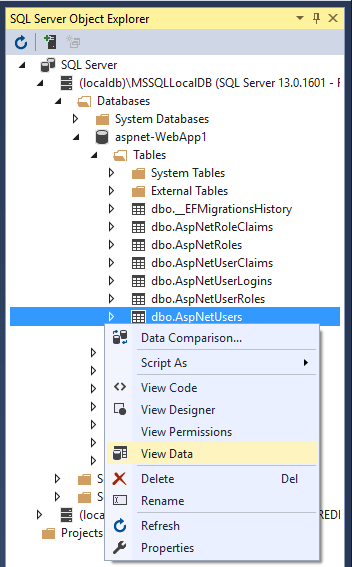
查看 Identity 数据库
- 在“视图”菜单中选择“SQL Server 对象资源管理器”(SSOX)。
- 导航到“(localdb)MSSQLLocalDB(SQL Server 13)”。 右键单击“dbo.AspNetUsers”>“查看数据”:
配置 Identity 服务
这些服务添加在 Program.cs 中。 典型模式是按以下顺序调用方法:
Add{Service}builder.Services.Configure{Service}
using Microsoft.AspNetCore.Identity;
using Microsoft.EntityFrameworkCore;
using WebApp1.Data;

var builder = WebApplication.CreateBuilder(args);

var connectionString = builder.Configuration.GetConnectionString("DefaultConnection");
builder.Services.AddDbContext<ApplicationDbContext>(options =>
    options.UseSqlServer(connectionString));
builder.Services.AddDatabaseDeveloperPageExceptionFilter();

builder.Services.AddDefaultIdentity<IdentityUser>(options => options.SignIn.RequireConfirmedAccount = true)
    .AddEntityFrameworkStores<ApplicationDbContext>();
builder.Services.AddRazorPages();

builder.Services.Configure<IdentityOptions>(options =>
{
    // Password settings.
    options.Password.RequireDigit = true;
    options.Password.RequireLowercase = true;
    options.Password.RequireNonAlphanumeric = true;
    options.Password.RequireUppercase = true;
    options.Password.RequiredLength = 6;
    options.Password.RequiredUniqueChars = 1;

    // Lockout settings.
    options.Lockout.DefaultLockoutTimeSpan = TimeSpan.FromMinutes(5);
    options.Lockout.MaxFailedAccessAttempts = 5;
    options.Lockout.AllowedForNewUsers = true;

    // User settings.
    options.User.AllowedUserNameCharacters =
    "abcdefghijklmnopqrstuvwxyzABCDEFGHIJKLMNOPQRSTUVWXYZ0123456789-._@+";
    options.User.RequireUniqueEmail = false;
});

builder.Services.ConfigureApplicationCookie(options =>
{
    // Cookie settings
    options.Cookie.HttpOnly = true;
    options.ExpireTimeSpan = TimeSpan.FromMinutes(5);

    options.LoginPath = "/Identity/Account/Login";
    options.AccessDeniedPath = "/Identity/Account/AccessDenied";
    options.SlidingExpiration = true;
});

var app = builder.Build();

if (app.Environment.IsDevelopment())
{
    app.UseMigrationsEndPoint();
}
else
{
    app.UseExceptionHandler("/Error");
    app.UseHsts();
}

app.UseHttpsRedirection();
app.UseStaticFiles();

app.UseRouting();

app.UseAuthentication();
app.UseAuthorization();

app.MapRazorPages();

app.Run();
上述代码用默认选项值来配置 Identity。 可通过依赖关系注入向应用提供服务。
通过调用 UseAuthentication 启用 Identity。 UseAuthentication 向请求管道添加身份验证中间件。
模板生成的应用不使用授权。 app.UseAuthorization 会被包含来内,确保在应用添加授权时按正确的顺序添加它。 必须按上述代码中所示的顺序调用 UseRouting、UseAuthentication 和 UseAuthorization。
有关 IdentityOptions 的详细信息,请参阅 IdentityOptions 和应用程序启动。
构建 Register、Login、LogOut 和 RegisterConfirmation 的基架
添加 Register、Login、LogOut 和 RegisterConfirmation 文件。 按照将基架 identity 搭建到具有授权的 Razor 项目说明来生成本节中显示的代码。
检查注册
当用户单击 Register 页面上的“注册”按钮时,会调用 RegisterModel.OnPostAsync 操作。 CreateAsync(TUser) 在 _userManager 对象上创建用户:
public async Task<IActionResult> OnPostAsync(string returnUrl = null)
{
    returnUrl = returnUrl ?? Url.Content("~/");
    ExternalLogins = (await _signInManager.GetExternalAuthenticationSchemesAsync())
                                          .ToList();
    if (ModelState.IsValid)
    {
        var user = new IdentityUser { UserName = Input.Email, Email = Input.Email };
        var result = await _userManager.CreateAsync(user, Input.Password);
        if (result.Succeeded)
        {
            _logger.LogInformation("User created a new account with password.");

            var code = await _userManager.GenerateEmailConfirmationTokenAsync(user);
            code = WebEncoders.Base64UrlEncode(Encoding.UTF8.GetBytes(code));
            var callbackUrl = Url.Page(
                "/Account/ConfirmEmail",
                pageHandler: null,
                values: new { area = "Identity", userId = user.Id, code = code },
                protocol: Request.Scheme);

            await _emailSender.SendEmailAsync(Input.Email, "Confirm your email",
                $"Please confirm your account by <a href='{HtmlEncoder.Default.Encode(callbackUrl)}'>clicking here</a>.");

            if (_userManager.Options.SignIn.RequireConfirmedAccount)
            {
                return RedirectToPage("RegisterConfirmation",
                                      new { email = Input.Email });
            }
            else
            {
                await _signInManager.SignInAsync(user, isPersistent: false);
                return LocalRedirect(returnUrl);
            }
        }
        foreach (var error in result.Errors)
        {
            ModelState.AddModelError(string.Empty, error.Description);
        }
    }

    // If we got this far, something failed, redisplay form
    return Page();
}
禁用默认帐户验证
使用默认模板时,会将用户重定向到 Account.RegisterConfirmation,用户可以从中选择一个链接来确认帐户。 默认值 Account.RegisterConfirmation 仅用于测试,应在生产应用中禁用自动帐户验证。
若要要求使用已确认的帐户,并防止注册时立即登录,请在 /Areas/Identity/Pages/Account/RegisterConfirmation.cshtml.cs 中设置 DisplayConfirmAccountLink = false:
[AllowAnonymous]
public class RegisterConfirmationModel : PageModel
{
    private readonly UserManager<IdentityUser> _userManager;
    private readonly IEmailSender _sender;

    public RegisterConfirmationModel(UserManager<IdentityUser> userManager, IEmailSender sender)
    {
        _userManager = userManager;
        _sender = sender;
    }

    public string Email { get; set; }

    public bool DisplayConfirmAccountLink { get; set; }

    public string EmailConfirmationUrl { get; set; }

    public async Task<IActionResult> OnGetAsync(string email, string returnUrl = null)
    {
        if (email == null)
        {
            return RedirectToPage("/Index");
        }

        var user = await _userManager.FindByEmailAsync(email);
        if (user == null)
        {
            return NotFound($"Unable to load user with email '{email}'.");
        }

        Email = email;
        // Once you add a real email sender, you should remove this code that lets you confirm the account
        DisplayConfirmAccountLink = false;
        if (DisplayConfirmAccountLink)
        {
            var userId = await _userManager.GetUserIdAsync(user);
            var code = await _userManager.GenerateEmailConfirmationTokenAsync(user);
            code = WebEncoders.Base64UrlEncode(Encoding.UTF8.GetBytes(code));
            EmailConfirmationUrl = Url.Page(
                "/Account/ConfirmEmail",
                pageHandler: null,
                values: new { area = "Identity", userId = userId, code = code, returnUrl = returnUrl },
                protocol: Request.Scheme);
        }

        return Page();
    }
}
登录
在以下情况中,会显示“登录”窗体:
- 选择“登录”链接时。
- 用户尝试访问他们无权访问的受限页面,或者他们未通过系统身份验证时。
提交登录页上的窗体时,将调用 OnPostAsync 操作。 对 _signInManager 对象调用 PasswordSignInAsync。
public async Task<IActionResult> OnPostAsync(string returnUrl = null)
{
    returnUrl = returnUrl ?? Url.Content("~/");

    if (ModelState.IsValid)
    {
        // This doesn't count login failures towards account lockout
        // To enable password failures to trigger account lockout,
        // set lockoutOnFailure: true
        var result = await _signInManager.PasswordSignInAsync(Input.Email,
                           Input.Password, Input.RememberMe, lockoutOnFailure: true);
        if (result.Succeeded)
        {
            _logger.LogInformation("User logged in.");
            return LocalRedirect(returnUrl);
        }
        if (result.RequiresTwoFactor)
        {
            return RedirectToPage("./LoginWith2fa", new
            {
                ReturnUrl = returnUrl,
                RememberMe = Input.RememberMe
            });
        }
        if (result.IsLockedOut)
        {
            _logger.LogWarning("User account locked out.");
            return RedirectToPage("./Lockout");
        }
        else
        {
            ModelState.AddModelError(string.Empty, "Invalid login attempt.");
            return Page();
        }
    }

    // If we got this far, something failed, redisplay form
    return Page();
}
若要了解如何做出授权决定,请参阅 ASP.NET Core 中的授权简介。
注销
“注销”链接会调用 LogoutModel.OnPost 操作。
using Microsoft.AspNetCore.Authorization;
using Microsoft.AspNetCore.Identity;
using Microsoft.AspNetCore.Mvc;
using Microsoft.AspNetCore.Mvc.RazorPages;
using Microsoft.Extensions.Logging;
using System.Threading.Tasks;

namespace WebApp1.Areas.Identity.Pages.Account
{
    [AllowAnonymous]
    public class LogoutModel : PageModel
    {
        private readonly SignInManager<IdentityUser> _signInManager;
        private readonly ILogger<LogoutModel> _logger;

        public LogoutModel(SignInManager<IdentityUser> signInManager, ILogger<LogoutModel> logger)
        {
            _signInManager = signInManager;
            _logger = logger;
        }

        public void OnGet()
        {
        }

        public async Task<IActionResult> OnPost(string returnUrl = null)
        {
            await _signInManager.SignOutAsync();
            _logger.LogInformation("User logged out.");
            if (returnUrl != null)
            {
                return LocalRedirect(returnUrl);
            }
            else
            {
                return RedirectToPage();
            }
        }
    }
}
在前面的代码中,代码 return RedirectToPage(); 需要是重定向,这样浏览器才会执行新请求,用户的 identity 才会更新。
SignOutAsync 清除存储在 cookie 中的用户声明。
在 Pages/Shared/_LoginPartial.cshtml 中指定了 Post:
@using Microsoft.AspNetCore.Identity
@inject SignInManager<IdentityUser> SignInManager
@inject UserManager<IdentityUser> UserManager

<ul class="navbar-nav">
@if (SignInManager.IsSignedIn(User))
{
    <li class="nav-item">
        <a  class="nav-link text-dark" asp-area="Identity" asp-page="/Account/Manage/Index"
                                              title="Manage">Hello @User.Identity.Name!</a>
    </li>
    <li class="nav-item">
        <form class="form-inline" asp-area="Identity" asp-page="/Account/Logout"
                                  asp-route-returnUrl="@Url.Page("/", new { area = "" })"
                                  method="post" >
            <button  type="submit" class="nav-link btn btn-link text-dark">Logout</button>
        </form>
    </li>
}
else
{
    <li class="nav-item">
        <a class="nav-link text-dark" asp-area="Identity" asp-page="/Account/Register">Register</a>
    </li>
    <li class="nav-item">
        <a class="nav-link text-dark" asp-area="Identity" asp-page="/Account/Login">Login</a>
    </li>
}
</ul>
测试 Identity
默认 Web 项目模板允许匿名访问 home 页。 若要测试 Identity,请添加 [Authorize]:
using Microsoft.AspNetCore.Authorization;
using Microsoft.AspNetCore.Mvc.RazorPages;
using Microsoft.Extensions.Logging;

namespace WebApp1.Pages
{
    [Authorize]
    public class PrivacyModel : PageModel
    {
        private readonly ILogger<PrivacyModel> _logger;

        public PrivacyModel(ILogger<PrivacyModel> logger)
        {
            _logger = logger;
        }

        public void OnGet()
        {
        }
    }
}
如果已登录,请注销。请运行应用并选择Privacy链接。 将被重定向到登录页。
了解 Identity
若要更详细地了解 Identity:
- 创建完整的 identity UI 源
- 检查每个页面的源,并单步执行调试程序。
Identity 组件
所有依赖 Identity 的 NuGet 包都包含在 ASP.NET Core 共享框架中。
Identity 的主包是 Microsoft.AspNetCore.Identity。 此包包含 ASP.NET Core Identity 的核心接口集,并且由 Microsoft.AspNetCore.Identity.EntityFrameworkCore 包含。
迁移到 ASP.NET Core Identity
有关迁移现有 Identity 存储的详细信息和指导,请参阅迁移身份验证和 Identity。
设置密码强度
有关设置最小密码要求的示例,请查看配置。
AddDefaultIdentity 和 AddIdentity
ASP.NET Core 2.1 中引入了 AddDefaultIdentity。 调用 AddDefaultIdentity 类似于调用以下内容:
有关详细信息,请参阅 AddDefaultIdentity 源。
禁止发布静态 Identity 资产
若要防止将静态 Identity 资产(Identity UI 的样式表和 JavaScript 文件)发布到 Web 根,请将以下 ResolveStaticWebAssetsInputsDependsOn 属性和 RemoveIdentityAssets 目标添加到应用的项目文件中:
<PropertyGroup>
  <ResolveStaticWebAssetsInputsDependsOn>RemoveIdentityAssets</ResolveStaticWebAssetsInputsDependsOn>
</PropertyGroup>

<Target Name="RemoveIdentityAssets">
  <ItemGroup>
    <StaticWebAsset Remove="@(StaticWebAsset)" Condition="%(SourceId) == 'Microsoft.AspNetCore.Identity.UI'" />
  </ItemGroup>
</Target>
后续步骤
ASP.NET Core Identity:
- 一个 API,它支持用户界面 (UI) 登录功能。
- 管理用户、密码、配置文件数据、角色、声明、令牌、电子邮件确认等等。
用户可使用存储在 Identity 中的登录信息创建帐户,或者可使用外部登录提供程序。 支持的外部登录提供程序包括 Facebook、Google、Microsoft 帐户和 Twitter。
有关如何全局要求所有用户进行身份验证的信息,请参阅需要通过身份验证的用户。
GitHub 上提供了 Identity 源代码。 Scaffold Identity 和查看生成的文件,以查看与 Identity 的模板交互。
Identity 通常使用 SQL Server 数据库进行配置,以存储用户名、密码和配置文件数据。 或者,可使用其他持久性存储,例如 Azure 表存储。
在本主题中,你将学习如何使用 Identity 来注册、登录和注销用户。 注意:模板会将用户的用户名和电子邮件看做是相同的。 若要更详细了解如何创建使用 Identity 的应用,请参阅后续步骤。
- Azure Active Directory (Azure AD) 开发人员平台的演变。
- 用于在 ASP.NET Core 应用中进行身份验证和授权的备用 identity 解决方案。
- 与 ASP.NET Core Identity 无关。
ASP.NET Core Identity 将用户界面 (UI) 登录功能添加到 ASP.NET Core Web 应用。 若要保护 Web API 和 SPA,请使用以下项之一:
- Microsoft Entra ID
- Azure Active Directory B2C (Azure AD B2C)
- Duende IdentityServer。 Duende IdentityServer 是第三方产品。
Duende IdentityServer 是适用于 ASP.NET Core 的 OpenID Connect 和 OAuth 2.0 框架。 Duende IdentityServer 支持以下安全功能:
- 身份验证即服务 (AaaS)
- 跨多个应用程序类型的单一登录/注销 (SSO)
- API 的访问控制
- Federation Gateway
有关详细信息,请参阅 Duende IdentityServer 概述。
有关其他身份验证提供程序的详细信息,请参阅适用于 ASP.NET Core 的社区 OSS 身份验证选项
创建使用身份验证的 Web 应用
使用个人用户帐户创建“ASP.NET Core Web 应用程序”项目。
- 选择“文件”>“新建”>“项目”。
- 选择“ASP.NET Core Web 应用程序”。 将项目命名为 WebApp1,使其命名空间与项目下载项相同。 单击“确定” 。
- 选择 ASP.NET Core Web 应用程序,然后选择“更改身份验证”。
- 选择“个人用户帐户”,然后单击“确定”。
生成的项目提供 ASP.NET Core Identity 作为 Razor 类库。 IdentityRazor 类库公开具有 Identity 区域的终结点。 例如:
- /Identity/Account/Login
- /Identity/Account/Logout
- /Identity/Account/Manage
应用迁移
应用迁移以初始化数据库。
在包管理器控制台 (PMC) 中运行以下命令:
PM> Update-Database
测试注册和登录
运行应用并注册用户。 根据屏幕大小,你可能需要选择导航切换按钮来查看“注册”和“登录”链接。
查看 Identity 数据库
- 在“视图”菜单中选择“SQL Server 对象资源管理器”(SSOX)。
- 导航到“(localdb)MSSQLLocalDB(SQL Server 13)”。 右键单击“dbo.AspNetUsers”>“查看数据”:
配置 Identity 服务
这些服务添加在 ConfigureServices 中。 典型模式是调用所有 Add{Service} 方法,然后调用所有 services.Configure{Service} 方法。
public void ConfigureServices(IServiceCollection services)
{
    services.AddDbContext<ApplicationDbContext>(options =>
     // options.UseSqlite(
        options.UseSqlServer(
            Configuration.GetConnectionString("DefaultConnection")));
    services.AddDefaultIdentity<IdentityUser>(options => options.SignIn.RequireConfirmedAccount = true)
        .AddEntityFrameworkStores<ApplicationDbContext>();
    services.AddRazorPages();

    services.Configure<IdentityOptions>(options =>
    {
        // Password settings.
        options.Password.RequireDigit = true;
        options.Password.RequireLowercase = true;
        options.Password.RequireNonAlphanumeric = true;
        options.Password.RequireUppercase = true;
        options.Password.RequiredLength = 6;
        options.Password.RequiredUniqueChars = 1;

        // Lockout settings.
        options.Lockout.DefaultLockoutTimeSpan = TimeSpan.FromMinutes(5);
        options.Lockout.MaxFailedAccessAttempts = 5;
        options.Lockout.AllowedForNewUsers = true;

        // User settings.
        options.User.AllowedUserNameCharacters =
        "abcdefghijklmnopqrstuvwxyzABCDEFGHIJKLMNOPQRSTUVWXYZ0123456789-._@+";
        options.User.RequireUniqueEmail = false;
    });

    services.ConfigureApplicationCookie(options =>
    {
        // Cookie settings
        options.Cookie.HttpOnly = true;
        options.ExpireTimeSpan = TimeSpan.FromMinutes(5);

        options.LoginPath = "/Identity/Account/Login";
        options.AccessDeniedPath = "/Identity/Account/AccessDenied";
        options.SlidingExpiration = true;
    });
}
上述突出显示的代码用默认选项值来配置 Identity。 可通过依赖关系注入向应用提供服务。
通过调用 UseAuthentication 启用 Identity。 UseAuthentication 向请求管道添加身份验证中间件。
public void Configure(IApplicationBuilder app, IWebHostEnvironment env)
{
    if (env.IsDevelopment())
    {
        app.UseDeveloperExceptionPage();
        app.UseDatabaseErrorPage();
    }
    else
    {
        app.UseExceptionHandler("/Error");
        app.UseHsts();
    }

    app.UseHttpsRedirection();
    app.UseStaticFiles();

    app.UseRouting();

    app.UseAuthentication();
    app.UseAuthorization();

    app.UseEndpoints(endpoints =>
    {
        endpoints.MapRazorPages();
    });
}
public void ConfigureServices(IServiceCollection services)
{
    services.AddDbContext<ApplicationDbContext>(options =>
        // options.UseSqlite(
        options.UseSqlServer(
            Configuration.GetConnectionString("DefaultConnection")));
    services.AddDatabaseDeveloperPageExceptionFilter();
    services.AddDefaultIdentity<IdentityUser>(options => options.SignIn.RequireConfirmedAccount = true)
        .AddEntityFrameworkStores<ApplicationDbContext>();
    services.AddRazorPages();

    services.Configure<IdentityOptions>(options =>
    {
        // Password settings.
        options.Password.RequireDigit = true;
        options.Password.RequireLowercase = true;
        options.Password.RequireNonAlphanumeric = true;
        options.Password.RequireUppercase = true;
        options.Password.RequiredLength = 6;
        options.Password.RequiredUniqueChars = 1;

        // Lockout settings.
        options.Lockout.DefaultLockoutTimeSpan = TimeSpan.FromMinutes(5);
        options.Lockout.MaxFailedAccessAttempts = 5;
        options.Lockout.AllowedForNewUsers = true;

        // User settings.
        options.User.AllowedUserNameCharacters =
        "abcdefghijklmnopqrstuvwxyzABCDEFGHIJKLMNOPQRSTUVWXYZ0123456789-._@+";
        options.User.RequireUniqueEmail = false;
    });

    services.ConfigureApplicationCookie(options =>
    {
        // Cookie settings
        options.Cookie.HttpOnly = true;
        options.ExpireTimeSpan = TimeSpan.FromMinutes(5);

        options.LoginPath = "/Identity/Account/Login";
        options.AccessDeniedPath = "/Identity/Account/AccessDenied";
        options.SlidingExpiration = true;
    });
}
上述代码用默认选项值来配置 Identity。 可通过依赖关系注入向应用提供服务。
通过调用 UseAuthentication 启用 Identity。 UseAuthentication 向请求管道添加身份验证中间件。
public void Configure(IApplicationBuilder app, IWebHostEnvironment env)
{
    if (env.IsDevelopment())
    {
        app.UseDeveloperExceptionPage();
        app.UseMigrationsEndPoint();
    }
    else
    {
        app.UseExceptionHandler("/Error");
        app.UseHsts();
    }

    app.UseHttpsRedirection();
    app.UseStaticFiles();

    app.UseRouting();

    app.UseAuthentication();
    app.UseAuthorization();

    app.UseEndpoints(endpoints =>
    {
        endpoints.MapRazorPages();
    });
}
模板生成的应用不使用授权。 app.UseAuthorization 会被包含来内,确保在应用添加授权时按正确的顺序添加它。 必须按上述代码中所示的顺序调用 UseRouting、UseAuthentication、UseAuthorization 和 UseEndpoints。
有关 IdentityOptions 和 Startup 的详细信息,请参阅 IdentityOptions 和应用程序启动。
构建 Register、Login、LogOut 和 RegisterConfirmation 的基架
添加 Register、Login、LogOut 和 RegisterConfirmation 文件。 按照将基架 identity 搭建到具有授权的 Razor 项目说明来生成本节中显示的代码。
检查注册
当用户单击 Register 页面上的“注册”按钮时,会调用 RegisterModel.OnPostAsync 操作。 CreateAsync(TUser) 在 _userManager 对象上创建用户:
public async Task<IActionResult> OnPostAsync(string returnUrl = null)
{
    returnUrl = returnUrl ?? Url.Content("~/");
    ExternalLogins = (await _signInManager.GetExternalAuthenticationSchemesAsync())
                                          .ToList();
    if (ModelState.IsValid)
    {
        var user = new IdentityUser { UserName = Input.Email, Email = Input.Email };
        var result = await _userManager.CreateAsync(user, Input.Password);
        if (result.Succeeded)
        {
            _logger.LogInformation("User created a new account with password.");

            var code = await _userManager.GenerateEmailConfirmationTokenAsync(user);
            code = WebEncoders.Base64UrlEncode(Encoding.UTF8.GetBytes(code));
            var callbackUrl = Url.Page(
                "/Account/ConfirmEmail",
                pageHandler: null,
                values: new { area = "Identity", userId = user.Id, code = code },
                protocol: Request.Scheme);

            await _emailSender.SendEmailAsync(Input.Email, "Confirm your email",
                $"Please confirm your account by <a href='{HtmlEncoder.Default.Encode(callbackUrl)}'>clicking here</a>.");

            if (_userManager.Options.SignIn.RequireConfirmedAccount)
            {
                return RedirectToPage("RegisterConfirmation",
                                      new { email = Input.Email });
            }
            else
            {
                await _signInManager.SignInAsync(user, isPersistent: false);
                return LocalRedirect(returnUrl);
            }
        }
        foreach (var error in result.Errors)
        {
            ModelState.AddModelError(string.Empty, error.Description);
        }
    }

    // If we got this far, something failed, redisplay form
    return Page();
}
禁用默认帐户验证
使用默认模板时,会将用户重定向到 Account.RegisterConfirmation,用户可以从中选择一个链接来确认帐户。 默认值 Account.RegisterConfirmation 仅用于测试,应在生产应用中禁用自动帐户验证。
若要要求使用已确认的帐户,并防止注册时立即登录,请在 /Areas/Identity/Pages/Account/RegisterConfirmation.cshtml.cs 中设置 DisplayConfirmAccountLink = false:
[AllowAnonymous]
public class RegisterConfirmationModel : PageModel
{
    private readonly UserManager<IdentityUser> _userManager;
    private readonly IEmailSender _sender;

    public RegisterConfirmationModel(UserManager<IdentityUser> userManager, IEmailSender sender)
    {
        _userManager = userManager;
        _sender = sender;
    }

    public string Email { get; set; }

    public bool DisplayConfirmAccountLink { get; set; }

    public string EmailConfirmationUrl { get; set; }

    public async Task<IActionResult> OnGetAsync(string email, string returnUrl = null)
    {
        if (email == null)
        {
            return RedirectToPage("/Index");
        }

        var user = await _userManager.FindByEmailAsync(email);
        if (user == null)
        {
            return NotFound($"Unable to load user with email '{email}'.");
        }

        Email = email;
        // Once you add a real email sender, you should remove this code that lets you confirm the account
        DisplayConfirmAccountLink = false;
        if (DisplayConfirmAccountLink)
        {
            var userId = await _userManager.GetUserIdAsync(user);
            var code = await _userManager.GenerateEmailConfirmationTokenAsync(user);
            code = WebEncoders.Base64UrlEncode(Encoding.UTF8.GetBytes(code));
            EmailConfirmationUrl = Url.Page(
                "/Account/ConfirmEmail",
                pageHandler: null,
                values: new { area = "Identity", userId = userId, code = code, returnUrl = returnUrl },
                protocol: Request.Scheme);
        }

        return Page();
    }
}
登录
在以下情况中,会显示“登录”窗体:
- 选择“登录”链接时。
- 用户尝试访问他们无权访问的受限页面,或者他们未通过系统身份验证时。
提交登录页上的窗体时,将调用 OnPostAsync 操作。 对 _signInManager 对象调用 PasswordSignInAsync。
public async Task<IActionResult> OnPostAsync(string returnUrl = null)
{
    returnUrl = returnUrl ?? Url.Content("~/");

    if (ModelState.IsValid)
    {
        // This doesn't count login failures towards account lockout
        // To enable password failures to trigger account lockout,
        // set lockoutOnFailure: true
        var result = await _signInManager.PasswordSignInAsync(Input.Email,
                           Input.Password, Input.RememberMe, lockoutOnFailure: true);
        if (result.Succeeded)
        {
            _logger.LogInformation("User logged in.");
            return LocalRedirect(returnUrl);
        }
        if (result.RequiresTwoFactor)
        {
            return RedirectToPage("./LoginWith2fa", new
            {
                ReturnUrl = returnUrl,
                RememberMe = Input.RememberMe
            });
        }
        if (result.IsLockedOut)
        {
            _logger.LogWarning("User account locked out.");
            return RedirectToPage("./Lockout");
        }
        else
        {
            ModelState.AddModelError(string.Empty, "Invalid login attempt.");
            return Page();
        }
    }

    // If we got this far, something failed, redisplay form
    return Page();
}
若要了解如何做出授权决定,请参阅 ASP.NET Core 中的授权简介。
注销
“注销”链接会调用 LogoutModel.OnPost 操作。
using Microsoft.AspNetCore.Authorization;
using Microsoft.AspNetCore.Identity;
using Microsoft.AspNetCore.Mvc;
using Microsoft.AspNetCore.Mvc.RazorPages;
using Microsoft.Extensions.Logging;
using System.Threading.Tasks;

namespace WebApp1.Areas.Identity.Pages.Account
{
    [AllowAnonymous]
    public class LogoutModel : PageModel
    {
        private readonly SignInManager<IdentityUser> _signInManager;
        private readonly ILogger<LogoutModel> _logger;

        public LogoutModel(SignInManager<IdentityUser> signInManager, ILogger<LogoutModel> logger)
        {
            _signInManager = signInManager;
            _logger = logger;
        }

        public void OnGet()
        {
        }

        public async Task<IActionResult> OnPost(string returnUrl = null)
        {
            await _signInManager.SignOutAsync();
            _logger.LogInformation("User logged out.");
            if (returnUrl != null)
            {
                return LocalRedirect(returnUrl);
            }
            else
            {
                return RedirectToPage();
            }
        }
    }
}
在前面的代码中,代码 return RedirectToPage(); 需要是重定向,这样浏览器才会执行新请求,用户的 identity 才会更新。
SignOutAsync 清除存储在 cookie 中的用户声明。
在 Pages/Shared/_LoginPartial.cshtml 中指定了 Post:
@using Microsoft.AspNetCore.Identity
@inject SignInManager<IdentityUser> SignInManager
@inject UserManager<IdentityUser> UserManager

<ul class="navbar-nav">
@if (SignInManager.IsSignedIn(User))
{
    <li class="nav-item">
        <a  class="nav-link text-dark" asp-area="Identity" asp-page="/Account/Manage/Index"
                                              title="Manage">Hello @User.Identity.Name!</a>
    </li>
    <li class="nav-item">
        <form class="form-inline" asp-area="Identity" asp-page="/Account/Logout"
                                  asp-route-returnUrl="@Url.Page("/", new { area = "" })"
                                  method="post" >
            <button  type="submit" class="nav-link btn btn-link text-dark">Logout</button>
        </form>
    </li>
}
else
{
    <li class="nav-item">
        <a class="nav-link text-dark" asp-area="Identity" asp-page="/Account/Register">Register</a>
    </li>
    <li class="nav-item">
        <a class="nav-link text-dark" asp-area="Identity" asp-page="/Account/Login">Login</a>
    </li>
}
</ul>
测试 Identity
默认 Web 项目模板允许匿名访问 home 页。 若要测试 Identity,请添加 [Authorize]:
using Microsoft.AspNetCore.Authorization;
using Microsoft.AspNetCore.Mvc.RazorPages;
using Microsoft.Extensions.Logging;

namespace WebApp1.Pages
{
    [Authorize]
    public class PrivacyModel : PageModel
    {
        private readonly ILogger<PrivacyModel> _logger;

        public PrivacyModel(ILogger<PrivacyModel> logger)
        {
            _logger = logger;
        }

        public void OnGet()
        {
        }
    }
}
如果已登录,请注销。请运行应用并选择Privacy链接。 将被重定向到登录页。
了解 Identity
若要更详细地了解 Identity:
- 创建完整的 identity UI 源
- 检查每个页面的源,并单步执行调试程序。
Identity 组件
所有依赖 Identity 的 NuGet 包都包含在 ASP.NET Core 共享框架中。
Identity 的主包是 Microsoft.AspNetCore.Identity。 此包包含 ASP.NET Core Identity 的核心接口集,并且由 Microsoft.AspNetCore.Identity.EntityFrameworkCore 包含。
迁移到 ASP.NET Core Identity
有关迁移现有 Identity 存储的详细信息和指导,请参阅迁移身份验证和 Identity。
设置密码强度
有关设置最小密码要求的示例,请查看配置。
禁止发布静态 Identity 资产
若要防止将静态 Identity 资产(Identity UI 的样式表和 JavaScript 文件)发布到 Web 根,请将以下 ResolveStaticWebAssetsInputsDependsOn 属性和 RemoveIdentityAssets 目标添加到应用的项目文件中:
<PropertyGroup>
  <ResolveStaticWebAssetsInputsDependsOn>RemoveIdentityAssets</ResolveStaticWebAssetsInputsDependsOn>
</PropertyGroup>

<Target Name="RemoveIdentityAssets">
  <ItemGroup>
    <StaticWebAsset Remove="@(StaticWebAsset)" Condition="%(SourceId) == 'Microsoft.AspNetCore.Identity.UI'" />
  </ItemGroup>
</Target>
后续步骤
- ASP.NET Core Identity 源代码
- AddDefaultIdentity 源
- 若要了解如何使用 SQLite 配置 Identity,请查看此 GitHub 问题。
- 配置 Identity
- 通过授权保护的用户数据创建 ASP.NET Core 应用
- 在 ASP.NET Core 项目中向 Identity 添加和下载用户数据,以及从中删除用户数据
- 为 ASP.NET Core 中的 TOTP 验证器应用启用 QR 码生成
- 将身份验证和 Identity 迁移到 ASP.NET Core
- ASP.NET Core 中的帐户确认和密码恢复
- ASP.NET Core 中使用短信的双因素身份验证
- 在 Web 场中托管 ASP.NET Core