作者 :Hao Kung、 Pranav Rastogi、 Rick Anderson、 Suhas Joshi
本教程介绍如何使用短信和电子邮件设置双因素身份验证 (2FA) 。
本文由里克·安德森· (·@RickAndMSFT·) 、普拉纳夫·拉斯托吉 (@rustd) 、浩功和苏哈斯·乔希撰写。 NuGet 示例主要由 Hao Kung 编写。
本主题涵盖以下内容:
生成标识示例
在本部分中,你将使用 NuGet 下载我们将使用的示例。 首先安装并运行 Visual Studio Express 2013 for Web 或 Visual Studio 2013。 安装 Visual Studio 2013 Update 2 或更高版本。
注意
警告:必须安装 Visual Studio 2013 Update 2 才能完成本教程。
创建新的 空 ASP.NET Web 项目。
在包管理器控制台中,输入以下命令:
Install-Package SendGrid
Install-Package -Prerelease Microsoft.AspNet.Identity.Samples在本教程中,我们将使用 SendGrid 发送电子邮件,并使用 Twilio 或 ASPSMS 发送短信。 包
Identity.Samples将安装我们将使用的代码。将 项目设置为使用 SSL。
可选:按照我的Email确认教程中的说明挂接 SendGrid,然后运行应用并注册电子邮件帐户。
选: 从示例中删除演示电子邮件链接确认代码 (
ViewBag.Link帐户控制器中的代码。DisplayEmail请参阅 和ForgotPasswordConfirmation操作方法和剃须刀视图) 。选:
ViewBag.Status从“管理和帐户”控制器以及 Views\Account\VerifyCode.cshtml 和 Views\Manage\VerifyPhoneNumber.cshtml razor 视图中删除代码。 或者,你可以保留ViewBag.Status显示来测试此应用在本地的工作方式,而无需连接和发送电子邮件和短信。
注意
警告:如果更改此示例中的任何安全设置,生产应用将需要进行安全审核,以显式调用所做的更改。
为双重身份验证设置短信
本教程提供有关使用 Twilio 或 ASPSMS 的说明,但你可以使用任何其他短信提供程序。
使用短信提供程序创建用户帐户
安装其他包或添加服务引用
Twilio:
在“包管理器控制台”中,输入以下命令:
Install-Package TwilioASPSMS:
需要添加以下服务引用: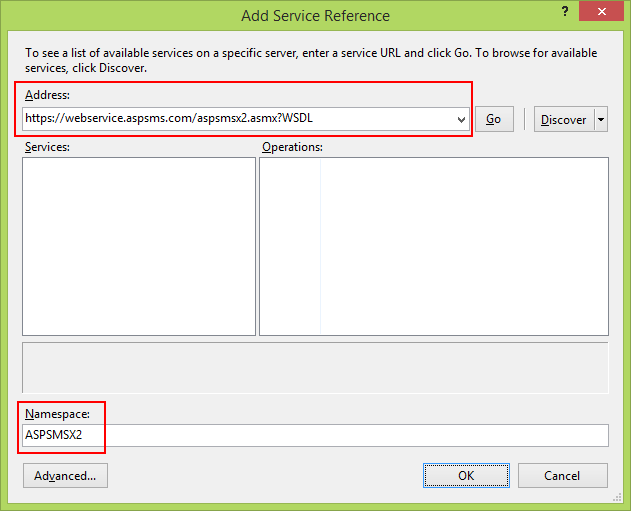
地址:
https://webservice.aspsms.com/aspsmsx2.asmx?WSDL命名空间:
ASPSMSX2找出短信提供程序用户凭据
Twilio:
在 Twilio 帐户的“ 仪表板 ”选项卡中,复制 “帐户 SID ”和 “身份验证”令牌。ASPSMS:
在帐户设置中,导航到 “Userkey” ,并将其与自定义 密码一起复制。稍后,我们会将这些值存储在变量
SMSAccountIdentification和SMSAccountPassword中。指定 SenderID/发信方
Twilio:
在“ 号码 ”选项卡中,复制 Twilio 电话号码。ASPSMS:
在“ 解锁发起方 ”菜单中,解锁一个或多个发起方,或选择字母数字发起人 (并非所有网络) 都支持。稍后,我们将此值存储在变量
SMSAccountFrom中。将短信提供程序凭据传输到应用中
使凭据和发件人电话号码可供应用使用:
public static class Keys
{
   public static string SMSAccountIdentification = "My Idenfitication";
   public static string SMSAccountPassword = "My Password";
   public static string SMSAccountFrom = "+15555551234";
}
警告
安全性 - 切勿将敏感数据存储在源代码中。 帐户和凭据将添加到上述代码中,使示例保持简单。 请参阅 Jon Atten 的 ASP.NET MVC:使专用设置远离源代码管理。
实现到 SMS 提供程序的数据传输
SmsService在 App_Start\IdentityConfig.cs 文件中配置 类。根据使用的短信提供程序激活 Twilio 或 ASPSMS 部分:
public class SmsService : IIdentityMessageService
{
    public Task SendAsync(IdentityMessage message)
    {
        // Twilio Begin
        // var Twilio = new TwilioRestClient(
        //   Keys.SMSAccountIdentification,
        //   Keys.SMSAccountPassword);
        // var result = Twilio.SendMessage(
        //   Keys.SMSAccountFrom,
        //   message.Destination, message.Body
        // );
        // Status is one of Queued, Sending, Sent, Failed or null if the number is not valid
        // Trace.TraceInformation(result.Status);
        // Twilio doesn't currently have an async API, so return success.
        // return Task.FromResult(0);
        // Twilio End

        // ASPSMS Begin
        // var soapSms = new WebApplication1.ASPSMSX2.ASPSMSX2SoapClient("ASPSMSX2Soap");
        // soapSms.SendSimpleTextSMS(
        //   Keys.SMSAccountIdentification,
        //   Keys.SMSAccountPassword,
        //   message.Destination,
        //   Keys.SMSAccountFrom,
        //   message.Body);
        // soapSms.Close();
        // return Task.FromResult(0);
        // ASPSMS End
    }
}
运行应用并使用之前注册的帐户登录。
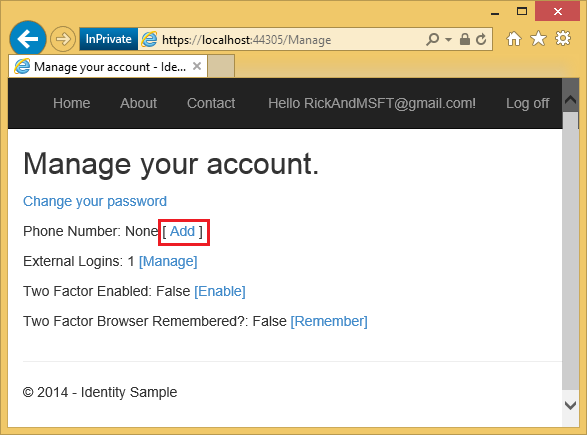
单击“用户 ID”,这将激活控制器中的
IndexManage操作方法。
单击“添加”。
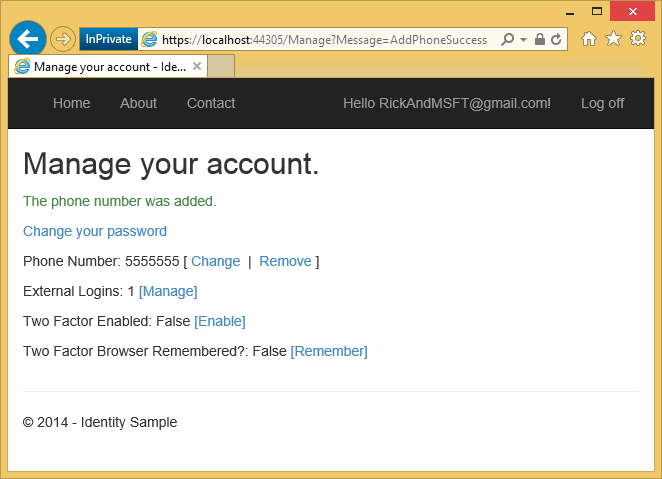
几秒钟后,你将收到一条包含验证码的短信。 输入并按 “提交”。

“管理”视图显示已添加电话号码。
检查代码
// GET: /Account/Index
public async Task<ActionResult> Index(ManageMessageId? message)
{
    ViewBag.StatusMessage =
        message == ManageMessageId.ChangePasswordSuccess ? "Your password has been changed."
        : message == ManageMessageId.SetPasswordSuccess ? "Your password has been set."
        : message == ManageMessageId.SetTwoFactorSuccess ? "Your two factor provider has been set."
        : message == ManageMessageId.Error ? "An error has occurred."
        : message == ManageMessageId.AddPhoneSuccess ? "The phone number was added."
        : message == ManageMessageId.RemovePhoneSuccess ? "Your phone number was removed."
        : "";

    var model = new IndexViewModel
    {
        HasPassword = HasPassword(),
        PhoneNumber = await UserManager.GetPhoneNumberAsync(User.Identity.GetUserId()),
        TwoFactor = await UserManager.GetTwoFactorEnabledAsync(User.Identity.GetUserId()),
        Logins = await UserManager.GetLoginsAsync(User.Identity.GetUserId()),
        BrowserRemembered = await AuthenticationManager.TwoFactorBrowserRememberedAsync(User.Identity.GetUserId())
    };
    return View(model);
}
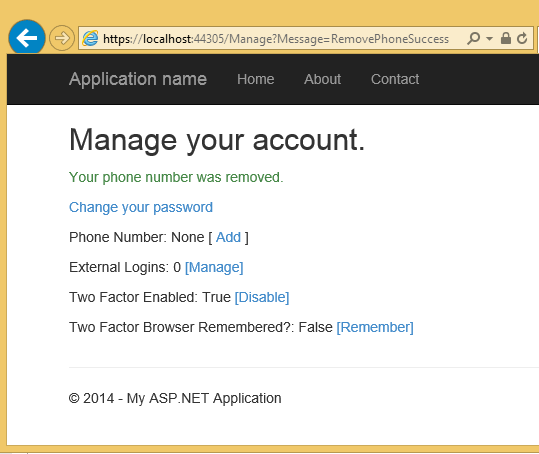
Index控制器中的Manage操作方法基于上一操作设置状态消息,并提供用于更改本地密码或添加本地帐户的链接。 此方法 Index 还显示状态或你的 2FA 电话号码、外部登录、已启用 2FA,并记住此浏览器的 2FA 方法, (稍后) 介绍。 单击标题栏中 (电子邮件) 的用户 ID 不会传递消息。 单击“ 电话号码:删除 链接”作为查询字符串传递 Message=RemovePhoneSuccess 。
https://localhost:44300/Manage?Message=RemovePhoneSuccess
[ ]
]
操作 AddPhoneNumber 方法显示一个对话框,用于输入可以接收短信的电话号码。
// GET: /Account/AddPhoneNumber
public ActionResult AddPhoneNumber()
{
   return View();
}
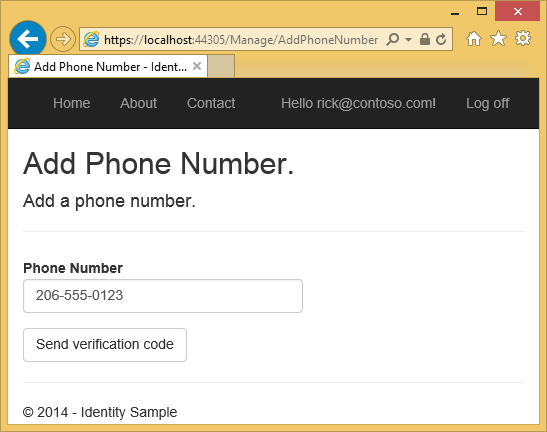
单击“ 发送验证码 ”按钮将电话号码发布到 HTTP POST AddPhoneNumber 操作方法。
// POST: /Account/AddPhoneNumber
[HttpPost]
[ValidateAntiForgeryToken]
public async Task<ActionResult> AddPhoneNumber(AddPhoneNumberViewModel model)
{
    if (!ModelState.IsValid)
    {
        return View(model);
    }

    // Generate the token
    var code = await UserManager.GenerateChangePhoneNumberTokenAsync(
                               User.Identity.GetUserId(), model.Number);
    if (UserManager.SmsService != null)
    {
        var message = new IdentityMessage
        {
            Destination = model.Number,
            Body = "Your security code is: " + code
        };
        // Send token
        await UserManager.SmsService.SendAsync(message);
    }
    return RedirectToAction("VerifyPhoneNumber", new { PhoneNumber = model.Number });
}
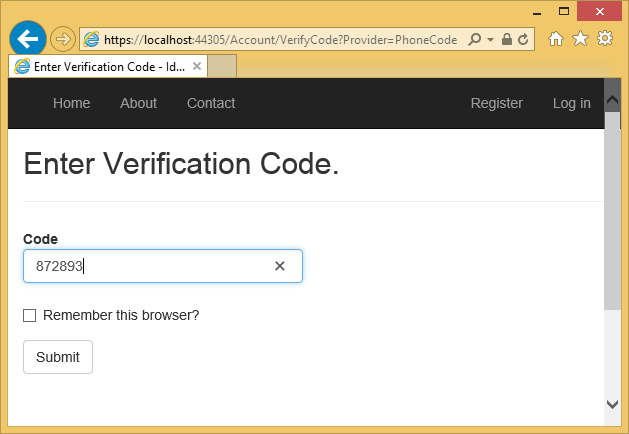
方法 GenerateChangePhoneNumberTokenAsync 生成将在短信中设置的安全令牌。 如果已配置 SMS 服务,则令牌将作为字符串“安全代码是 <令牌>”发送。 以 SmsService.SendAsync 异步方式调用 的方法,然后应用重定向到 VerifyPhoneNumber 操作方法 (其中显示以下对话框) ,可在其中输入验证码。
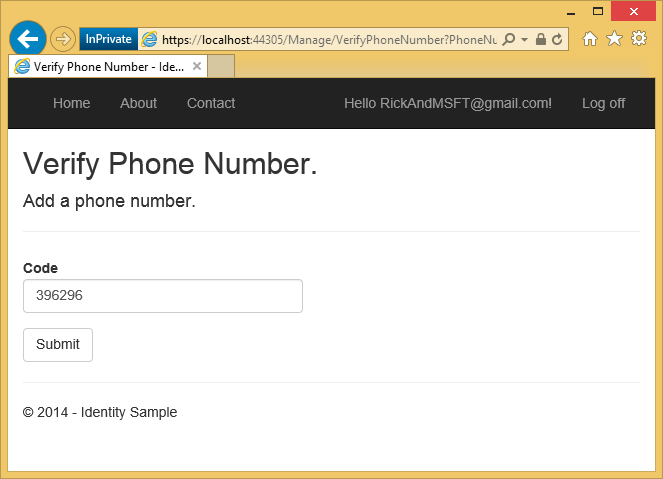
输入代码并单击“提交”后,代码将发布到 HTTP POST VerifyPhoneNumber 操作方法。
// POST: /Account/VerifyPhoneNumber
[HttpPost]
[ValidateAntiForgeryToken]
public async Task<ActionResult> VerifyPhoneNumber(VerifyPhoneNumberViewModel model)
{
    if (!ModelState.IsValid)
    {
        return View(model);
    }
    var result = await UserManager.ChangePhoneNumberAsync(User.Identity.GetUserId(), model.PhoneNumber, model.Code);
    if (result.Succeeded)
    {
        var user = await UserManager.FindByIdAsync(User.Identity.GetUserId());
        if (user != null)
        {
            await SignInAsync(user, isPersistent: false);
        }
        return RedirectToAction("Index", new { Message = ManageMessageId.AddPhoneSuccess });
    }
    // If we got this far, something failed, redisplay form
    ModelState.AddModelError("", "Failed to verify phone");
    return View(model);
}
方法 ChangePhoneNumberAsync 检查已发布的安全代码。 如果代码正确,则会将电话号码添加到 PhoneNumber 表的 AspNetUsers 字段中。 如果该调用成功,则 SignInAsync 调用 方法:
private async Task SignInAsync(ApplicationUser user, bool isPersistent)
{
   // Clear the temporary cookies used for external and two factor sign ins
    AuthenticationManager.SignOut(DefaultAuthenticationTypes.ExternalCookie,
       DefaultAuthenticationTypes.TwoFactorCookie);
    AuthenticationManager.SignIn(new AuthenticationProperties
    {
       IsPersistent = isPersistent
    },
       await user.GenerateUserIdentityAsync(UserManager));
}
参数 isPersistent 设置身份验证会话是否在多个请求之间持久化。
更改安全配置文件时,将生成新的安全标记并将其存储在 SecurityStampAspNetUsers 表的 字段中。 请注意,字段 SecurityStamp 不同于安全 Cookie。 安全 Cookie 不会存储在 AspNetUsers 表 (或标识 DB) 的任何其他位置。 安全 Cookie 令牌是使用 DPAPI 自签名的,并使用 UserId, SecurityStamp 和 过期时间信息创建。
Cookie 中间件会检查每个请求上的 Cookie。
SecurityStampValidator类中的 Startup 方法命中 DB 并定期检查安全标记,如 指定的validateInterval一样。 除非更改安全配置文件,否则仅在示例) (每隔 30 分钟发生一次。 选择 30 分钟的间隔以最大程度地减少数据库行程。
SignInAsync对安全配置文件进行任何更改时,需要调用 方法。 当安全配置文件发生更改时,数据库将更新 SecurityStamp 字段,如果不调用 SignInAsync 方法, 则只会 在 OWIN 管道下次命中数据库 (validateInterval) 之前保持登录状态。 可以通过将 方法更改为 SignInAsync 立即返回,并将 Cookie validateInterval 属性从 30 分钟设置为 5 秒来对此进行测试:
private async Task SignInAsync(ApplicationUser user, bool isPersistent)
{
   return;

   // Clear any partial cookies from external or two factor partial sign ins
    AuthenticationManager.SignOut(DefaultAuthenticationTypes.ExternalCookie,
       DefaultAuthenticationTypes.TwoFactorCookie);
    AuthenticationManager.SignIn(new AuthenticationProperties
    {
       IsPersistent = isPersistent
    },
       await user.GenerateUserIdentityAsync(UserManager));
}
public void ConfigureAuth(IAppBuilder app) {
    // Configure the db context, user manager and role manager to use a single instance per request
    app.CreatePerOwinContext(ApplicationDbContext.Create);
    app.CreatePerOwinContext<ApplicationUserManager>(ApplicationUserManager.Create);
    app.CreatePerOwinContext<ApplicationRoleManager>(ApplicationRoleManager.Create);
    app.CreatePerOwinContext<ApplicationSignInManager>(ApplicationSignInManager.Create);

    // Enable the application to use a cookie to store information for the signed in user
    // and to use a cookie to temporarily store information about a user logging in with a
    // third party login provider
    // Configure the sign in cookie
    app.UseCookieAuthentication(new CookieAuthenticationOptions {
        AuthenticationType = DefaultAuthenticationTypes.ApplicationCookie,
        LoginPath = new PathString("/Account/Login"),
        Provider = new CookieAuthenticationProvider {
            // Enables the application to validate the security stamp when the user logs in.
            // This is a security feature which is used when you change a password or add
            // an external login to your account.
            OnValidateIdentity = SecurityStampValidator.OnValidateIdentity<ApplicationUserManager, ApplicationUser>(
                //validateInterval: TimeSpan.FromMinutes(30),
                validateInterval: TimeSpan.FromSeconds(5),
                regenerateIdentity: (manager, user) => user.GenerateUserIdentityAsync(manager))
        }
    });
    app.UseExternalSignInCookie(DefaultAuthenticationTypes.ExternalCookie);
通过上述代码更改,你可以更改安全配置文件 (,例如,通过更改 双因素启用) 的状态,方法失败后 SecurityStampValidator.OnValidateIdentity 将在 5 秒内注销。 删除 方法中的 SignInAsync 返回行,进行另一个安全配置文件更改,并且不会注销。方法 SignInAsync 生成新的安全 Cookie。
启用双因素身份验证
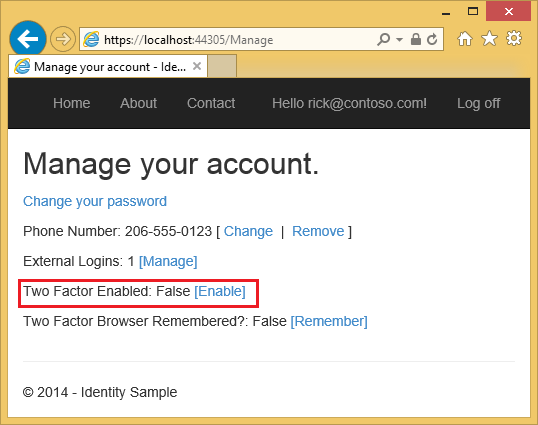
在示例应用中,需要使用 UI (2FA) 启用双因素身份验证。 若要启用 2FA,请单击导航栏中的用户 ID (电子邮件别名) 。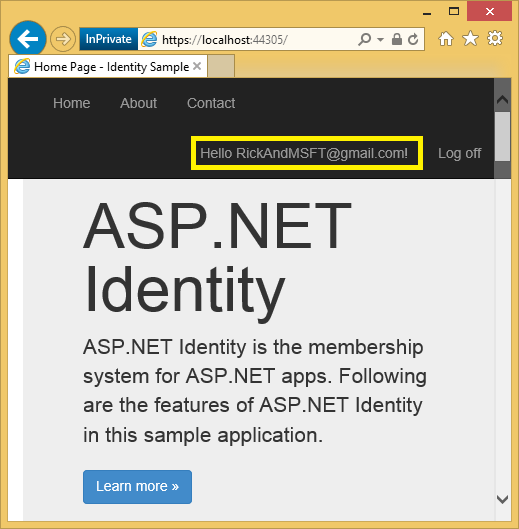
单击“启用 2FA”。
 注销,然后重新登录。 如果已启用电子邮件 (请参阅上一 篇教程) ,则可以为 2FA 选择短信或电子邮件。
 将显示“验证代码”页,可在其中输入来自短信或电子邮件) 的代码 (。
 单击“记住此浏览器检查框,无需使用 2FA 使用该计算机和浏览器登录。 启用 2FA 并单击“ 记住此浏览器 ”将为你提供强大的 2FA 保护,防止尝试访问你的帐户的恶意用户,只要他们无权访问你的计算机。 可以在经常使用的任何专用计算机上执行此操作。 通过设置 “记住此浏览器”,你可以从不经常使用的计算机获得 2FA 的附加安全性,并且无需在自己的计算机上通过 2FA 即可获得便利。
如何注册双因素身份验证提供程序
创建新的 MVC 项目时, IdentityConfig.cs 文件包含以下代码来注册双重身份验证提供程序:
public static ApplicationUserManager Create(
   IdentityFactoryOptions<ApplicationUserManager> options,
   IOwinContext context)
{
    var manager = new ApplicationUserManager(
       new UserStore<ApplicationUser>(context.Get<ApplicationDbContext>()));
    // Configure validation logic for usernames
    manager.UserValidator = new UserValidator<ApplicationUser>(manager)
    {
        AllowOnlyAlphanumericUserNames = false,
        RequireUniqueEmail = true
    };
    // Configure validation logic for passwords
    manager.PasswordValidator = new PasswordValidator
    {
        RequiredLength = 6,
        RequireNonLetterOrDigit = true,
        RequireDigit = true,
        RequireLowercase = true,
        RequireUppercase = true,
    };
    // Register two factor authentication providers. This application uses Phone and Emails as a
    // step of receiving a code for verifying the user
    // You can write your own provider and plug it in here.
    manager.RegisterTwoFactorProvider("PhoneCode", new PhoneNumberTokenProvider<ApplicationUser>
    {
        MessageFormat = "Your security code is: {0}"
    });
    manager.RegisterTwoFactorProvider("EmailCode", new EmailTokenProvider<ApplicationUser>
    {
        Subject = "Security Code",
        BodyFormat = "Your security code is: {0}"
    });
    manager.EmailService = new EmailService();
    manager.SmsService = new SmsService();

    var dataProtectionProvider = options.DataProtectionProvider;
    if (dataProtectionProvider != null)
    {
        manager.UserTokenProvider = new DataProtectorTokenProvider<ApplicationUser>
           (dataProtectionProvider.Create("ASP.NET Identity"));
    }
    return manager;
}
为 2FA 添加电话号码
AddPhoneNumber控制器中的Manage操作方法生成安全令牌,并将其发送到你提供的电话号码。
[HttpPost]
[ValidateAntiForgeryToken]
public async Task<ActionResult> AddPhoneNumber(AddPhoneNumberViewModel model)
{
    if (!ModelState.IsValid)
    {
        return View(model);
    }
    // Generate the token and send it
    var code = await UserManager.GenerateChangePhoneNumberTokenAsync(
       User.Identity.GetUserId(), model.Number);
    if (UserManager.SmsService != null)
    {
        var message = new IdentityMessage
        {
            Destination = model.Number,
            Body = "Your security code is: " + code
        };
        await UserManager.SmsService.SendAsync(message);
    }
    return RedirectToAction("VerifyPhoneNumber", new { PhoneNumber = model.Number });
}
发送令牌后,它会重定向到 VerifyPhoneNumber 操作方法,你可以在其中输入代码来注册 2FA 的短信。 在验证电话号码之前,不会使用 SMS 2FA。
启用 2FA
操作 EnableTFA 方法启用 2FA:
// POST: /Manage/EnableTFA
[HttpPost]
public async Task<ActionResult> EnableTFA()
{
    await UserManager.SetTwoFactorEnabledAsync(User.Identity.GetUserId(), true);
    var user = await UserManager.FindByIdAsync(User.Identity.GetUserId());
    if (user != null)
    {
        await SignInAsync(user, isPersistent: false);
    }
    return RedirectToAction("Index", "Manage");
}
请注意,必须调用 , SignInAsync 因为启用 2FA 是对安全配置文件的更改。 启用 2FA 后,用户需要使用 2FA 登录,使用他们在示例) 中注册的 2FA 方法 (短信和电子邮件。
可以添加更多 2FA 提供程序,例如 QR 码生成器,也可以编写自己的提供程序。
注意
2FA 代码使用 基于时间的一次性密码算法 生成,代码有效期为 6 分钟。 如果输入代码的时间超过 6 分钟,则会收到“代码无效”错误消息。
合并社交和本地登录帐户
可通过单击电子邮件链接来合并本地帐户和社交帐户。 在以下序列中,“”RickAndMSFT@gmail.com首先创建为本地登录名,但你可以先在 中创建帐户作为社交日志,然后添加本地登录名。

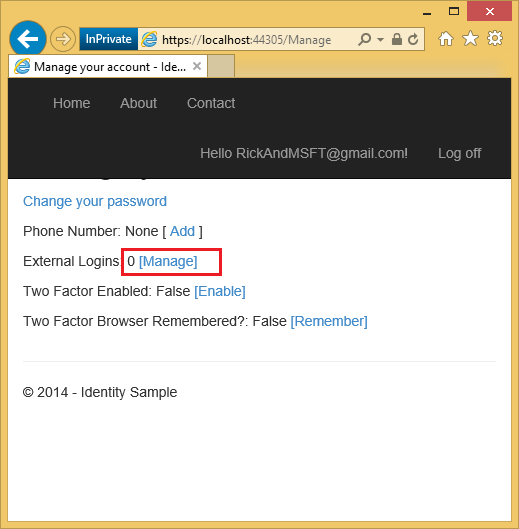
单击“管理”链接。 请注意,与此帐户关联的外部登录(社交登录)为 0。
单击指向另一个登录服务的链接并接受应用请求。 这两个帐户已合并,你将能够使用任一帐户登录。 你可能希望用户添加本地帐户,以防其社交登录身份验证服务关闭,或者他们更有可能失去对其社交帐户的访问权限。
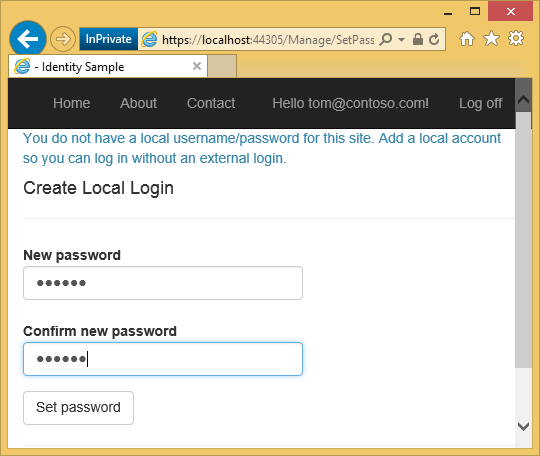
在下图中,Tom 是 (可从 外部登录名中看到的社交日志:1 显示在) 页上。
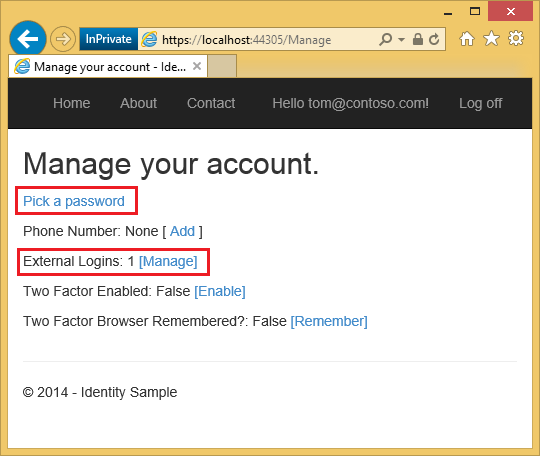
单击“ 选取密码 ”可以添加与同一帐户关联的本地登录。
暴力攻击的帐户锁定
可以通过启用用户锁定来保护应用上的帐户免受字典攻击。 方法中的 ApplicationUserManager Create 以下代码配置锁定:
// Configure user lockout defaults
manager.UserLockoutEnabledByDefault = true;
manager.DefaultAccountLockoutTimeSpan = TimeSpan.FromMinutes(5);
manager.MaxFailedAccessAttemptsBeforeLockout = 5;
上述代码仅对双重身份验证启用锁定。 虽然可以通过在帐户控制器的 方法中Login更改为 shouldLockout true 来为登录启用锁定,但我们建议不要为登录启用锁定,因为这会使帐户容易受到 DOS 登录攻击。 在示例代码中,对在 方法中创建 ApplicationDbInitializer Seed 的管理员帐户禁用锁定:
public static void InitializeIdentityForEF(ApplicationDbContext db)
{
    var userManager = HttpContext.Current.GetOwinContext().GetUserManager<ApplicationUserManager>();
    var roleManager = HttpContext.Current.GetOwinContext().Get<ApplicationRoleManager>();
    const string name = "admin@example.com";
    const string roleName = "Admin";

    //Create Role Admin if it does not exist
    var role = roleManager.FindByName(roleName);
    if (role == null)
    {
        role = new IdentityRole(roleName);
        var roleresult = roleManager.Create(role);
    }

    var user = userManager.FindByName(name);
    if (user == null)
    {
        user = new ApplicationUser { UserName = name, Email = name };
        var result = userManager.Create(user, GetSecurePassword());
        result = userManager.SetLockoutEnabled(user.Id, false);
    }

    // Add user admin to Role Admin if not already added
    var rolesForUser = userManager.GetRoles(user.Id);
    if (!rolesForUser.Contains(role.Name))
    {
        var result = userManager.AddToRole(user.Id, role.Name);
    }
}
要求用户拥有经过验证的电子邮件帐户
以下代码要求用户先具有经过验证的电子邮件帐户,然后才能登录:
public async Task<ActionResult> Login(LoginViewModel model, string returnUrl)
{
    if (!ModelState.IsValid)
    {
        return View(model);
    }

   // Require the user to have a confirmed email before they can log on.
    var user = await UserManager.FindByNameAsync(model.Email);
    if (user != null)
    {
       if (!await UserManager.IsEmailConfirmedAsync(user.Id))
       {
          ViewBag.errorMessage = "You must have a confirmed email to log on.";
          return View("Error");
       }
    }
    // This doen't count login failures towards lockout only two factor authentication
    // To enable password failures to trigger lockout, change to shouldLockout: true
    var result = await SignInManager.PasswordSignInAsync(model.Email, model.Password,
       model.RememberMe, shouldLockout: false);
    switch (result)
    {
        case SignInStatus.Success:
            return RedirectToLocal(returnUrl);
        case SignInStatus.LockedOut:
            return View("Lockout");
        case SignInStatus.RequiresVerification:
            return RedirectToAction("SendCode", new { ReturnUrl = returnUrl });
        case SignInStatus.Failure:
        default:
            ModelState.AddModelError("", "Invalid login attempt.");
            return View(model);
    }
}
SignInManager 如何检查 2FA 要求
本地登录和社交登录检查查看是否启用了 2FA。 如果启用了 2FA,则 SignInManager 登录方法将返回 SignInStatus.RequiresVerification,用户将被重定向到 SendCode 操作方法,用户必须在此处输入代码才能按顺序完成登录。 如果用户在用户本地 Cookie 上设置了 RememberMe, SignInManager 则会返回 SignInStatus.Success ,他们不必通过 2FA。
public async Task<ActionResult> Login(LoginViewModel model, string returnUrl)
{
    if (!ModelState.IsValid)
    {
        return View(model);
    }

   // Require the user to have a confirmed email before they can log on.
    var user = await UserManager.FindByNameAsync(model.Email);
    if (user != null)
    {
       if (!await UserManager.IsEmailConfirmedAsync(user.Id))
       {
          ViewBag.errorMessage = "You must have a confirmed email to log on.";
          return View("Error");
       }
    }
    // This doen't count login failures towards lockout only two factor authentication
    // To enable password failures to trigger lockout, change to shouldLockout: true
    var result = await SignInManager.PasswordSignInAsync(model.Email, model.Password,
       model.RememberMe, shouldLockout: false);
    switch (result)
    {
        case SignInStatus.Success:
            return RedirectToLocal(returnUrl);
        case SignInStatus.LockedOut:
            return View("Lockout");
        case SignInStatus.RequiresVerification:
            return RedirectToAction("SendCode", new { ReturnUrl = returnUrl });
        case SignInStatus.Failure:
        default:
            ModelState.AddModelError("", "Invalid login attempt.");
            return View(model);
    }
}
public async Task<ActionResult> ExternalLoginCallback(string returnUrl)
{
    var loginInfo = await AuthenticationManager.GetExternalLoginInfoAsync();
    if (loginInfo == null)
    {
        return RedirectToAction("Login");
    }

    // Sign in the user with this external login provider if the user already has a login
    var result = await SignInManager.ExternalSignInAsync(loginInfo, isPersistent: false);
    switch (result)
    {
        case SignInStatus.Success:
            return RedirectToLocal(returnUrl);
        case SignInStatus.LockedOut:
            return View("Lockout");
        case SignInStatus.RequiresVerification:
            return RedirectToAction("SendCode", new { ReturnUrl = returnUrl });
        case SignInStatus.Failure:
        default:
            // If the user does not have an account, then prompt the user to create an account
            ViewBag.ReturnUrl = returnUrl;
            ViewBag.LoginProvider = loginInfo.Login.LoginProvider;
            return View("ExternalLoginConfirmation", new ExternalLoginConfirmationViewModel { Email = loginInfo.Email });
    }
}
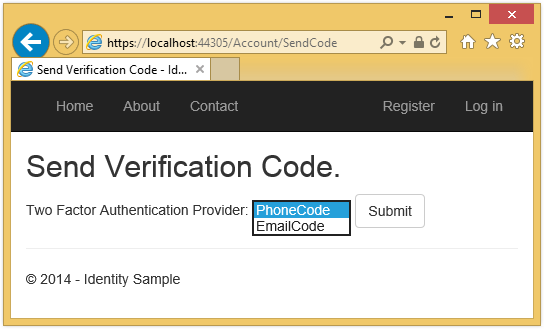
以下代码演示操作 SendCode 方法。 使用为用户启用所有 2FA 方法创建 SelectListItem 。
SelectListItem 将传递给 DropDownListFor 帮助程序,它允许用户选择 2FA 方法 (通常为电子邮件和短信) 。
public async Task<ActionResult> SendCode(string returnUrl)
{
    var userId = await SignInManager.GetVerifiedUserIdAsync();
    if (userId == null)
    {
        return View("Error");
    }
    var userFactors = await UserManager.GetValidTwoFactorProvidersAsync(userId);
    var factorOptions = userFactors.Select(purpose => new SelectListItem { Text = purpose, Value = purpose }).ToList();
    return View(new SendCodeViewModel { Providers = factorOptions, ReturnUrl = returnUrl });
}
用户发布 2FA 方法后, HTTP POST SendCode 将调用操作方法, SignInManager 发送 2FA 代码,并将用户重定向到 VerifyCode 操作方法,他们可以在其中输入代码以完成登录。
//
// POST: /Account/SendCode
[HttpPost]
[AllowAnonymous]
[ValidateAntiForgeryToken]
public async Task<ActionResult> SendCode(SendCodeViewModel model)
{
    if (!ModelState.IsValid)
    {
        return View();
    }

    // Generate the token and send it
    if (!await SignInManager.SendTwoFactorCodeAsync(model.SelectedProvider))
    {
        return View("Error");
    }
    return RedirectToAction("VerifyCode", new { Provider = model.SelectedProvider, ReturnUrl = model.ReturnUrl });
}
2FA 锁定
尽管可以在登录密码尝试失败时设置帐户锁定,但这种方法会使登录容易受到 DOS 锁定的影响。 建议仅对 2FA 使用帐户锁定。
ApplicationUserManager创建 时,示例代码将 2FA 锁定设置为 MaxFailedAccessAttemptsBeforeLockout 5。 用户通过本地帐户或社交帐户) 登录 (后,将存储 2FA 中失败的每次尝试,如果达到最大尝试次数,用户将被锁定五分钟, (可以使用) 设置锁定时间 DefaultAccountLockoutTimeSpan 。
其他资源
- ASP.NET 标识建议的资源 标识博客、视频、教程和出色的 SO 链接的完整列表。
- 使用 Facebook、Twitter、LinkedIn和 Google OAuth2 登录的 MVC 5 应用 还演示了如何将个人资料信息添加到用户表。
- ASP.NET MVC 和标识 2.0:了解 John Atten 的基础知识。
- 使用 ASP.NET 标识进行帐户确认和密码恢复
- ASP.NET Identity 简介
- Pranav Rastogi 宣布推出 ASP.NET Identity 2.0.0 的 RTM。
- ASP.NET Identity 2.0:由 John Atten 设置帐户验证和Two-Factor授权 。