你当前正在访问 Microsoft Azure Global Edition 技术文档网站。 如果需要访问由世纪互联运营的 Microsoft Azure 中国技术文档网站,请访问 https://docs.azure.cn。
重要
自 2025 年 5 月 1 日起,Azure AD B2C 将不再可供新客户购买。 在我们的常见问题解答中了解详细信息。
在开始之前,请使用此页面顶部的 “选择策略类型 选择器”来选择要设置的策略类型。 Azure Active Directory B2C 提供了两种定义用户如何与应用程序交互的方法:通过预定义的用户流,或者通过可完全配置的自定义策略。 对于每种方法,本文中所需的步骤都不同。
在本文中,你将在 Azure Active Directory B2C(Azure AD B2C)注册过程中收集新属性,例如城市。 获取用户的城市,将其配置为下拉列表,并定义是否需要提供它。
重要
此示例使用内置声明“city”。 相反,可以选择受支持的 Azure AD B2C 内置属性 之一或自定义属性。 若要使用自定义属性, 请启用自定义属性。 若要使用不同的内置或自定义属性,请将“city”替换为所选属性,例如内置属性 jobTitle 或自定义属性(如 extension_loyaltyId)。
先决条件
- 创建用户流,以便用户能够注册并登录应用程序。
- 注册 Web 应用程序。
- 完成 Active Directory B2C 中的自定义策略入门中的步骤。 本教程指导你如何更新自定义策略文件以使用 Azure AD B2C 租户配置。
- 注册 Web 应用程序。
向用户流中添加用户属性
- 登录到 Azure 门户。
- 如果有权访问多个租户,请选择顶部菜单中的“设置”图标,从“目录 + 订阅”菜单切换到你的 Azure AD B2C 租户。
- 在“Azure 服务”下,选择“Azure AD B2C”。 或者,使用搜索框查找并选择“Azure AD B2C”。
- 在 Azure AD B2C 租户中,选择“用户流” 。
- 选择策略(例如,“B2C_1_SignupSignin”)将其打开。
- 选择 “用户属性 ”,然后选择用户属性(例如“City”)。
- 选择“保存”。
向应用提供可选声明
应用程序声明是应用程序返回的值。 更新用户流以包含所需的声明:
- 选择策略(例如,“B2C_1_SignupSignin”)将其打开。
- 选择 应用程序声明。
- 选择您希望返回到应用程序的属性(例如“城市”)。
- 选择“保存”。
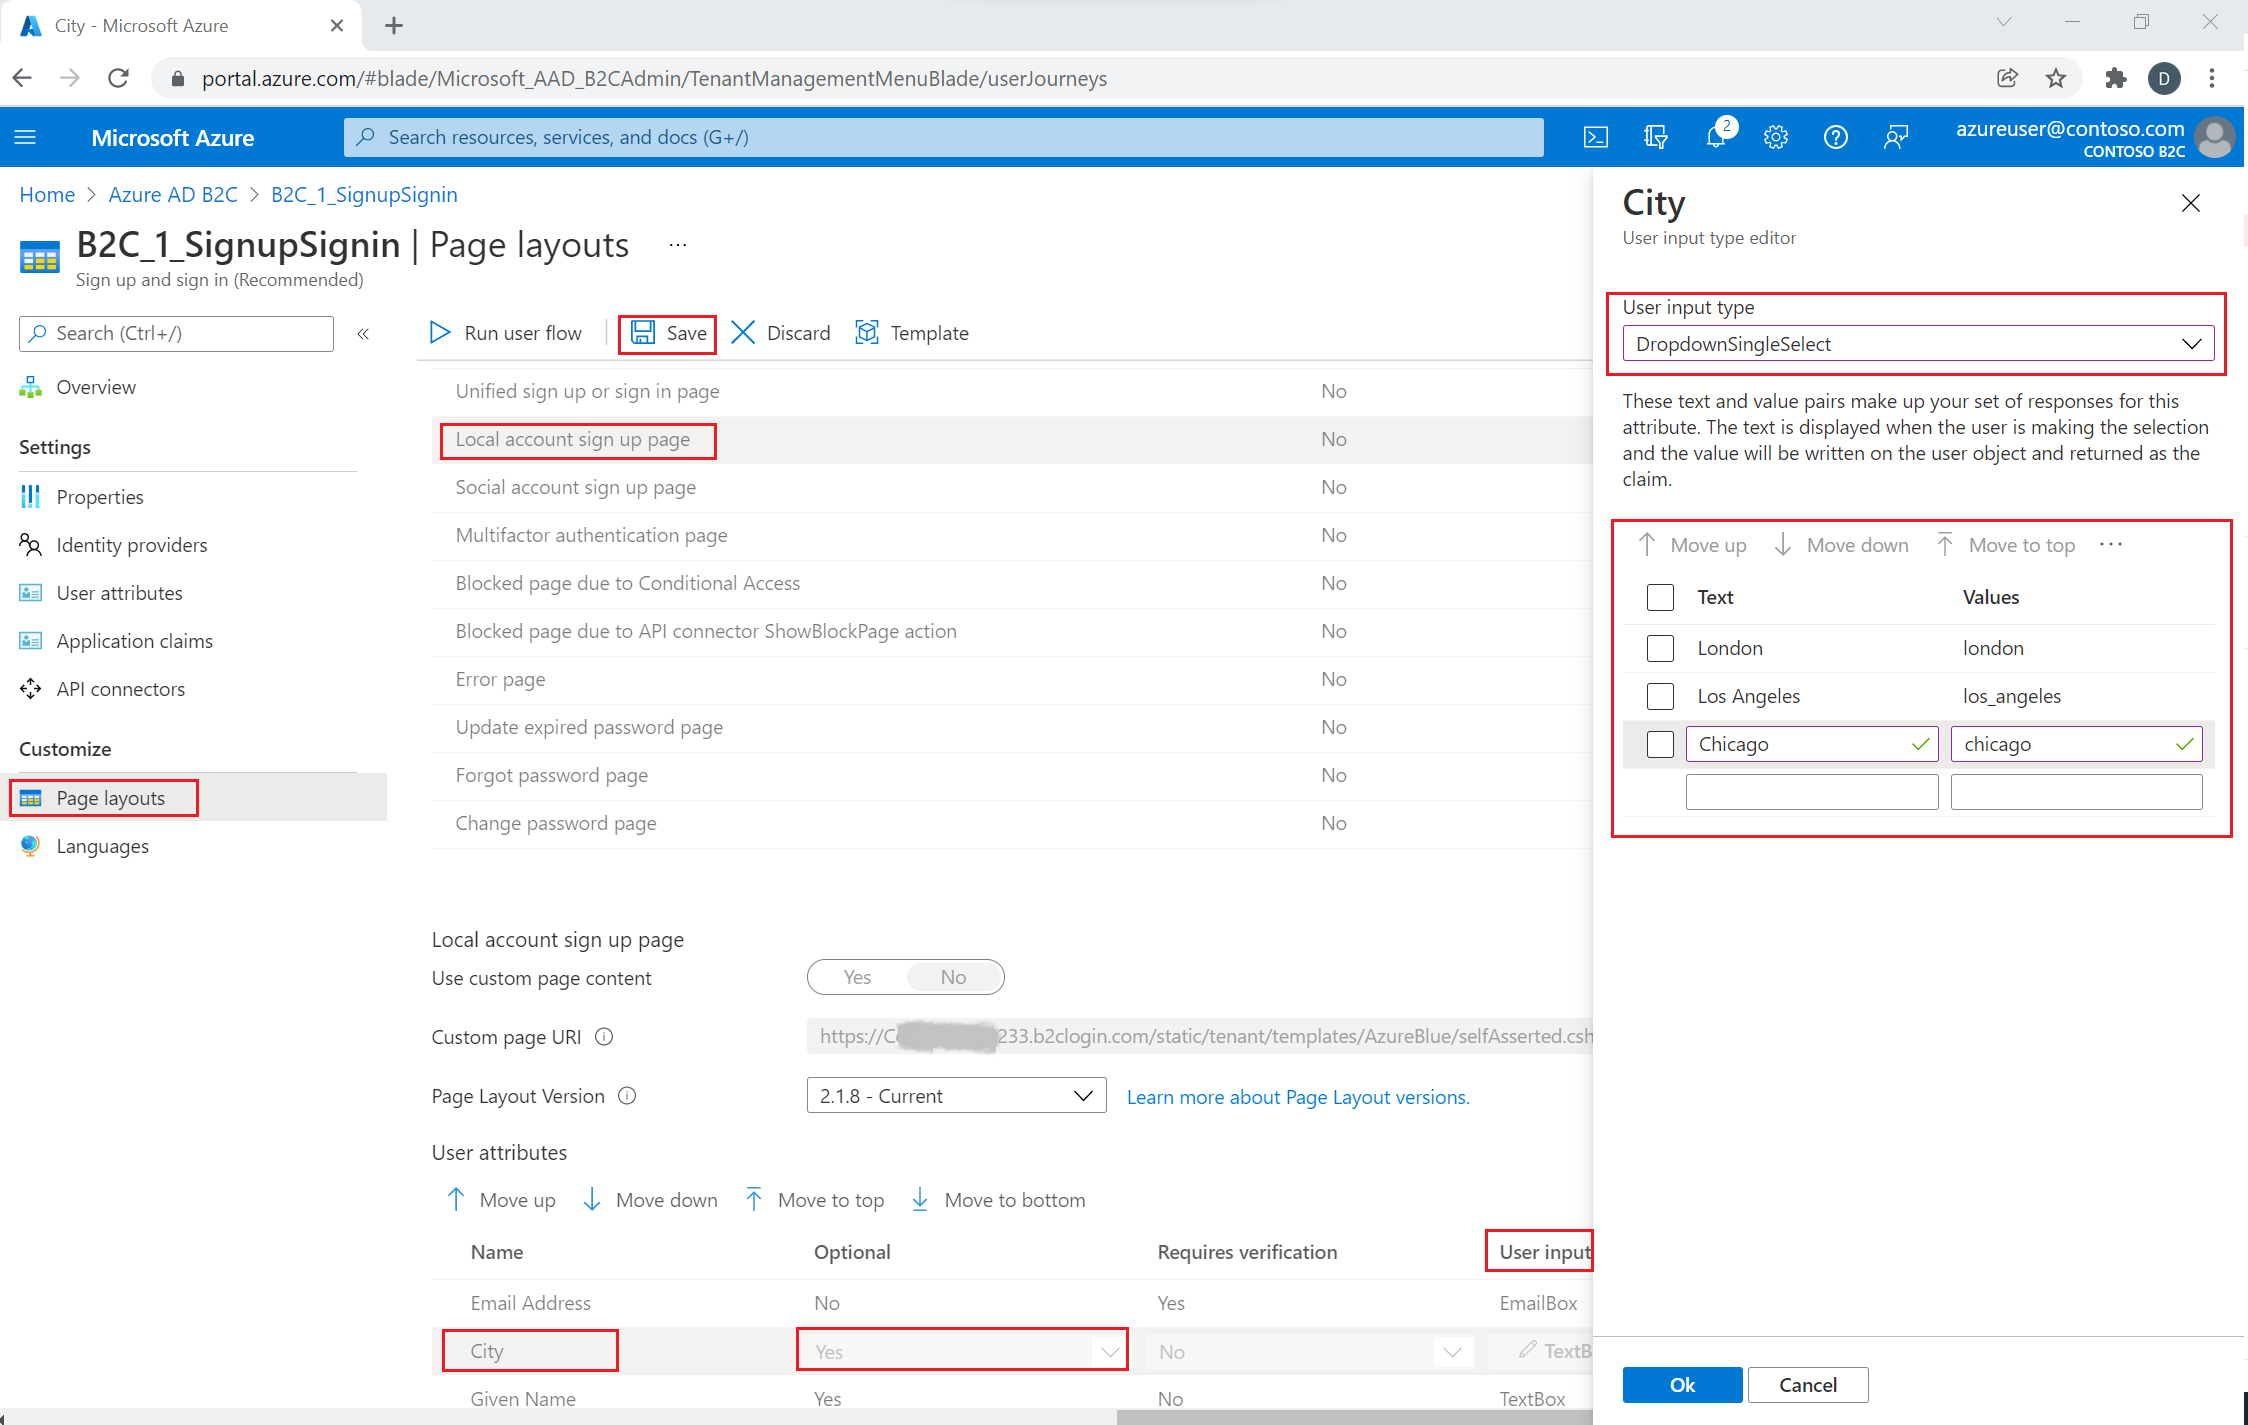
配置用户属性输入类型
选择策略(例如,“B2C_1_SignupSignin”)将其打开。
选择 页面布局。
选择 “本地帐户注册”页。
在 “用户属性”下,选择“ 城市”。
- 在 “可选 ”下拉列表中,选择“ 否”。
- 在 “用户输入类型”中,选择当前用户输入类型(如 TextBox)以打开 “用户输入类型编辑器 ”窗口窗格。
- 在 “用户输入类型” 下拉列表中,选择 “下拉单选”。
- 在 “文本 和 值”中,输入构成属性响应集的文本和值对。 文本显示在流的 Web 界面中,值存储到 Azure AD B2C 以供所选文本使用。 可选:使用“上移/下移”按钮对下拉项进行重新排序。
选择“确定”。 可选:使用“上移/下移”按钮对注册页面中的用户属性进行重新排序。
选择“保存”。
使用本地化集合提供值列表
若要为城市属性提供一组值列表,
- 在用户流上启用语言自定义
- 选择策略(例如,“B2C_1_SignupSignin”)将其打开。
- 在用户流的“语言”页面,选择想要自定义的语言。
- 在 “页面级别资源文件”下,选择 “本地帐户注册”页。
- 选择“下载默认值”(如果以前已编辑这种语言,则选择“下载重写”)。
- 创建
LocalizedCollections属性。
LocalizedCollections是由Name和Value组成的数组。 项目的顺序就是它们显示的顺序。
-
ElementId是此LocalizedCollections属性响应的用户属性。 -
Name是向用户显示的值。 -
Value是选择此选项时要在声明中返回的内容。
{
  "LocalizedStrings": [...],
  "LocalizedCollections": [
    {
      "ElementType": "ClaimType",
      "ElementId": "city",
      "TargetCollection": "Restriction",
      "Override": true,
      "Items": [
        {
          "Name": "Berlin",
          "Value": "Berlin"
        },
        {
          "Name": "London",
          "Value": "London"
        },
        {
          "Name": "Seattle",
          "Value": "Seattle"
        }
      ]
    }
  ]
}
上传更改
- 完成对 JSON 文件的更改后,返回到 B2C 租户。
- 选择 用户流 并选择您的策略(例如“B2C_1_SignupSignin”)以打开它。
- 选择“语言”。
- 选择要翻译成的语言。
- 在 “页面级别资源”文件下,选择 “本地帐户注册”页。
- 选择文件夹图标,选择要上传的 JSON 文件。 更改将自动保存到用户流。
测试用户流
- 选择策略(例如,“B2C_1_SignupSignin”)将其打开。
- 若要测试策略,请选择“运行用户流”。
- 对于“应用程序”,请选择前面已注册的名为“testapp1”的 Web 应用程序。 “回复 URL”应显示为
https://jwt.ms。 - 选择“运行用户流”
概述
可以通过用户注册和登录路径收集初始数据。 稍后可以使用配置文件编辑用户旅程来收集更多声明。 每当 Azure AD B2C 以交互方式从用户收集信息时,它都使用 自声明技术配置文件。 在此示例中,你将:
- 定义“city”声明。
- 要求用户输入其城市。
- 将城市保存到 Azure AD B2C 目录中的用户配置文件。
- 在每次登录时从 Azure AD B2C 目录读取城市声明。
- 登录或注册后,将 city 返回给信赖方应用程序。
定义索赔
声明可在 Azure AD B2C 策略执行过程中提供数据的临时存储。 声明架构是发出声明的位置。 以下元素用于定义声明:
- DisplayName - 定义面向用户的标签的字符串。
- DataType - 声明的类型。
- UserHelpText - 帮助用户了解所需的内容。
- UserInputType - 输入控件的类型,例如文本框、单选选择、下拉列表或多个选择。
打开策略的扩展文件。 例如,SocialAndLocalAccounts/TrustFrameworkExtensions.xml。
- 搜索 BuildingBlocks 元素。 如果该元素不存在,请添加该元素。
- 找到 ClaimsSchema 元素。 如果该元素不存在,请添加该元素。
- 将城市声明添加到 ClaimsSchema 元素。
<!--
<BuildingBlocks>
  <ClaimsSchema> -->
    <ClaimType Id="city">
      <DisplayName>City where you work</DisplayName>
      <DataType>string</DataType>
      <UserInputType>DropdownSingleSelect</UserInputType>
      <Restriction>
        <Enumeration Text="Berlin" Value="berlin" />
        <Enumeration Text="London" Value="london" />
        <Enumeration Text="Seattle" Value="seattle" />
      </Restriction>
    </ClaimType>
  <!--
  </ClaimsSchema>
</BuildingBlocks>-->
在元素上包含Enumeration属性,以使它在页面首次加载时默认选中。 例如,若要预先选择 伦敦 项,请更改 Enumeration 元素,如以下示例所示:
<Restriction>
  <Enumeration Text="Berlin" Value="berlin" />
  <Enumeration Text="London" Value="london" SelectByDefault="true" />
  <Enumeration Text="Seattle" Value="seattle" />
</Restriction>
将声明添加到用户界面
以下技术配置文件为自断言,在用户需要提供输入时调用:
- LocalAccountSignUpWithLogonEmail - 本地帐户注册流。
- SelfAsserted-Social - 联合帐户首次用户登录。
- SelfAsserted-ProfileUpdate - 编辑配置文件流。
若要在注册期间收集 city 声明,则必须将其作为输出声明添加到 LocalAccountSignUpWithLogonEmail 技术配置文件。 在扩展文件中覆盖此技术配置文件。 指定输出声明的完整列表,以控制屏幕上显示声明的顺序。 找到 ClaimsProviders 元素。 添加一个新的 ClaimsProviders,如下所示:
<ClaimsProvider>
  <DisplayName>Local Account</DisplayName>
  <TechnicalProfiles>
    <!--Local account sign-up page-->
    <TechnicalProfile Id="LocalAccountSignUpWithLogonEmail">
      <OutputClaims>
       <OutputClaim ClaimTypeReferenceId="email" PartnerClaimType="Verified.Email" Required="true" />
       <OutputClaim ClaimTypeReferenceId="newPassword" Required="true" />
       <OutputClaim ClaimTypeReferenceId="reenterPassword" Required="true" />
       <OutputClaim ClaimTypeReferenceId="displayName" />
       <OutputClaim ClaimTypeReferenceId="givenName" />
       <OutputClaim ClaimTypeReferenceId="surName" />
       <OutputClaim ClaimTypeReferenceId="city"/>
     </OutputClaims>
   </TechnicalProfile>
  </TechnicalProfiles>
</ClaimsProvider>
若要在使用联合帐户初次登录后收集 city 声明,必须将其作为输出声明添加到 SelfAsserted-Social 技术配置文件。 为了使本地和联合帐户用户以后能够编辑其配置文件数据,请将输入和输出声明添加到 SelfAsserted-ProfileUpdate 技术配置文件。 在扩展文件中覆盖这些技术配置文件。 指定输出声明的整个列表,以控制屏幕上显示声明的顺序。 找到 ClaimsProviders 元素。 添加一个新的 ClaimsProviders,如下所示:
<ClaimsProvider>
  <DisplayName>Self Asserted</DisplayName>
  <TechnicalProfiles>
    <!--Federated account first-time sign-in page-->
    <TechnicalProfile Id="SelfAsserted-Social">
      <InputClaims>
        <InputClaim ClaimTypeReferenceId="city" />
      </InputClaims>
      <OutputClaims>
        <OutputClaim ClaimTypeReferenceId="displayName"/>
        <OutputClaim ClaimTypeReferenceId="givenName"/>
        <OutputClaim ClaimTypeReferenceId="surname"/>
        <OutputClaim ClaimTypeReferenceId="city"/>
      </OutputClaims>
    </TechnicalProfile>
    <!--Edit profile page-->
    <TechnicalProfile Id="SelfAsserted-ProfileUpdate">
      <InputClaims>
        <InputClaim ClaimTypeReferenceId="city" />
      </InputClaims>
      <OutputClaims>
        <OutputClaim ClaimTypeReferenceId="displayName"/>
        <OutputClaim ClaimTypeReferenceId="givenName" />
        <OutputClaim ClaimTypeReferenceId="surname" />
        <OutputClaim ClaimTypeReferenceId="city"/>
      </OutputClaims>
    </TechnicalProfile>
  </TechnicalProfiles>
</ClaimsProvider>
读取和写入声明
以下技术 配置文件是 Active Directory 技术配置文件,这些配置文件将数据读取和写入到 Microsoft Entra ID。
使用 PersistedClaims 将数据写入用户配置文件,并使用 OutputClaims 从相应的 Active Directory 技术配置文件中读取用户配置文件的数据。
在扩展文件中覆盖这些技术配置文件。 找到 ClaimsProviders 元素。 添加一个新的 ClaimsProviders,如下所示:
<ClaimsProvider>
  <DisplayName>Azure Active Directory</DisplayName>
  <TechnicalProfiles>
    <!-- Write data during a local account sign-up flow. -->
    <TechnicalProfile Id="AAD-UserWriteUsingLogonEmail">
      <PersistedClaims>
        <PersistedClaim ClaimTypeReferenceId="city"/>
      </PersistedClaims>
    </TechnicalProfile>
    <!-- Write data during a federated account first-time sign-in flow. -->
    <TechnicalProfile Id="AAD-UserWriteUsingAlternativeSecurityId">
      <PersistedClaims>
        <PersistedClaim ClaimTypeReferenceId="city"/>
      </PersistedClaims>
    </TechnicalProfile>
    <!-- Write data during edit profile flow. -->
    <TechnicalProfile Id="AAD-UserWriteProfileUsingObjectId">
      <PersistedClaims>
        <PersistedClaim ClaimTypeReferenceId="city"/>
      </PersistedClaims>
    </TechnicalProfile>
    <!-- Read data after user resets the password. -->
    <TechnicalProfile Id="AAD-UserReadUsingEmailAddress">
      <OutputClaims>
        <OutputClaim ClaimTypeReferenceId="city" />
      </OutputClaims>
    </TechnicalProfile>
    <!-- Read data after user authenticates with a local account. -->
    <TechnicalProfile Id="AAD-UserReadUsingObjectId">
      <OutputClaims>
        <OutputClaim ClaimTypeReferenceId="city" />
      </OutputClaims>
    </TechnicalProfile>
    <!-- Read data after user authenticates with a federated account. -->
    <TechnicalProfile Id="AAD-UserReadUsingAlternativeSecurityId">
      <OutputClaims>
        <OutputClaim ClaimTypeReferenceId="city" />
      </OutputClaims>
    </TechnicalProfile>
  </TechnicalProfiles>
</ClaimsProvider>
在令牌中包括声明
若要将城市声明返回给信赖方应用程序,请将输出声明添加到 SocialAndLocalAccounts/SignUpOrSignIn.xml 文件。 输出声明将在用户旅程成功后添加到令牌,并发送到应用程序。 修改信赖方部分中的技术配置文件元素,以将 city 添加为输出声明。
<RelyingParty>
  <DefaultUserJourney ReferenceId="SignUpOrSignIn" />
  <TechnicalProfile Id="PolicyProfile">
    <DisplayName>PolicyProfile</DisplayName>
    <Protocol Name="OpenIdConnect" />
    <OutputClaims>
      <OutputClaim ClaimTypeReferenceId="displayName" />
      <OutputClaim ClaimTypeReferenceId="givenName" />
      <OutputClaim ClaimTypeReferenceId="surname" />
      <OutputClaim ClaimTypeReferenceId="email" />
      <OutputClaim ClaimTypeReferenceId="objectId" PartnerClaimType="sub"/>
      <OutputClaim ClaimTypeReferenceId="identityProvider" />
      <OutputClaim ClaimTypeReferenceId="tenantId" AlwaysUseDefaultValue="true" DefaultValue="{Policy:TenantObjectId}" />
      <OutputClaim ClaimTypeReferenceId="city" DefaultValue="" />
    </OutputClaims>
    <SubjectNamingInfo ClaimType="sub" />
  </TechnicalProfile>
</RelyingParty>
上传并测试更新后的自定义策略
- 如果有权访问多个租户,请选择顶部菜单中的“设置”图标,从“目录 + 订阅”菜单切换到你的 Azure AD B2C 租户。
- 搜索并选择“Azure AD B2C”。
- 在“策略”下,选择“Identity Experience Framework”。
- 选择“上传自定义策略”。
- 上传之前更改的策略文件。
测试自定义策略
- 选择依赖方策略,例如
B2C_1A_signup_signin。 - 对于应用程序,请选择您前面注册的 Web 应用程序。 “回复 URL”应显示为
https://jwt.ms。 - 选择“立即运行”按钮。
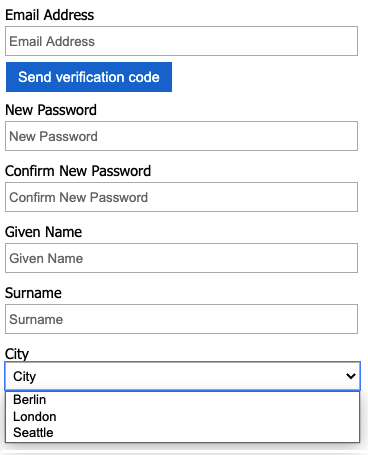
- 在注册或登录页中,选择“ 立即注册 ”进行注册。 完成输入用户信息(包括城市名称),然后选择“ 创建”。 你应该可以看到返回的令牌的内容。
注册屏幕应类似于以下屏幕截图:
发送回应用程序的令牌包含 city 声明。
{
  "typ": "JWT",
  "alg": "RS256",
  "kid": "X5eXk4xyojNFum1kl2Ytv8dlNP4-c57dO6QGTVBwaNk"
}.{
  "exp": 1583500140,
  "nbf": 1583496540,
  "ver": "1.0",
  "iss": "https://contoso.b2clogin.com/aaaabbbb-0000-cccc-1111-dddd2222eeee/v2.0/",
  "aud": "00001111-aaaa-2222-bbbb-3333cccc4444",
  "acr": "b2c_1a_signup_signin",
  "nonce": "defaultNonce",
  "iat": 1583496540,
  "auth_time": 1583496540,
  "name": "Emily Smith",
  "email": "joe@outlook.com",
  "given_name": "Emily",
  "family_name": "Smith",
  "city": "Berlin"
  ...
}
[可选] UI 本地化
Azure AD B2C 允许将策略适应不同的语言。 有关详细信息, 请了解如何自定义语言体验。 若要本地化注册页面, 请设置支持的语言列表,并提供 特定于语言的标签。
以下示例演示如何提供英语和西班牙语城市列表。 这两个元素都设置了声明 city 的 Restriction 集合,以及适用于英语和西班牙语的项列表。
SelectByDefault 在页面首次加载时默认选择一个项。
<!--
<BuildingBlocks>-->
  <Localization Enabled="true">
    <SupportedLanguages DefaultLanguage="en" MergeBehavior="Append">
      <SupportedLanguage>en</SupportedLanguage>
      <SupportedLanguage>es</SupportedLanguage>
    </SupportedLanguages>
    <LocalizedResources Id="api.localaccountsignup.en">
      <LocalizedCollections>
        <LocalizedCollection ElementType="ClaimType" ElementId="city" TargetCollection="Restriction">
          <Item Text="Berlin" Value="Berlin"></Item>
          <Item Text="London" Value="London" SelectByDefault="true"></Item>
          <Item Text="Seattle" Value="Seattle"></Item>
        </LocalizedCollection>
      </LocalizedCollections>
    </LocalizedResources>
    <LocalizedResources Id="api.localaccountsignup.es">
      <LocalizedCollections>
        <LocalizedCollection ElementType="ClaimType" ElementId="city" TargetCollection="Restriction">
          <Item Text="Berlina" Value="Berlin"></Item>
          <Item Text="Londres" Value="London" SelectByDefault="true"></Item>
          <Item Text="Seattle" Value="Seattle"></Item>
        </LocalizedCollection>
      </LocalizedCollections>
    </LocalizedResources>
  </Localization>
<!--
</BuildingBlocks>-->
添加本地化元素后, 使用本地化编辑内容定义。 在以下示例中,英语(en)和西班牙语(es)自定义本地化资源将添加到注册页:
<!--
<BuildingBlocks>
  <ContentDefinitions> -->
   <ContentDefinition Id="api.localaccountsignup">
    <LocalizedResourcesReferences MergeBehavior="Prepend">
        <LocalizedResourcesReference Language="en" LocalizedResourcesReferenceId="api.localaccountsignup.en" />
        <LocalizedResourcesReference Language="es" LocalizedResourcesReferenceId="api.localaccountsignup.es" />
    </LocalizedResourcesReferences>
   </ContentDefinition>
  <!--
  </ContentDefinitions>
</BuildingBlocks>-->
后续步骤
- 详细了解 IEF 参考中的 ClaimsSchema 元素。
- 了解如何 在 Azure AD B2C 中使用自定义属性。