你当前正在访问 Microsoft Azure Global Edition 技术文档网站。 如果需要访问由世纪互联运营的 Microsoft Azure 中国技术文档网站,请访问 https://docs.azure.cn。
重要
自 2025 年 5 月 1 日起,Azure AD B2C 将不再可供新客户购买。 在我们的常见问题解答中了解详细信息。
在此示例教程中,了解如何将 Azure AD B2C 身份验证与 Trusona Authentication Cloud 集成。 它是一项基于云的服务,使用户能够使用 点击和移动 体验进行身份验证,而无需任何类型的移动验证器应用。
将 Trusona Authentication Cloud 与 Azure AD B2C 集成的好处包括:
通过更好的用户体验提供强身份验证
- 在线消费更多的更快乐的用户
- 降低减员和放弃,增加收入
- 提高留存率和终身价值(LTV)
运行业务的成本更低
- 减少帐户接管和帐户共享
- 减少欺诈和减少手动欺诈分析操作
- 减少外包手动评审的支出
消除密码
- 不再重置密码
- 减少呼叫中心投诉
- 使用通行密钥,实现快速、简单且无摩擦的登录
先决条件
若要开始,需要:
- Trusona Authentication Cloud 试用帐户。 若要请求帐户, 请联系 Trusona。
- 一份 Azure 订阅。 如果你没有订阅,可以获取一个免费帐户。
- 已链接到 Azure 订阅的 Azure AD B2C 租户。
- 完成 Azure AD B2C 中的自定义策略入门文章中的步骤。
方案说明
Web 身份验证标准 - WebAuthn 实现新式作系统和浏览器,以支持通过手指打印、Windows hello 或外部 FIDO 设备(如 USB、蓝牙和一次性密码)进行身份验证。
在此方案中,Trusona 充当 Azure AD B2C 的标识提供者(IdP),以启用无密码身份验证。 以下组件构成解决方案:
- Azure AD B2C 合并登录和注册策略。
- Trusona Authentication Cloud 作为 IdP 添加到 Azure AD B2C。
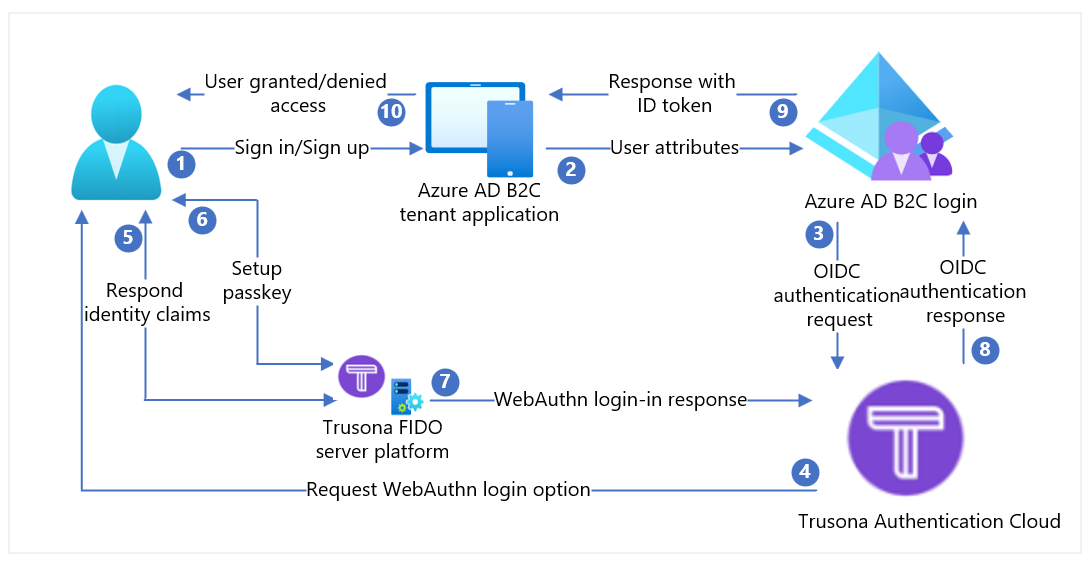
| 步骤 | DESCRIPTION |
|---|---|
| 1. | 用户尝试通过其浏览器登录到 Web 应用程序。 |
| 2. | Web 应用程序重定向到 Azure AD B2C 注册和登录策略。 |
| 3. | Azure AD B2C 将用户重定向到 Trusona Authentication Cloud OpenID Connect (OIDC) IdP 进行身份验证。 |
| 4. | 用户会显示一个登录网页,该网页要求其用户名 - 通常是电子邮件地址。 |
| 5 | 用户输入其电子邮件地址并选择“ 继续 ”按钮。 如果在 Trusona Authentication Cloud 中找不到用户帐户,则会向浏览器发送响应,该浏览器在设备上启动 WebAuthn 注册过程。 否则,响应将发送到开始 WebAuthn 身份验证过程的浏览器。 |
| 6 | 要求用户选择要使用的凭据。 密钥与 Web 应用程序的域或硬件安全密钥相关联。 用户选择凭据后,OS 会请求用户使用生物识别、密码或 PIN 来确认其身份。 这将解锁安全 Enclave/可信执行环境,它们会生成由与所选凭据相关联的私钥签名的身份验证声明。 |
| 7. | 身份验证断言将返回到 Trusona 云服务进行验证。 |
| 8. | 验证后,Trusona 身份验证云(IdP)将创建 OIDC ID 令牌,然后将其转发到 Azure AD B2C(服务提供商)。 Azure AD B2C 根据 Trusona 的 OpenID 发现文档中的值验证令牌和颁发者的签名。 这些详细信息是在 IdP 设置期间配置的。 验证后,Azure AD B2C 会根据范围颁发 OIDC id_token,并使用令牌将用户重定向回起始应用程序。 |
| 9. | Web 应用程序(或用于实现身份验证的开发人员库)检索令牌并验证 Azure AD B2C 令牌的真实性。 如果是这种情况,它将提取声明并将其传递给 Web 应用程序以使用。 |
| 10. | 验证后,将授予/拒绝用户访问权限。 |
步骤 1:加入 Trusona 身份验证云
登录到 Trusona 门户。
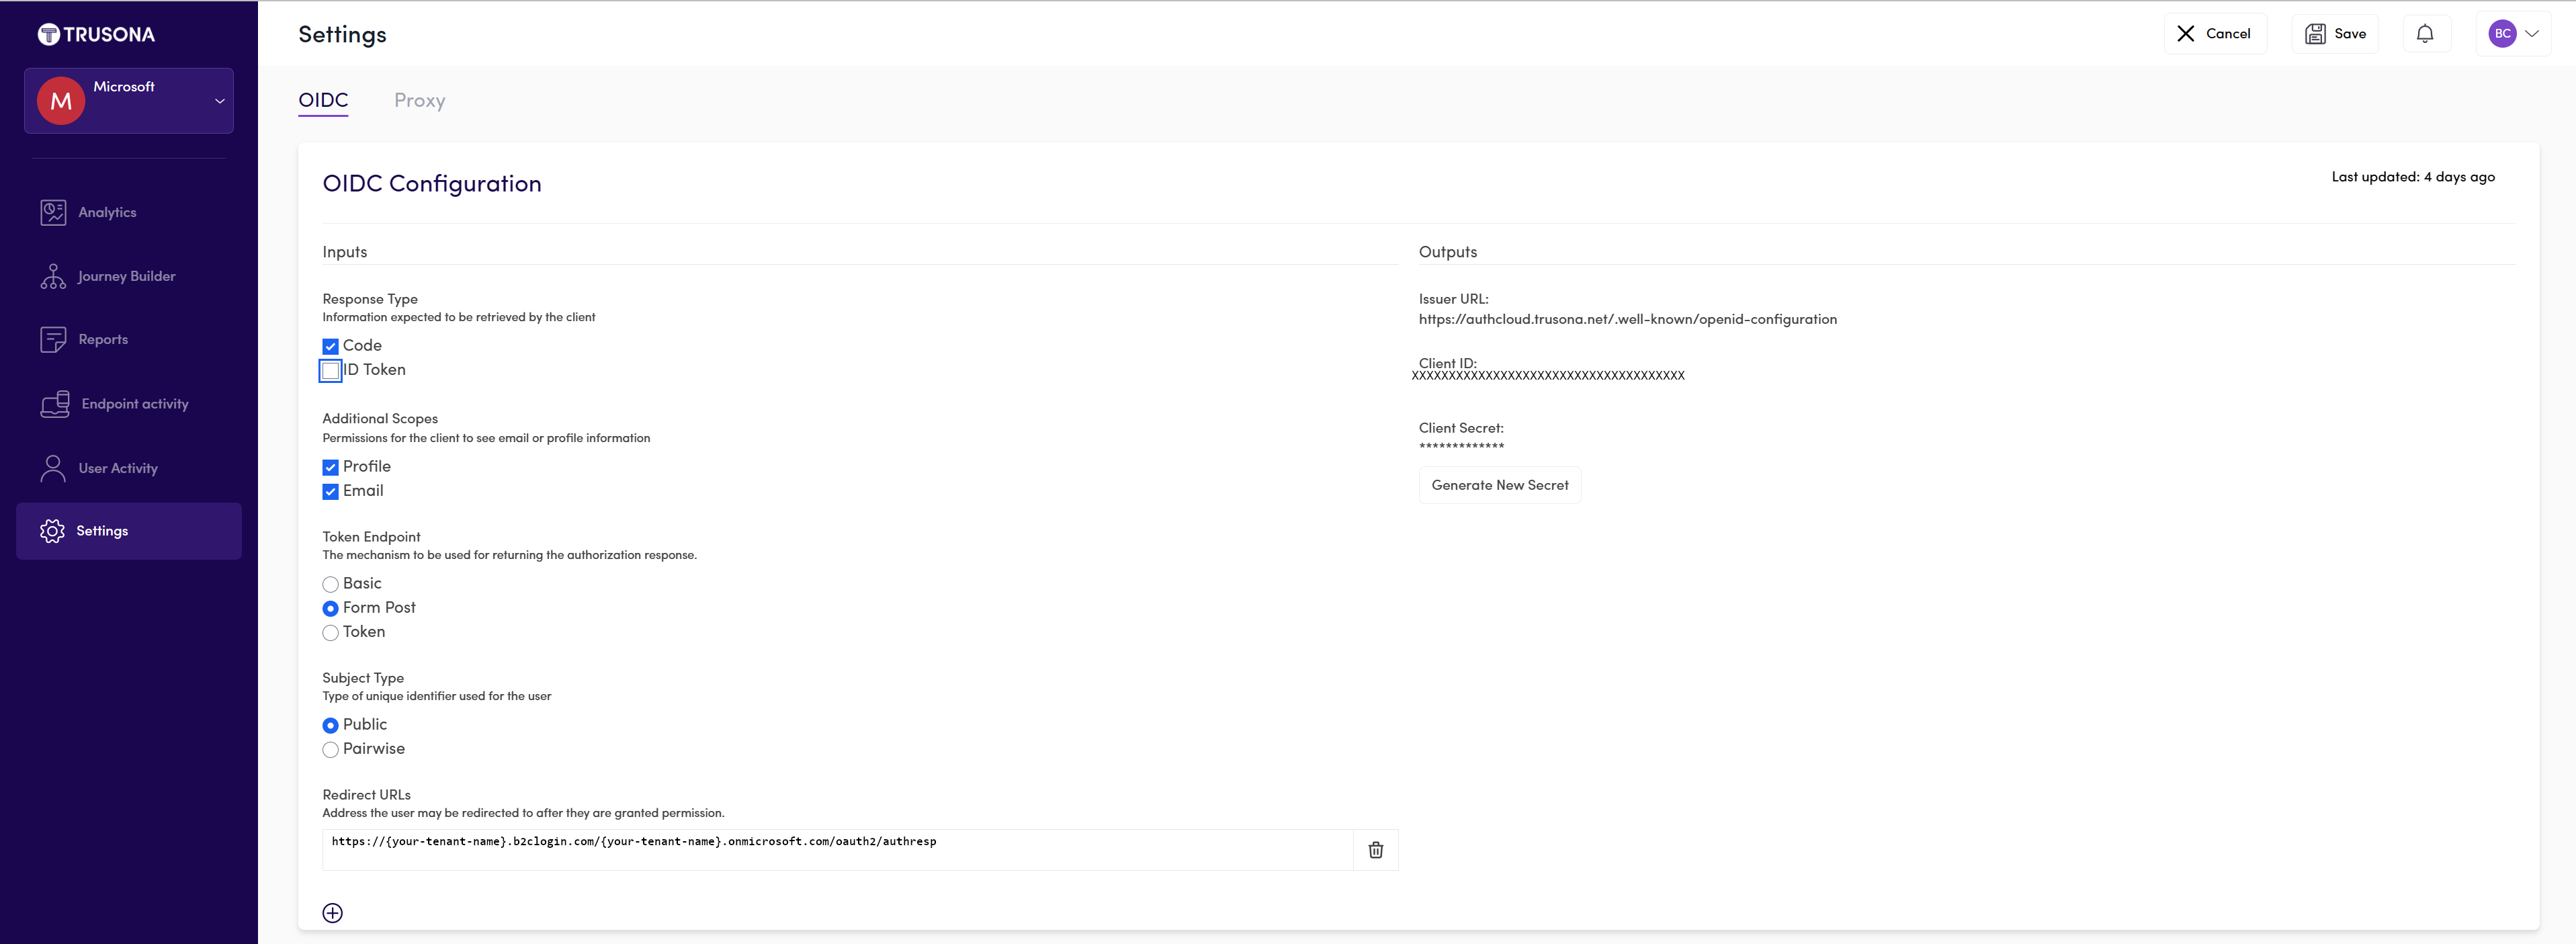
在左侧导航面板中,选择 “设置”
在“设置”菜单中,选择滑块以 启用 OIDC。
选择相应的 输入 并提供 重定向 URL
https://{your-tenant-name}.b2clogin.com/{your-tenant-name}.onmicrosoft.com/oauth2/authresp。生成 密钥并 复制 密钥,以便在 Azure AD B2C 设置中使用。
注释
- Trusona 门户支持自助注册。 注册后,将分配到具有只读权限的 Trusona 帐户。 之后,Trusona 会根据组织的门户用户访问控制策略将你分配到正确的帐户,并提升读写权限。
- Microsoft Entra ID 的初始域名用作客户端重定向主机。

步骤 2:在 Azure AD B2C 中注册 Web 应用程序
必须先在客户租户中注册应用程序,然后应用程序才能与 Azure AD B2C 交互。 本教程介绍如何使用 Azure 门户注册 Web 应用程序。 出于像本教程这样的测试目的,您正在注册https://jwt.ms,这是一个由 Microsoft 拥有的 Web 应用程序,用于显示令牌的解码内容(令牌的内容永远不会离开您的浏览器)。
若要在 Azure AD B2C 租户中注册 Web 应用程序,请使用新的统一应用注册体验。
登录到 Azure 门户。
如果有权访问多个租户,请选择顶部菜单中的“设置”图标,从“目录 + 订阅”菜单切换到你的 Azure AD B2C 租户。
在 Azure 门户中,搜索并选择 Azure AD B2C。
选择“应用注册”,然后选择“新建注册”。
输入应用程序的“名称”。 例如, jwt ms。
在“支持的帐户类型”下,选择“任何标识提供者或组织目录中的帐户(用于通过用户流对用户进行身份验证)”。
在 “重定向 URI”下,选择 “Web”,然后在 URL 文本框中输入
https://jwt.ms。重定向 URI 是授权服务器的终结点,在本例中,Azure AD B2C 会将用户发送到该终结点。 完成与用户的交互后,在成功授权后发送访问令牌或授权代码。 在生产应用程序中,它通常是运行应用的公共可访问终结点,如
https://contoso.com/auth-response。 出于本教程等测试目的,可以将它https://jwt.ms设置为一个Microsoft拥有的 Web 应用程序,它显示令牌的解码内容(令牌的内容永远不会离开浏览器)。 在应用开发过程中,可以添加应用程序在本地侦听的终结点,如https://localhost:5000。 可以随时在注册的应用程序中添加和修改重定向 URI。以下限制适用于重定向统一资源标识符(URI):
- 回复 URL 必须以方案
https开头,除非使用 localhost 重定向 URL。 - 回复 URL 区分大小写。 其大小写必须与正在运行的应用程序的 URL 路径的大小写匹配。 例如,如果应用程序包含在其路径
.../abc/response-oidc中,请不要在回复 URL 中指定.../ABC/response-oidc。 由于 Web 浏览器将路径视为区分大小写的,所以如果重定向到了大小写不符的.../abc/response-oidcURL,那么与.../ABC/response-oidc关联的 Cookie 可能会被排除在外。 - 回复 URL 应包括或排除应用程序预期的尾随正斜杠。 例如,
https://contoso.com/auth-response并https://contoso.com/auth-response/可能被视为应用程序中的非匹配 URL。
- 回复 URL 必须以方案
在“权限”下,选择“向 OpenID 和 offline_access 权限授予管理员同意”复选框。
选择“注册”。
启用 ID 令牌隐式授权
可以启用隐式授权流以使用此应用注册来测试用户流以进行测试。
选择创建的应用注册。
在“管理”下,选择“身份验证”。
在“隐式授权和混合流”下,同时选中“访问令牌(用于隐式流)”和“ID 令牌(用于隐式流和混合流)”复选框。
选择“保存”。
注释
如果启用隐式授权来测试用户流,请确保在将应用部署到生产环境之前禁用隐式授权流设置。
步骤 3:在 Azure AD B2C 中将 Trusona 身份验证云配置为 IdP
以 Azure AD B2C 租户中的外部标识提供者管理员和 B2C 用户流管理员角色身份登录到 Azure 门户 。
如果有权访问多个租户,请选择顶部菜单中的“设置”图标,从“目录 + 订阅”菜单切换到你的 Azure AD B2C 租户。
选择 Azure 门户左上角的“所有服务” ,搜索并选择 Azure AD B2C。
导航到“仪表板”“Azure Active Directory B2C”>“标识提供者”。>
选择 标识提供者。
选择 并添加。
配置 IdP
选择标识提供者类型>OpenID Connect (预览版)。
填写用于设置 IdP 的表单:
资产 价值 元数据 URL https://authcloud.trusona.net/.well-known/openid-configuration客户 ID 在 Trusona 身份验证云门户中提供 客户密钥 在 Trusona 身份验证云门户中提供 范围 OpenID 配置文件电子邮件 响应类型 代码 响应模式 form_post 选择“确定”。
选择“映射此标识提供者的声明”。
若要映射 IdP,请填写表单:
资产 价值 UserID 子项 显示名称 昵称 名 given_name 姓 姓氏 响应模式 电子邮件 选择 “确定” 以完成新 OIDC IdP 的设置。
步骤 4:创建用户流策略
现在,您应该在 B2C IdP 中看到 Trusona 列为新的 OpenID Connect 标识提供者。
在 Azure AD B2C 租户的 “策略”下,选择 “用户流”。
选择“新建用户流”。
选择 “注册并登录”,选择一个版本,然后选择 “创建”。
为您的策略输入一个名称。
在 Identity providers(身份提供商 )部分中,选择您新创建的 Trusona Authentication Cloud-Identity Provider(Trusona 身份验证提供商)。
注释
由于 Trusona 本质上是多重身份验证,因此最好禁用多重身份验证。
选择 创建。
在 “用户属性和声明”下,选择 “显示更多”。 在表单中,选择在前面部分的设置标识提供者过程中指定的至少一个特性。
选择“确定”。
步骤 5:测试用户流
选择创建的策略。
选择 “运行用户流”,然后选择设置:
a。 应用程序:选择已注册的应用,例如 jwt ms。
b. 回复 URL:选择重定向 URL,例如
https://jwt.ms。选择运行用户流。 应重定向到 Trusona 身份验证云。 用户会显示一个登录网页,该网页要求其用户名 - 通常是电子邮件地址。 如果在 Trusona Authentication Cloud 中找不到用户帐户,则会向浏览器发送响应,该浏览器在设备上启动 WebAuthn 注册过程。 否则,响应将发送到开始 WebAuthn 身份验证过程的浏览器。 要求用户选择要使用的凭据。 密钥与 Web 应用程序的域或硬件安全密钥相关联。 用户选择凭据后,OS 会请求用户使用生物识别、密码或 PIN 来确认其身份。 这将解锁安全 Enclave/可信执行环境,它们会生成由与所选凭据相关联的私钥签名的身份验证声明。 Azure AD B2C 验证 Trusona 身份验证响应并颁发 OIDC 令牌。 例如,
https://jwt.ms将用户重定向回发起的应用程序,并显示 Azure AD B2C 返回的令牌内容。
步骤 3:创建 Trusona 身份验证云策略密钥
存储之前在 Azure AD B2C 租户中的 步骤 1 中生成的客户端密码。
登录到 Azure 门户。
如果有权访问多个租户,请选择顶部菜单中的“设置”图标,从“目录 + 订阅”菜单切换到你的 Azure AD B2C 租户。
选择 Azure 门户左上角的“所有服务”,然后搜索并选择“Azure AD B2C” 。
在“概述”页上选择“标识体验框架”。
选择“策略密钥”,然后选择“添加”。
对于“选项”,选择“手动”。
输入策略密钥的名称。 例如,
TrusonaTacClientSecret。 前缀B2C_1A_会自动添加到密钥名称。在 “机密”中,输入之前记录的客户端密码。
在“密钥用法”处选择 。
选择 创建。
步骤 4:将 Trusona 身份验证云配置为 IdP
小窍门
此时应配置 Azure AD B2C 策略。 如果没有,请按照此处的说明设置 Azure AD B2C 租户并配置相关策略。
若要使用户能够使用 Trusona Authentication Cloud 登录,您需要将 Trusona 定义为一个声明提供者,以便 Azure AD B2C 可以通过终结点与其进行通信。 该终结点提供一组声明,Azure AD B2C 使用这些声明来验证特定用户是否已使用其设备上的密码或硬件安全密钥进行身份验证,从而证明用户的标识。
使用以下步骤将 Trusona 添加为声明提供程序:
从 GitHub 获取自定义策略初学者包,然后使用 Azure AD B2C 租户名称更新 LocalAccounts 初学者包中的 XML 文件:
下载 .zip 文件 或克隆存储库:
git clone https://github.com/Azure-Samples/active-directory-b2c-custom-policy-starterpack在 LocalAccounts 目录中的所有文件中,将字符串
yourtenant替换为 Azure AD B2C 租户的名称。 例如,如果 B2C 租户的名称是contoso,则所有实例yourtenant.onmicrosoft.com都变为contoso.onmicrosoft.com。
打开
LocalAccounts/TrustFrameworkExtensions.xml。找到 ClaimsProviders 元素。 如果不存在,请在根元素
TrustFrameworkPolicy下添加它。添加类似于如下所示的新 ClaimsProvider :
<ClaimsProvider>
  <Domain>TrusonaTAC</Domain>
  <DisplayName>Trusona TAC</DisplayName>
  <TechnicalProfiles>
    <TechnicalProfile Id="TrusonaTAC-OpenIdConnect">
      <DisplayName>TrusonaTAC</DisplayName>
      <Description>Login with your Trusona TAC  account</Description>
      <Protocol Name="OpenIdConnect" />
      <Metadata>
        <Item Key="METADATA">https://authcloud.trusona.net/.well-known/openid-configuration</Item>
        <Item Key="scope">openid profile email</Item>
         <!-- Update the Client ID to the Trusona Authentication Cloud Application ID -->
         <Item Key="client_id">00001111-aaaa-2222-bbbb-3333cccc4444</Item>
        <Item Key="response_types">code</Item>
        <Item Key="response_mode">form_post</Item>
        <Item Key="HttpBinding">POST</Item>
        <Item Key="UsePolicyInRedirectUri">false</Item>
        <Item Key="IncludeClaimResolvingInClaimsHandling">true</Item>
        <!-- trying to add additional claim-->
        <!--Insert b2c-extensions-app application ID here, for example: 00001111-aaaa-2222-bbbb-3333cccc4444-->
        <Item Key="00001111-aaaa-2222-bbbb-3333cccc4444"></Item>
        <!--Insert b2c-extensions-app application ObjectId here, for example: aaaaaaaa-0000-1111-2222-bbbbbbbbbbbb-->
        <Item Key="00001111-aaaa-2222-bbbb-3333cccc4444"></Item>
        <!-- The key allows you to specify each of the Azure AD tenants that can be used to sign in. Update the GUIDs for each tenant. -->
        <!--<Item Key="ValidTokenIssuerPrefixes">https://login.microsoftonline.com/187f16e9-81ab-4516-8db7-1c8ef94ffeca,https://login.microsoftonline.com/00001111-aaaa-2222-bbbb-3333cccc4444</Item>-->
        <!-- The commented key specifies that users from any tenant can sign-in. Uncomment if you would like anyone with an Azure AD account to be able to sign in. -->
        <Item Key="ValidTokenIssuerPrefixes">https://login.microsoftonline.com/</Item>

      </Metadata>
      <CryptographicKeys>
       <!-- Update the Client Secret to the Trusona Authentication Cloud Client Secret Name -->
        <Key Id="client_secret" StorageReferenceId="B2C_1A_TrusonaTacSecret" />
      </CryptographicKeys>
      <OutputClaims>
        <OutputClaim ClaimTypeReferenceId="issuerUserId" PartnerClaimType="sub" />
        <OutputClaim ClaimTypeReferenceId="tenantId" PartnerClaimType="tid" AlwaysUseDefaultValue="true" DefaultValue="{Policy:TenantObjectId}" />
        <OutputClaim ClaimTypeReferenceId="authenticationSource" DefaultValue="socialIdpAuthentication" AlwaysUseDefaultValue="true" />
        <OutputClaim ClaimTypeReferenceId="identityProvider" PartnerClaimType="iss" DefaultValue="https://authcloud.trusona.net/" />
        <OutputClaim ClaimTypeReferenceId="issuerUserId" PartnerClaimType="sub" />
        <OutputClaim ClaimTypeReferenceId="displayName" PartnerClaimType="name" />
        <OutputClaim ClaimTypeReferenceId="givenName" PartnerClaimType="given_name" />
        <OutputClaim ClaimTypeReferenceId="surName" PartnerClaimType="family_name" />
        <OutputClaim ClaimTypeReferenceId="email" />
      </OutputClaims>
      <OutputClaimsTransformations>
        <OutputClaimsTransformation ReferenceId="CreateRandomUPNUserName" />
        <OutputClaimsTransformation ReferenceId="CreateUserPrincipalName" />
        <OutputClaimsTransformation ReferenceId="CreateAlternativeSecurityId" />
        <OutputClaimsTransformation ReferenceId="CreateSubjectClaimFromAlternativeSecurityId" />
      </OutputClaimsTransformations>
      <UseTechnicalProfileForSessionManagement ReferenceId="SM-SocialLogin" />
    </TechnicalProfile>
  </TechnicalProfiles>
</ClaimsProvider>
使用之前在步骤 1 中记录的 Trusona 身份验证云应用程序 ID 设置client_id。
使用步骤 3 中创建的策略密钥的名称更新client_secret部分。 例如,
B2C_1A_TrusonaTacClientSecret:<Key Id="client_secret" StorageReferenceId="B2C_1A_TrusonaTacClientSecret" />保存更改。
步骤 5:添加用户体验路径
此时,你设置了 IdP,但它尚未出现在任何登录页中。 如果你有自己的自定义用户旅程,请继续执行 步骤 6,否则,如下所示创建现有模板用户旅程的副本。
打开入门套件中的
LocalAccounts/TrustFrameworkBase.xml文件。找到并复制包含 的
Id=SignUpOrSignIn元素的完整内容。打开
LocalAccounts/TrustFrameworkExtensions.xml并且查找UserJourneys元素。 如果该元素不存在,请添加一个。将复制的 UserJourney 元素的全部内容粘贴到 UserJourneys 元素的子元素中。
对用户旅程的
Id进行重命名。 例如,Id=TrusonaTacSUSI。
步骤 6:将 IdP 添加到用户流程
现在你已有用户流程,请将新的 IdP 添加到用户流程中。
在用户旅程中,查找包含
Type=CombinedSignInAndSignUp或Type=ClaimsProviderSelection的业务流程步骤元素。 通常这是第一个编排步骤。 ClaimsProviderSelections 元素包含用户可以登录的 IdP 列表。 元素的顺序将决定向用户显示的登录按钮的顺序。 添加ClaimsProviderSelection XML 元素。 将 TargetClaimsExchangeId 的值设置为友好名称,例如TrusonaTacExchange。在下一个编排步骤中,添加 ClaimsExchange 元素。 将 ID 设置为目标声明交换 ID 的值。 将 TechnicalProfileReferenceId 的值更新为先前添加声明提供程序时创建的技术配置文件的 ID,例如
TrusonaTAC-OpenIdConnect。
以下 XML 演示了使用标识提供者的用户旅程的业务流程步骤:
    <UserJourney Id="TrusonaTacSUSI">
      <OrchestrationSteps>
        <OrchestrationStep Order="1" Type="CombinedSignInAndSignUp" ContentDefinitionReferenceId="api.signuporsignin">
          <ClaimsProviderSelections>
            <ClaimsProviderSelection TargetClaimsExchangeId="TrusonaTacExchange" />
            <ClaimsProviderSelection ValidationClaimsExchangeId="LocalAccountSigninEmailExchange" />
          </ClaimsProviderSelections>
          <ClaimsExchanges>
            <ClaimsExchange Id="LocalAccountSigninEmailExchange" TechnicalProfileReferenceId="SelfAsserted-LocalAccountSignin-Email" />
          </ClaimsExchanges>
        </OrchestrationStep>
        <!-- Check if the user has selected to sign in using one of the social providers -->
        <OrchestrationStep Order="2" Type="ClaimsExchange">
          <Preconditions>
            <Precondition Type="ClaimsExist" ExecuteActionsIf="true">
              <Value>objectId</Value>
              <Action>SkipThisOrchestrationStep</Action>
            </Precondition>
          </Preconditions>
          <ClaimsExchanges>
            <ClaimsExchange Id="TrusonaTacExchange" TechnicalProfileReferenceId="TrusonaTAC-OpenIdConnect" />
            <ClaimsExchange Id="SignUpWithLogonEmailExchange" TechnicalProfileReferenceId="LocalAccountSignUpWithLogonEmail" />
          </ClaimsExchanges>
        </OrchestrationStep>
        <OrchestrationStep Order="3" Type="ClaimsExchange">
          <Preconditions>
            <Precondition Type="ClaimEquals" ExecuteActionsIf="true">
              <Value>authenticationSource</Value>
              <Value>localAccountAuthentication</Value>
              <Action>SkipThisOrchestrationStep</Action>
            </Precondition>
          </Preconditions>
          <ClaimsExchanges>
            <ClaimsExchange Id="AADUserReadUsingAlternativeSecurityId" TechnicalProfileReferenceId="AAD-UserReadUsingAlternativeSecurityId-NoError" />
          </ClaimsExchanges>
        </OrchestrationStep>
        <!-- Show self-asserted page only if the directory does not have the user account already (we do not have an objectId). This can only happen when authentication happened using a social IDP. If local account was created or authentication done using ESTS in step 2, then an user account must exist in the directory by this time. -->
        <OrchestrationStep Order="4" Type="ClaimsExchange">
          <Preconditions>
            <Precondition Type="ClaimsExist" ExecuteActionsIf="true">
              <Value>objectId</Value>
              <Action>SkipThisOrchestrationStep</Action>
            </Precondition>
          </Preconditions>
          <ClaimsExchanges>
            <ClaimsExchange Id="SelfAsserted-Social" TechnicalProfileReferenceId="SelfAsserted-Social" />
          </ClaimsExchanges>
        </OrchestrationStep>
        <!-- This step reads any user attributes that we may not have received when authenticating using ESTS so they can be sent in the token. -->
        <OrchestrationStep Order="5" Type="ClaimsExchange">
          <Preconditions>
            <Precondition Type="ClaimEquals" ExecuteActionsIf="true">
              <Value>authenticationSource</Value>
              <Value>socialIdpAuthentication</Value>
              <Action>SkipThisOrchestrationStep</Action>
            </Precondition>
          </Preconditions>
          <ClaimsExchanges>
            <ClaimsExchange Id="AADUserReadWithObjectId" TechnicalProfileReferenceId="AAD-UserReadUsingObjectId" />
          </ClaimsExchanges>
        </OrchestrationStep>
        <!-- The previous step (SelfAsserted-Social) could have been skipped if there were no attributes to collect from the user. So, in that case, create the user in the directory if one does not already exist (verified using objectId which would be set from the last step if account was created in the directory. -->
        <OrchestrationStep Order="6" Type="ClaimsExchange">
          <Preconditions>
            <Precondition Type="ClaimsExist" ExecuteActionsIf="true">
              <Value>objectId</Value>
              <Action>SkipThisOrchestrationStep</Action>
            </Precondition>
          </Preconditions>
          <ClaimsExchanges>
            <ClaimsExchange Id="AADUserWrite" TechnicalProfileReferenceId="AAD-UserWriteUsingAlternativeSecurityId" />
          </ClaimsExchanges>
        </OrchestrationStep>
        <OrchestrationStep Order="7" Type="SendClaims" CpimIssuerTechnicalProfileReferenceId="JwtIssuer" />
      </OrchestrationSteps>
      <ClientDefinition ReferenceId="DefaultWeb" />
    </UserJourney>
详细了解 用户旅程。
步骤 7:配置信赖方策略
信赖方策略(例如 SignUpSignIn.xml)指定 Azure AD B2C 执行的用户旅程。 在信赖方内查找 DefaultUserJourney 元素。 更新 ReferenceId,使其与已在其中添加标识提供者的用户旅程 ID 匹配。
在以下示例中,对于 Trusona Authentication Cloud 用户旅程,将 ReferenceId 设置为 TrusonaTacSUSI:
   <RelyingParty>
        <DefaultUserJourney ReferenceId="TrusonaTacSUSI" />
        <TechnicalProfile Id="PolicyProfile">
          <DisplayName>PolicyProfile</DisplayName>
          <Protocol Name="OpenIdConnect" />
          <OutputClaims>
            <OutputClaim ClaimTypeReferenceId="displayName" />
            <OutputClaim ClaimTypeReferenceId="givenName" />
            <OutputClaim ClaimTypeReferenceId="surname" />
            <OutputClaim ClaimTypeReferenceId="email" />
            <OutputClaim ClaimTypeReferenceId="objectId" PartnerClaimType="sub"/>
            <OutputClaim ClaimTypeReferenceId="identityProvider" />
            <OutputClaim ClaimTypeReferenceId="tenantId" AlwaysUseDefaultValue="true" DefaultValue="{Policy:TenantObjectId}" />
            <OutputClaim ClaimTypeReferenceId="correlationId" DefaultValue="{Context:CorrelationId}" />
          </OutputClaims>
          <SubjectNamingInfo ClaimType="sub" />
        </TechnicalProfile>
      </RelyingParty>
步骤 8:上传自定义策略
登录到 Azure 门户。
如果有权访问多个租户,请选择顶部菜单中的“设置”图标,从“目录 + 订阅”菜单切换到你的 Azure AD B2C 租户。
在 Azure 门户中,搜索并选择 Azure AD B2C。
在“策略”下,选择“ 标识体验框架”。
选择“上传自定义策略”,然后上传已更改的两个策略文件,其顺序为:先上传扩展策略(例如 ),然后上传信赖方策略(例如
TrustFrameworkExtensions.xml)。
步骤 9:测试自定义策略
在 Azure AD B2C 租户的 “策略”下,选择“ 标识体验框架”。
在 “自定义策略”下,选择 TrusonaTacSUSI。
对于 应用程序,请选择之前注册为本文先决条件的一部分的 Web 应用程序。 例如
jwt ms。 “回复 URL”应显示为https://jwt.ms。选择“立即运行”。 浏览器应重定向到 Trusona Authentication Cloud 登录页。
显示登录屏幕;底部应该是使用 Trusona 身份验证云 身份验证的按钮。
应重定向到 Trusona 身份验证云。 用户会显示一个登录网页,该网页要求其用户名 - 通常是电子邮件地址。 如果在 Trusona Authentication Cloud 中找不到用户帐户,则会向浏览器发送响应,该浏览器在设备上启动 WebAuthn 注册过程。 否则,响应将发送到开始 WebAuthn 身份验证过程的浏览器。 要求用户选择要使用的凭据。 密钥与 Web 应用程序的域或硬件安全密钥相关联。 用户选择凭据后,OS 会请求用户使用生物识别、密码或 PIN 来确认其身份。 这将解锁安全 Enclave/可信执行环境,它们会生成由与所选凭据相关联的私钥签名的身份验证声明。
如果登录过程成功,浏览器将重定向到
https://jwt.ms,后者显示 Azure AD B2C 返回的令牌内容。
后续步骤
有关其他信息,请查看以下文章: