你当前正在访问 Microsoft Azure Global Edition 技术文档网站。 如果需要访问由世纪互联运营的 Microsoft Azure 中国技术文档网站,请访问 https://docs.azure.cn。
了解如何使用 Azure Key Vault 安全地开发 Azure AI 服务应用程序。
Key Vault 可降低机密意外泄露的风险,因为你不会在应用程序中存储安全信息。
先决条件
- 一个有效的 Azure 订阅 - 免费创建订阅
- Visual Studio IDE
- 一个 Azure Key Vault
- AI Foundry 资源
- 一个有效的 Azure 订阅 - 免费创建订阅。
- Python 3.7 或更高版本
- Azure CLI 或 Azure PowerShell
- 一个 Azure Key Vault
- AI Foundry 资源
- 一个有效的 Azure 订阅 - 免费创建订阅。
- Java 开发工具包 (JDK) 版本 8 或更高版本
- Azure CLI 或 Azure PowerShell
- 一个 Azure Key Vault
- AI Foundry 资源
- 一个有效的 Azure 订阅 - 免费创建订阅。
- 当前 Node.js v14 LTS 或更高版本
- Azure CLI 或 Azure PowerShell
- 一个 Azure Key Vault
- AI Foundry 资源
注意
查看关于正在使用的 Azure AI 服务的文档和快速入门文章,以了解:
- 发送 API 调用所需的凭据和其他信息。
- 运行应用程序所需的包和代码。
从您的 Azure AI Foundry 资源中获取认证信息
在将凭据信息添加到 Azure 密钥保管库之前,需要从 Azure AI Foundry 资源中检索凭据信息。 例如,如果服务需要密钥和终结点,你可以使用以下步骤找到它们:
在 Azure 门户中导航到 Azure 资源。
在左侧可折叠菜单中,选择“密钥和终结点”。
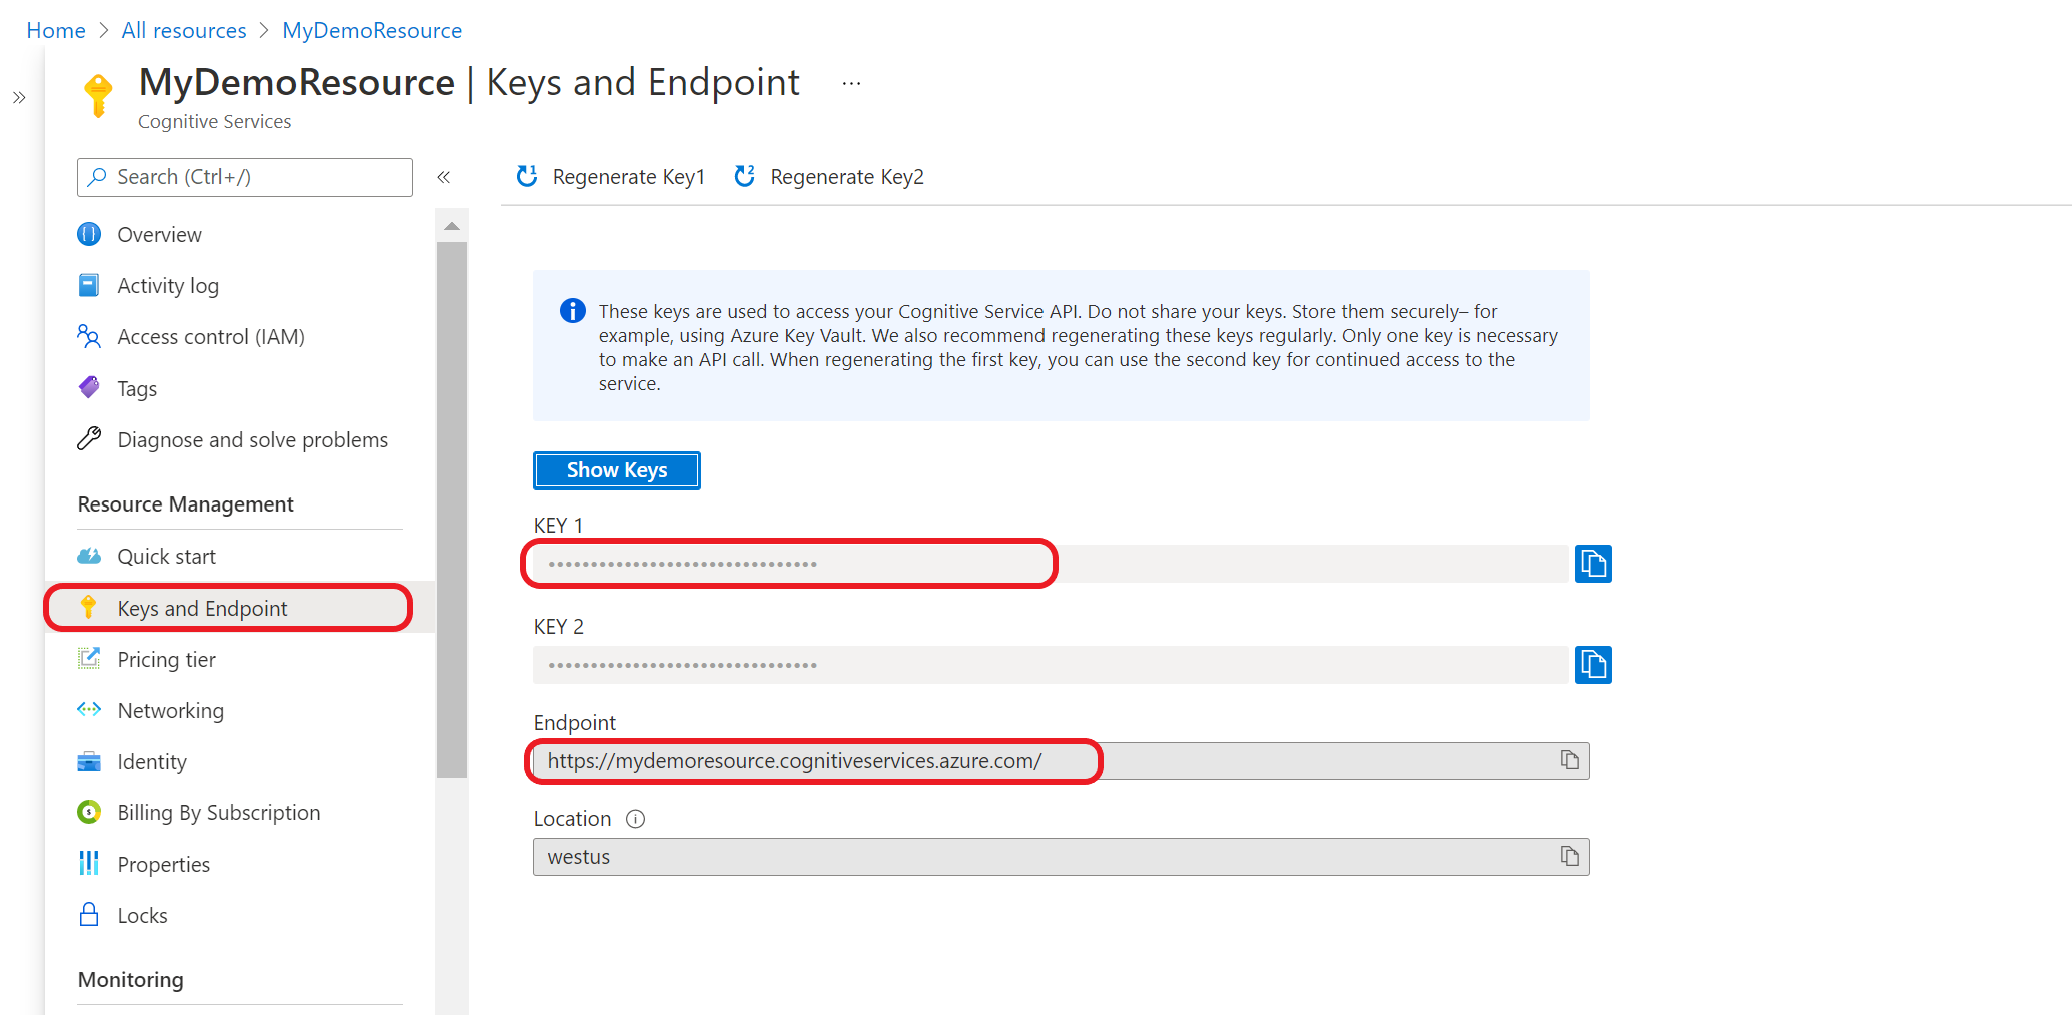

某些 Azure AI 服务需要不同的信息来对 API 调用进行身份验证,例如密钥和区域。 请确保在继续之前检索此信息。
将凭据添加到密钥保管库
若要使应用程序能够检索并使用凭据对 API 调用进行身份验证,你需要将凭据添加到密钥保管库机密。
重复这些步骤,为每个必需的资源凭据生成机密。 例如,密钥和终结点。 稍后将使用这些机密名称对应用程序进行身份验证。
打开新的浏览器选项卡或窗口。 导航到Azure 门户中的密钥保管库。
从左侧的可折叠菜单中,选择“对象”“机密”。
选择“生成/导入”。
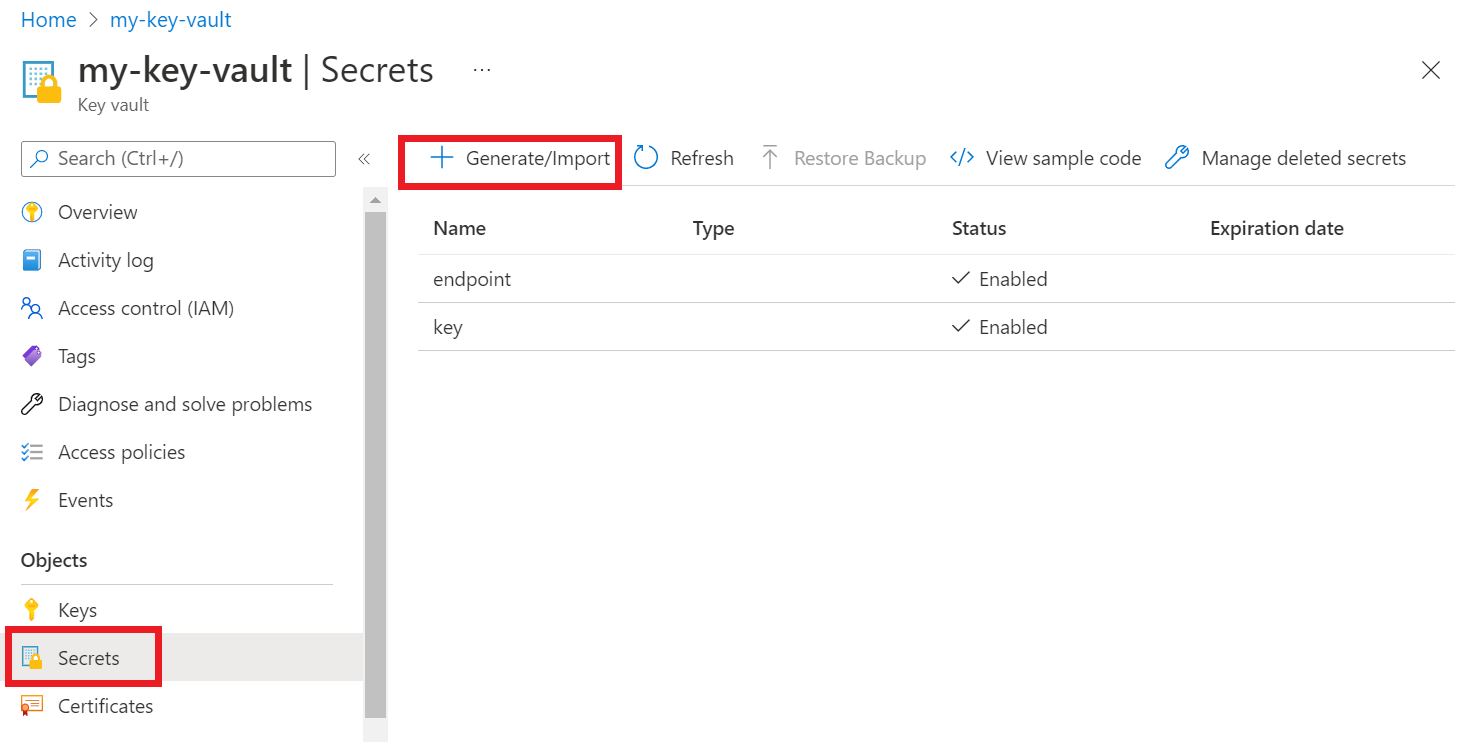
在“创建机密”屏幕上,输入以下值:
名称 值 上传选项 生成 名称 密钥或终结点的机密名称。 例如:“CognitiveServicesKey”或“CognitiveServicesEndpoint” 值 Azure AI Foundry 资源密钥或终结点。 稍后,应用程序将使用机密“名称”来安全地访问“值”。
将其他值保留为其默认值。 选择“创建”。
提示
请务必记住为机密设置的名称,因为稍后将在应用程序中使用它们。

现在,你应该已为资源信息创建了命名机密。
为密钥保管库的名称创建环境变量
建议为 Azure 密钥保管库的名称创建环境变量。 应用程序将在运行时读取此环境变量,以检索密钥和终结点信息。
若要设置环境变量,请使用以下命令之一。 将 KEY_VAULT_NAME 替换为环境变量的名称,并将 Your-Key-Vault-Name 替换为密钥保管库的名称,该名称将存储在环境变量中。
在给定值的情况下,创建并分配持久化环境变量。
setx KEY_VAULT_NAME "Your-Key-Vault-Name"
在命令提示符的新实例中,读取环境变量。
echo %KEY_VAULT_NAME%
使用 Visual Studio 向 Azure 进行身份验证
使用 Visual Studio 2017 或更高版本的开发人员可以通过 Visual Studio 对 Microsoft Entra 帐户进行身份验证。 这使你能够通过从 IDE 中登录到 Azure 订阅来访问密钥保管库中的机密。
若要在 Visual Studio 中进行身份验证,请从顶部导航菜单中选择“工具”,然后选择“选项”。 导航到“Azure 服务身份验证”选项以使用用户名和密码登录。
使用命令行进行身份验证
在授予对密钥保管库的访问权限之前,必须使用 Microsoft Entra 用户名和密码进行身份验证。
若要使用 Azure CLI 进行身份验证,请运行 az login 命令。
az login
在具有默认 Web 浏览器的系统上,Azure CLI 将启动浏览器进行身份验证。 对于没有默认 Web 浏览器的系统,az login 命令将使用设备代码身份验证流。 你还可以通过指定 --use-device-code 参数来强制 Azure CLI 使用设备代码流,而不是启动浏览器。
如果有多个订阅,请确保选择包含密钥保管库的 Azure 订阅。
授予对 Key Vault 的访问权限
针对密钥保管库创建一个访问策略,以便为用户帐户授予机密权限。
若要设置访问策略,请运行 az keyvault set-policy 命令。 将 Your-Key-Vault-Name 替换为你的密钥保管库名称。 将 user@domain.com 替换为 Microsoft Entra。
az keyvault set-policy --name Your-Key-Vault-Name --upn user@domain.com --secret-permissions delete get list set purge
新建 C# 应用程序
使用 Visual Studio IDE 创建新的 .NET Core 控制台应用。 这会创建包含单个 C# 源文件的“Hello World”项目:program.cs。
右键单击“解决方案资源管理器”中的解决方案,然后选择“管理 NuGet 包”,以便安装以下客户端库。 在打开的包管理器中,选择“浏览”并搜索以下库,然后为每个库选择“安装”:
Azure.Security.KeyVault.SecretsAzure.Identity
导入示例代码
将下面的示例代码复制到 program.cs 文件中。 将 Your-Key-Secret-Name 和 Your-Endpoint-Secret-Name 替换为在密钥保管库中设置的机密名称。
using System;
using System.Threading.Tasks;
using Azure;
using Azure.Identity;
using Azure.Security.KeyVault.Secrets;
using System.Net;

namespace key_vault_console_app
{
    class Program
    {
        static async Task Main(string[] args)
        {
            //Name of your key vault
            var keyVaultName = Environment.GetEnvironmentVariable("KEY_VAULT_NAME");

            //variables for retrieving the key and endpoint from your key vault.
            //Set these variables to the names you created for your secrets
            const string keySecretName = "Your-Key-Secret-Name";
            const string endpointSecretName = "Your-Endpoint-Secret-Name";

            //Endpoint for accessing your key vault
            var kvUri = $"https://{keyVaultName}.vault.azure.net";

            var keyVaultClient = new SecretClient(new Uri(kvUri), new DefaultAzureCredential());

            Console.WriteLine($"Retrieving your secrets from {keyVaultName}.");

            //Key and endpoint secrets retrieved from your key vault
            var keySecret = await keyVaultClient.GetSecretAsync(keySecretName);
            var endpointSecret = await keyVaultClient.GetSecretAsync(endpointSecretName);
            Console.WriteLine($"Your key secret value is: {keySecret.Value.Value}");
            Console.WriteLine($"Your endpoint secret value is: {endpointSecret.Value.Value}");
            Console.WriteLine("Secrets retrieved successfully");

        }
    }
}
运行应用程序
通过选择 Visual Studio 顶部的“调试”按钮来运行应用程序。 将从密钥保管库中检索密钥和终结点机密。
发送测试性语言服务调用(可选)
如果使用的是多服务资源或语言资源,则可以按以下步骤更新你的应用程序,以通过从密钥保管库中检索密钥和终结点来发送示例命名实体识别调用。
右键单击“解决方案资源管理器”中的解决方案,然后选择“管理 NuGet 包”,以便安装
Azure.AI.TextAnalytics库。 在打开的包管理器中,选择“浏览”并搜索以下库,然后为每个库选择“安装”:将下面的指令添加到
program.cs文件的顶部。using Azure.AI.TextAnalytics;将以下代码示例添加到应用程序中。
// Example method for extracting named entities from text
private static void EntityRecognitionExample(string keySecret, string endpointSecret)
{
    //String to be sent for Named Entity Recognition
    var exampleString = "I had a wonderful trip to Seattle last week.";

    AzureKeyCredential azureKeyCredential = new AzureKeyCredential(keySecret);
    Uri endpoint = new Uri(endpointSecret);
    var languageServiceClient = new TextAnalyticsClient(endpoint, azureKeyCredential);

    Console.WriteLine($"Sending a Named Entity Recognition (NER) request");
    var response = languageServiceClient.RecognizeEntities(exampleString);
    Console.WriteLine("Named Entities:");
    foreach (var entity in response.Value)
    {
        Console.WriteLine($"\tText: {entity.Text},\tCategory: {entity.Category},\tSub-Category: {entity.SubCategory}");
        Console.WriteLine($"\t\tScore: {entity.ConfidenceScore:F2},\tLength: {entity.Length},\tOffset: {entity.Offset}\n");
    }
}
添加以下代码,以使用键和终结点值从 main 方法调用
EntityRecognitionExample()。EntityRecognitionExample(keySecret.Value.Value, endpointSecret.Value.Value);运行应用程序。
对应用程序进行身份验证
在授予对密钥保管库的访问权限之前,必须使用 Microsoft Entra 用户名和密码进行身份验证。
若要使用 Azure CLI 进行身份验证,请运行 az login 命令。
az login
在具有默认 Web 浏览器的系统上,Azure CLI 将启动浏览器进行身份验证。 对于没有默认 Web 浏览器的系统,az login 命令将使用设备代码身份验证流。 你还可以通过指定 --use-device-code 参数来强制 Azure CLI 使用设备代码流,而不是启动浏览器。
如果有多个订阅,请确保选择包含密钥保管库的 Azure 订阅。
授予对 Key Vault 的访问权限
针对密钥保管库创建一个访问策略,以便为用户帐户授予机密权限。
若要设置访问策略,请运行 az keyvault set-policy 命令。 将 Your-Key-Vault-Name 替换为你的密钥保管库名称。 将 user@domain.com 替换为 Microsoft Entra。
az keyvault set-policy --name Your-Key-Vault-Name --upn user@domain.com --secret-permissions delete get list set purge
创建 Python 应用程序
创建名为 keyVaultExample 的新文件夹。 然后,使用首选代码编辑器在新创建的文件夹中创建一个名为 program.py 的文件。
安装 Key Vault 和语言服务包
在终端或命令提示符下,导航到项目文件夹并安装 Microsoft Entra 标识库:
pip install azure-identity安装 Key Vault 机密库:
pip install azure-keyvault-secrets
导入示例代码
将以下代码示例添加到名为 program.py 的文件中。 将 Your-Key-Secret-Name 和 Your-Endpoint-Secret-Name 替换为在密钥保管库中设置的机密名称。
import os
from azure.keyvault.secrets import SecretClient
from azure.identity import DefaultAzureCredential
from azure.core.credentials import AzureKeyCredential

keyVaultName = os.environ["KEY_VAULT_NAME"]

# Set these variables to the names you created for your secrets
keySecretName = "Your-Key-Secret-Name"
endpointSecretName = "Your-Endpoint-Secret-Name"

# URI for accessing key vault
KVUri = f"https://{keyVaultName}.vault.azure.net"

# Instantiate the client and retrieve secrets
credential = DefaultAzureCredential()
kv_client = SecretClient(vault_url=KVUri, credential=credential)

print(f"Retrieving your secrets from {keyVaultName}.")

retrieved_key = kv_client.get_secret(keySecretName).value
retrieved_endpoint = kv_client.get_secret(endpointSecretName).value

print(f"Your secret key value is {retrieved_key}.");
print(f"Your secret endpoint value is {retrieved_endpoint}.");
运行应用程序
使用以下命令运行应用程序。 将从密钥保管库中检索密钥和终结点机密。
python ./program.py
发送测试性语言服务调用(可选)
如果使用的是多服务资源或语言资源,则可以按以下步骤更新你的应用程序,以通过从密钥保管库中检索密钥和终结点来发送示例命名实体识别调用。
安装语言服务库:
pip install azure-ai-textanalytics==5.1.0将以下代码添加到应用程序
from azure.ai.textanalytics import TextAnalyticsClient
# Authenticate the key vault secrets client using your key and endpoint
azure_key_credential = AzureKeyCredential(retrieved_key)
# Now you can use key vault credentials with the Language service
language_service_client = TextAnalyticsClient(
    endpoint=retrieved_endpoint,
    credential=azure_key_credential)

# Example of recognizing entities from text

print("Sending NER request")

try:
    documents = ["I had a wonderful trip to Seattle last week."]
    result = language_service_client.recognize_entities(documents = documents)[0]
    print("Named Entities:\n")
    for entity in result.entities:
        print("\tText: \t", entity.text, "\tCategory: \t", entity.category, "\tSubCategory: \t", entity.subcategory,
                "\n\tConfidence Score: \t", round(entity.confidence_score, 2), "\tLength: \t", entity.length, "\tOffset: \t", entity.offset, "\n")

except Exception as err:
    print("Encountered exception. {}".format(err))
运行应用程序。
对应用程序进行身份验证
在授予对密钥保管库的访问权限之前,必须使用 Microsoft Entra 用户名和密码进行身份验证。
若要使用 Azure CLI 进行身份验证,请运行 az login 命令。
az login
在具有默认 Web 浏览器的系统上,Azure CLI 将启动浏览器进行身份验证。 对于没有默认 Web 浏览器的系统,az login 命令将使用设备代码身份验证流。 你还可以通过指定 --use-device-code 参数来强制 Azure CLI 使用设备代码流,而不是启动浏览器。
如果有多个订阅,请确保选择包含密钥保管库的 Azure 订阅。
授予对 Key Vault 的访问权限
针对密钥保管库创建一个访问策略,以便为用户帐户授予机密权限。
若要设置访问策略,请运行 az keyvault set-policy 命令。 将 Your-Key-Vault-Name 替换为你的密钥保管库名称。 将 user@domain.com 替换为 Microsoft Entra。
az keyvault set-policy --name Your-Key-Vault-Name --upn user@domain.com --secret-permissions delete get list set purge
创建 Java 应用程序
在首选 IDE 中,创建一个新的 Java 控制台应用程序项目,并创建一个名为 Example 的类。
添加依赖项
在项目中,将以下依赖项添加到 pom.xml 文件中。
<dependencies>
    <dependency>
        <groupId>com.azure</groupId>
        <artifactId>azure-security-keyvault-secrets</artifactId>
        <version>4.2.3</version>
    </dependency>
    <dependency>
        <groupId>com.azure</groupId>
        <artifactId>azure-identity</artifactId>
        <version>1.2.0</version>
    </dependency>
</dependencies>
导入示例代码
将以下代码复制到名为 Example.java 的文件中。 将 Your-Key-Secret-Name 和 Your-Endpoint-Secret-Name 替换为在密钥保管库中设置的机密名称。
import com.azure.identity.DefaultAzureCredentialBuilder;
import com.azure.security.keyvault.secrets.SecretClient;
import com.azure.security.keyvault.secrets.SecretClientBuilder;
import com.azure.core.credential.AzureKeyCredential;

public class Example {

    public static void main(String[] args) {

        String keyVaultName = System.getenv("KEY_VAULT_NAME");
        String keyVaultUri = "https://" + keyVaultName + ".vault.azure.net";

        //variables for retrieving the key and endpoint from your key vault.
        //Set these variables to the names you created for your secrets
        String keySecretName = "Your-Key-Secret-Name";
        String endpointSecretName = "Your-Endpoint-Secret-Name";

        //Create key vault secrets client
        SecretClient secretClient = new SecretClientBuilder()
                .vaultUrl(keyVaultUri)
                .credential(new DefaultAzureCredentialBuilder().build())
                .buildClient();

        //retrieve key and endpoint from key vault
        String keyValue = secretClient.getSecret(keySecretName).getValue();
        String endpointValue = secretClient.getSecret(endpointSecretName).getValue();
        System.out.printf("Your secret key value is: %s", keyValue)
        System.out.printf("Your secret endpoint value is: %s", endpointValue)
    }
}
发送测试性语言服务调用(可选)
如果使用的是多服务资源或语言资源,则可以按以下步骤更新你的应用程序,以通过从密钥保管库中检索密钥和终结点来发送示例命名实体识别调用。
在应用程序中,添加以下依赖项:
<dependency>
    <groupId>com.azure</groupId>
    <artifactId>azure-ai-textanalytics</artifactId>
    <version>5.1.12</version>
</dependency>
将以下 import 语句添加到你的文件。
import com.azure.ai.textanalytics.models.*;
import com.azure.ai.textanalytics.TextAnalyticsClientBuilder;
import com.azure.ai.textanalytics.TextAnalyticsClient;
将以下代码添加到应用程序中的
main()方法:TextAnalyticsClient languageClient = new TextAnalyticsClientBuilder() .credential(new AzureKeyCredential(keyValue)) .endpoint(endpointValue) .buildClient(); // Example for recognizing entities in text String text = "I had a wonderful trip to Seattle last week."; for (CategorizedEntity entity : languageClient.recognizeEntities(text)) { System.out.printf( "Recognized entity: %s, entity category: %s, entity sub-category: %s, score: %s, offset: %s, length: %s.%n", entity.getText(), entity.getCategory(), entity.getSubcategory(), entity.getConfidenceScore(), entity.getOffset(), entity.getLength()); }运行应用程序
对应用程序进行身份验证
在授予对密钥保管库的访问权限之前,必须使用 Microsoft Entra 用户名和密码进行身份验证。
若要使用 Azure CLI 进行身份验证,请运行 az login 命令。
az login
在具有默认 Web 浏览器的系统上,Azure CLI 将启动浏览器进行身份验证。 对于没有默认 Web 浏览器的系统,az login 命令将使用设备代码身份验证流。 你还可以通过指定 --use-device-code 参数来强制 Azure CLI 使用设备代码流,而不是启动浏览器。
如果有多个订阅,请确保选择包含密钥保管库的 Azure 订阅。
授予对 Key Vault 的访问权限
针对密钥保管库创建一个访问策略,以便为用户帐户授予机密权限。
若要设置访问策略,请运行 az keyvault set-policy 命令。 将 Your-Key-Vault-Name 替换为你的密钥保管库名称。 将 user@domain.com 替换为 Microsoft Entra。
az keyvault set-policy --name Your-Key-Vault-Name --upn user@domain.com --secret-permissions delete get list set purge
创建新的 Node.js 应用程序
创建一个使用密钥保管库的 Node.js 应用程序。
在终端中,创建一个名为 key-vault-js-example 的文件夹并更改为该文件夹:
mkdir key-vault-js-example && cd key-vault-js-example
初始化 Node.js 项目:
npm init -y
安装 Key Vault 和语言服务包
使用终端安装 Azure Key Vault 机密库(适用于 Node.js 的 @azure/keyvault-secrets)。
npm install @azure/keyvault-secrets安装 Azure 标识库(@azure.identity 包)以对密钥保管库进行身份验证。
npm install @azure/identity
导入代码示例
将以下代码示例添加到名为 index.js 的文件中。 将 Your-Key-Secret-Name 和 Your-Endpoint-Secret-Name 替换为在密钥保管库中设置的机密名称。
const { SecretClient } = require("@azure/keyvault-secrets");
const { DefaultAzureCredential } = require("@azure/identity");
// Load the .env file if it exists
const dotenv = require("dotenv");
dotenv.config();

async function main() {
    const credential = new DefaultAzureCredential();

    const keyVaultName = process.env["KEY_VAULT_NAME"];
    const url = "https://" + keyVaultName + ".vault.azure.net";

    const kvClient = new SecretClient(url, credential);

    // Set these variables to the names you created for your secrets
    const keySecretName = "Your-Key-Secret-Name";
    const endpointSecretName = "Your-Endpoint-Secret-Name";

    console.log("Retrieving secrets from ", keyVaultName);
    const retrievedKey = await (await kvClient.getSecret(keySecretName)).value;
    const retrievedEndpoint = await (await kvClient.getSecret(endpointSecretName)).value;
    console.log("Your secret key value is: ", retrievedKey);
    console.log("Your secret endpoint value is: ", retrievedEndpoint);
}

main().catch((error) => {
  console.error("An error occurred:", error);
  process.exit(1);
});
运行示例应用程序
使用以下命令运行应用程序。 将从密钥保管库中检索密钥和终结点机密。
node index.js
发送测试性语言服务调用(可选)
如果使用的是多服务资源或语言资源,则可以按以下步骤更新你的应用程序,以通过从密钥保管库中检索密钥和终结点来发送示例命名实体识别调用。
安装适用于语言的 Azure AI 服务库 @azure/ai-text-analytics,以便将 API 请求发送到语言服务。
npm install @azure/ai-text-analytics@5.1.0将以下代码添加到应用程序:
const { TextAnalyticsClient, AzureKeyCredential } = require("@azure/ai-text-analytics");
// Authenticate the language client with your key and endpoint
const languageClient = new TextAnalyticsClient(retrievedEndpoint,  new AzureKeyCredential(retrievedKey));

// Example for recognizing entities in text
console.log("Sending NER request")
const entityInputs = [
    "I had a wonderful trip to Seattle last week."
];
const entityResults = await languageClient.recognizeEntities(entityInputs);
entityResults.forEach(document => {
    console.log(`Document ID: ${document.id}`);
    document.entities.forEach(entity => {
        console.log(`\tName: ${entity.text} \tCategory: ${entity.category} \tSubcategory: ${entity.subCategory ? entity.subCategory : "N/A"}`);
        console.log(`\tScore: ${entity.confidenceScore}`);
    });
});
运行应用程序。
后续步骤
- 请参阅什么是 Azure AI 服务以了解可与 Azure Key Vault 一起开发的可用功能。
- 有关安全应用程序开发的其他信息,请参阅: