你当前正在访问 Microsoft Azure Global Edition 技术文档网站。 如果需要访问由世纪互联运营的 Microsoft Azure 中国技术文档网站,请访问 https://docs.azure.cn。
适用于: ✔️ AKS Automatic
Azure Kubernetes 服务 (AKS) Automatic是一种托管的 Kubernetes 体验,可自动执行 AKS 群集设置和操作并嵌入最佳做法配置。 AKS 自动还包括 [Pod 就绪 SLA][azure-sla],保证 99.9% 的合格 Pod 就绪操作在 5 分钟内完成,为应用程序提供可靠、自我修复的基础结构。 在此快速入门中,您将学习如何:
- 部署 AKS Automatic 群集。
- 运行示例多容器应用程序,其中的一组微服务和 Web 前端模拟零售应用场景。
在您开始之前
- 本快速入门假设读者基本了解 Kubernetes 的概念。 有关详细信息,请参阅 Azure Kubernetes 服务 (AKS) 的 Kubernetes 核心概念。
- AKS Automatic 在 AKS 群集上启用 Azure Policy,但你应在订阅中预注册
Microsoft.PolicyInsights资源提供程序。 有关详细信息,请参阅Azure资源提供程序和类型。
在 Azure Cloud Shell 中使用 Bash 环境。 有关详细信息,请参阅 Get started with Azure Cloud Shell。

如果希望在本地运行 CLI 引用命令,install Azure CLI。 如果在 Windows 或 macOS 上运行,请考虑在 Docker 容器中运行Azure CLI。 有关详细信息,请参阅 如何在 Docker 容器中运行Azure CLI。
如果使用本地安装,请使用 az login 命令登录到Azure CLI。 若要完成身份验证过程,请遵循终端中显示的步骤。 有关其他登录选项,请参阅 使用 Azure CLI 进行身份验证。
出现提示时,请在首次使用时安装 Azure CLI 扩展。 有关扩展的详细信息,请参阅 使用 Azure CLI 使用和管理扩展。
运行az version命令,以查看已安装的版本和依赖库。 若要升级到最新版本,请运行az upgrade。
- Azure CLI 2.86.0 或更高版本。 若要查找版本,请运行
az --version命令。 如果需要进行安装或升级,请参阅安装 Azure CLI。 - 如果有多个Azure订阅,请选择相应的订阅 ID 以使用
az account set命令向资源计费。
- 若要部署Bicep文件,需要对您创建的资源具有写入权限,并拥有对
Microsoft.Resources/deployments资源类型的所有操作权限。 例如,若要创建虚拟机(VM),需要Microsoft.Compute/virtualMachines/write和Microsoft.Resources/deployments/*权限。 有关角色和权限的列表,请参阅 Azure 内置角色。
注释
此示例使用 AzureRM 提供程序 azurerm_kubernetes_automatic_cluster 的资源创建 AKS 自动群集,该群集需要 AzureRM 提供程序版本 v4.81 或更高版本。 有关改用 AzAPI 提供程序 的等效示例,请参阅 101-aks-automatic-azapi。 当你需要直接控制托管群集 API 的有效负载内容,或者需要使用 AzureRM 提供程序尚未公开的 API 版本或属性时,请使用 AzAPI。
重要
从 AKS 1.36 开始,由于上游 Ingress NGINX 停用,新的 AKS 自动群集会默认启用通过应用程序路由加载项使用 Kubernetes 网关 API,而不是具有应用程序路由加载项的托管 NGINX Ingress。
现有自动群集不受影响,但应 通过应用程序路由加载项开始迁移到 Kubernetes 网关 API。
局限性
以下限制适用于 AKS 自动群集:
- AKS Automatic 已在以下区域正式发布:
australiacentral,newzealandnorth,belgiumcentral,austriaeast,brazilsouth,canadacentral,canadaeast,centralindia,centralus,australiasoutheast,denmarkeast,chilecentral,eastasia,eastus,eastus2,francecentral,malaysiawest,koreasouth,mexicocentral,koreacentral,japanwest,japaneast,northcentralus,italynorth,israelcentral,indonesiacentral,northeurope,australiaeast,uaenorth,switzerlandnorth,germanywestcentral,southcentralus,southeastasia,southafricanorth,southindia,polandcentral,spaincentral,westcentralus,uksouth,swedencentral,norwayeast,westeurope,westus,ukwest,westus3,westus2. - 默认情况下,新的 AKS 自动群集启用托管系统节点池和 LocalDNS。 不能在任何区域中创建没有托管系统节点池的 AKS 自动群集。
- AKS 自动群集已节点资源组锁定预配置,不允许更改
MC_资源组,从而阻止默认专用 DNS区域中的虚拟网络链接。 对于跨 VNet 或自定义 DNS 场景,请使用自定义网络和专用 DNS,并遵循在自定义虚拟网络中创建专用 Azure Kubernetes 服务 (AKS) 自动群集。 - Azure CLI版本 2.86.0 或更高版本是必需的。 若要查找版本,请运行
az --version命令。 如果需要进行安装或升级,请参阅安装 Azure CLI。 - 不支持以下扩展:
- 不支持 Windows 节点。
- 不支持从 AKS 基础 SKU 迁移到自动 SKU。
- 在托管系统节点池已正式可用的区域中,支持以预览版方式将不含托管系统节点池的现有 AKS Automatic 群集迁移到具有托管系统节点池的 AKS Automatic 群集。 不支持从具有托管系统节点池的 AKS 自动迁移回 AKS 自动,而无需托管系统节点池。
创建资源组
Azure资源组是在其中部署和管理Azure资源的逻辑组。
使用 az group create 命令创建资源组。 以下示例在 canadacentral 位置创建名为 myResourceGroup 的资源组:
az group create --name myResourceGroup --location canadacentral
以下示例输出类似于资源组成功创建:
{
  "id": "/subscriptions/<guid>/resourceGroups/myResourceGroup",
  "location": "canadacentral",
  "managedBy": null,
  "name": "myResourceGroup",
  "properties": {
    "provisioningState": "Succeeded"
  },
  "tags": null
}
创建 AKS Automatic 群集
使用az aks create命令,并将--sku参数设置为automatic来创建 AKS 自动群集。 以下示例创建名为 myAKSAutomaticCluster 的群集,并启用了 Managed Prometheus 和 Container Insights 集成:
az aks create \
    --resource-group myResourceGroup \
    --name myAKSAutomaticCluster \
    --sku automatic
    --enable-hosted-system
部署完成后,输出显示一个 hostedSystemProfile 属性,其中 enabled 属性设置为 true。 还可以运行以下命令来显示 hostedSystemProfile 属性:
az aks show \
  --resource-group myResourceGroup \
  --name myAKSAutomaticCluster \
  --query hostedSystemProfile
{
  "enabled": true,
  "nodeSubnetId": null,
  "systemNodeSubnetId": null
}
创建自动版 Kubernetes 群集
若要创建 AKS 自动群集,请搜索并选择 Kubernetes 服务。 这会转到 Kubernetes 中心(预览版) 页。
在 Kubernetes 中心(预览版) 页上,选择“ 创建>自动 Kubernetes 群集”。
创建自动 AKS 群集按钮在 Azure 门户上的屏幕截图。
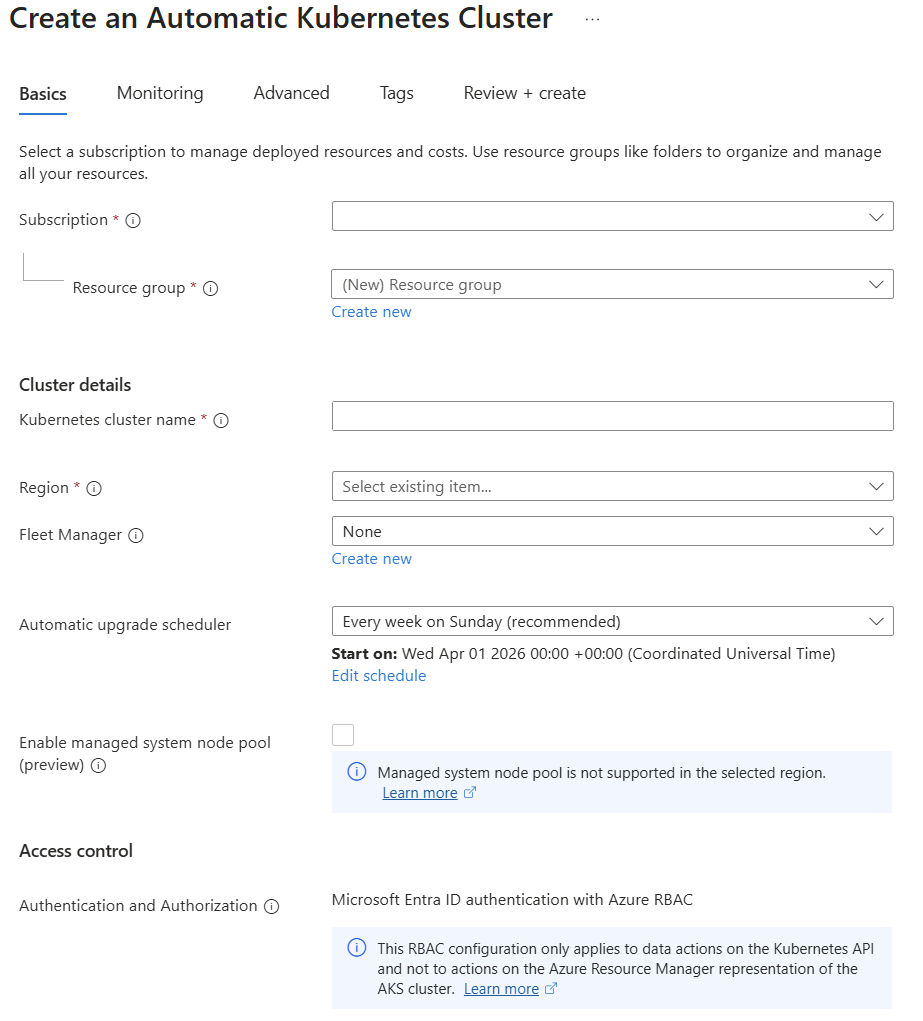
在 “基本信息 ”选项卡上,填写所有必填字段(订阅、资源组、Kubernetes 群集名称和区域),然后选择“ 下一步”。
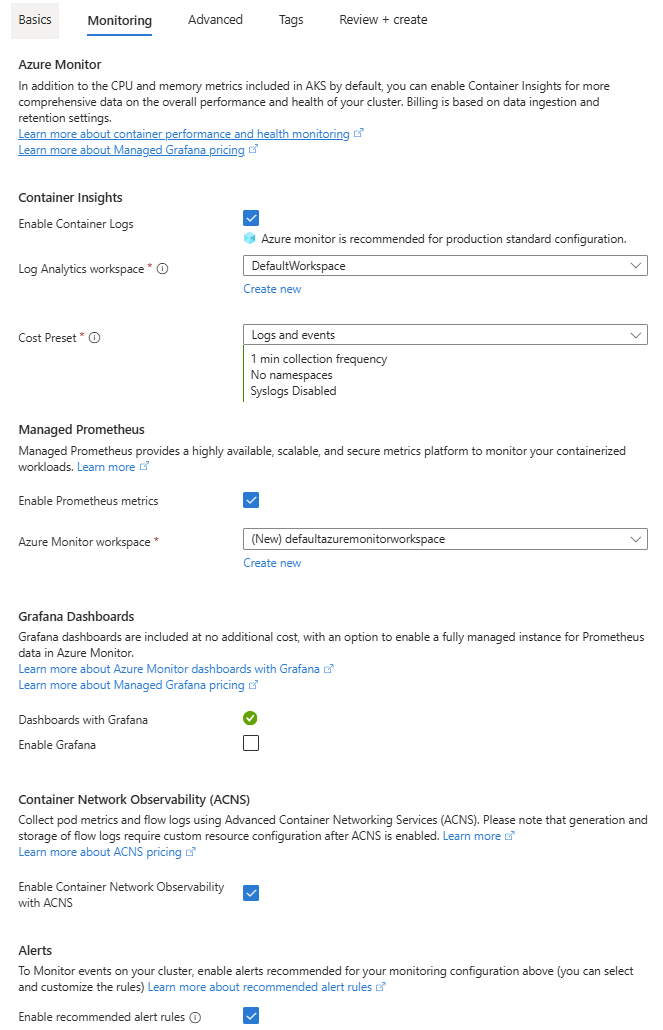
在 监视 选项卡上,选择所需的监视配置,包括 Azure Monitor(容器见解)、托管的 Prometheus、Grafana 仪表板和警报,然后选择 下一步。
在“Advanced 选项卡上,选择所需的高级配置”专用访问“、”Azure虚拟网络“、”托管标识“、”容器网络安全“(ACNS)和托管 Kubernetes 命名空间,然后选择”Review + create。
在 Azure 门户中创建 AKS 自动化群集时,高级选项卡的屏幕截图。
查看“ 查看 + 创建 ”选项卡上的配置,然后选择“ 创建 ”以部署 AKS 自动群集。
开始从GitHub配置第一个应用程序并设置自动化部署管道。

查看Bicep文件
以下 Bicep 文件定义一个 AKS 自动化群集:
@description('The name of the managed cluster resource.')
param clusterName string = 'myAKSAutomaticCluster'

@description('The location of the managed cluster resource.')
param location string = resourceGroup().location

resource aks 'Microsoft.ContainerService/managedClusters@2026-02-01' ' = {
  name: clusterName
  location: location
  sku: {
    name: 'Automatic'
  }
  identity: {
    type: 'SystemAssigned'
  }
}
有关在 Bicep 文件中定义的资源的详细信息,请参阅 Microsoft.ContainerService/managedClusters 参考。
部署 Bicep 文件
将Bicep文件保存为 main.bicep 到本地计算机。
重要
Bicep文件将
clusterName参数设置为字符串 myAKSAutomaticCluster。 如果要使用其他群集名称,请确保先将字符串更新为首选群集名称,然后再将文件保存到计算机。使用 [
az deployment group create][az-deployment-group-create] 命令部署 Bicep 文件。az deployment group create --resource-group myResourceGroup --template-file main.bicep创建 AKS 群集需要几分钟时间。 等待群集成功部署,然后转到下一步骤。
查看 Terraform 代码
注释
本文的示例代码位于 Azure Terraform GitHub 存储库中。 你可以查看包含当前和以前 Terraform 版本的测试结果的日志文件。
创建一个目录来测试示例 Terraform 代码,并将其设置为当前目录。
创建名为
providers.tf的文件并插入下列代码:terraform { required_version = ">= 1.0" required_providers { azurerm = { source = "hashicorp/azurerm" version = "~>5.0" } random = { source = "hashicorp/random" version = "~>3.0" } } } provider "azurerm" { features {} }创建一个名为
main.tf文件的文件,并添加以下代码:# Create a random name for the resource group using random_pet resource "random_pet" "rg_name" { prefix = var.resource_group_name_prefix } # Create a resource group using the generated random name resource "azurerm_resource_group" "rg" { location = var.resource_group_location name = random_pet.rg_name.id } # Create a random name for the AKS Automatic cluster resource "random_pet" "cluster_name" { prefix = var.cluster_name_prefix } # Create the AKS Automatic cluster resource "azurerm_kubernetes_automatic_cluster" "aks_automatic" { name = random_pet.cluster_name.id location = azurerm_resource_group.rg.location resource_group_name = azurerm_resource_group.rg.name identity { type = "SystemAssigned" } }创建一个名为
variables.tf文件的文件,并添加以下代码:variable "resource_group_location" { type = string default = "westus2" description = "Location of the resource group." } variable "resource_group_name_prefix" { type = string default = "rg" description = "Prefix of the resource group name that's combined with a random ID so name is unique in your Azure subscription." } variable "cluster_name_prefix" { type = string default = "aks-automatic" description = "Prefix of the AKS Automatic cluster name that's combined with a random ID so the name is unique in your Azure subscription." }创建名为
outputs.tf的文件并插入下列代码:output "resource_group_name" { value = azurerm_resource_group.rg.name } output "cluster_name" { value = azurerm_kubernetes_automatic_cluster.aks_automatic.name } output "cluster_id" { value = azurerm_kubernetes_automatic_cluster.aks_automatic.id } output "node_resource_group_id" { value = azurerm_kubernetes_automatic_cluster.aks_automatic.node_resource_group_id } output "fully_qualified_domain_name" { value = azurerm_kubernetes_automatic_cluster.aks_automatic.fully_qualified_domain_name }
初始化 Terraform
运行 terraform init,将 Terraform 部署进行初始化。 此命令下载管理Azure资源所需的Azure提供程序。
terraform init -upgrade
创建 Terraform 执行计划
运行 terraform plan 以创建执行计划。
terraform plan -out main.tfplan
应用 Terraform 的执行计划
运行 terraform apply 以将执行计划应用到您的云基础架构。
terraform apply main.tfplan
创建 AKS 自动群集需要几分钟才能完成。
验证集群
获取Azure资源组名称和群集名称。
resource_group_name=$(terraform output -raw resource_group_name)
cluster_name=$(terraform output -raw cluster_name)
运行 az aks show 以显示群集并确认它使用
AutomaticSKU。az aks show --resource-group $resource_group_name --name $cluster_name --query "{name:name, sku:sku, provisioningState:provisioningState}"
连接至群集
若要管理 Kubernetes 群集,请使用 Kubernetes 命令行客户端 kubectl。 如果使用Azure Cloud Shell,则已安装 kubectl。 可以使用kubectl命令在本地安装az aks install-cli。 AKS Automatic 群集配置为使用 Microsoft Entra ID 进行 Kubernetes 基于角色的访问控制 (RBAC)。
使用
kubectl命令将az aks get-credentials配置为连接到你的 Kubernetes 群集。 此命令将下载凭据,并将 Kubernetes CLI 配置为使用这些凭据。az aks get-credentials --resource-group myResourceGroup --name myAKSAutomaticCluster
配置
kubectl以使用az aks get-credentials命令连接到 Kubernetes 群集。 此命令将下载凭据,并将 Kubernetes CLI 配置为使用这些凭据。az aks get-credentials --resource-group $resource_group_name --name $cluster_name
使用
kubectl get命令验证与群集之间的连接。 此命令将返回群集节点的列表。kubectl get nodes以下示例输出显示系统如何提示你登录:
To sign in, use a web browser to open the page https://microsoft.com/devicelogin and enter the code AAAAAAAAA to authenticate.登录后,以下示例输出显示托管系统节点池。 确保节点状态为“就绪”。
NAME                           STATUS   ROLES    AGE   VERSION
aks-hostedpool-16652789-vms1   Ready    <none>   19m   v1.34.7
aks-hostedpool-16652789-vms2   Ready    <none>   19m   v1.34.7
aks-hostedpool-16652789-vms3   Ready    <none>   19m   v1.34.7
aks-system-surge-zq4d2         Ready    <none>   19m   v1.34.7
部署应用程序
若要部署应用程序,请使用清单文件创建运行 AKS Store 应用程序所需的所有对象。 Kubernetes 清单文件定义群集的所需状态,例如,要运行哪些容器映像。 该清单包括以下 Kubernetes 部署和服务:
& lt;c2>& lt;c1>& lt;c0>& lt;sb0> Azure 商店示例架构的截图。& lt;/sb0>& lt;/c0>& lt;/c1>& lt;/c2>
- 门店:Web 应用程序,供客户查看产品和下单。
- 产品服务:显示产品信息。
- 订单服务:下单。
- Rabbit MQ:订单队列的消息队列。
注释
建议不要在没有持久性存储用于生产的情况下运行有状态容器(例如 Rabbit MQ)。 此处使用这些服务是为了简单起见,但我们建议使用托管服务,例如Azure Cosmos DB或Azure 服务总线。
创建命名空间
aks-store-demo以将 Kubernetes 资源部署到其中。kubectl create ns aks-store-demo使用
kubectl apply命令将应用程序部署到aks-store-demo命名空间中。 定义部署的 YAML 文件位于 GitHub 上。kubectl apply -n aks-store-demo -f https://raw.githubusercontent.com/Azure-Samples/aks-store-demo/main/aks-store-ingress-quickstart.yaml以下示例输出显示部署和服务:
statefulset.apps/rabbitmq created
configmap/rabbitmq-enabled-plugins created
service/rabbitmq created
deployment.apps/order-service created
service/order-service created
deployment.apps/product-service created
service/product-service created
deployment.apps/store-front created
service/store-front created
ingress/store-front created
测试应用程序
应用程序运行时,Kubernetes 服务将向 Internet 公开应用程序前端。 此过程可能需要几分钟才能完成。
使用 kubectl get pods 命令查看已部署的 Pod 的状态。 在继续操作之前,请确保所有 Pod 的状态为
Running。 如果这是您部署的第一个工作负载,节点自动预配可能需要几分钟才能创建用于运行 Pod 的节点池。kubectl get pods -n aks-store-demo检查应用商店前端应用程序的公共 IP 地址。 使用带有 参数的
--watch命令来监视进度。kubectl get ingress store-front -n aks-store-demo --watch服务的 ADDRESS 输出最初显示为空:
store-frontNAME CLASS HOSTS ADDRESS PORTS AGE store-front webapprouting.kubernetes.azure.com * 80 12m在 ADDRESS 从空白变为实际公共 IP 地址后,使用 停止
CTRL-C监视过程。kubectl以下示例输出显示向服务分配的有效公共 IP 地址:
NAME          CLASS                                HOSTS   ADDRESS        PORTS   AGE
store-front   webapprouting.kubernetes.azure.com   *       4.255.22.196   80      12m
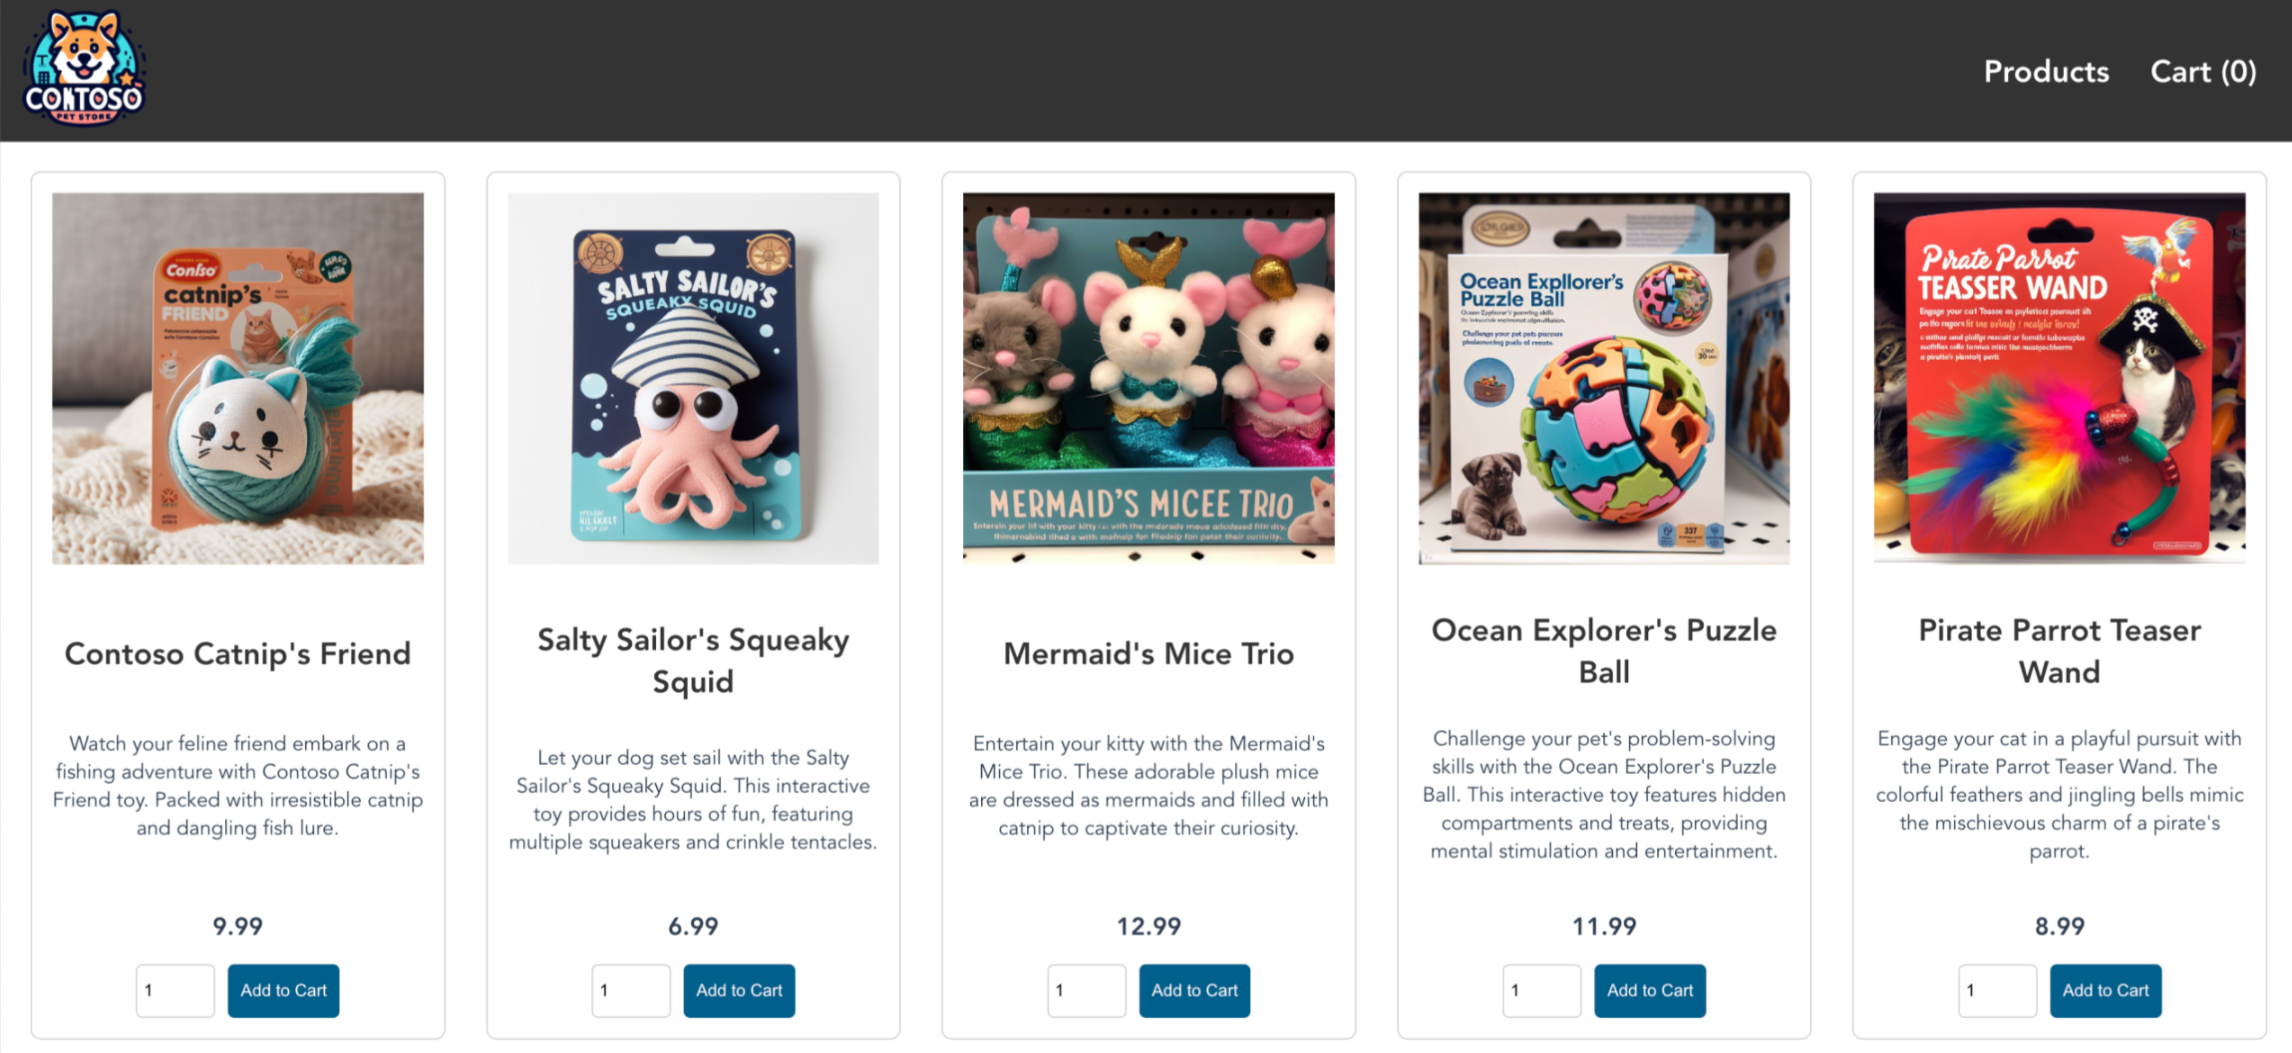
打开 Web 浏览器以访问入口的外部 IP 地址,以查看Azure应用商店应用是否在运行中。
删除群集
如果不打算完成 AKS 教程,请清理不必要的资源以避免Azure费用。
使用 az group delete 命令删除资源组、容器服务和所有相关资源。
az group delete --name myResourceGroup --yes --no-wait
注释
AKS 群集是使用系统分配的托管标识创建的,这是本快速入门中使用的默认标识选项。 平台负责管理此标识,因此你无需手动移除它。
如果不再需要使用 Terraform 创建的资源,请运行 terraform 计划 并指定 destroy 标志。
terraform plan -destroy -out main.destroy.tfplan
运行 terraform apply 来应用执行计划。
terraform apply main.destroy.tfplan
相关内容
在本快速入门中,你使用 AKS Automatic 部署了一个 Kubernetes 群集,然后在其中部署了示例多容器应用程序。 此示例应用程序仅用于演示目的,并未展示出 Kubernetes 应用程序的所有最佳做法。 有关使用生产版 AKS 创建完整解决方案的指南,请参阅 AKS 解决方案指南。
若要了解有关 AKS 自动化的详细信息,请参阅 Azure Kubernetes 服务(AKS)自动化简介