本文介绍如何在尚未配置网络 ATC 的现有 Azure 本地群集上配置网络 ATC。
重要
在尚未配置网络 ATC 的 Azure 本地升级方案中,建议先升级作系统,然后配置网络 ATC,然后继续执行解决方案升级。 如果群集上已配置网络 ATC,请跳过本文。 有关升级的详细信息,请参阅 关于 Azure 本地升级。
关于网络 ATC
网络 ATC 将信息存储在群集数据库中,然后复制到群集中的其他计算机。 从初始计算机开始,群集中的其他计算机将看到群集数据库中的更改并应用新意向。 在这里,我们设置了系统来接收新的意向。 此外,我们通过在托管虚拟机 (VM) 的计算机上停止或禁用网络 ATC 服务来控制新意向的推出。 有关详细信息,请参阅网络 ATC 概述。
好处
网络 ATC 为 Azure 本地提供以下优势:
- 减少主机网络部署时间、复杂性和错误。
- 部署经过验证和支持的最新Microsoft最佳做法。
- 确保整个实例的配置一致性。
- 消除配置偏移。
关键注意事项
在现有 Azure 本地设备上配置网络 ATC 之前,请确保满足以下条件:
- 主机上没有任何正在运行的 VM。
- 群集积极运行任务。 如果您的 Azure 本地群集上没有正在运行的工作负荷,您可以选择移除所有虚拟交换机和 QoS 策略,然后使用部署主机网络和网络ATC中所述的标准过程来添加您的意图。
- 删除与 VM 关联的所有检查点。 否则会导致主机之间的实时迁移失败。
步骤 1:安装网络 ATC
在此步骤中,使用以下命令在群集中的每个计算机上安装网络 ATC 和所需的 FS-SMBBW 功能。 无需重启。
Install-WindowsFeature -Name NetworkATC
Install-WindowsFeature -Name FS-SMBBW
步骤 2:暂停群集中的一台计算机
当您暂停群集中的一台计算机时,所有工作负载都会转移到其他计算机,使暂停的计算机可进行更改。 然后,暂停的计算机将迁移到网络 ATC。
若要暂停计算机,请使用以下命令:
Suspend-ClusterNode -Drain -Wait
步骤 3:停止网络 ATC 服务
若要防止网络 ATC 在 VM 运行时应用意向,请在未暂停的所有计算机上停止和禁用网络 ATC 服务。
若要停止和禁用网络 ATC 服务,请使用以下命令:
Stop-Service -Name NetworkATC
Set-Service -Name NetworkATC -StartupType Disabled
步骤 4:删除以前的配置
从暂停的计算机中删除任何以前的配置,这些配置可能会干扰网络 ATC 应用新意向的能力。 以前的配置包括:
- RDMA 流量的数据中心桥接 (NetQos) 策略
- 负载均衡故障转移 (LBFO)
尽管网络 ATC 尝试采用具有匹配名称(包括 NetQos 和其他设置)的现有配置,但删除当前配置并允许网络 ATC 重新部署必要的配置项目等更为容易。
重要
请勿删除交换机嵌入式组合(SET)虚拟交换机,并允许网络 ATC 重新创建它。 删除虚拟交换机可能会导致意外的连接丢失,并会中断现有的软件定义网络(SDN)部署。 相反,我们建议将 SET 虚拟交换机和虚拟 NIC 重命名为预期的网络 ATC 约定,该约定将在后面的步骤中执行。
若要删除现有的 NetQos 配置,请使用以下命令:
Get-NetQosTrafficClass | Remove-NetQosTrafficClass
Get-NetQosPolicy | Remove-NetQosPolicy -Confirm:$false
Get-NetQosFlowControl | Disable-NetQosFlowControl
Azure Local 不支持 LBFO。 但是,如果意外部署了 LBFO 团队,可以使用以下命令将其删除:
Get-NetLBFOTeam | Remove-NetLBFOTeam -Confirm:$false
如果计算机是通过 Virtual Machine Manager(VMM)配置的,则可能需要删除任何关联的配置对象。
步骤 5:转换 VLAN 设置
某些 Azure 本地部署要求在管理或存储虚拟网络适配器上配置 VLAN。 网络 ATC 要求使用 VMNetworkAdapterIsolation 该方法设置 VLAN ID。 但是,Hyper-V 还允许使用 VMNetworkAdapterVlan 该方法设置 VLAN。
使用以下命令检查虚拟适配器是否具有 VLAN,并在必要时重新配置它。
# Use the command below to list the virtual adapters present on the system
Get-VMNetworkAdapter -ManagementOS

# Add the name of the VMNetworkAdapter below to check for a VLAN configuration
Get-VMNetworkAdapterVlan -ManagementOS -VMNetworkAdapterName "vNICName"
Get-VMNetworkAdapterIsolation -ManagementOS -VMNetworkAdapterName "vNICName"
输出自
Get-VMNetworkAdapterVlan:- 如果
Mode是Access并且VlanList具有数值,则适配器打上 VLAN 标签,需要更新。 - 如果
Mode是Untagged,则不使用此方法配置 VLAN。
输出自
Get-VMNetworkAdapterIsolation:- 如果
IsolationMode是Vlan并且DefaultIsolationID具有除0以外的数值,则适配器使用 VLAN 标记,无需更新。 - 如果
IsolationMethod是None,则不使用此方法配置 VLAN。
- 如果
若要将 VLAN 从
VMNetworkAdapterVlan方法转换为VMNetworkAdapterIsolation方法,请使用以下命令:重要
运行以下命令会断开群集节点与网络的连接,直到 VLAN 重新配置。 建议从 BMC 控制台运行这些命令。
Set-VMNetworkAdapterVlan -ManagementOS -VMNetworkAdapterName "vNICName" -Untagged

# Use the VLAN ID from above for the DefaultIsolationID parameter in the below command
Set-VMNetworkAdapterIsolation -ManagementOS -VMNetworkAdapterName "vNICName" -IsolationMode Vlan -AllowUntaggedTraffic $true -DefaultIsolationID 100
针对群集节点上存在的所有管理和存储虚拟网络适配器完成这些步骤。 如果两个输出都没有配置 VLAN,请转到下一步。
步骤 6:规划和部署意图
可以添加各种多种意向。 使用 “示例意向 ”部分中的示例确定想要的意向。
确定与环境匹配的示例后,请使用该示例中提供的命令仅在暂停的节点上执行所需步骤。
步骤 7:验证一台计算机上的部署
该 Get-NetIntentStatus 命令显示所请求意向的部署状态。 结果为集群中每台计算机的每个意图返回一个对象。
若要验证计算机成功部署 步骤 6 中提交的意向,请运行以下命令:
Get-NetIntentStatus -Name <IntentName>
这是一个输出示例:
PS C:\Users\administrator.CONTOSO> Get-NetlntentStatus

IntentName                  : mgmt_compute_storage
Host                        : node1
IsComputelntentSet          : True
IsManagementlntentSet       : True
IsStoragelntentSet          : True
IsStretchlntentSet          : False
LastUpdated                 : 05/13/2025 11:11:15
LastSuccess                 : 05/13/2025 11:11:15
RetryCount                  : 0
LastConfigApplied           : 1
Error                       :
Progress                    : 1 of 1
ConfigurationStatus         : Success
ProvisioningStatus          : Completed
确保添加的每个意向都有正在处理的主机条目。 此外,请确保 ConfigurationStatus 显示 “成功”。
如果 ConfigurationStatus 显示 “失败”,请检查错误消息是否指示失败的原因。 还可以查看 Microsoft-Windows-Networking-NetworkATC/Admin 事件日志,了解有关失败原因的更多详细信息。 有关故障解决的一些示例,请参阅 常见错误消息。
步骤 8:恢复暂停的节点
在第一个节点上完成网络 ATC 配置后,恢复该节点并允许它返回到群集。
若要重新输入群集节点或将群集节点放回服务中,请运行以下命令:
Resume-ClusterNode运行
Get-StorageJob以检查任何正在运行的存储作业。 在转到下一步之前,让他们完成。
步骤 9:重命名其他计算机上的虚拟组件
在此步骤中,将从使用网络 ATC 部署的计算机移动到下一台计算机,并从第二台计算机迁移 VM。 必须验证第二台计算机是否具有与使用网络 ATC 部署的计算机相同的 VMSwitch 名称。
重要
重命名虚拟交换机后,必须断开连接并重新连接每个 VM,以便它可以适当地缓存虚拟交换机的新名称。 由于此步骤会影响 VM 连接,因此它被视为需要计划进行的中断性操作。 如果跳过此步骤,实时迁移将失败,并出现一个错误,提示目标上不存在虚拟交换机。
重命名虚拟交换机是一项不中断的更改,可以在所有计算机上同时完成。 运行下面的命令:
#Run on the machine where you configured Network ATC
Get-VMSwitch | ft Name

#Run on the next machine to rename the virtual switch
Rename-VMSwitch -Name 'ExistingName' -NewName 'NewATCName'
重命名交换机后,请断开并重新连接 vNIC,以应用 VMSwitch 名称更改。 以下命令可用于对所有 VM 执行此作:
重要
以下命令假定主机只有一个虚拟交换机,并且所有虚拟机都连接到该虚拟交换机。 如果环境不同,则需要修改命令,或手动断开连接并重新连接 VM。
$VMSW = Get-VMSwitch
$VMs = Get-VM
$VMs | %{Get-VMNetworkAdapter -VMName $_.name | Disconnect-VMNetworkAdapter ; Get-VMNetworkAdapter -VMName $_.name | Connect-VMNetworkAdapter -SwitchName $VMSW.name}
由于两个原因,你不会更改网络 ATC VMSwitch :
- 网络 ATC 可确保群集中的所有计算机具有相同的名称,以支持实时迁移和对称。
- 网络 ATC 实现和控制配置对象的名称。 否则,需要确保正确部署此配置项目。
步骤 10:将所需的更改应用到剩余群集节点
重命名虚拟交换机并重新连接 VM 后,可以在群集节点之间实时迁移虚拟机。 按照这些步骤作,对群集中的每个附加节点重复,直到所有节点都完成。
注意
网络 ATC 应管理实时迁移网络。 如果实时迁移因错误 Cluster network not found而失败,则可能需要手动更新实时迁移网络。 可以使用以下脚本将存储网络设置为可用的实时迁移网络,并排除管理网络。 或者,可以通过故障转移群集管理器更新这些网络。
# Configure the Virtual Machine ClusterResourceType not to use the management network for live migration
$mgmtID = (Get-ClusterNetwork | where "Name" -match "Management").ID
Get-ClusterResourceType "Virtual Machine" | Set-ClusterParameter -Name "MigrationExcludeNetworks" -Value $mgmtID
# Configure the Virtual Machine ClusterResourceType to use the storage networks for live migration
$storageID = (Get-ClusterNetwork | where "Name" -match "Storage").ID
$storageIDs = $storageID -join ";"
Get-ClusterResourceType "Virtual Machine" | Set-ClusterParameter -Name "MigrationNetworkOrder" -Value $storageIDs
使用命令
Suspend-ClusterNode -Drain -Wait暂停和清空群集节点。使用 步骤 4 中的命令删除现有的 NetQos 配置。
如有必要,请使用 步骤 5 中的命令更新虚拟适配器的 VLAN ID。
使用在
Rename-VMNetworkAdapter中使用的Rename-NetAdapter和命令重命名虚拟网络适配器。 无需运行任何Rename-VMSwitch或Add-NetIntent命令。使用以下命令在暂停的节点上启用和启动网络 ATC 服务:
Set-Service -Name NetworkATC -StartupType Automatic
Start-Service -Name NetworkATC
请通过运行在
Get-NetIntentStatus中使用的命令,来验证您的计算机是否成功部署了意图。 确保ConfigurationStatus在所有意图上显示 成功。使用
Resume-ClusterNode命令恢复暂停的节点。使用
Get-StorageJob命令确保所有存储作业完成。
示例意向
网络 ATC 修改的是主机网络的部署方式,而不是部署的内容。 如果每个方案都受Microsoft支持,则可以部署多个方案。 下面是常见主机网络模式和 Azure 本地的相应 PowerShell 命令的一些示例。
这些示例不是唯一可用的组合,但它们应该让你了解可能的情况。
重要
以下命令使用默认最佳实践配置部署意向。 在部署意向之前,请使用 Get-NetAdapterAdvancedProperty 命令查看适配器高级属性设置。 如果您有独特的高级适配器设置,请参阅网络 ATC 覆盖规则以覆盖网络 ATC 默认设置,并保持您的现有设置与网络 ATC 一致。 请务必在创建意向时配置这些替代以避免意外更改。
参考文章:
- 有关默认值的信息,请参阅 使用网络 ATC 部署主机网络。
- 有关配置替代的信息,请参阅 “管理网络 ATC”。
- 有关网络 ATC 命令的信息,请参阅 NetworkATC。
这只是出于简化考虑,例子中为每个SET团队仅演示两个物理适配器,但可以添加更多。 有关详细信息,请参阅 Azure 本地的网络参考模式概述。
示例意向:将管理和计算组合为一个意向,并为存储设置一个单独的意向。
在此示例中,有两个意向是跨计算机管理的。
管理和计算:此意向使用专用的网络适配器端口对。
存储:此意图使用专用的一对网络适配器端口。
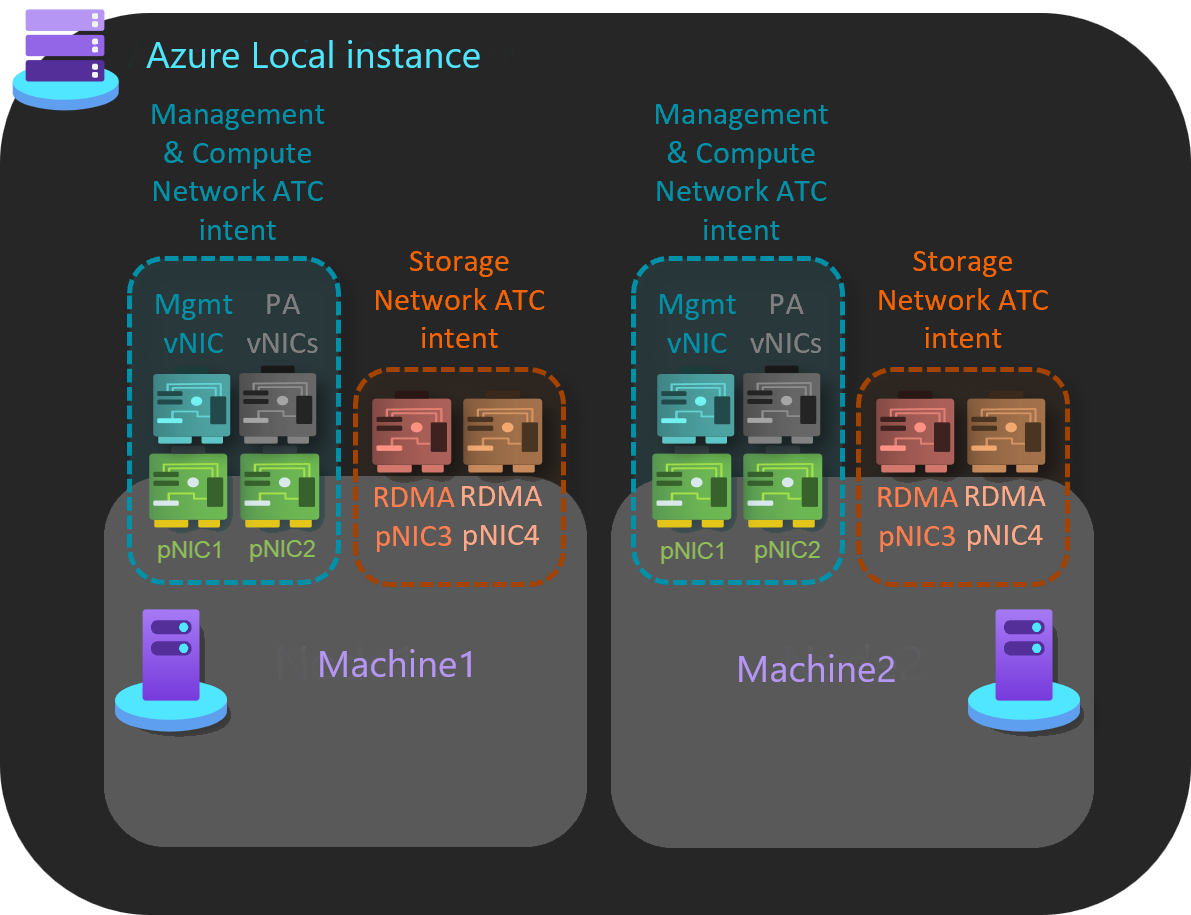

下面是实现此主机网络模式的示例:
重要
以下命令假定你的环境只有一个虚拟交换机和一个虚拟网络适配器存在。 如果存在多个虚拟交换机或虚拟网络适配器,这些命令将返回错误。 如果环境存在多个虚拟交换机或一个虚拟网络适配器,请将命令中的变量替换为要在双引号中修改的虚拟交换机或虚拟网络适配器的全名。 请勿更改命令的任何其他部分。
# These commands rename the virtual components to the Network ATC naming convention
Rename-VMSwitch -Name (Get-VMSwitch).Name -NewName "ConvergedSwitch(mgmt_compute)"
Rename-VMNetworkAdapter -ManagementOS -Name (Get-VMNetworkAdapter -ManagementOS).Name -NewName "vManagement(mgmt_compute)"
Rename-NetAdapter -Name "vEthernet (vManagement(mgmt_compute))" -NewName "vManagement(mgmt_compute)"

# This command adds the management and compute intent.  Update the -AdapterName parameter with the appropriate names of the network adapters
# Note that if you had to configure a VLAN in Step 5, you will need to add that into the -ManagementVlan parameter below.
# If you do not need to configure a management VLAN, remove the -ManagementVlan parameter before running the command
Add-NetIntent -Name mgmt_compute -Management -Compute -AdapterName "pNIC1","pNIC2" -ManagementVlan 100

# These commands add the storage intent.  Automatic storage IP addressing is disabled to allow your existing storage IP addresses to continue to be used.
# Update the -AdapterName parameter with the appropriate names of the network adapters.
# Update the -StorageVlans parameter below to the VLAN IDs used by your network adapters.  If you want to use the default Network ATC VLAN IDs (711, 712, etc.), remove the -StorageVlans parameter.
$override = New-NetIntentStorageOverrides
$override.EnableAutomaticIPGeneration = 0
Add-NetIntent -Name storage -Storage -StorageOverrides $override -AdapterName "pNIC3","pNIC4" -StorageVlans 200,201
示例意向:将所有流量集中到单个意向上
在此示例中,有单个意向是跨计算机管理的。
管理、计算和存储:此意向使用一对专用的网络适配器端口。
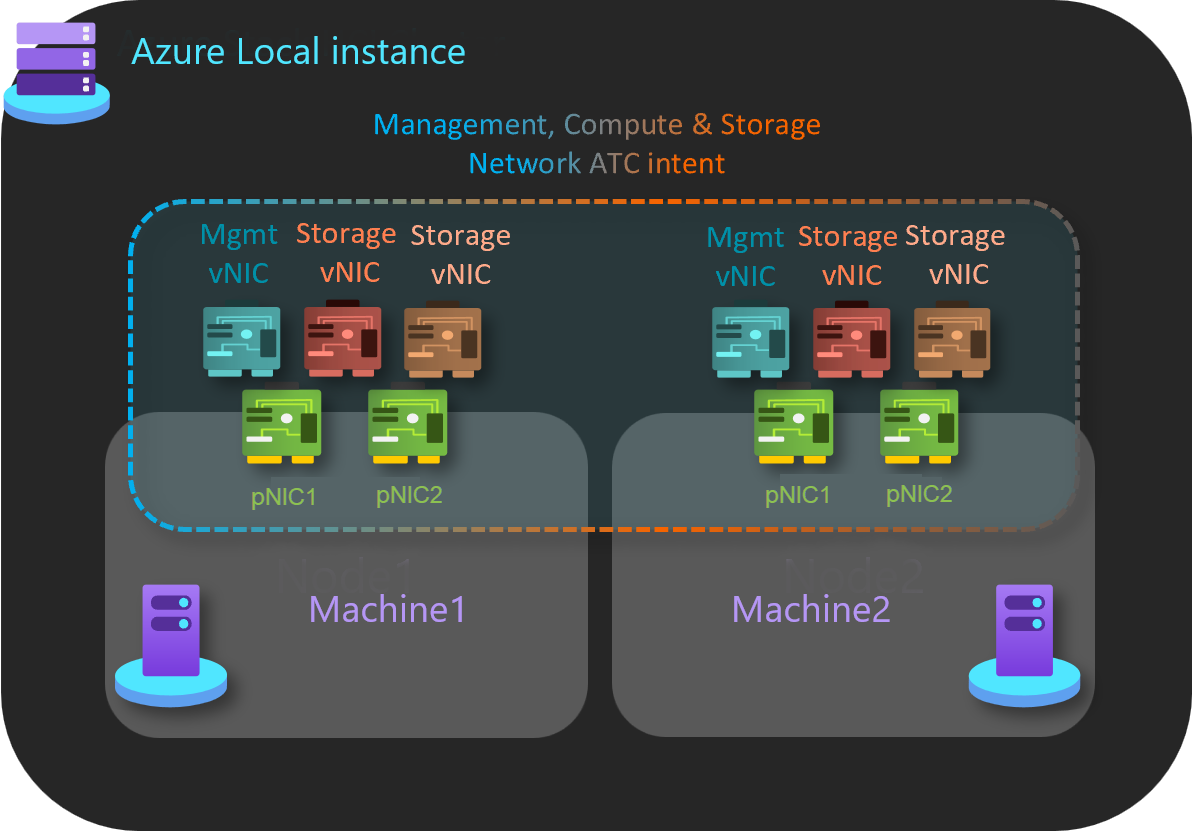

下面是实现此主机网络模式的示例:
重要
- 以下命令假定你的环境只有一个虚拟交换机存在。 如果存在多个虚拟交换机,命令将返回错误。 如果环境有多个虚拟交换机,请将命令中的变量替换为要在双引号中修改的虚拟交换机的全名。 请勿更改命令的任何其他部分。
- 在实现这些命令时,请格外小心。
# This command renames the virtual switch to the Network ATC naming convention
Rename-VMSwitch -Name (Get-VMSwitch).Name -NewName "ConvergedSwitch(mgmt_compute_storage)"

# These commands rename the virtual network adapters.  Note that each adapter must be renamed to a very specific naming convention.
# First, collect the output from Get-VMNetworkAdapter -ManagementOS to get a list of the current virtual adapters.
# The management virtual network adapter can be renamed using the two commands below.
# You must update the -Name parameter in the Rename-VMNetworkAdapter command with the name of the management virtual adapter from the output above.
Rename-VMNetworkAdapter -ManagementOS -Name "mgmtVNICname" -NewName "vManagement(mgmt_compute_storage)"
Rename-NetAdapter -Name "vEthernet (vManagement(mgmt_compute_storage))" -NewName "vManagement(mgmt_compute_storage)"

# The storage virtual network adapters can be renamed using the two commands below.
# You must update the -Name parameter in the Rename-VMNetworkAdapter command with the name of the storage virtual adapter from the output above.
# You must also update each parameter with the name of the physical adapter after the # sign.  In the example below, "pNIC1" is the name of the physical adapter associated with the first storage virtual adapter.
# These two commands need to be executed for each storage virtual adapter present on the cluster node.  For example, if you have two physical adapters for storage, you would need to run 4 total commands.
Rename-VMNetworkAdapter -ManagementOS -Name "storagevNIC1" -NewName "vSMB(mgmt_compute_storage#pNIC1)"
Rename-NetAdapter -Name "vEthernet (vSMB(mgmt_compute_storage#pNIC1))" -NewName "vSMB(mgmt_compute_storage#pNIC1)"
Rename-VMNetworkAdapter -ManagementOS -Name "storagevNIC2" -NewName "vSMB(mgmt_compute_storage#pNIC2)"
Rename-NetAdapter -Name "vEthernet (vSMB(mgmt_compute_storage#pNIC2))" -NewName "vSMB(mgmt_compute_storage#pNIC2)"

# This command adds the management, compute, and storage intent.  Update the -AdapterName parameter with the appropriate names of the network adapters
# Note that if you had to configure a VLAN in Step 5, you will need to add that into the -ManagementVlan parameter below.
# If you do not need to configure a management VLAN, remove the -ManagementVlan parameter before running the command
# Automatic storage IP addressing is disabled to allow your existing storage IP addresses to continue to be used.
# Update the -StorageVlans parameter below to the VLAN IDs used by your network adapters.  If you want to use the default Network ATC VLAN IDs (711, 712, etc.), remove the -StorageVlans parameter.
$override = New-NetIntentStorageOverrides
$override.EnableAutomaticIPGeneration = 0
Add-NetIntent -Name mgmt_compute_storage -Management -Compute -Storage -StorageOverrides $override -AdapterName "pNIC1","pNIC2" -ManagementVlan 100 -StorageVlans 200,201
示例意向:将计算和存储流量在一个意向上分组,并使用单独的管理意图进行管理。
在此示例中,有两个意向是跨计算机管理的。
管理:此意向使用专用的网络适配器端口对。
计算和存储:此意向使用专用的网络适配器端口对。
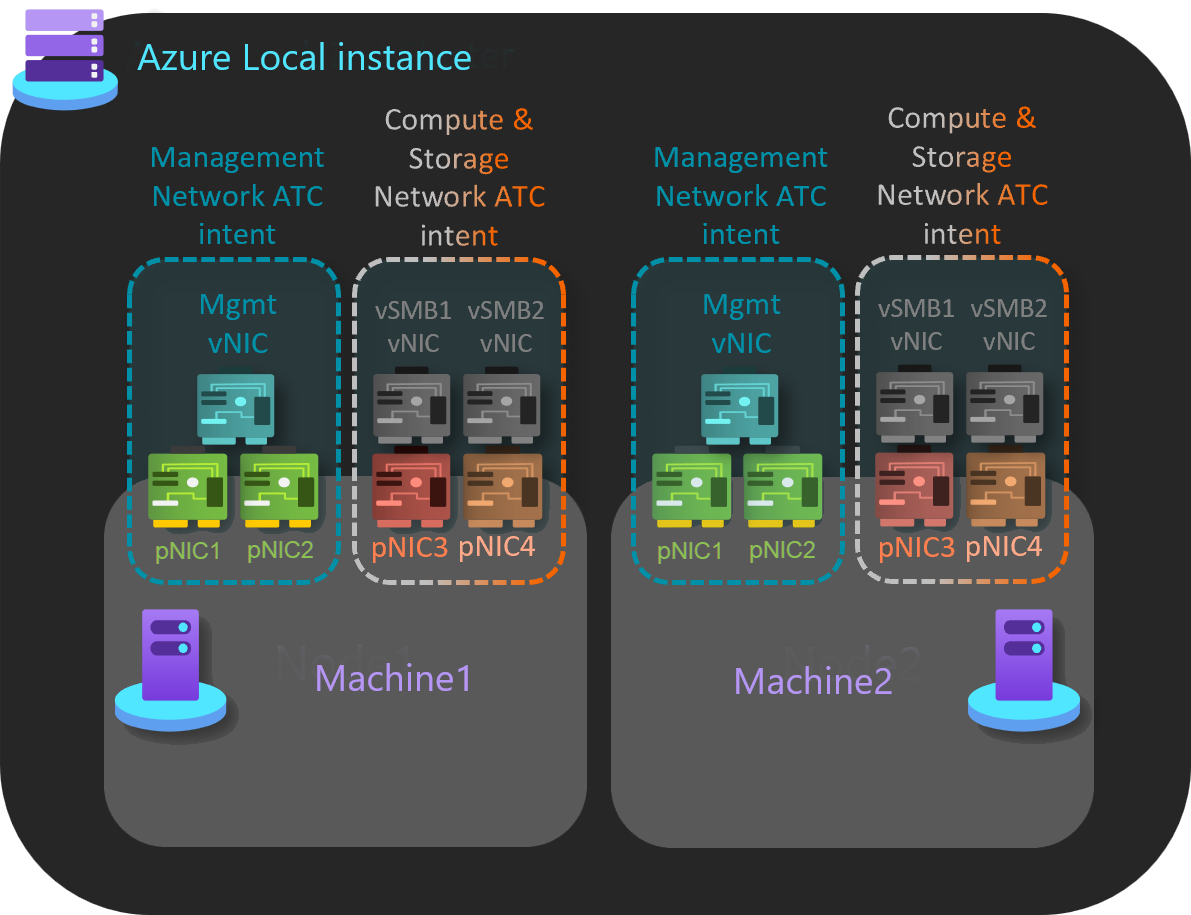

下面是实现此主机网络模式的示例:
# These commands rename the virtual switches to the Network ATC naming convention
# First rename the management virtual switch, then the compute/storage virtual switch
Rename-VMSwitch -Name "management_vSwitch_name" -NewName "ConvergedSwitch(mgmt)"
Rename-VMSwitch -Name "compute_storage_vSwitch_name" -NewName "ConvergedSwitch(compute_storage)"

# These commands rename the virtual network adapters.  Note that each adapter must be renamed to a very specific naming convention.
# First, collect the output from Get-VMNetworkAdapter -ManagementOS to get a list of the current virtual adapters.
# The management virtual network adapter can be renamed using the two commands below.
# You must update the -Name parameter in the Rename-VMNetworkAdapter command with the name of the management virtual adapter from the output above.
Rename-VMNetworkAdapter -ManagementOS -Name "mgmtVNICname" -NewName "vManagement(mgmt_compute_storage)"
Rename-NetAdapter -Name "vEthernet (vManagement(mgmt_compute_storage))" -NewName "vManagement(mgmt_compute_storage)"

# The storage virtual network adapters can be renamed using the two commands below.
# You must update the -Name parameter in the Rename-VMNetworkAdapter command with the name of the storage virtual adapter from the output above.
# You must also update each parameter with the name of the physical adapter after the # sign.  In the example below, "pNIC1" is the name of the physical adapter associated with the first storage virtual adapter.
# These two commands need to be executed for each storage virtual adapter present on the cluster node.  For example, if you have two physical adapters for storage, you would need to run 4 total commands.
Rename-VMNetworkAdapter -ManagementOS -Name "storagevNIC1" -NewName "vSMB(mgmt_compute_storage#pNIC1)"
Rename-NetAdapter -Name "vEthernet (vSMB(mgmt_compute_storage#pNIC1))" -NewName "vSMB(mgmt_compute_storage#pNIC1)"
Rename-VMNetworkAdapter -ManagementOS -Name "storagevNIC2" -NewName "vSMB(mgmt_compute_storage#pNIC2)"
Rename-NetAdapter -Name "vEthernet (vSMB(mgmt_compute_storage#pNIC2))" -NewName "vSMB(mgmt_compute_storage#pNIC2)"

# This command adds the management intent.  Update the -AdapterName parameter with the appropriate names of the network adapters
# Note that if you had to configure a VLAN in Step 5, you will need to add that into the -ManagementVlan parameter below.
# If you do not need to configure a management VLAN, remove the -ManagementVlan parameter before running the command
Add-NetIntent -Name mgmt -Management -AdapterName "pNIC1","pNIC2" -ManagementVlan 100

# This command adds the compute and storage intent.  Update the -AdapterName parameter with the appropriate names of the network adapters
# Automatic storage IP addressing is disabled to allow your existing storage IP addresses to continue to be used.
# Update the -StorageVlans parameter below to the VLAN IDs used by your network adapters.  If you want to use the default Network ATC VLAN IDs (711, 712, etc.), remove the -StorageVlans parameter.
$override = New-NetIntentStorageOverrides
$override.EnableAutomaticIPGeneration = 0
Add-NetIntent -Name compute_storage -Compute -Storage -StorageOverrides $override -AdapterName "pNIC1","pNIC2" -StorageVlans 200,201
示例意向:完全分离的主机网络
在此示例中,有三个意向是跨计算机管理的。
管理:此意向使用专用的网络适配器端口对。
计算:此意向使用专用的网络适配器端口对。
存储:此意图使用专用的一对网络适配器端口。
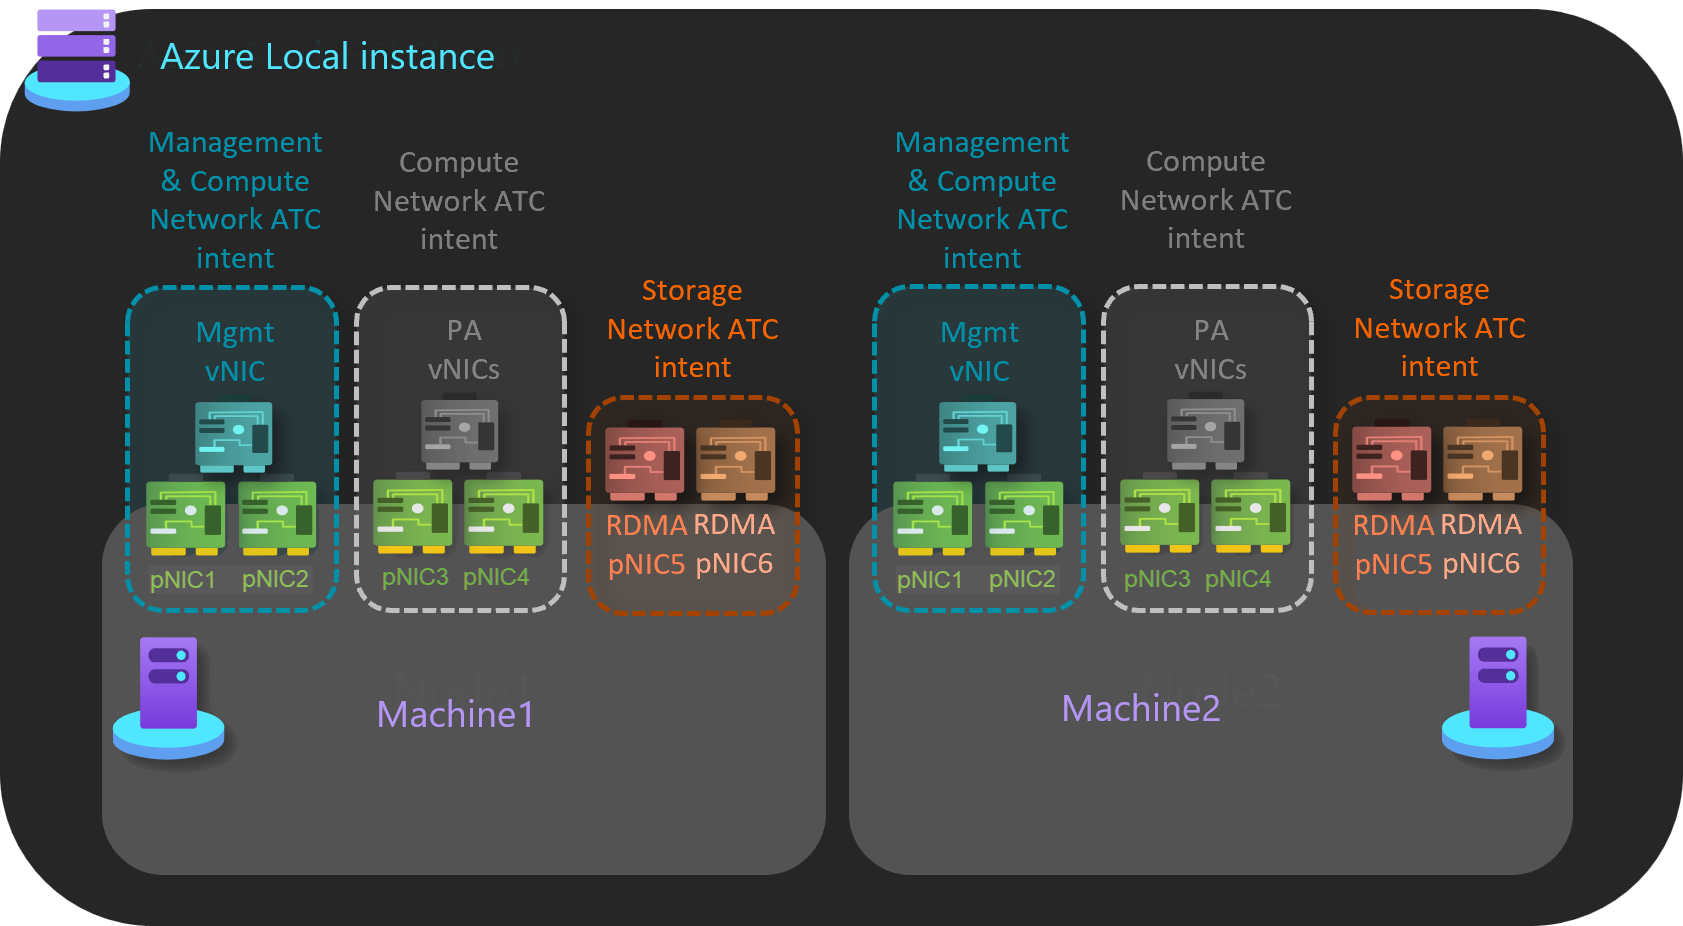

下面是实现此主机网络模式的示例:
# These commands rename the virtual switches to the Network ATC naming convention
# First rename the management virtual switch, then the compute/storage virtual switch
Rename-VMSwitch -Name "management_vSwitch_name" -NewName "ConvergedSwitch(mgmt)"
Rename-VMSwitch -Name "compute_vSwitch_name" -NewName "ConvergedSwitch(compute)"

# These commands rename the virtual network adapters.  Note that each adapter must be renamed to a very specific naming convention.
# First, collect the output from Get-VMNetworkAdapter -ManagementOS to get a list of the current virtual adapters.
# The management virtual network adapter can be renamed using the two commands below.
# You must update the -Name parameter in the Rename-VMNetworkAdapter command with the name of the management virtual adapter from the output above.
Rename-VMNetworkAdapter -ManagementOS -Name "mgmtVNICname" -NewName "vManagement(mgmt)"
Rename-NetAdapter -Name "vEthernet (vManagement(mgmt))" -NewName "vManagement(mgmt)"

# This command adds the management intent.  Update the -AdapterName parameter with the appropriate names of the network adapters
# Note that if you had to configure a VLAN in Step 5, you will need to add that into the -ManagementVlan parameter below.
# If you do not need to configure a management VLAN, remove the -ManagementVlan parameter before running the command
Add-NetIntent -Name mgmt -Management -AdapterName "pNIC1","pNIC2" -ManagementVlan 100

# These commands add the storage intent.  Automatic storage IP addressing is disabled to allow your existing storage IP addresses to continue to be used.
# Update the -AdapterName parameter with the appropriate names of the network adapters.
# Update the -StorageVlans parameter below to the VLAN IDs used by your network adapters.  If you want to use the default Network ATC VLAN IDs (711, 712, etc.), remove the -StorageVlans parameter.
$override = New-NetIntentStorageOverrides
$override.EnableAutomaticIPGeneration = 0
Add-NetIntent -Name storage -Storage -StorageOverrides $override -AdapterName "pNIC3","pNIC4" -StorageVlans 200,201

# This command adds the compute intent.  Update the -AdapterName parameter with the appropriate names of the network adapters
Add-NetIntent -Name compute -Compute -AdapterName "pNIC5","pNIC6"
下一步
了解如何 评估 Azure 本地的解决方案升级准备情况。