你当前正在访问 Microsoft Azure Global Edition 技术文档网站。 如果需要访问由世纪互联运营的 Microsoft Azure 中国技术文档网站,请访问 https://docs.azure.cn。
Send Prometheus data to Azure Monitor by using Microsoft Entra authentication
This article describes how to set up remote write to send data from a self-managed Prometheus server running in your Azure Kubernetes Service (AKS) cluster or Azure Arc-enabled Kubernetes cluster by using Microsoft Entra authentication and a side car container that Azure Monitor provides. Note that you can also directly configure remote-write in the Prometheus configuration for the same.
Note
We recommend that you directly configure Prometheus running on your Kubernetes cluster to remote-write into Azure Monitor Workspace. See Send Prometheus data to Azure Monitor using Microsoft Entra Id authentication to learn more. The steps below use the Azure Monitor side car container.
Cluster configurations
This article applies to the following cluster configurations:
- Azure Kubernetes Service cluster
- Azure Arc-enabled Kubernetes cluster
- Kubernetes cluster running in a different cloud or on-premises
Note
For an AKS cluster or an Azure Arc-enabled Kubernetes cluster, we recommend that you use managed identity authentication. For more information, see Azure Monitor managed service for Prometheus remote write for managed identity.
Prerequisites
Supported versions
- Prometheus versions greater than v2.48 are required for Microsoft Entra ID application authentication.
Azure Monitor workspace
This article covers sending Prometheus metrics to an Azure Monitor workspace. To create an Azure monitor workspace, see Manage an Azure Monitor workspace.
Permissions
Administrator permissions for the cluster or resource are required to complete the steps in this article.
Set up an application for Microsoft Entra ID
The process to set up Prometheus remote write for an application by using Microsoft Entra authentication involves completing the following tasks:
- Register an application with Microsoft Entra ID.
- Get the client ID of the Microsoft Entra application.
- Assign the Monitoring Metrics Publisher role on the workspace data collection rule to the application.
- Create an Azure key vault and generate a certificate.
- Add a certificate to the Microsoft Entra application.
- Add a CSI driver and storage for the cluster.
- Deploy a sidecar container to set up remote write.
The tasks are described in the following sections.
Register an application with Microsoft Entra ID
Complete the steps to register an application with Microsoft Entra ID and create a service principal.
Get the client ID of the Microsoft Entra application
- In the Azure portal, go to the Microsoft Entra ID menu and select App registrations.
- In the list of applications, copy the value for Application (client) ID for the registered application.

Assign the Monitoring Metrics Publisher role on the workspace data collection rule to the application
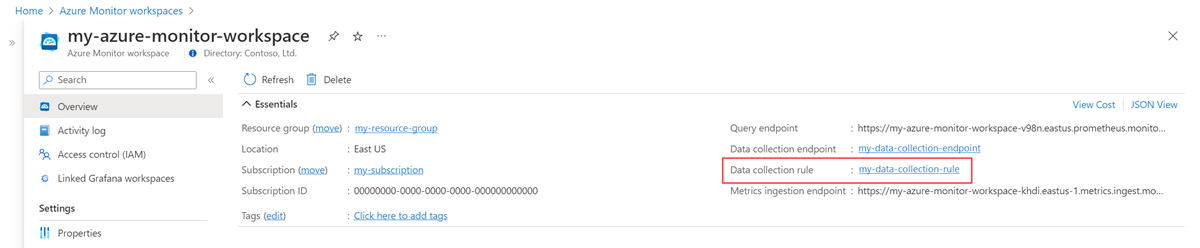
The application must be assigned the Monitoring Metrics Publisher role on the data collection rule that is associated with your Azure Monitor workspace.
On the resource menu for your Azure Monitor workspace, select Overview. For Data collection rule, select the link.
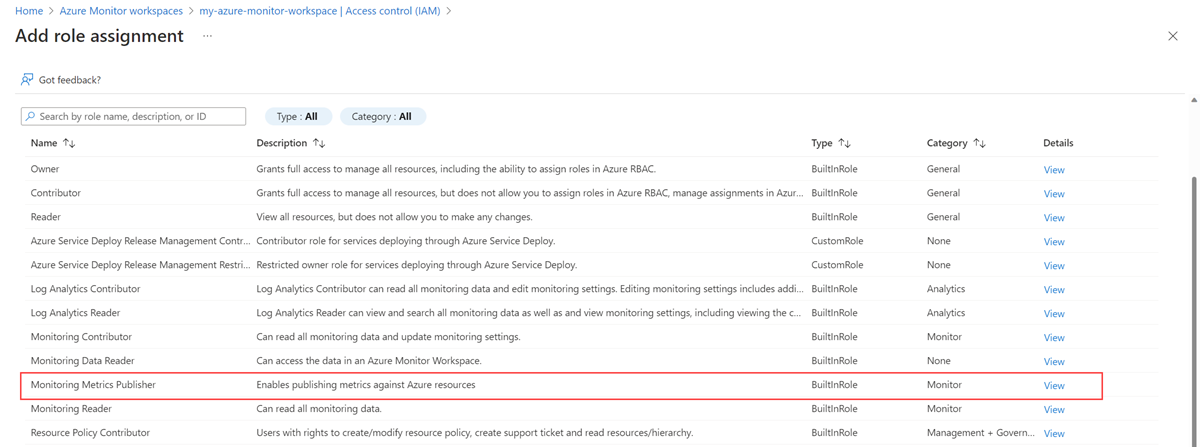
On the resource menu for the data collection rule, select Access control (IAM).
Select Add, and then select Add role assignment.

Select the Monitoring Metrics Publisher role, and then select Next.
Select User, group, or service principal, and then choose Select members. Select the application that you created, and then choose Select.
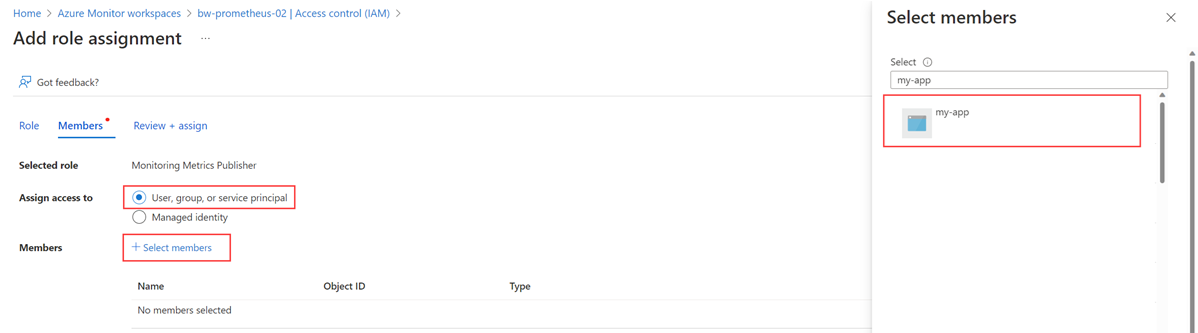
To complete the role assignment, select Review + assign.


Create an Azure key vault and generate a certificate
- If you don't already have an Azure key vault, create a vault.
- Create a certificate by using the guidance in Add a certificate to Key Vault.
- Download the certificate in CER format by using the guidance in Export a certificate from Key Vault.
Add a certificate to the Microsoft Entra application
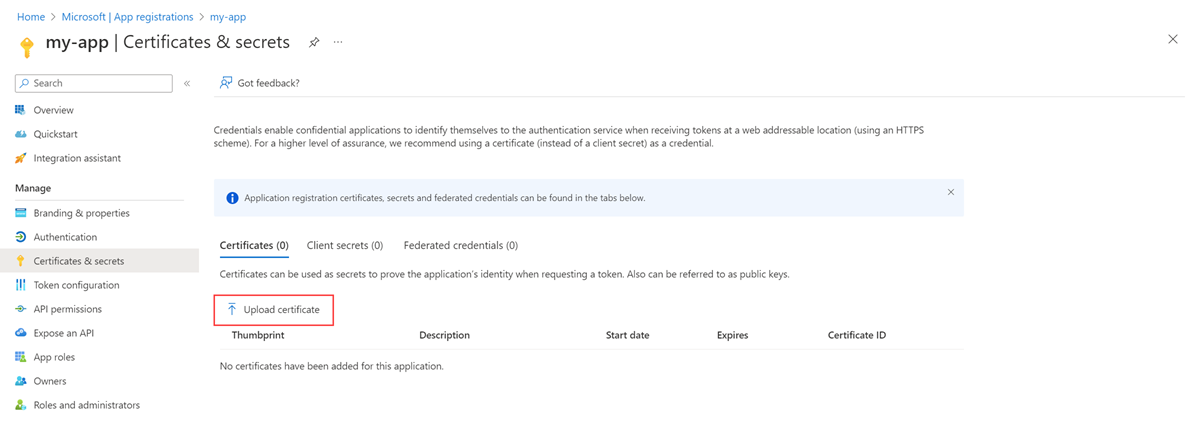
On the resource menu for your Microsoft Entra application, select Certificates & secrets.
On the Certificates tab, select Upload certificate and select the certificate that you downloaded.

Warning
Certificates have an expiration date. It's the responsibility of the user to keep certificates valid.
Add a CSI driver and storage for the cluster
Note
Azure Key Vault CSI driver configuration is only one of the ways to get a certificate mounted on a pod. The remote write container needs a local path to a certificate in the pod only for the <AZURE_CLIENT_CERTIFICATE_PATH> value in the step Deploy a sidecar container to set up remote write.
This step is required only if you didn't turn on Azure Key Vault Provider for Secrets Store CSI Driver when you created your cluster.
To turn on Azure Key Vault Provider for Secrets Store CSI Driver for your cluster, run the following Azure CLI command:
az aks enable-addons --addons azure-keyvault-secrets-provider --name <aks-cluster-name> --resource-group <resource-group-name>To give the identity access to the key vault, run these commands:
# show client id of the managed identity of the cluster
az aks show -g <resource-group> -n <cluster-name> --query addonProfiles.azureKeyvaultSecretsProvider.identity.clientId -o tsv

# set policy to access keys in your key vault
az keyvault set-policy -n <keyvault-name> --key-permissions get --spn <identity-client-id>

# set policy to access secrets in your key vault
az keyvault set-policy -n <keyvault-name> --secret-permissions get --spn <identity-client-id>

# set policy to access certs in your key vault
az keyvault set-policy -n <keyvault-name> --certificate-permissions get --spn <identity-client-id>
Create
SecretProviderClassby saving the following YAML to a file named secretproviderclass.yml. Replace the values foruserAssignedIdentityID,keyvaultName,tenantId, and the objects to retrieve from your key vault. For information about what values to use, see Provide an identity to access the Azure Key Vault Provider for Secrets Store CSI Driver.# This is a SecretProviderClass example using user-assigned identity to access your key vault apiVersion: secrets-store.csi.x-k8s.io/v1 kind: SecretProviderClass metadata: name: azure-kvname-user-msi spec: provider: azure parameters: usePodIdentity: "false" useVMManagedIdentity: "true" # Set to true for using managed identity userAssignedIdentityID: <client-id> # Set the client ID of the user-assigned managed identity to use keyvaultName: <key-vault-name> # Set to the name of your key vault cloudName: "" # [OPTIONAL for Azure] if not provided, the Azure environment defaults to AzurePublicCloud objects: | array: - | objectName: <name-of-cert> objectType: secret # object types: secret, key, or cert objectFormat: pfx objectEncoding: base64 objectVersion: "" tenantId: <tenant-id> # The tenant ID of the key vaultApply
SecretProviderClassby running the following command on your cluster:kubectl apply -f secretproviderclass.yml
Deploy a sidecar container to set up remote write
Copy the following YAML and save it to a file. The YAML uses port 8081 as the listening port. If you use a different port, modify that value in the YAML.
prometheus:
  prometheusSpec:
    externalLabels:
      cluster: <CLUSTER-NAME>

    ##	Azure Managed Prometheus currently exports some default mixins in Grafana.
    ##  These mixins are compatible with data scraped by Azure Monitor agent on your
    ##  Azure Kubernetes Service cluster. These mixins aren't compatible with Prometheus
    ##  metrics scraped by the Kube Prometheus stack.
    ##  To make these mixins compatible, uncomment the remote write relabel configuration below:
    ##	writeRelabelConfigs:
    ##	  - sourceLabels: [metrics_path]
    ##	    regex: /metrics/cadvisor
    ##	    targetLabel: job
    ##	    replacement: cadvisor
    ##	    action: replace
    ##	  - sourceLabels: [job]
    ##	    regex: 'node-exporter'
    ##	    targetLabel: job
    ##	    replacement: node
    ##	    action: replace
    ## https://prometheus.io/docs/prometheus/latest/configuration/configuration/#remote_write
    remoteWrite:
      - url: 'http://localhost:8081/api/v1/write'

    # Additional volumes on the output StatefulSet definition.
    # Required only for Microsoft Entra ID based auth
    volumes:
      - name: secrets-store-inline
        csi:
          driver: secrets-store.csi.k8s.io
          readOnly: true
          volumeAttributes:
            secretProviderClass: azure-kvname-user-msi
    containers:
      - name: prom-remotewrite
        image: <CONTAINER-IMAGE-VERSION>
        imagePullPolicy: Always
        # Required only for Microsoft Entra ID based auth
        volumeMounts:
          - name: secrets-store-inline
            mountPath: /mnt/secrets-store
            readOnly: true
        ports:
          - name: rw-port
            containerPort: 8081
        livenessProbe:
          httpGet:
            path: /health
            port: rw-port
            initialDelaySeconds: 10
            timeoutSeconds: 10
        readinessProbe:
          httpGet:
            path: /ready
            port: rw-port
            initialDelaySeconds: 10
            timeoutSeconds: 10
        env:
          - name: INGESTION_URL
            value: '<INGESTION_URL>'
          - name: LISTENING_PORT
            value: '8081'
          - name: IDENTITY_TYPE
            value: aadApplication
          - name: AZURE_CLIENT_ID
            value: '<APP-REGISTRATION-CLIENT-ID>'
          - name: AZURE_TENANT_ID
            value: '<TENANT-ID>'
          - name: AZURE_CLIENT_CERTIFICATE_PATH
            value: /mnt/secrets-store/<CERT-NAME>
          - name: CLUSTER
            value: '<CLUSTER-NAME>'
Replace the following values in the YAML file:
Value Description <CLUSTER-NAME>The name of your AKS cluster. <CONTAINER-IMAGE-VERSION>mcr.microsoft.com/azuremonitor/containerinsights/ciprod/prometheus-remote-write/images:prom-remotewrite-20240617.1
The remote write container image version.<INGESTION-URL>The value for Metrics ingestion endpoint from the Overview page for the Azure Monitor workspace. <APP-REGISTRATION -CLIENT-ID>The client ID of your application. <TENANT-ID>The tenant ID of the Microsoft Entra application. <CERT-NAME>The name of the certificate. <CLUSTER-NAME>The name of the cluster that Prometheus is running on. Open Azure Cloud Shell and upload the YAML file.
Use Helm to apply the YAML file and update your Prometheus configuration:
# set the context to your cluster
az aks get-credentials -g <aks-rg-name> -n <aks-cluster-name>

# use Helm to update your remote write config
helm upgrade -f <YAML-FILENAME>.yml prometheus prometheus-community/kube-prometheus-stack -namespace <namespace where Prometheus pod resides>
Verification and troubleshooting
For verification and troubleshooting information, see Troubleshooting remote write and Azure Monitor managed service for Prometheus remote write.
Next steps
- Collect Prometheus metrics from an AKS cluster
- Learn more about Azure Monitor managed service for Prometheus
- Remote write in Azure Monitor managed service for Prometheus
- Send Prometheus data to Azure Monitor by using managed identity authentication
- Send Prometheus data to Azure Monitor by using Microsoft Entra Workload ID (preview) authentication
- Send Prometheus data to Azure Monitor by using Microsoft Entra pod-managed identity (preview) authentication