你当前正在访问 Microsoft Azure Global Edition 技术文档网站。 如果需要访问由世纪互联运营的 Microsoft Azure 中国技术文档网站,请访问 https://docs.azure.cn。
本文演示如何使用 Microsoft Azure 和 Visual Studio 生成混合云应用程序。 你将创建使用云中多个 Azure 资源的应用程序。 本教程将帮助你了解:
- 如何创建或修改现有 Web 服务以供 Web 解决方案使用。
- 如何使用 Azure Windows Communication Foundation (WCF) 中继服务在 Azure 应用程序和托管于其他某处的 Web 服务之间共享数据。
在本教程中,你将执行以下任务:
- 安装本教程的必备组件。
- 查看方案。
- 创建命名空间。
- 创建本地服务器。
- 创建 ASP .NET 应用程序。
- 在本地运行应用。
- 将 Web 应用部署到 Azure。
- 在 Azure 上运行应用。
先决条件
若要完成本教程,需要具备以下先决条件:
- Azure 订阅。 如果没有订阅,请在开始之前创建一个免费帐户。
- Visual Studio 2015 或更高版本。 本教程中的示例使用 Visual Studio 2019。
- 用于 .NET 的 Azure SDK。 从 SDK 下载页安装它。
Azure 中继功能将为混合解决方案带来哪些帮助
业务解决方案通常由自定义代码和现有功能组合而成。 自定义代码处理新的和独特的业务要求。 已部署好的解决方案和系统提供现有功能。
解决方案架构师开始使用云来轻松地处理缩放需求和降低运营成本。 在此过程中,他们发现希望用作其解决方案的构建基块的现有服务资产位于企业防火墙内,无法通过云解决方案轻松访问。 许多内部服务的构建或托管方式使得它们无法在企业网络边缘轻松公开。
Azure 中继可以利用现有的 WCF Web 服务,并使公司外部的解决方案可以安全地访问这些服务,而无需对企业网络基础结构进行侵入式更改。 虽然此类中继服务仍托管在现有环境中,但它们会将侦听传入会话和请求这一任务委派给云托管的中继服务。 Azure 中继还会通过使用共享访问签名 (SAS) 身份验证来保护这些服务,以阻止未经授权的访问。
查看方案
在本教程中,请创建一个 ASP.NET 网站,用于查看产品库存页上的产品列表。
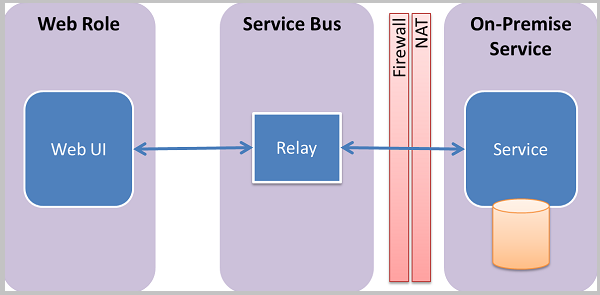
本教程假定产品信息位于现有的本地系统中,而且你使用 Azure 中继来访问该系统。 在简单的控制台应用程序中运行的 Web 服务可以模拟这种场景。 该服务包含一组内存中产品。 你可以在自己的计算机上运行此控制台应用程序并将 Web 角色部署到 Azure 中。 这样,便可以观察 Azure 数据中心内运行的 Web 角色如何调用计算机。 即使基本上可以肯定计算机位于至少一个防火墙和网络地址转换 (NAT) 层后面,也会发生此调用。
设置开发环境
在开始开发 Azure 应用程序之前,需要下载工具并设置开发环境:
- 从 SDK 下载页安装用于 .NET 的 Azure SDK。
- 在“.NET”列中,选择要使用的 Visual Studio 版本。 本教程使用 Visual Studio 2019。
- 当系统提示是要运行还是保存安装程序时,选择“运行”。
- 在“Web 平台安装程序”对话框中,选择“安装”并继续安装。
安装完成后,就有了开始开发应用所需的一切。 SDK 包含了一些工具,可利用这些工具在 Visual Studio 中轻松开发 Azure 应用程序。
创建命名空间
第一步是创建命名空间并获取共享访问签名 (SAS) 密钥。 命名空间为每个通过中继服务公开的应用程序提供应用程序边界。 创建服务命名空间时,系统会自动生成 SAS 密钥。 服务命名空间与 SAS 密钥的组合为 Azure 提供了用于验证应用程序访问权限的凭据。
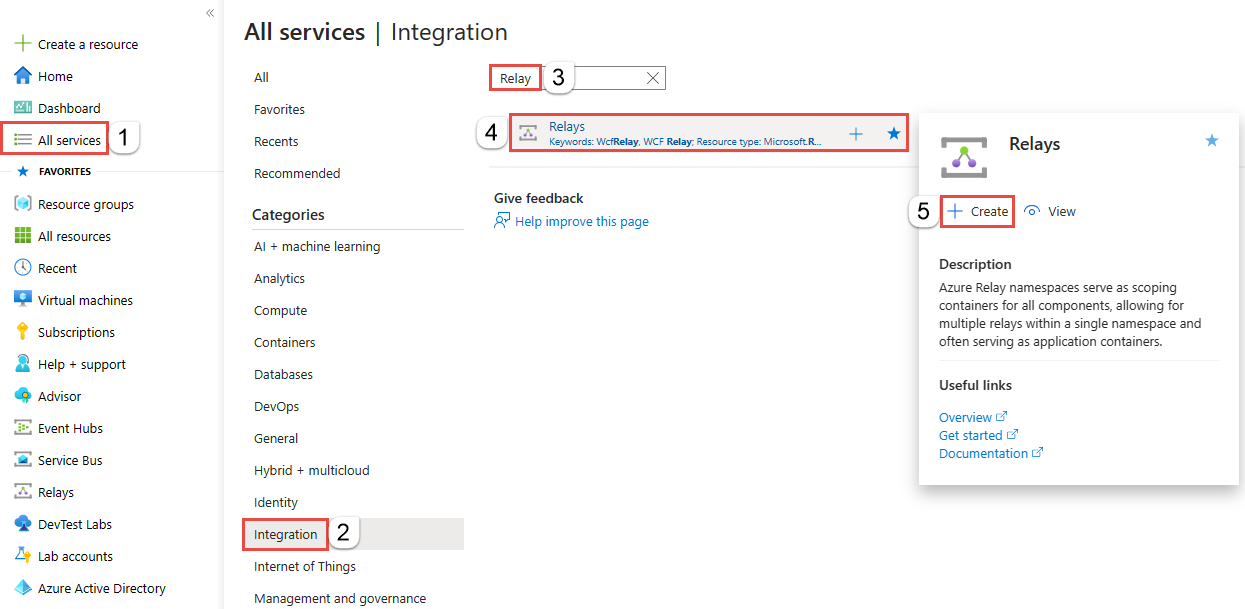
登录 Azure 门户。
在左侧菜单中,选择“所有服务” 。 选择“集成”,搜索“中继”,将鼠标移到“中继”上方,然后选择“创建”。
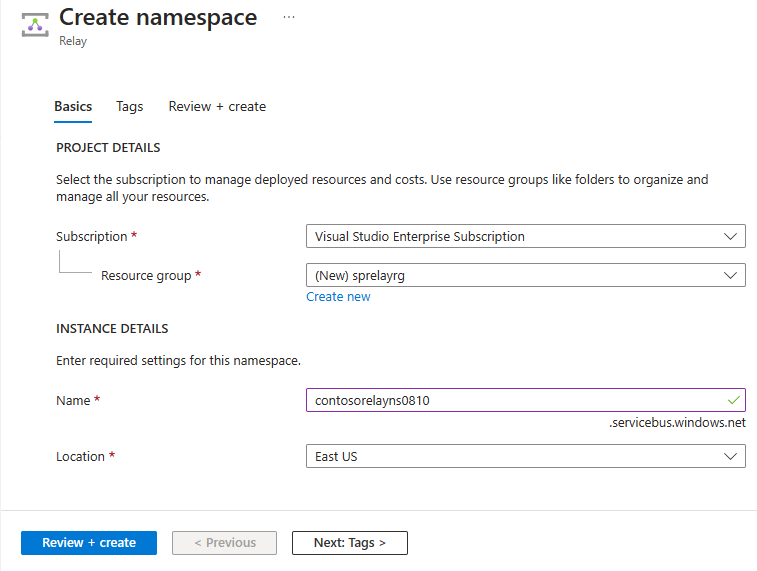
在“创建命名空间”页上,执行以下步骤:
选择要在其中创建命名空间的 Azure 订阅。
对于资源组,选择一个要在其中放置命名空间的现有资源组,或创建一个新资源组。
输入中继命名空间的名称。
选择应托管该命名空间的区域。
在页面底部选择查看 + 创建。
在“查看 + 创建”页面上,选择“创建”。
几分钟后,将看到该命名空间的“中继”页面。
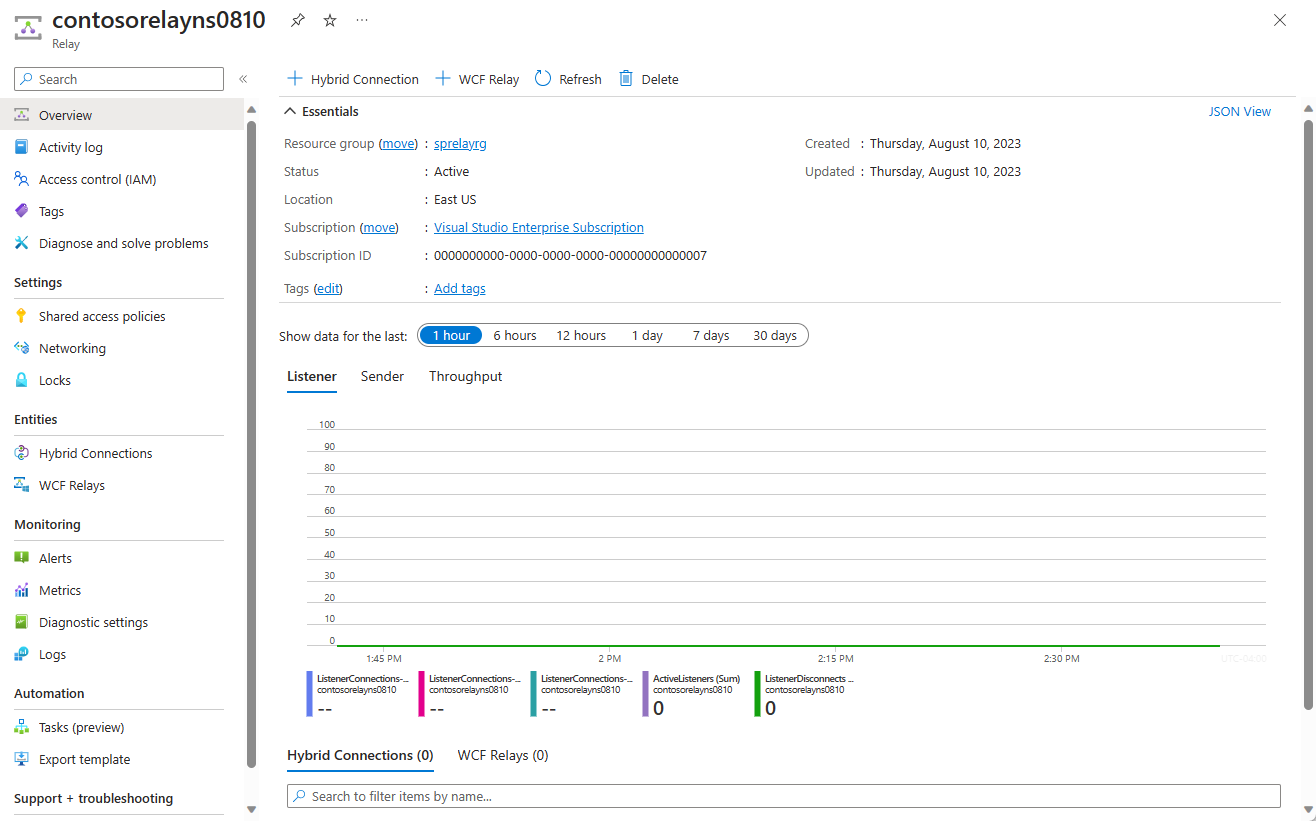
获取管理凭据
在“中继”页上,选择左侧菜单的“共享访问策略”。
在“共享访问策略”页,选择“RootManageSharedAccessKey” 。
在“SAS 策略:RootManageSharedAccessKey”下,选择“主连接字符串”旁边的“复制”按钮。 此操作会将连接字符串复制到剪贴板,供以后使用。 将此值粘贴到记事本或其他某个临时位置。
重复上述步骤,将主密钥的值复制和粘贴到临时位置,供以后使用。

创建本地服务器
首先,生成一个模拟的本地产品目录系统。 此项目是一个 Visual Studio 控制台应用程序,它使用 Azure 服务总线 NuGet 包 来包含服务总线库和配置设置。
以管理员身份启动 Microsoft Visual Studio。 为此,请右键单击 Visual Studio 程序图标,并选择“以管理员身份运行”。
在 Visual Studio 中,选择“新建项目”。
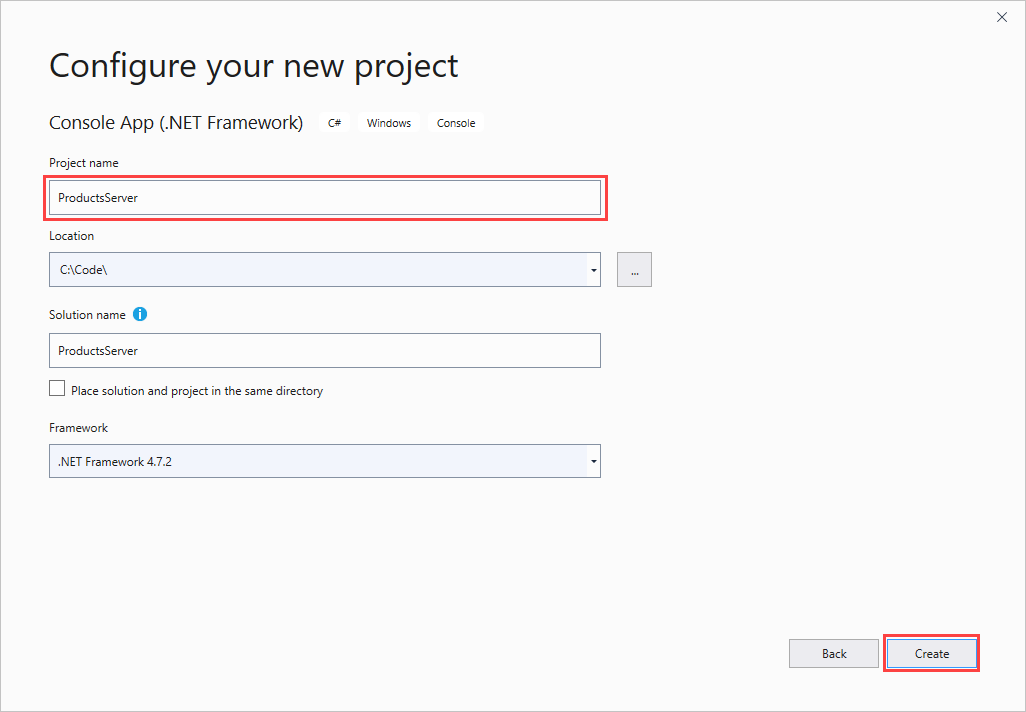
在“创建新项目”中,选择适用于 C# 的“控制台应用(.NET Framework)”,然后选择“下一步”。
将项目命名为 ProductsServer,然后选择“创建”。
在“解决方案资源管理器”中,右键单击“ProductsServer”项目并选择“管理 NuGet 包”。
选择“浏览”,然后搜索并选择“WindowsAzure.ServiceBus”。 选择“安装”并接受使用条款。
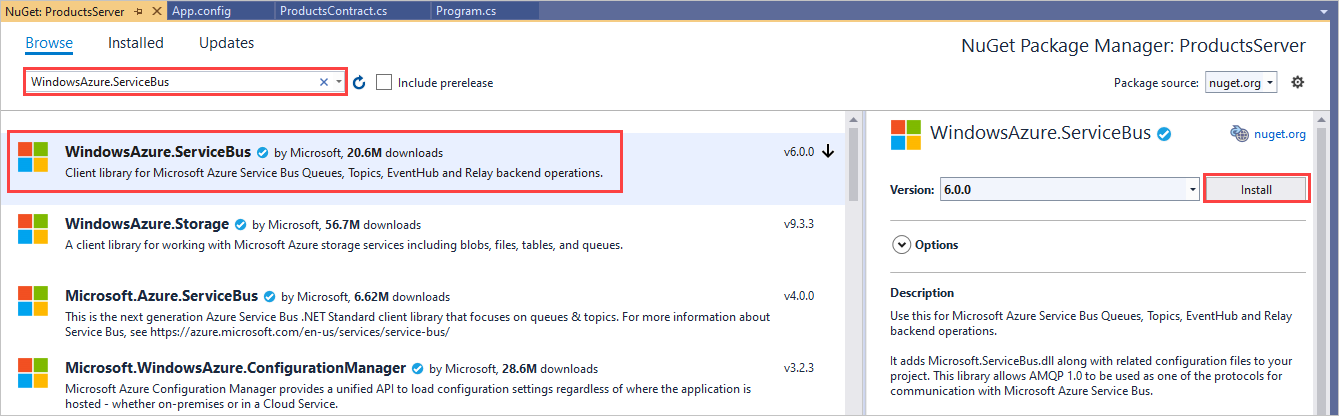
现已引用所需的客户端程序集。
为产品协定添加新类。 在“解决方案资源管理器”中,右键单击“ProductsServer”项目并选择“添加”>“类”。
在“名称”中输入名称 ProductsContract.cs,然后选择“添加”。
对解决方案进行以下代码更改:
在“ProductsContract.cs”中,将命名空间定义替换为以下代码,以定义服务的协定。
namespace ProductsServer
{
    using System.Collections.Generic;
    using System.Runtime.Serialization;
    using System.ServiceModel;

    // Define the data contract for the service
    [DataContract]
    // Declare the serializable properties.
    public class ProductData
    {
        [DataMember]
        public string Id { get; set; }
        [DataMember]
        public string Name { get; set; }
        [DataMember]
        public string Quantity { get; set; }
    }

    // Define the service contract.
    [ServiceContract]
    interface IProducts
    {
        [OperationContract]
        IList<ProductData> GetProducts();

    }

    interface IProductsChannel : IProducts, IClientChannel
    {
    }
}
在 Program.cs 中,将命名空间定义替换为以下代码,以便为其添加配置文件服务和主机。
namespace ProductsServer
{
    using System;
    using System.Linq;
    using System.Collections.Generic;
    using System.ServiceModel;

    // Implement the IProducts interface.
    class ProductsService : IProducts
    {

        // Populate array of products for display on website
        ProductData[] products =
            new []
                {
                    new ProductData{ Id = "1", Name = "Rock",
                                     Quantity = "1"},
                    new ProductData{ Id = "2", Name = "Paper",
                                     Quantity = "3"},
                    new ProductData{ Id = "3", Name = "Scissors",
                                     Quantity = "5"},
                    new ProductData{ Id = "4", Name = "Well",
                                     Quantity = "2500"},
                };

        // Display a message in the service console application
        // when the list of products is retrieved.
        public IList<ProductData> GetProducts()
        {
            Console.WriteLine("GetProducts called.");
            return products;
        }

    }

    class Program
    {
        // Define the Main() function in the service application.
        static void Main(string[] args)
        {
            var sh = new ServiceHost(typeof(ProductsService));
            sh.Open();

            Console.WriteLine("Press ENTER to close");
            Console.ReadLine();

            sh.Close();
        }
    }
}
在“解决方案资源管理器”中,双击“App.config”在 Visual Studio 编辑器中将其打开。 在
<system.ServiceModel>元素的底部(但仍在<system.ServiceModel>中)添加以下 XML 代码。重要
将
yourServiceNamespace替换为你的命名空间名称,并将yourKey替换为前面从门户中检索到的 SAS 密钥:<services> <service name="ProductsServer.ProductsService"> <endpoint address="sb://yourServiceNamespace.servicebus.windows.net/products" binding="netTcpRelayBinding" contract="ProductsServer.IProducts" behaviorConfiguration="products"/> </service> </services> <behaviors> <endpointBehaviors> <behavior name="products"> <transportClientEndpointBehavior> <tokenProvider> <sharedAccessSignature keyName="RootManageSharedAccessKey" key="yourKey" /> </tokenProvider> </transportClientEndpointBehavior> </behavior> </endpointBehaviors> </behaviors>注意
在本示例中,
transportClientEndpointBehavior导致的错误只是一条警告,而不是阻碍性的问题。仍在 App.config 文件中,在
<appSettings>元素中,将连接字符串值替换为前面从门户获取的连接字符串。<appSettings> <!-- Service Bus specific app settings for messaging connections --> <add key="Microsoft.ServiceBus.ConnectionString" value="Endpoint=sb://yourNamespace.servicebus.windows.net/;SharedAccessKeyName=RootManageSharedAccessKey;SharedAccessKey=yourKey"/> </appSettings>按 Ctrl+Shift+B 或者选择“生成”>“生成解决方案”以生成应用程序,并验证到目前为止操作的准确性。
创建 ASP.NET 应用程序
在本部分,请生成一个简单的 ASP.NET 应用程序,以便显示产品服务中检索到的数据。
创建项目
确保 Visual Studio 正在以管理员身份运行。
在 Visual Studio 中,选择“新建项目”。
在“创建新项目”中,选择适用于 C# 的“ASP.NET Web 应用程序(.NET Framework)”,然后选择“下一步” 。
将项目命名为 ProductsPortal,然后选择“创建”。
在“创建新 ASP.NET Web 应用程序”中选择“**MVC”,然后选择“身份验证”下的“更改”。
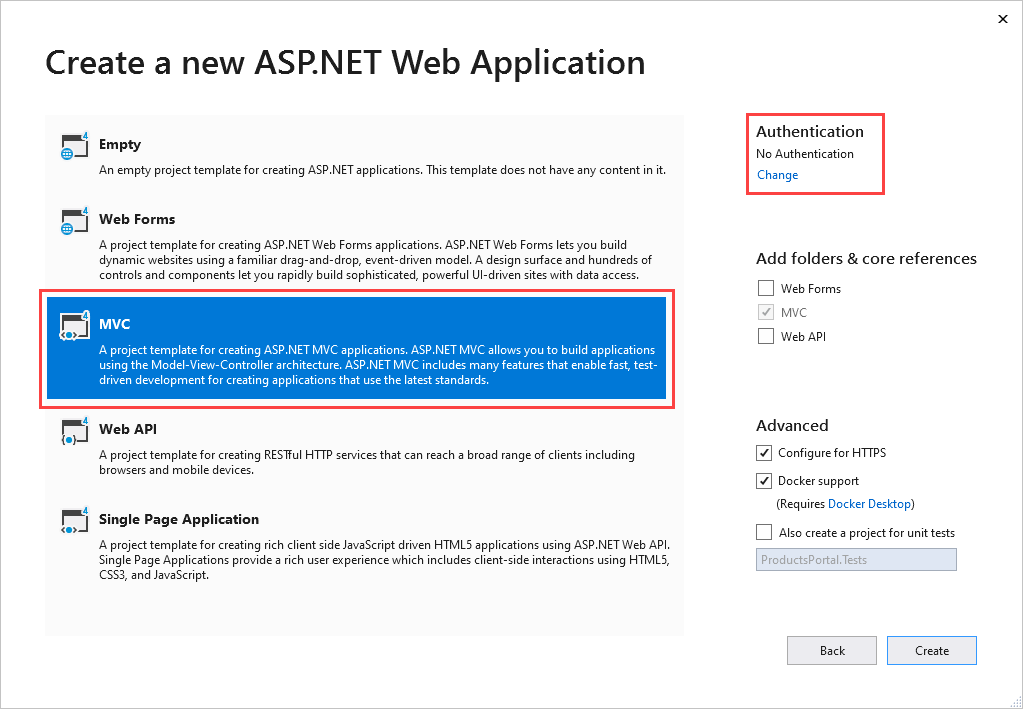
在“更改身份验证”中,依次选择“无身份验证”、“确定”。 在本教程中,你将部署无需用户登录的应用。

返回“创建新 ASP.NET Web 应用程序”,选择“创建”以创建 MVC 应用。
配置新 Web 应用的 Azure 资源。 遵循发布 Web 应用中的步骤。 然后,返回本教程并继续执行下一步。
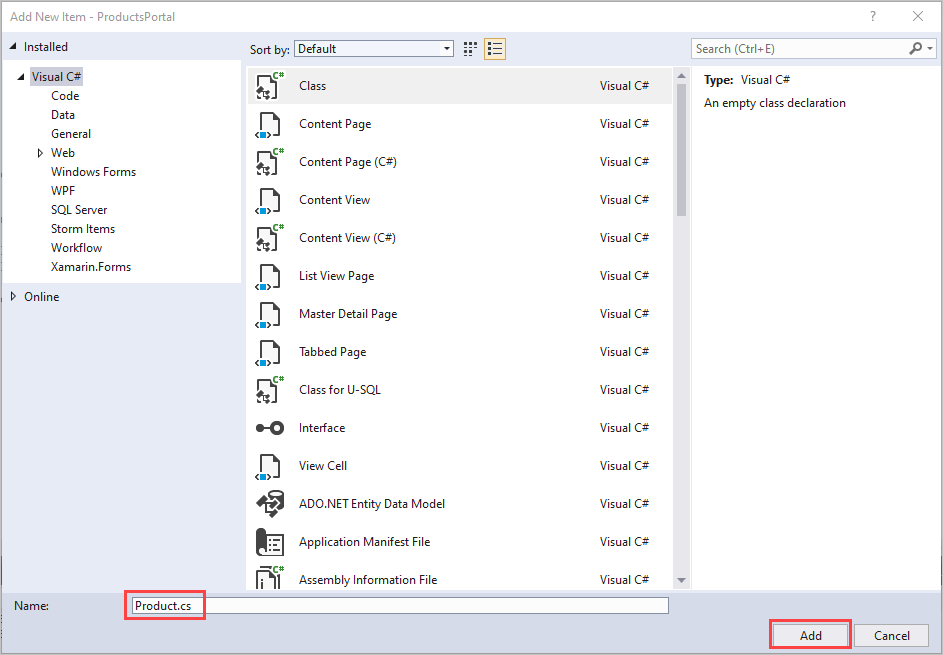
在“解决方案资源管理器”中,右键单击“模型”并选择“添加”>“类”。
将类命名为 Product.cs,然后选择“添加”。
修改 Web 应用程序
在 Visual Studio 的 Product.cs 文件中将现有命名空间定义替换为以下代码:
 // Declare properties for the products inventory.
 namespace ProductsWeb.Models
 {
    public class Product
    {
        public string Id { get; set; }
        public string Name { get; set; }
        public string Quantity { get; set; }
    }
 }
在“解决方案资源管理器”中展开“控制器”,然后双击“HomeController.cs”在 Visual Studio 中打开该文件。
在 HomeController.cs中,将现有命名空间定义替换为以下代码:
namespace ProductsWeb.Controllers
{
    using System.Collections.Generic;
    using System.Web.Mvc;
    using Models;

    public class HomeController : Controller
    {
        // Return a view of the products inventory.
        public ActionResult Index(string Identifier, string ProductName)
        {
            var products = new List<Product>
                {new Product {Id = Identifier, Name = ProductName}};
            return View(products);
        }
     }
}
在“解决方案资源管理器”中展开“视图”>“共享”,然后双击“_Layout.cshtml”在 Visual Studio 编辑器中打开该文件。
将出现的所有
My ASP.NET Application更改为“Northwind Traders 产品”。删除
Home、About和Contact链接。 在以下示例中,删除突出显示的代码。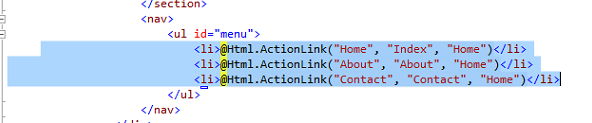
在“解决方案资源管理器”中展开“视图”>“主目录”,然后双击“Index.cshtml”在 Visual Studio 编辑器中打开该文件。 将文件的全部内容替换为以下代码:
@model IEnumerable<ProductsWeb.Models.Product>

@{
         ViewBag.Title = "Index";
}

<h2>Prod Inventory</h2>

<table>
          <tr>
              <th>
                  @Html.DisplayNameFor(model => model.Name)
              </th>
              <th></th>
              <th>
                  @Html.DisplayNameFor(model => model.Quantity)
              </th>
          </tr>

@foreach (var item in Model) {
          <tr>
              <td>
                  @Html.DisplayFor(modelItem => item.Name)
              </td>
              <td>
                  @Html.DisplayFor(modelItem => item.Quantity)
              </td>
          </tr>
}

</table>
若要验证到目前为止操作的准确性,可以按 Ctrl+Shift+B 生成项目。
在本地运行应用
运行应用程序以验证其是否正常运行。
- 确保 ProductsPortal 是活动项目。 在“解决方案资源管理器”中,右键单击项目名称并选择“设置为启动项目” 。
- 在 Visual Studio 中按 F5。
应用程序应在浏览器中显示为正在运行。
将各个部分组合在一起
下一步是将本地产品服务器与 ASP.NET 应用程序挂钩。
如果尚未打开在创建 ASP.NET 应用程序部分中创建的 ProductsPortal 项目,请在 Visual Studio 中重新打开该项目。
采用与创建本地服务器部分类似的步骤,将 NuGet 包添加到项目引用中。 在“解决方案资源管理器”中,右键单击“ProductsPortal”项目并选择“管理 NuGet 包”。
搜索“WindowsAzure.ServiceBus”,然后选择“WindowsAzure.ServiceBus”项。 然后完成安装过程并关闭此对话框。
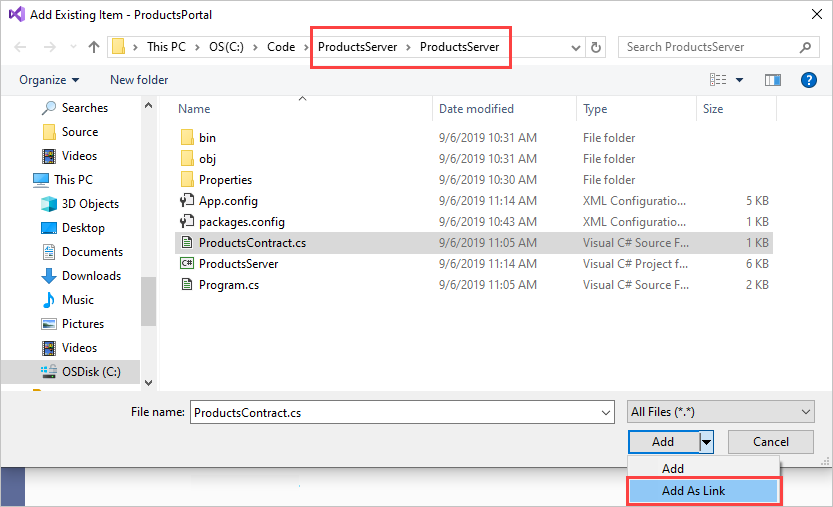
在“解决方案资源管理器”中,右键单击“ProductsPortal”项目并选择“添加”>“现有项”。
从 ProductsServer 控制台项目导航到 ProductsContract.cs 文件。 突出显示“ProductsContract.cs”。 选择“添加”旁边的向下箭头,然后选择“添加为链接”。
现在,在 Visual Studio 编辑器中打开 HomeController.cs 文件,并将命名空间定义替换为以下代码。 请确保将
yourServiceNamespace替换为你的 Relay 命名空间名称,并将yourKey替换为你的 SAS 密钥。 此代码使客户端能够调用本地服务,并返回调用结果。namespace ProductsWeb.Controllers { using System.Linq; using System.ServiceModel; using System.Web.Mvc; using Microsoft.ServiceBus; using Models; using ProductsServer; public class HomeController : Controller { // Declare the channel factory. static ChannelFactory<IProductsChannel> channelFactory; static HomeController() { // Create shared access signature token credentials for authentication. channelFactory = new ChannelFactory<IProductsChannel>(new NetTcpRelayBinding(), "sb://yourServiceNamespace.servicebus.windows.net/products"); channelFactory.Endpoint.Behaviors.Add(new TransportClientEndpointBehavior { TokenProvider = TokenProvider.CreateSharedAccessSignatureTokenProvider( "RootManageSharedAccessKey", "yourKey") }); } public ActionResult Index() { using (IProductsChannel channel = channelFactory.CreateChannel()) { // Return a view of the products inventory. return this.View(from prod in channel.GetProducts() select new Product { Id = prod.Id, Name = prod.Name, Quantity = prod.Quantity }); } } } }在“解决方案资源管理器”中右键单击“ProductsPortal”解决方案。 请务必右键单击该解决方案而不是项目。 选择“添加”>“现有项目”。
导航到 ProductsServer 项目,然后双击“ProductsServer.csproj”解决方案文件将其添加。
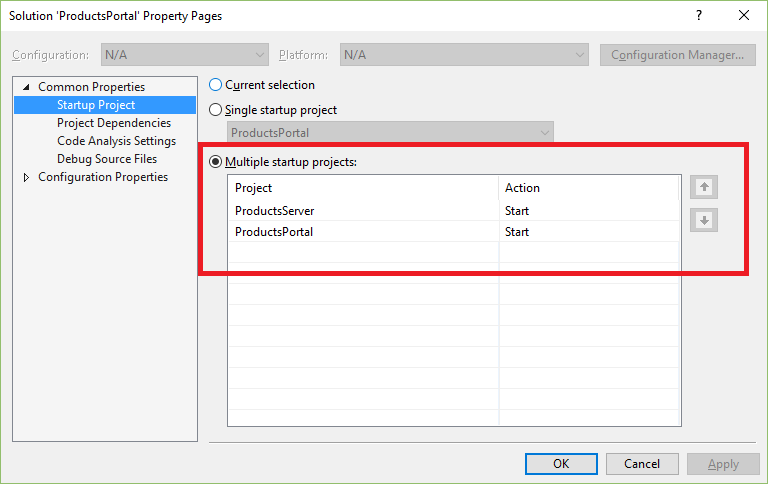
ProductsServer 必须正在运行才能显示 ProductsPortal 中的数据。 在“解决方案资源管理器”中,右键单击“ProductsPortal”解决方案并选择“属性”以显示“属性页”。
选择“通用属性”>“启动项目”,然后选择“多个启动项目”。 确保 ProductsServer 和 ProductsPortal 按此顺序显示,并且两者的操作为“启动”。
选择左侧的“通用属性”>“项目依赖项”。
对于“项目”,请选择“ProductsPortal”。 确保已选择 ProductsServer。
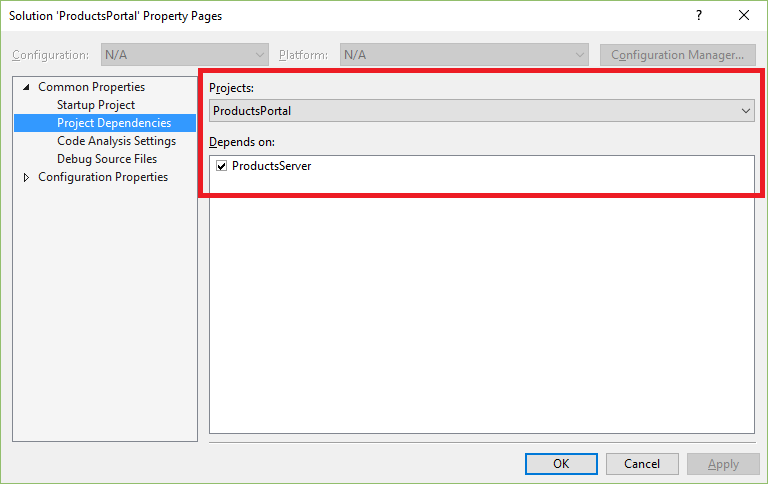
对于“项目”,请选择“ProductsServer”。 确保未选择“ProductsPortal”,然后选择“确定”保存更改。
在本地运行项目
若要在本地测试应用程序,请在 Visual Studio 中按 F5。 本地服务器 (ProductsServer) 应该会先启动,然后 ProductsPortal 应用程序应该会在浏览器窗口中启动。 这次,会看到产品清单列出了从产品服务本地系统中检索到的数据。
在“ProductsPortal”页上选择“刷新”。 每次刷新该页面时,都会看到服务器应用在调用来自 ProductsServer 的 GetProducts() 时显示一条消息。
关闭这两个应用程序,然后转到下一部分。
将 ProductsPortal 项目部署到 Azure Web 应用
下一步是重新发布 Azure Web 应用 ProductsPortal 前端:
在“解决方案资源管理器”中,右键单击“ProductsPortal”项目并选择“发布” 。 在“发布”页上选择“发布” 。
注意
在部署后自动启动 ProductsPortal Web 项目时,可能会在浏览器窗口中看到错误消息。 这在意料之中,因为 ProductsServer 应用程序尚未运行。
复制已部署的 Web 应用的 URL。 稍后需要使用该 URL。 也可以从 Visual Studio 的“Azure 应用服务活动”窗口获取此 URL:

关闭浏览器窗口,停止正在运行的应用程序。
在云中运行应用程序之前,必须确保 ProductsPortal 从 Visual Studio 内以 Web 应用的形式启动。
在 Visual Studio 中,右键单击“ProductsPortal”项目并选择“属性” 。
选择“Web”。 在“启动操作”下,选择“启动 URL”。 输入以前部署的 Web 应用的 URL,在本示例中为
https://productsportal20190906122808.azurewebsites.net/。
选择“文件”>“全部保存”。
选择“生成”>“重新生成解决方案”。
运行应用程序
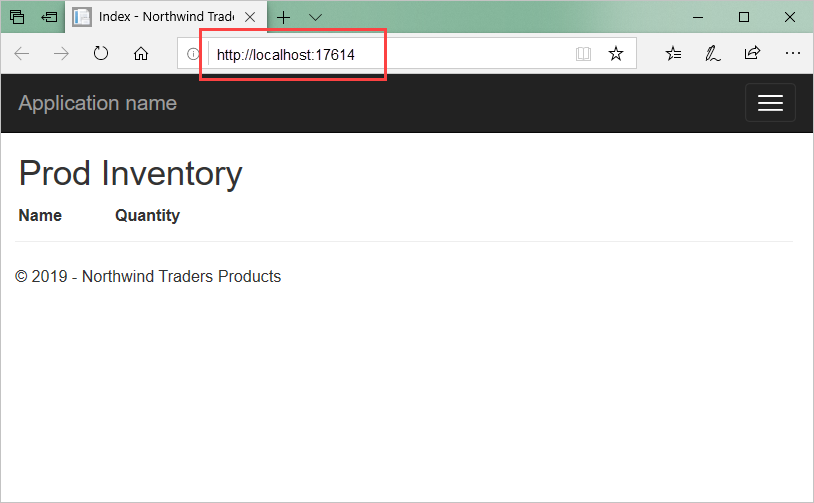
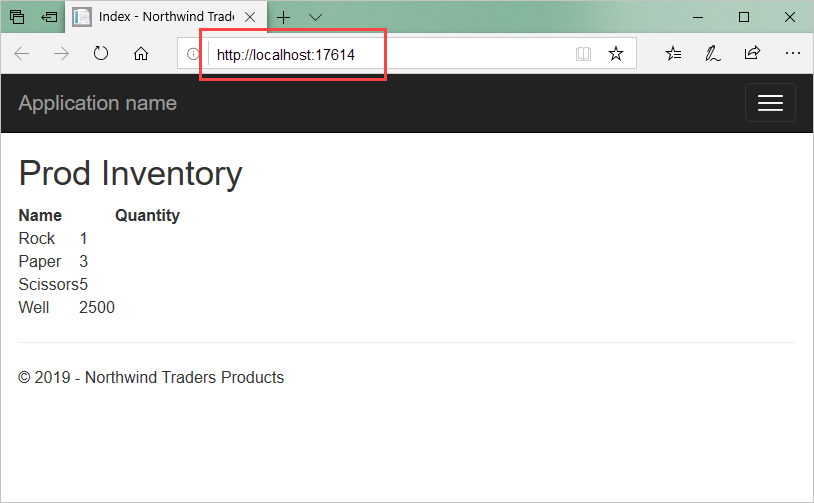
按 F5 生成并运行应用程序。 本地服务器(ProductsServer 控制台应用程序)应该会先启动,然后 ProductsPortal 应用程序应会在浏览器窗口中启动,如下所示:
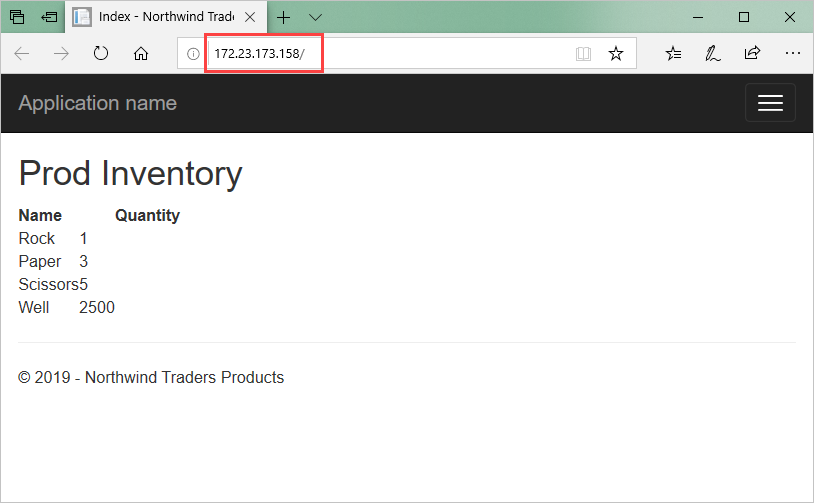
产品库存列表会列出从产品服务本地系统检索到的数据,并在 Web 应用中显示该数据。 请检查 URL,确保 ProductsPortal 正在云中以 Azure Web 应用的形式运行。
重要
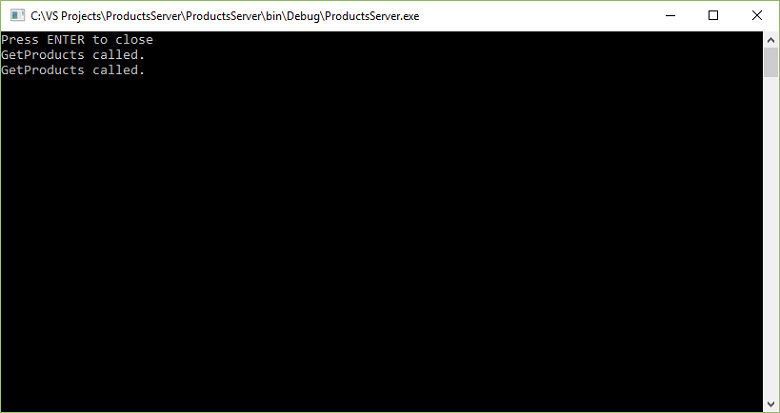
ProductsServer 控制台应用程序必须正在运行,而且能够为 ProductsPortal 应用程序提供数据。 如果浏览器显示错误,请多等几秒钟,让 ProductsServer 加载并显示以下消息;然后刷新浏览器。
在浏览器中刷新“ProductsPortal”页。 每次刷新该页面时,都会看到服务器应用在调用来自 ProductsServer 的 GetProducts() 时显示一条消息。
下一步
转到以下教程: