你当前正在访问 Microsoft Azure Global Edition 技术文档网站。 如果需要访问由世纪互联运营的 Microsoft Azure 中国技术文档网站,请访问 https://docs.azure.cn。
聊天 SDK 旨在与 Microsoft Teams 无缝协作。 具体来说,Chat SDK 提供了一种解决方案,用于从 Microsoft Teams 接收内嵌图像并将内嵌图像发送给用户。
在本教程中,你将了解如何使用适用于 JavaScript 的 Azure 通信服务聊天 SDK 启用内联图像支持。
内嵌图像是直接复制并粘贴到 Teams 客户端的发送框中的图像。 对于通过 Upload from this device 菜单或通过拖放上传的图像,例如直接拖动到 Teams 中发送框的图像,您需要将 本教程 作为文件共享功能的一部分进行参考。 (请参阅“处理图像附件”部分。
要复制图像,Teams 用户有两个选项:
- 使用其作系统的上下文菜单复制图像文件,然后将其粘贴到其 Teams 客户端的发送框中。
- 使用键盘快捷键。
在本教程中,您将了解在以下情况下需要做什么:
注释
发送内嵌图像的功能目前以公共预览版提供。 它仅适用于 JavaScript。 对于接收内嵌图像,它目前已正式发布。 它在 Teams 互作性聊天中可用于 JavaScript 和 C#。
先决条件
- 查看快速入门:将聊天应用加入 Teams 会议。
- 创建 Azure 通信服务资源。 有关详细信息,请参阅创建 Azure 通信服务资源。 需要为此教程记录连接字符串。
- 使用企业帐户设置 Teams 会议,并准备好会议 URL。
- 请使用适用于 JavaScript 的聊天 SDK (@azure/communication-chat) 1.4.0 或更高版本。 有关详细信息,请参阅适用于 JavaScript 的 Azure 通信聊天客户端库。
示例代码
在 GitHub 上找到本教程的最终代码。
在新消息事件中处理收到的内嵌图像
在本节中,您将了解如何呈现嵌入在新消息接收事件的消息内容中的内嵌图像。
在本 快速入门中,您为 chatMessageReceived 事件创建了一个事件处理程序,当您收到来自 Teams 用户的新消息时,将触发该事件处理程序。 您还可以在从 中收到chatMessageReceived事件chatClient时直接将传入消息内容messageContainer附加到 ,如下所示:
chatClient.on("chatMessageReceived", (e) => {
   console.log("Notification chatMessageReceived!");

   // Check whether the notification is intended for the current thread
   if (threadIdInput.value != e.threadId) {
      return;
   }

   if (e.sender.communicationUserId != userId) {
      renderReceivedMessage(e.message);
   }
   else {
      renderSentMessage(e.message);
   }
});

async function renderReceivedMessage(message) {
   messages += '<div class="container lighter">' + message + '</div>';
   messagesContainer.innerHTML = messages;
}
从 type ChatMessageReceivedEvent的传入事件中,名为 attachments 的属性包含有关内联图像的信息。 这就是在 UI 中渲染内嵌图像所需的全部内容:
export interface ChatMessageReceivedEvent extends BaseChatMessageEvent {
  /**
   * Content of the message.
   */
  message: string;

  /**
   * Metadata of the message.
   */
  metadata: Record<string, string>;

  /**
   * Chat message attachment.
   */
  attachments?: ChatAttachment[];
}

export interface ChatAttachment {
  /** Id of the attachment */
  id: string;
  /** The type of attachment. */
  attachmentType: ChatAttachmentType;
  /** The name of the attachment content. */
  name?: string;
  /** The URL where the attachment can be downloaded */
  url?: string;
  /** The URL where the preview of attachment can be downloaded */
  previewUrl?: string;
}

export type ChatAttachmentType = "image" | "unknown";
现在返回前面的代码以添加一些额外的逻辑,如以下代码片段:
chatClient.on("chatMessageReceived", (e) => {
  console.log("Notification chatMessageReceived!");
  // Check whether the notification is intended for the current thread
  if (threadIdInput.value != e.threadId) {
     return;
  }

  const isMyMessage = e.sender.communicationUserId === userId;
  renderReceivedMessage(e, isMyMessage);
});

function renderReceivedMessage(e, isMyMessage) {
  const messageContent = e.message;

  const card = document.createElement('div');
  card.className = isMyMessage ? "container darker" : "container lighter";
  card.innerHTML = messageContent;

  messagesContainer.appendChild(card);

  // Filter out inline images from attachments
  const imageAttachments = e.attachments.filter((e) =>
    e.attachmentType.toLowerCase() === 'image');

  // Fetch and render preview images
  fetchPreviewImages(imageAttachments);

  // Set up onclick event handler to fetch full-scale image
  setImgHandler(card, imageAttachments);
}

function setImgHandler(element, imageAttachments) {
  // Do nothing if there are no image attachments
  if (!imageAttachments.length > 0) {
    return;
  }
  const imgs = element.getElementsByTagName('img');
  for (const img of imgs) {
    img.addEventListener('click', (e) => {
      // Fetch full-scale image upon click
      fetchFullScaleImage(e, imageAttachments);
    });
  }
}

async function fetchPreviewImages(attachments) {
  if (!attachments.length > 0) {
    return;
  }
  // Since each message could contain more than one inline image
  // we need to fetch them individually
  const result = await Promise.all(
      attachments.map(async (attachment) => {
        // Fetch preview image from its 'previewURL'
        const response = await fetch(attachment.previewUrl, {
          method: 'GET',
          headers: {
            // The token here should be the same one from chat initialization
            'Authorization': 'Bearer ' + tokenString,
          },
        });
        // The response would be in an image blob, so we can render it directly
        return {
          id: attachment.id,
          content: await response.blob(),
        };
      }),
  );
  result.forEach((imageResult) => {
    const urlCreator = window.URL || window.webkitURL;
    const url = urlCreator.createObjectURL(imageResult.content);
    // Look up the image ID and replace its 'src' with object URL
    document.getElementById(imageResult.id).src = url;
  });
}
在此示例中,您创建了两个帮助程序函数 fetchPreviewImages 和 setImgHandler. 第一个选项直接从 previewURL 每个对象中提供的 auth 标头中获取 ChatAttachment 预览图像。 同样,您可以在函数 setImgHandler中为每个图像设置一个onclick事件。 在事件处理程序中,您可以从具有 auth 标头的对象ChatAttachment中获取 property url 的全尺寸图像。
现在,您需要在全局级别公开令牌,因为您需要使用它构造一个 auth 标头。 您需要修改以下代码:
// New variable for token string
var tokenString = '';

async function init() {

   ....

   let tokenResponse = await identityClient.getToken(identityResponse, [
      "voip",
      "chat"
	]);
	const { token, expiresOn } = tokenResponse;

   // Save to token string
   tokenString = token;

   ...
}
要在叠加层中显示全尺寸图像,您还需要添加一个新组件:
<div class="overlay" id="overlay-container">
   <div class="content">
      <img id="full-scale-image" src="" alt="" />
   </div>
</div>
使用一些 CSS:
/* let's make chat popup scrollable */
.chat-popup {

   ...

   max-height: 650px;
   overflow-y: scroll;
}

 .overlay {
    position: fixed;
    width: 100%;
    height: 100%;
    background: rgba(0, 0, 0, .7);
    top: 0;
    left: 0;
    z-index: 100;
 }

.overlay .content {
   position: fixed;
   width: 100%;
   height: 100%;
   text-align: center;
   overflow: hidden;
   z-index: 100;
   margin: auto;
   background-color: rgba(0, 0, 0, .7);
}

.overlay img {
   position: absolute;
   display: block;
   max-height: 90%;
   max-width: 90%;
   top: 50%;
   left: 50%;
   transform: translate(-50%, -50%);
}

#overlay-container {
   display: none
}
现在您已经设置了叠加层,是时候研究渲染全尺寸图像的逻辑了。 回想一下,您创建了一个 onClick 事件处理程序来调用函数 fetchFullScaleImage:
const overlayContainer = document.getElementById('overlay-container');
const loadingImageOverlay = document.getElementById('full-scale-image');

function fetchFullScaleImage(e, imageAttachments) {
  // Get the image ID from the clicked image element
  const link = imageAttachments.filter((attachment) =>
    attachment.id === e.target.id)[0].url;
  loadingImageOverlay.src = '';

  // Fetch the image
  fetch(link, {
    method: 'GET',
    headers: {'Authorization': 'Bearer ' + tokenString},
  }).then(async (result) => {

    // Now we set image blob to our overlay element
    const content = await result.blob();
    const urlCreator = window.URL || window.webkitURL;
    const url = urlCreator.createObjectURL(content);
    loadingImageOverlay.src = url;
  });
  // Show overlay
  overlayContainer.style.display = 'block';
}
您要添加的最后一件事是在单击图像时关闭叠加层的功能:
loadingImageOverlay.addEventListener('click', () => {
  overlayContainer.style.display = 'none';
});
现在,您已经完成了为来自实时通知的消息呈现内嵌图像所需的所有更改。
运行代码
Webpack 用户可以使用它来 webpack-dev-server 构建和运行您的应用程序。 运行以下命令,在本地 Web 服务器上捆绑应用程序主机:
npx webpack-dev-server --entry ./client.js --output bundle.js --debug --devtool inline-source-map
演示
打开浏览器并转到 http://localhost:8080/。 输入会议 URL 和会话 ID。 从 Teams 客户端发送一些内嵌图像。
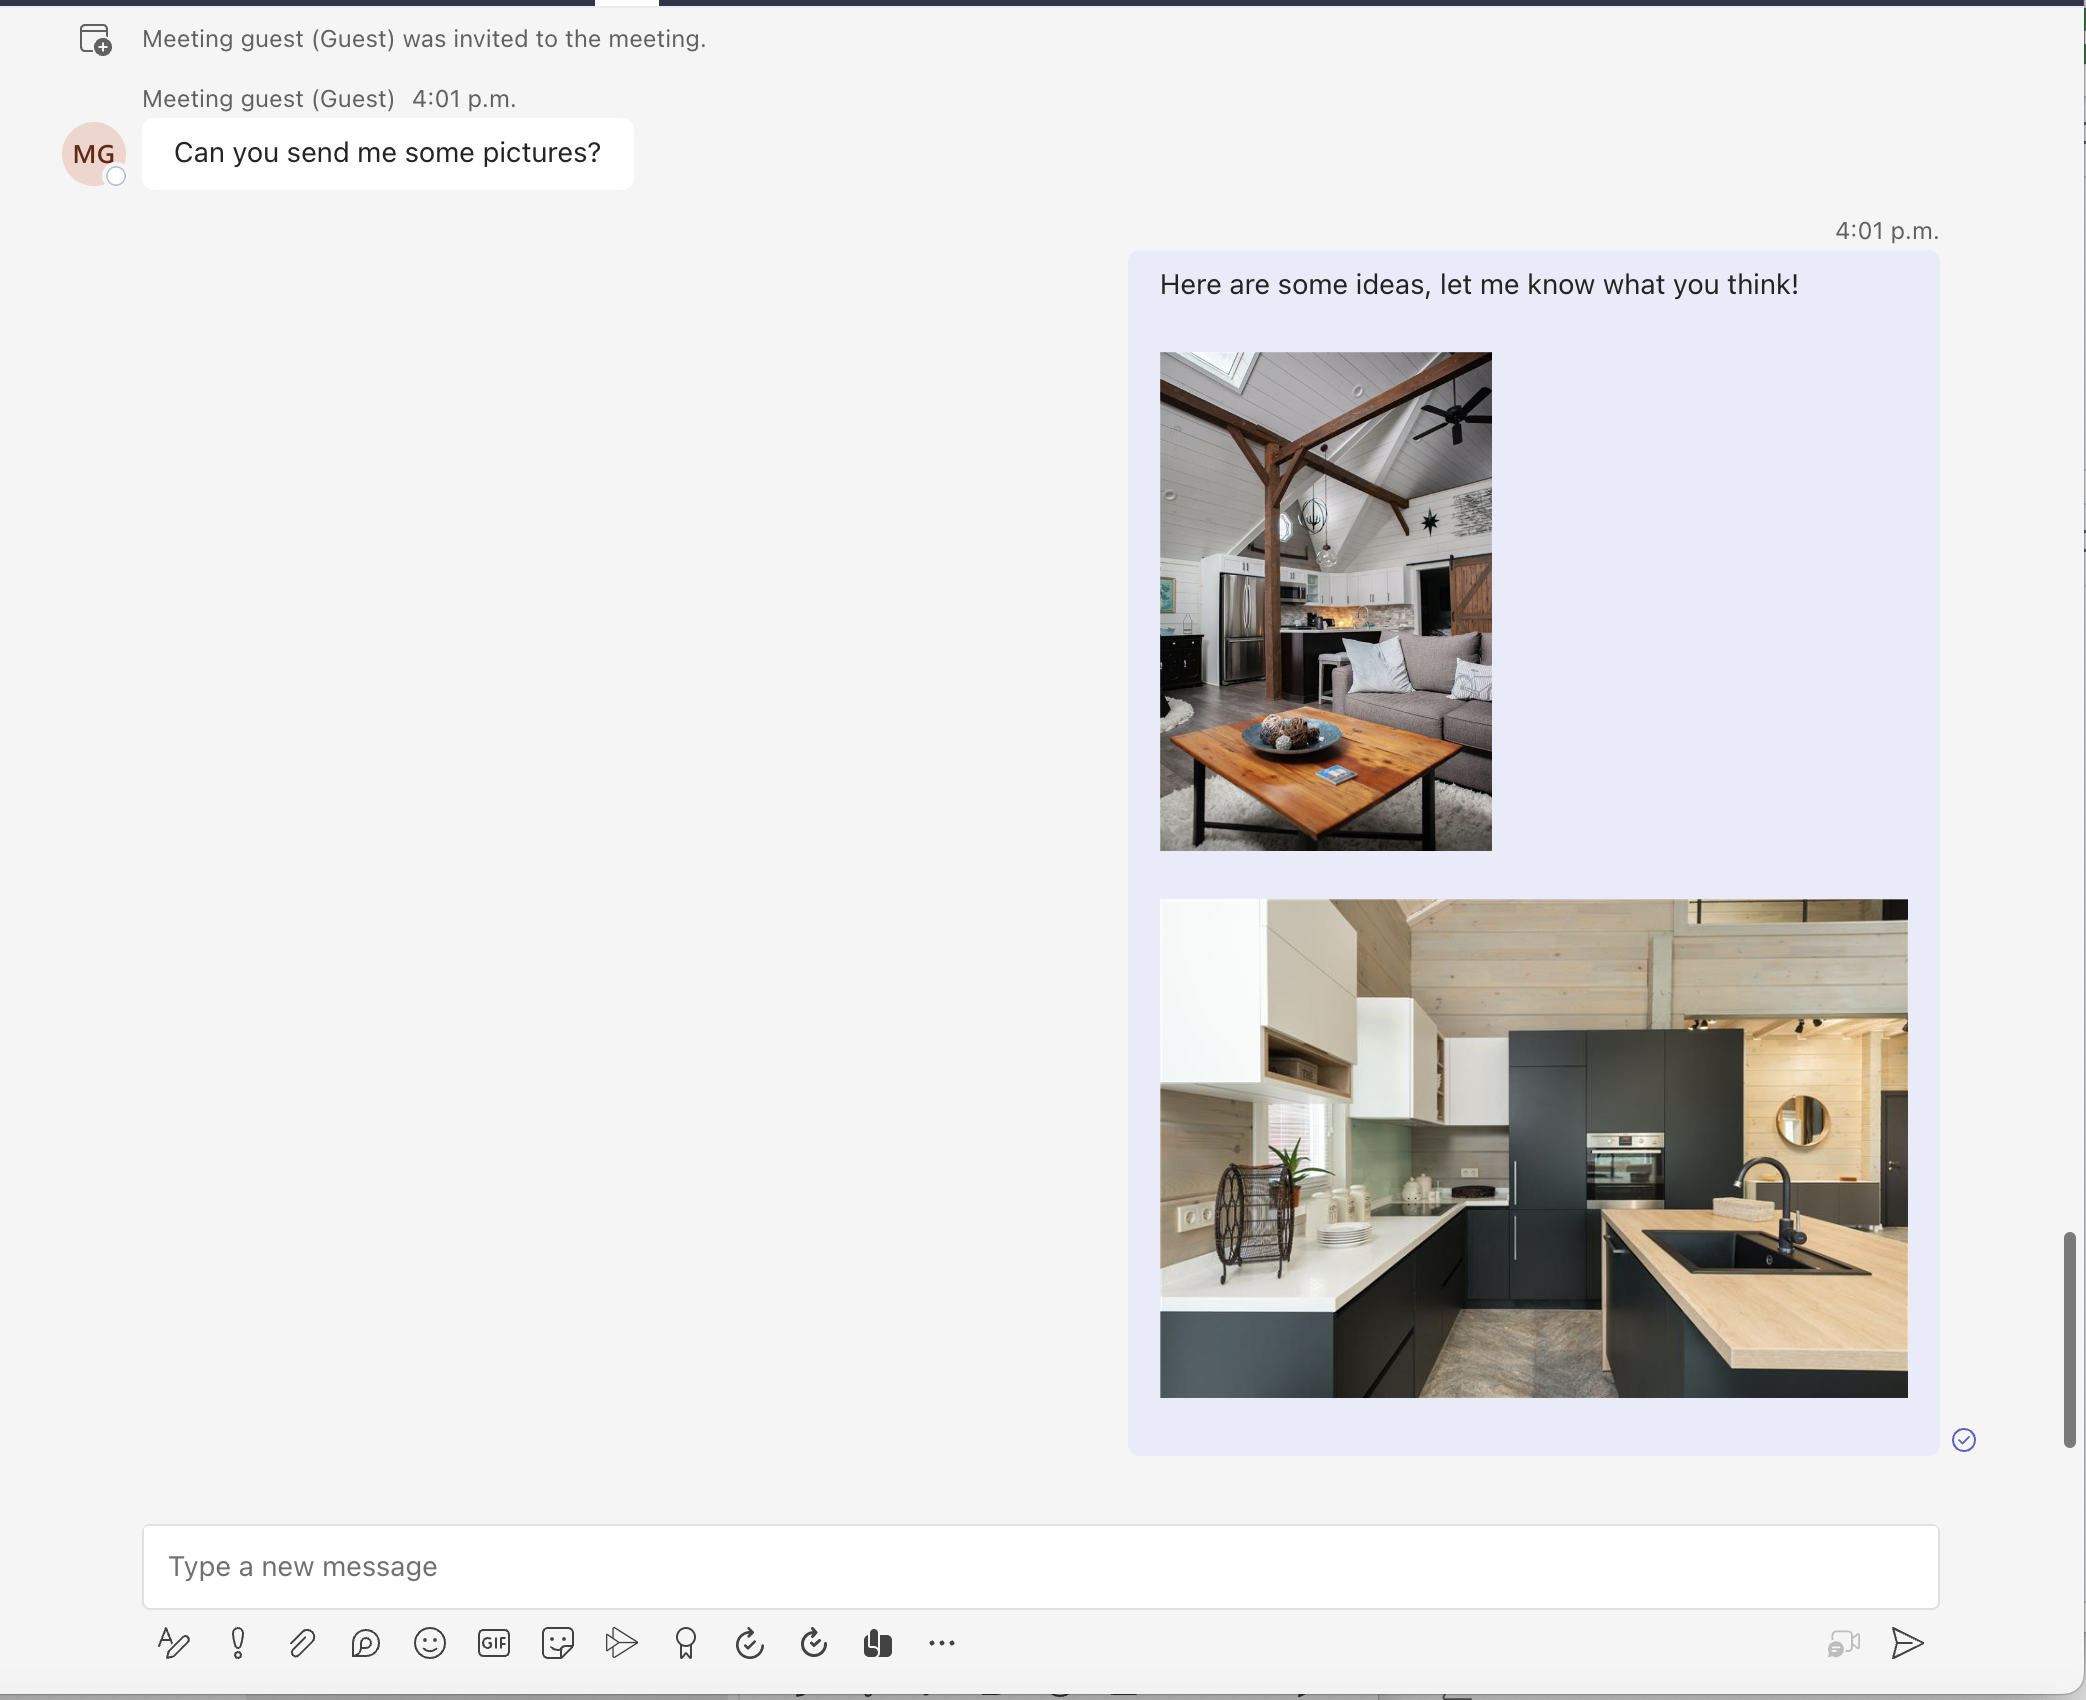
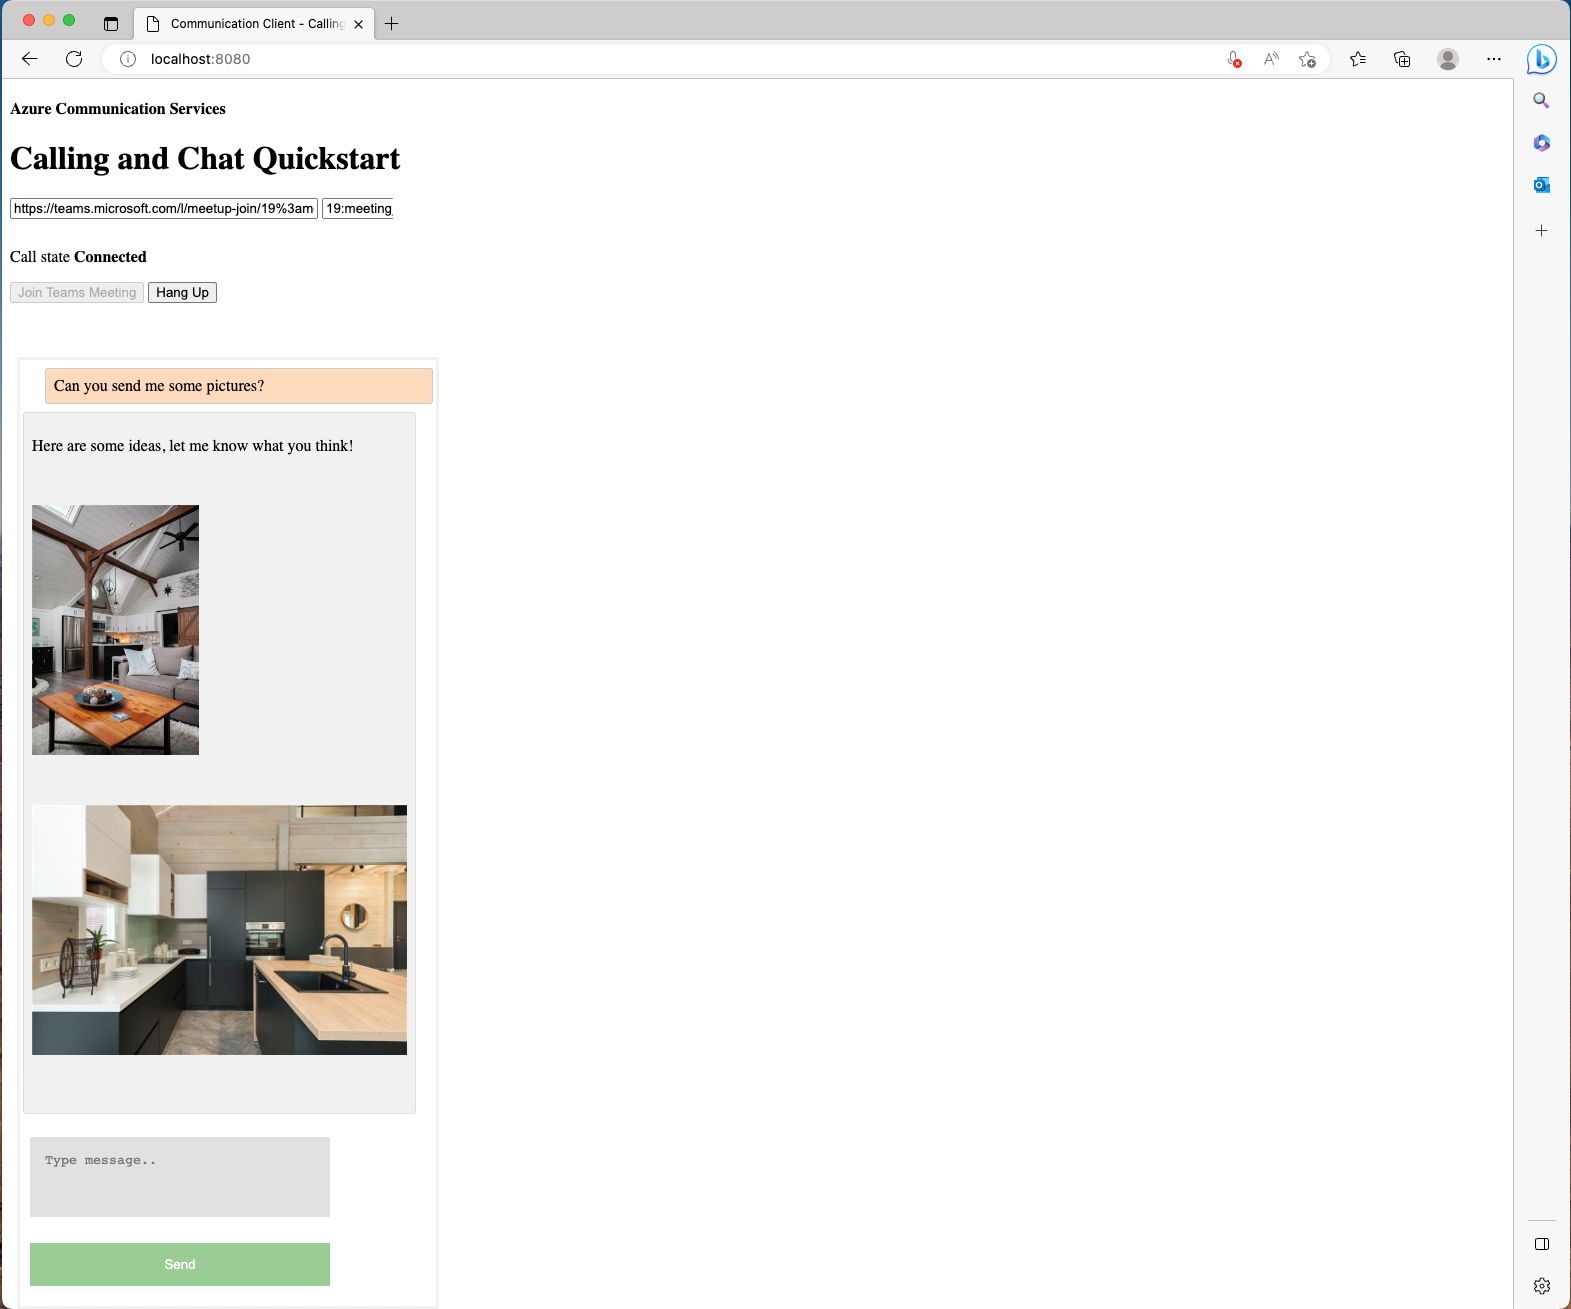
然后,您应该会看到新消息与预览图像一起呈现。
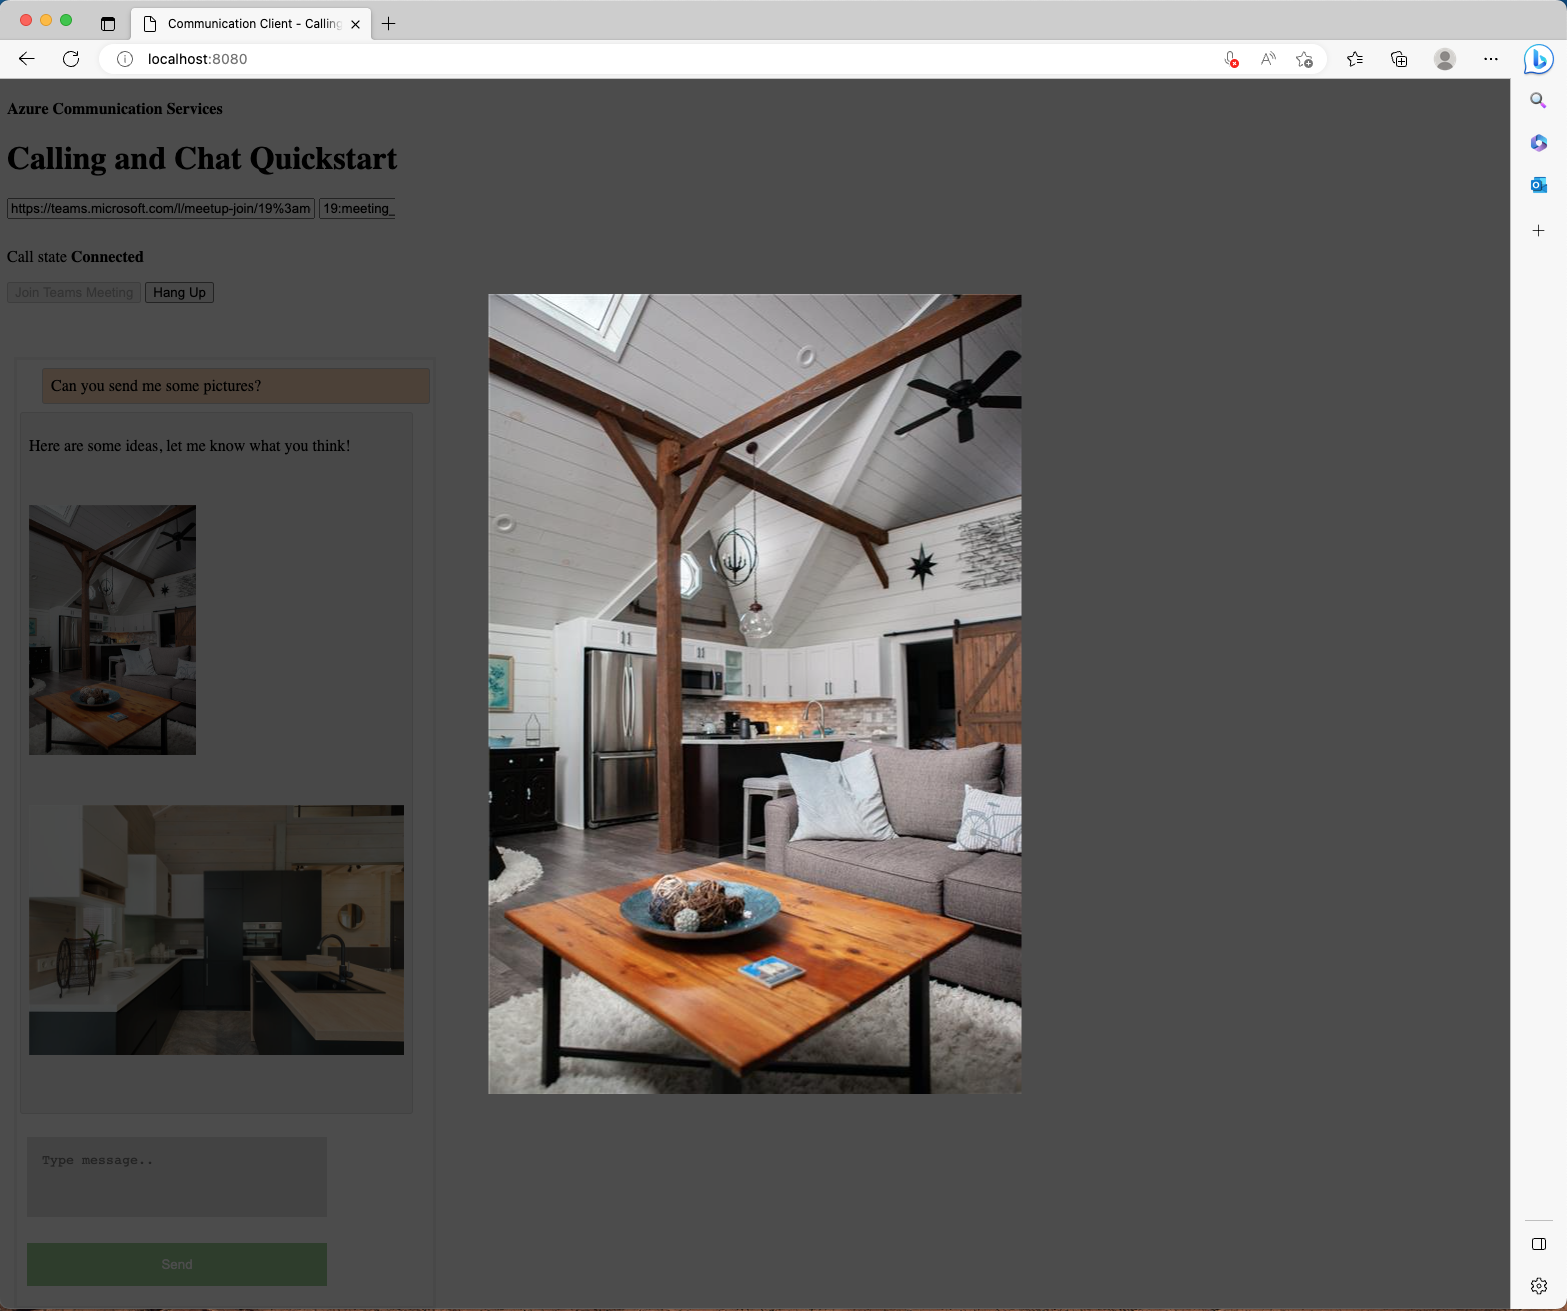
Azure 通信服务用户选择预览图像后,将显示一个覆盖层,其中包含 Teams 用户发送的全尺寸图像。
处理在新消息请求中发送内嵌图像
重要
Azure 通信服务的这一功能目前以预览版提供。 预览版中的功能已公开发布,可供所有新客户和现有Microsoft客户使用。
预览版 API 和 SDK 在没有服务级别协议的情况下提供。 建议不要将它们用于生产工作负荷。 某些功能可能不受支持,或者功能可能受到限制。
有关详细信息,请参阅 Microsoft Azure 预览版补充使用条款。
除了处理带有内嵌图像的消息外,适用于 JavaScript 的聊天 SDK 还提供了一种解决方案,允许通信用户在互作性聊天中向 Microsoft Teams 用户发送内嵌图像。
从以下位置 ChatThreadClient查看新的 API:
var imageAttachment = await chatThreadClient.uploadImage(blob, file.name, {
  "onUploadProgress": reportProgressCallback
});
该 API 采用图像 blob、文件名字符串和报告上传进度的函数回调。
要将图像发送给其他聊天参与者,您需要:
- 通过
uploadImageAPIChatThreadClient从 上传图像,然后保存返回的对象。 - 撰写消息内容,并将附件设置为您在上一步中保存的返回对象。
- 通过
sendMessageAPIChatThreadClient从 发送新消息。
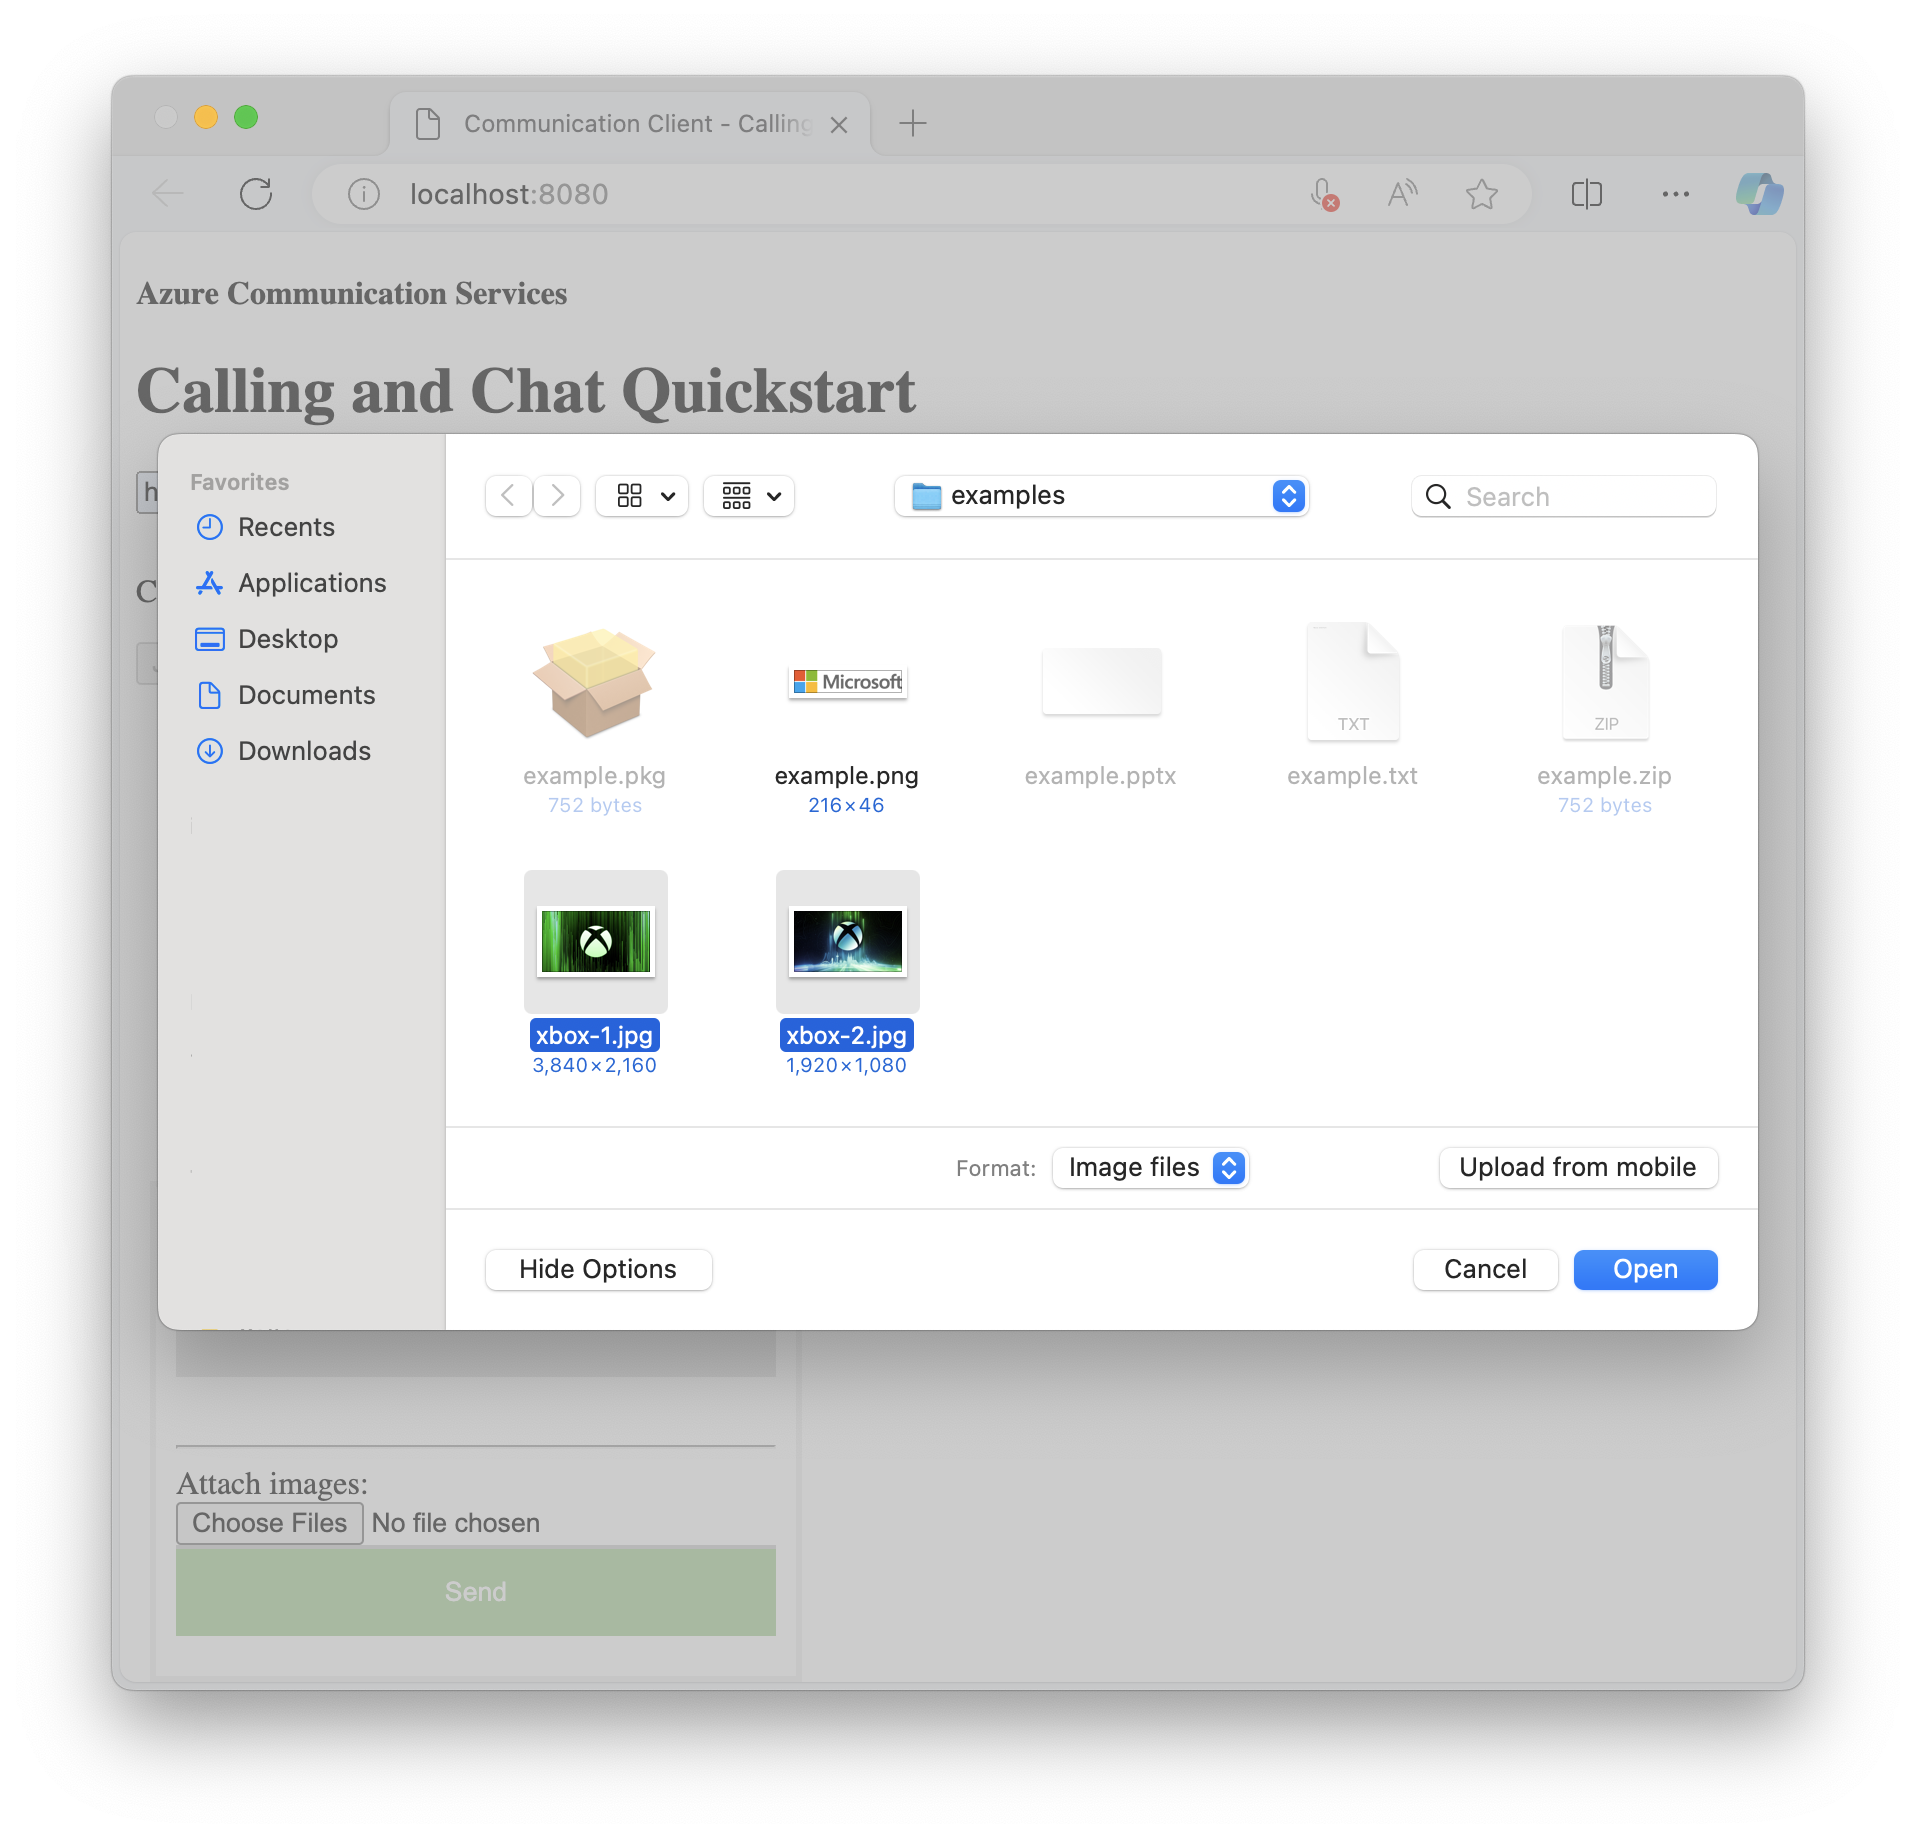
创建接受图像的新文件选取器:
<label for="myfile">Attach images:</label>
<input id="upload" type="file" id="myfile" name="myfile" accept="image/*" multiple>
<input style="display: none;" id="upload-result"></input>
现在设置一个事件监听器,用于状态更改时:
document.getElementById("upload").addEventListener("change", uploadImages);
您需要创建一个新函数,用于 state 更改时:
var uploadedImageModels = [];

async function uploadImages(e) {
  const files = e.target.files;
  if (files.length === 0) {
    return;
  }
  for (let key in files) {
    if (files.hasOwnProperty(key)) {
        await uploadImage(files[key]);
    }
}
}

async function uploadImage(file) {
  const buffer = await file.arrayBuffer();
  const blob = new Blob([new Uint8Array(buffer)], {type: file.type });
  const url = window.URL.createObjectURL(blob);
  document.getElementById("upload-result").innerHTML += `<img src="${url}" height="auto" width="100" />`;
  let uploadedImageModel = await chatThreadClient.uploadImage(blob, file.name, {
    imageBytesLength: file.size
  });
  uploadedImageModels.push(uploadedImageModel);
}
在此示例中,您创建了一个 FileReader to 将每个图像读取为 base64-encoded 图像,然后在调用 ChatSDK API 上传它们之前创建一个 Blob 。 您创建了一个全局 uploadedImageModels 变量,用于保存从 Chat SDK 上传的图片的数据模型。
最后,您需要修改 sendMessageButton 之前创建的事件侦听器,以附加您上传的图像。
sendMessageButton.addEventListener("click", async () => {
  let message = messagebox.value;
  let attachments = uploadedImageModels;

    // Inject image tags for images we have selected
  // so they can be treated as inline images
  // Alternatively, we can use some third-party libraries
  // to have a rich text editor with inline image support
  message += attachments.map((attachment) => `<img id="${attachment.id}" />`).join("");

  let sendMessageRequest = {
    content: message,
    attachments: attachments,
  };

  let sendMessageOptions = {
    senderDisplayName: "Jack",
    type: "html"
  };

  let sendChatMessageResult = await chatThreadClient.sendMessage(
    sendMessageRequest,
    sendMessageOptions
  );
  let messageId = sendChatMessageResult.id;
  uploadedImageModels = [];

  messagebox.value = "";
  document.getElementById("upload").value = "";
  console.log(`Message sent!, message id:${messageId}`);
});
就是这样。 现在运行代码以查看它的实际效果。
运行代码
Webpack 用户可以使用它来 webpack-dev-server 构建和运行您的应用程序。 运行以下命令,在本地 Web 服务器上捆绑应用程序主机:
npx webpack-dev-server --entry ./client.js --output bundle.js --debug --devtool inline-source-map
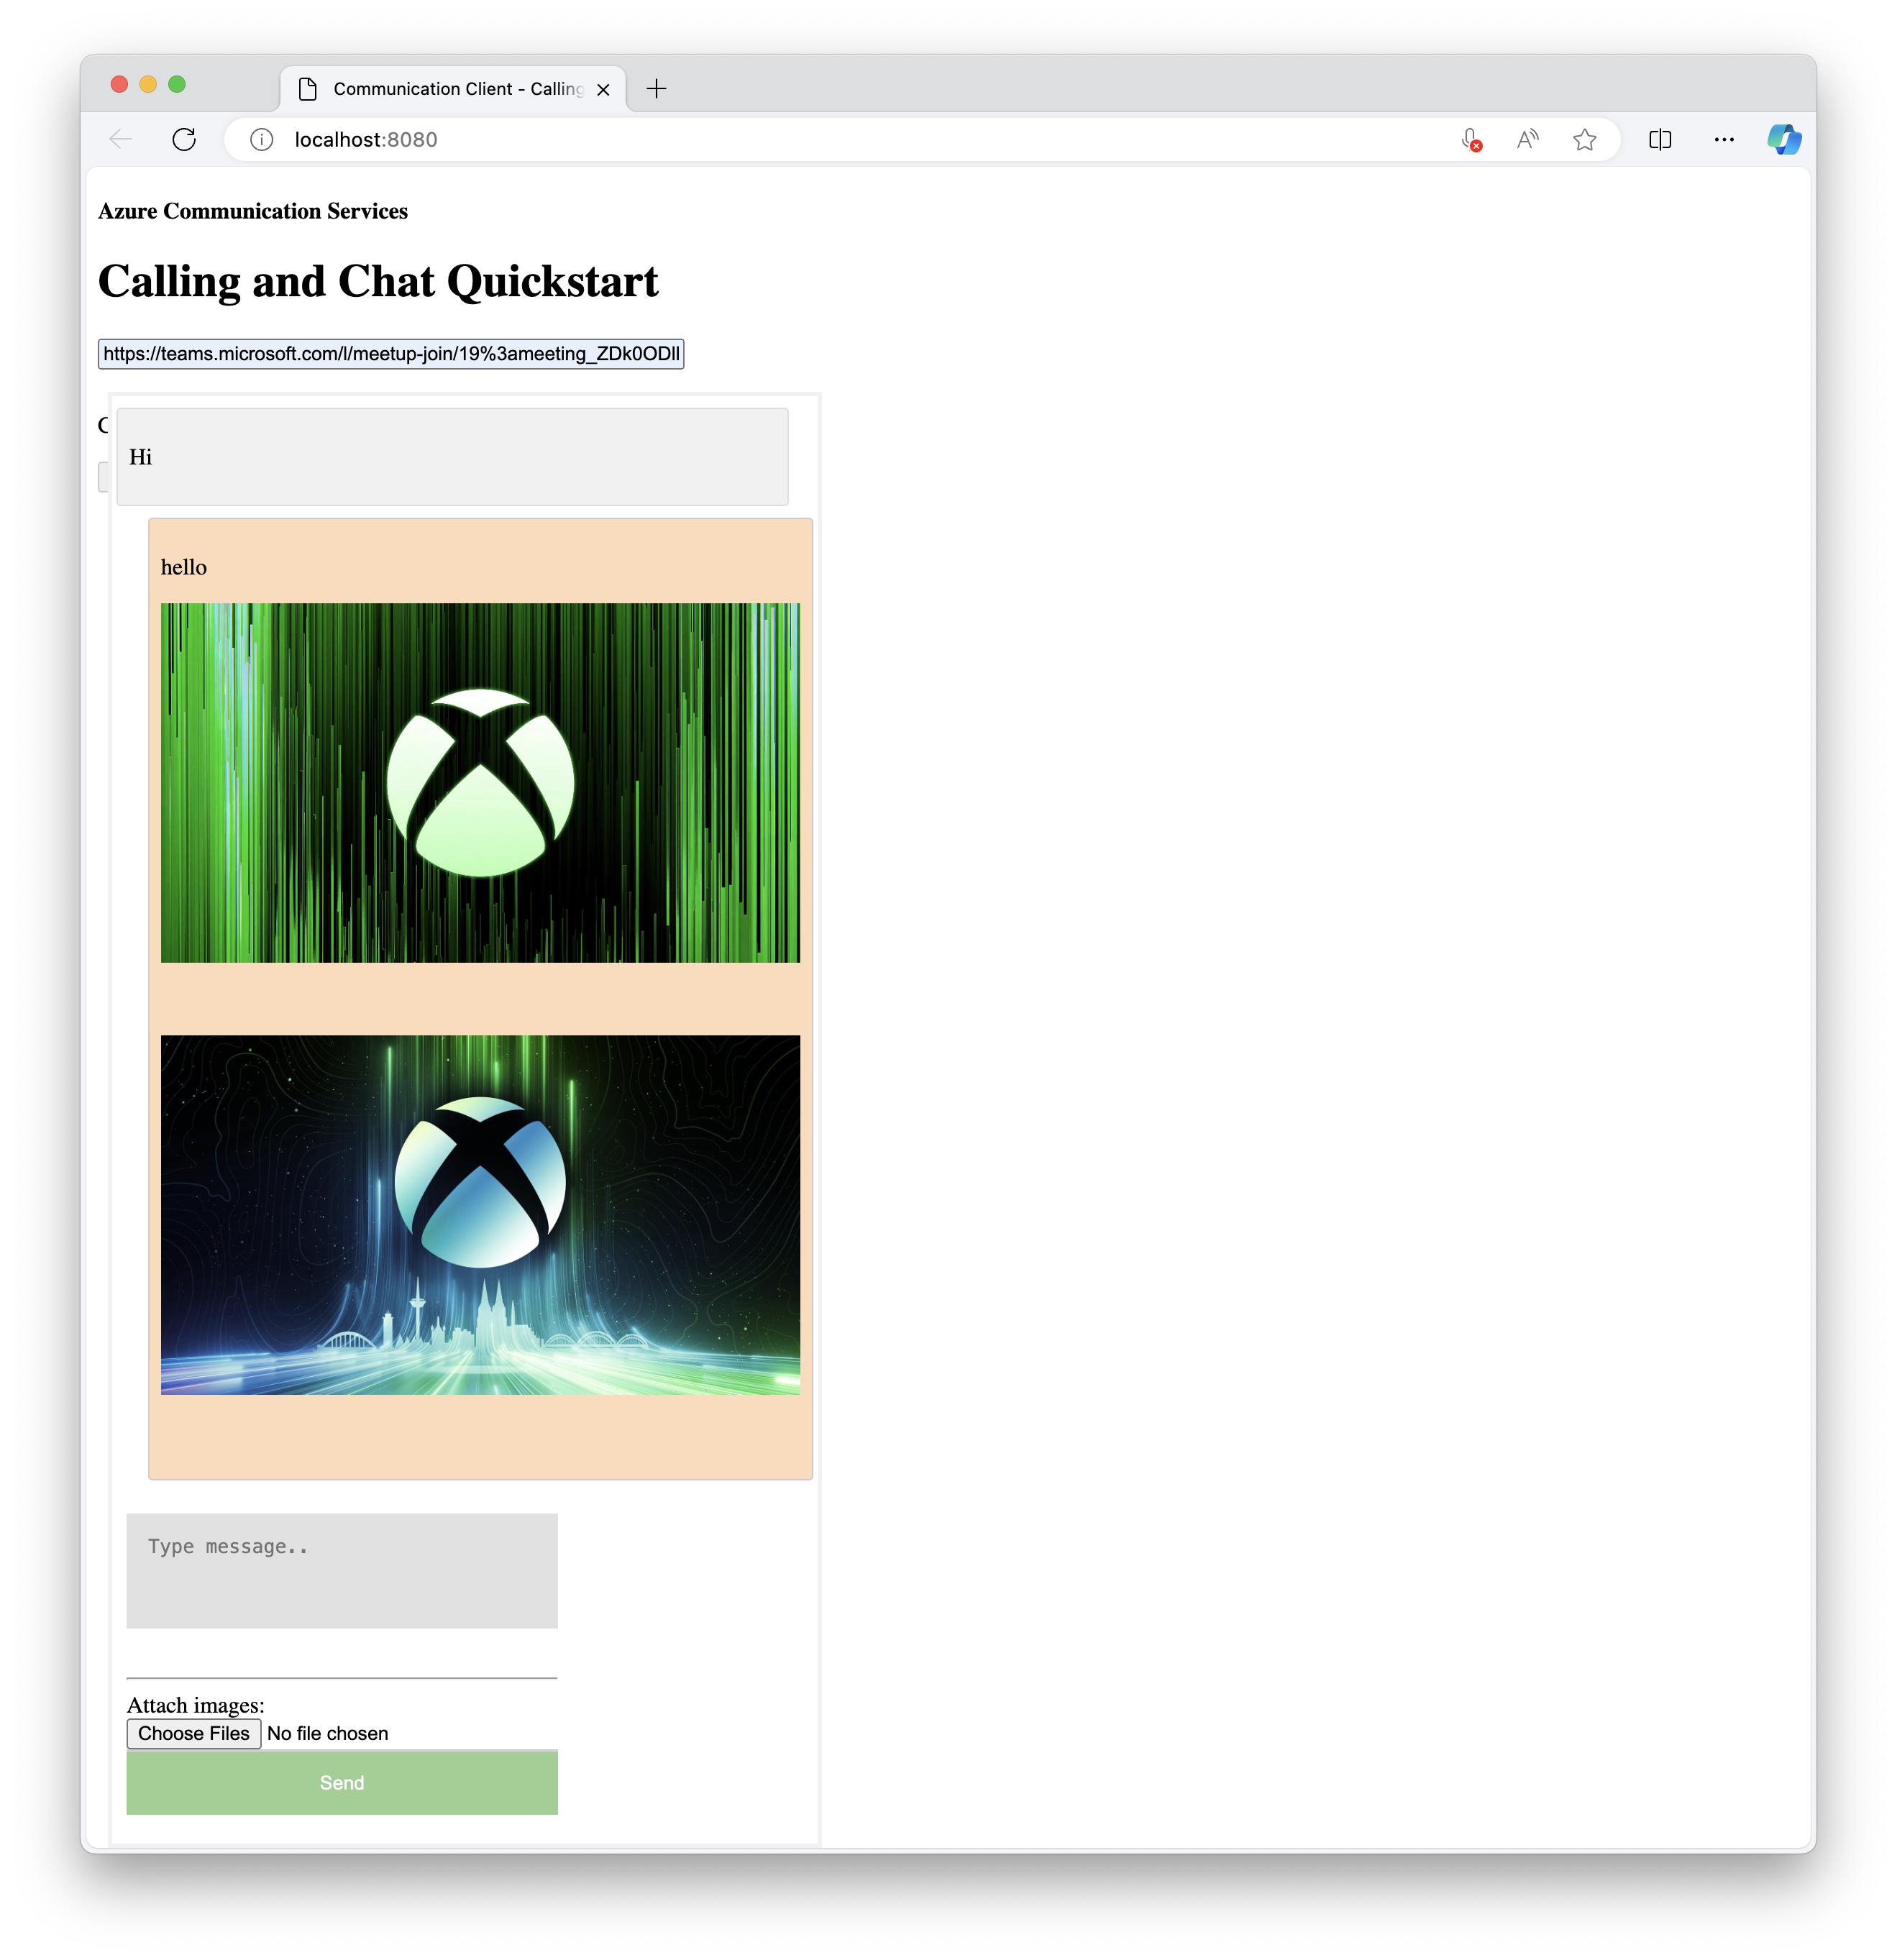
演示
打开浏览器并转到 http://localhost:8080/。 发送框中有一个用于附加图像的新部分。
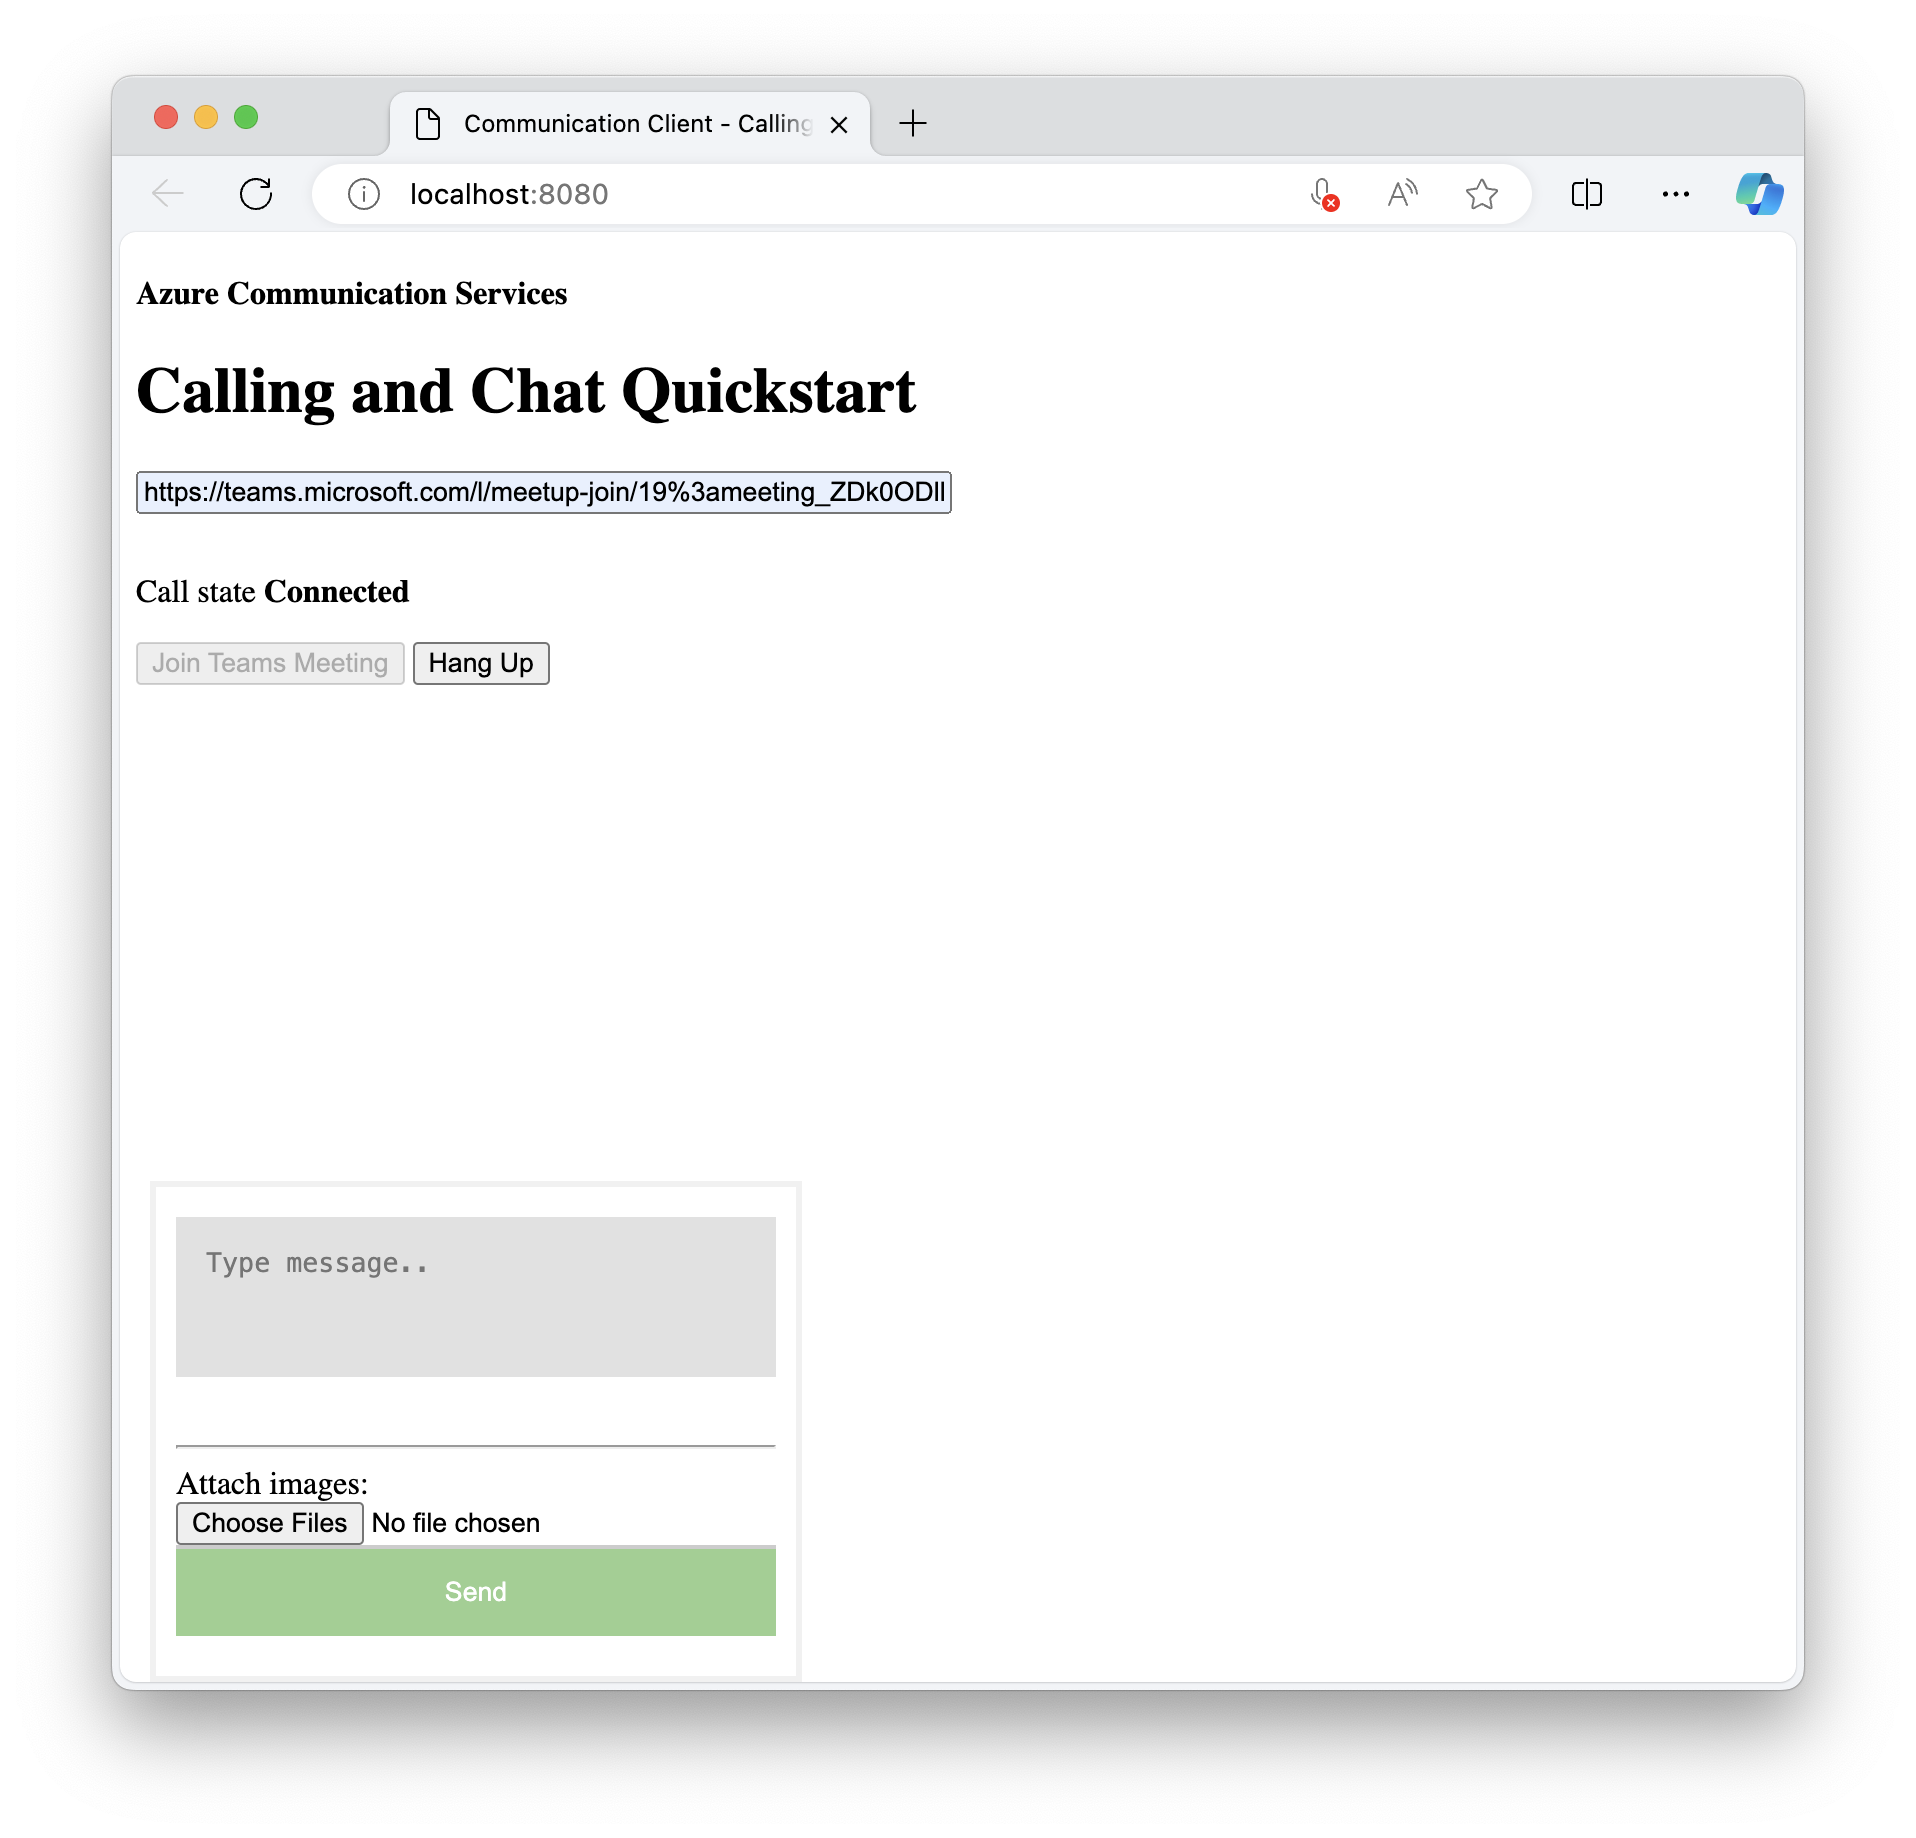
接下来,您可以选择要附加的图像。

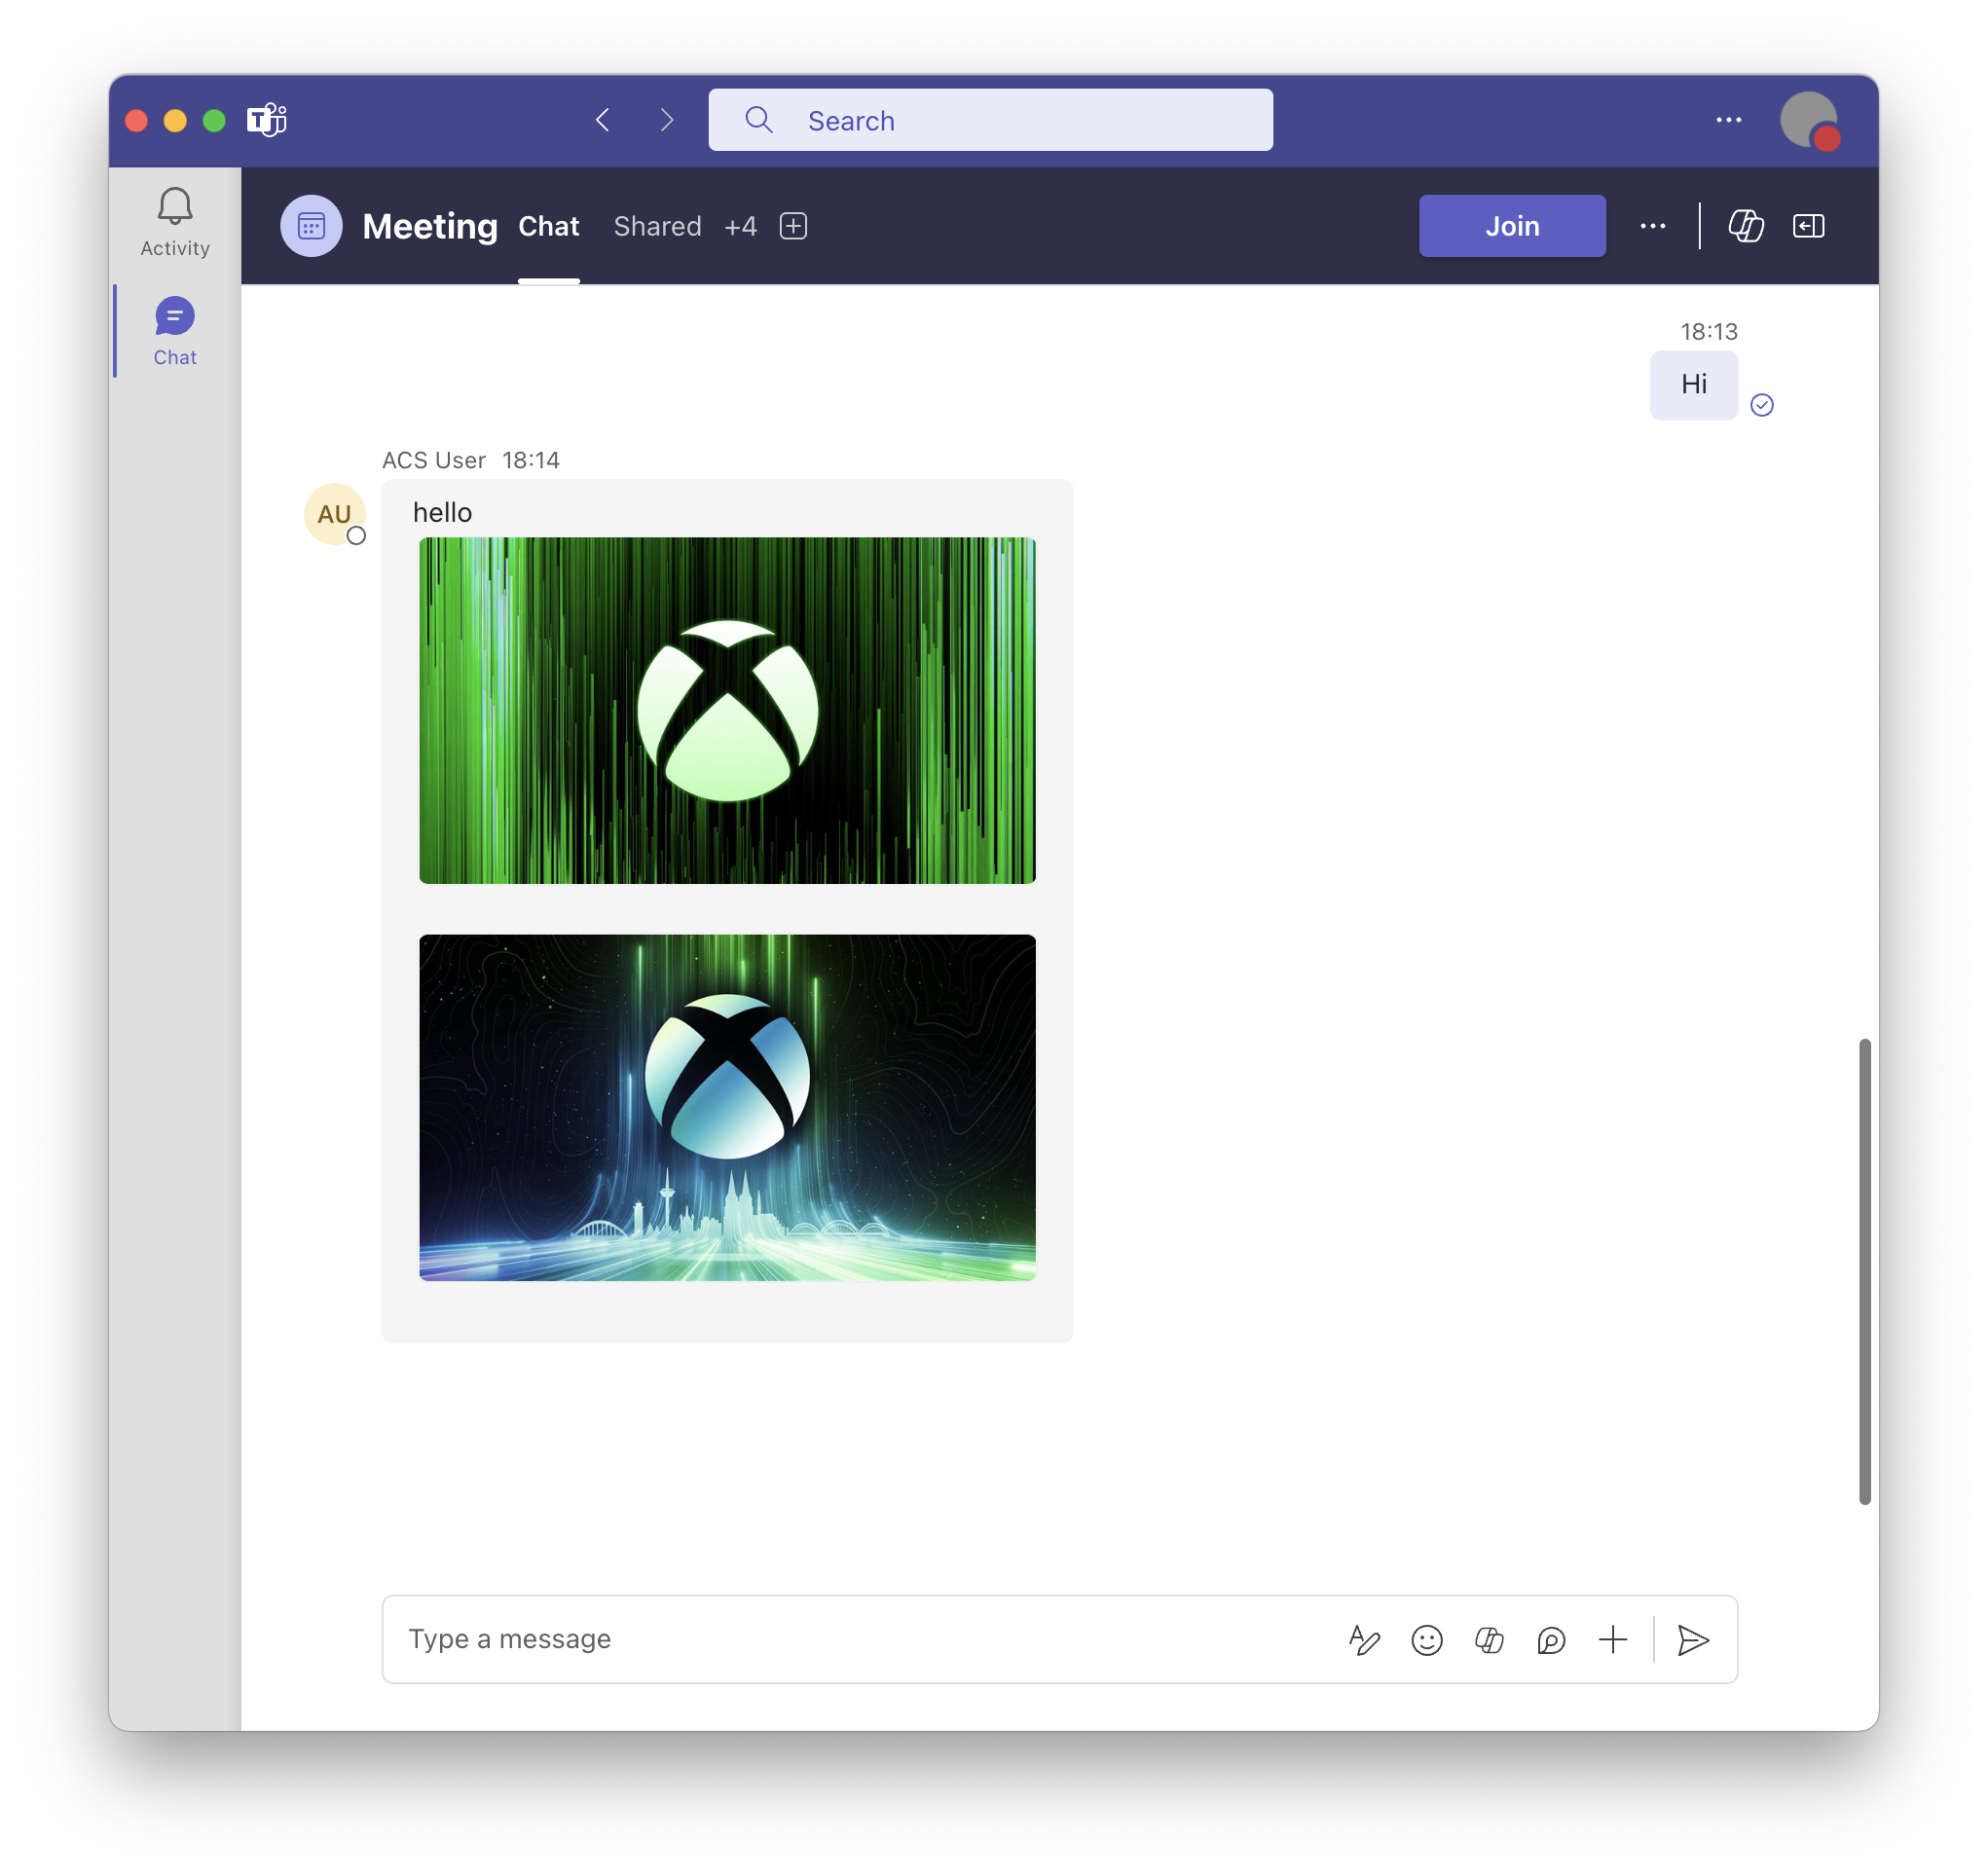
Teams 用户现在应该会收到您刚刚在选择 Send (发送) 时发送的图像。
本教程介绍如何使用适用于 C# 的 Azure 通信服务聊天 SDK 启用内联图像支持。
本教程中,您将学习如何:
- 处理新邮件的内嵌图像。
先决条件
- 查看快速入门 将聊天应用加入 Teams 会议。
- 创建 Azure 通信服务资源。 有关详细信息,请参阅创建 Azure 通信服务资源。 需要为此教程记录连接字符串。
- 使用企业帐户设置 Teams 会议,并准备好会议 URL。
- 使用适用于 C# 的聊天 SDK (Azure.Communication.Chat) 1.3.0 或最新版本。 有关详细信息,请参阅 适用于 .NET 的 Azure 通信聊天客户端库。
目标
- 获取
previewUri内联图像附件的属性。
处理新邮件的内嵌图像
在本 快速入门中,您将轮询消息并将新消息 messageList 附加到属性。 稍后将基于此功能进行构建,以包括内联图像的解析和提取。
  CommunicationUserIdentifier currentUser = new(user_Id_);
  AsyncPageable<ChatMessage> allMessages = chatThreadClient.GetMessagesAsync();
  SortedDictionary<long, string> messageList = [];
  int textMessages = 0;
  await foreach (ChatMessage message in allMessages)
  {
      if (message.Type == ChatMessageType.Html || message.Type == ChatMessageType.Text)
      {
          textMessages++;
          var userPrefix = message.Sender.Equals(currentUser) ? "[you]:" : "";
          var strippedMessage = StripHtml(message.Content.Message);
          messageList.Add(long.Parse(message.SequenceId), $"{userPrefix}{strippedMessage}");
      }
  }
从 type ChatMessageReceivedEvent的传入事件中,名为 attachments 的属性包含有关内联图像的信息。 这就是在 UI 中渲染内嵌图像所需的全部内容。
public class ChatAttachment
{
    public ChatAttachment(string id, ChatAttachmentType attachmentType)
    public ChatAttachmentType AttachmentType { get }
    public string Id { get }
    public string Name { get }
    public System.Uri PreviewUrl { get }
    public System.Uri Url { get }
}

public struct ChatAttachmentType : System.IEquatable<AttachmentType>
{
    public ChatAttachmentType(string value)
    public static File { get }
    public static Image { get }
}
以下 JSON 是图像附件的示例 ChatAttachment :
"attachments": [
    {
        "id": "9d89acb2-c4e4-4cab-b94a-7c12a61afe30",
        "attachmentType": "image",
        "name": "Screenshot.png",
        "url": "https://contoso.communication.azure.com/chat/threads/19:9d89acb29d89acb2@thread.v2/images/9d89acb2-c4e4-4cab-b94a-7c12a61afe30/views/original?api-version=2023-11-03",
        "previewUrl": "https://contoso.communication.azure.com/chat/threads/19:9d89acb29d89acb2@thread.v2/images/9d89acb2-c4e4-4cab-b94a-7c12a61afe30/views/small?api-version=2023-11-03"
      }
]
现在返回并替换代码以添加额外的逻辑来解析和获取图像附件:
  CommunicationUserIdentifier currentUser = new(user_Id_);
  AsyncPageable<ChatMessage> allMessages = chatThreadClient.GetMessagesAsync();
  SortedDictionary<long, string> messageList = [];
  int textMessages = 0;
  await foreach (ChatMessage message in allMessages)
  {
      // Get message attachments that are of type 'image'
      IEnumerable<ChatAttachment> imageAttachments = message.Content.Attachments.Where(x => x.AttachmentType == ChatAttachmentType.Image);

      // Fetch image and render
      var chatAttachmentImageUris = new List<Uri>();
      foreach (ChatAttachment imageAttachment in imageAttachments)
      {
          client.DefaultRequestHeaders.Authorization = new System.Net.Http.Headers.AuthenticationHeaderValue("Bearer", communicationTokenCredential.GetToken().Token);
          var response = await client.GetAsync(imageAttachment.PreviewUri);
          var randomAccessStream = await response.Content.ReadAsStreamAsync();
          await Dispatcher.RunAsync(CoreDispatcherPriority.Normal, async () =>
          {
              var bitmapImage = new BitmapImage();
              await bitmapImage.SetSourceAsync(randomAccessStream.AsRandomAccessStream());
              InlineImage.Source = bitmapImage;
          });

          chatAttachmentImageUris.Add(imageAttachment.PreviewUri);
      }

      // Build message list
      if (message.Type == ChatMessageType.Html || message.Type == ChatMessageType.Text)
      {
          textMessages++;
          var userPrefix = message.Sender.Equals(currentUser) ? "[you]:" : "";
          var strippedMessage = StripHtml(message.Content.Message);
          var chatAttachments = chatAttachmentImageUris.Count > 0 ? "[Attachments]:\n" + string.Join(",\n", chatAttachmentImageUris) : "";
          messageList.Add(long.Parse(message.SequenceId), $"{userPrefix}{strippedMessage}\n{chatAttachments}");
      }
在此示例中,您将从 type 为 Image 的邮件中获取所有附件,然后获取每个图像。 您必须在请求标头的部分中使用 your TokenBearer 进行授权。 下载图像后,您可以将其 InlineImage 分配给视图的元素。
您还可以在文本消息列表中包括要与消息一起显示的附件 URI 列表。
演示
- 从集成开发环境 (IDE) 运行应用程序。
- 输入 Teams 会议链接。
- 加入会议。
- 允许 Teams 端的用户。
- 从 Teams 端发送包含图像的消息。
消息中包含的 URL 将显示在消息列表中。 最后接收的图像呈现在窗口底部。
后续步骤
- 详细了解其他受支持的互操作性功能。
- 查看我们的出色聊天示例。
- 详细了解聊天的工作原理。