你当前正在访问 Microsoft Azure Global Edition 技术文档网站。 如果需要访问由世纪互联运营的 Microsoft Azure 中国技术文档网站,请访问 https://docs.azure.cn。
适用于: Azure Stack Edge Pro - GPUAzure Stack Edge Pro 2Azure Stack Edge Pro RAzure Stack Edge Mini R
本文介绍如何使用 Azure PowerShell 在 Azure Stack Edge 设备上创建和管理虚拟机 (VM)。
VM 部署工作流
下面是 VM 部署的概要部署工作流:
- 连接到设备的本地 Azure 资源管理器。
- 识别设备上的内置订阅。
- 提供 VM 映像。
- 在内置订阅中创建资源组。 资源组包含 VM 和所有相关资源。
- 在设备上创建本地存储帐户,以存储用于创建 VM 映像的 VHD。
- 将 Windows/Linux 源映像上传到存储帐户,用于创建托管磁盘。
- 使用托管磁盘创建 VM 映像。
- 启用设备端口的计算功能,以创建虚拟交换机。
- 这将使用连接到已启用计算功能的端口的虚拟交换机来创建虚拟网络。
- 使用之前创建的 VM 映像、虚拟网络和虚拟网络接口创建 VM,以在虚拟网络中进行通信,并分配用于远程访问 VM 的公共 IP 地址。 可以选择包含数据磁盘,以便为 VM 提供更多存储空间。
先决条件
在 Azure Stack Edge 设备上部署 VM 之前,必须先将客户端配置为使用 Azure PowerShell 通过 Azure 资源管理器连接到设备。 有关详细说明,请参阅连接到 Azure Stack Edge 设备上的 Azure 资源管理器。
确保可使用以下步骤从客户端访问设备。 能连接到 Azure 资源管理器即表示已完成此配置,现在是验证配置是否成功。
运行以下命令,验证 Azure 资源管理器通信是否正常运行:
若要调用本地设备 API 进行身份验证,请输入:
如果已为 Kubernetes 配置计算,则可以跳过此步骤。 否则,请执行以下操作,确保已为网络接口启用计算:
a. 在本地用户界面上,转到“计算”设置。
b. 选择要用于创建虚拟交换机的网络接口。 创建的 VM 将附加到与此端口及关联网络连接的虚拟交换机。 请确保选择与要用于此 VM 的 IP 地址相匹配的网络。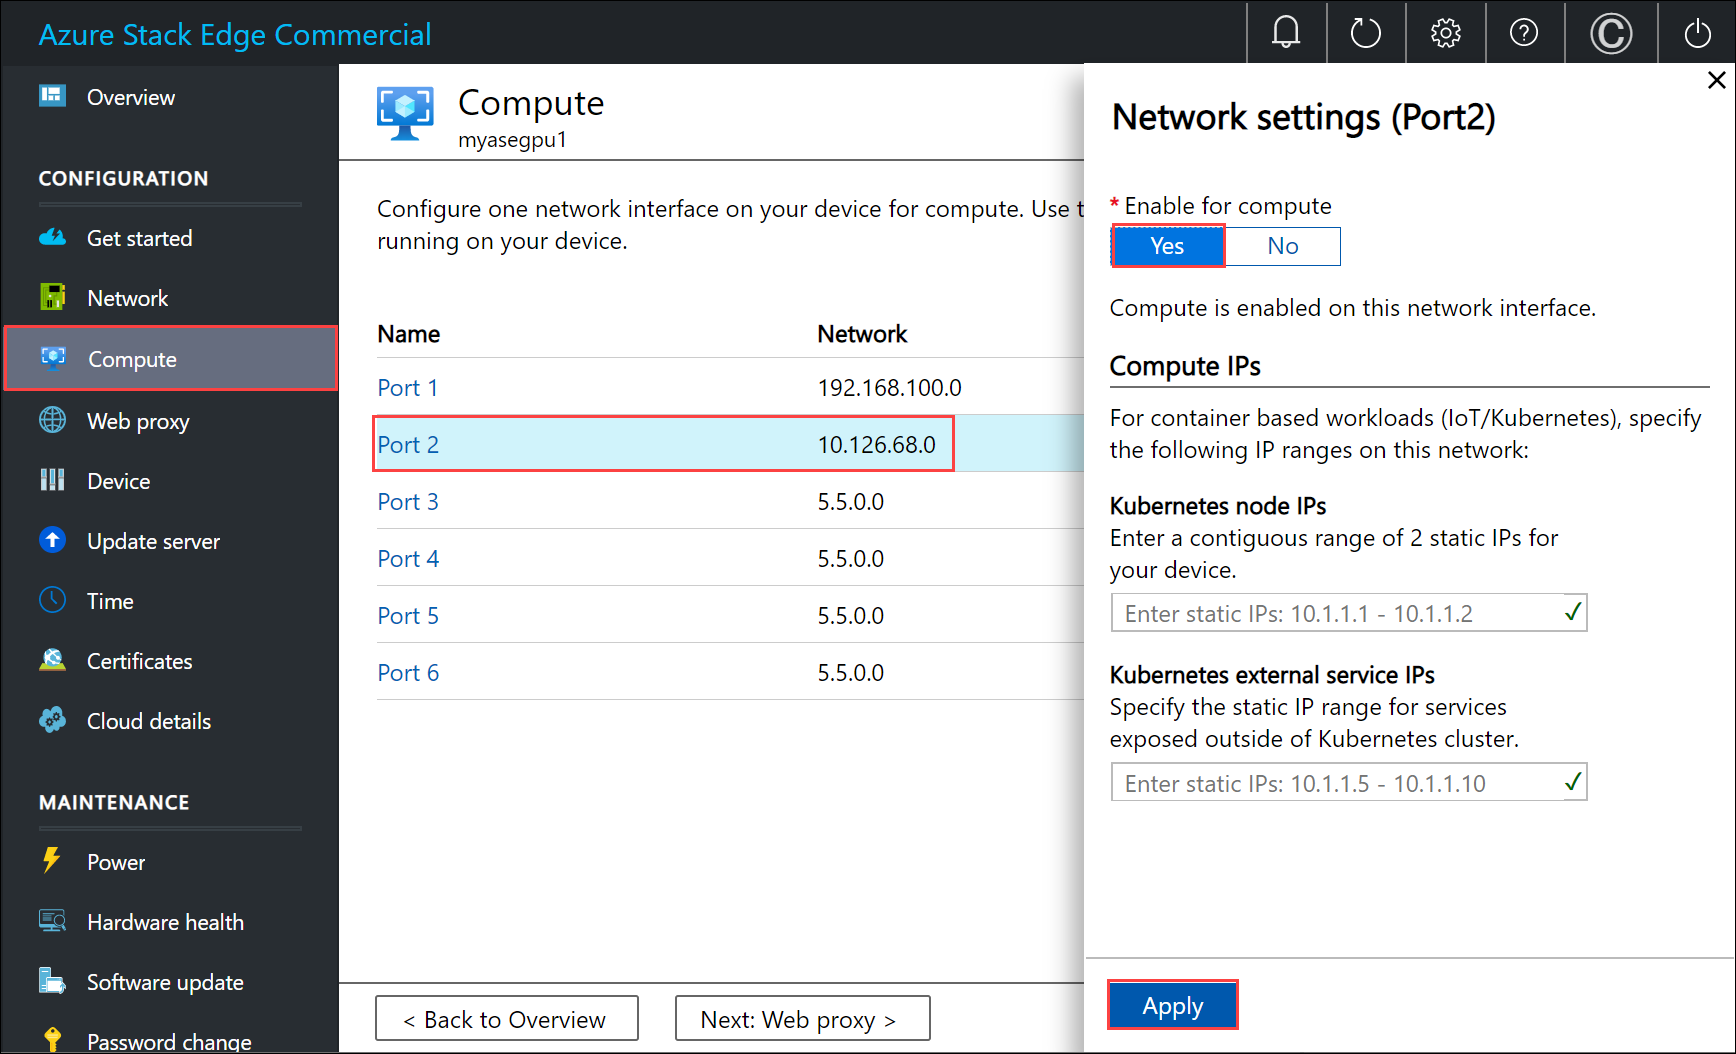
c. 在网络接口上的“启用计算”下,选择“是”。 Azure Stack Edge 将创建一个与该网络接口相对应的虚拟交换机,并对其进行管理。 请勿在此时输入 Kubernetes 的特定 IP。 启用计算可能需要花费几分钟时间。
注意
如果是创建 GPU VM,请选择已连接到 Internet 的网络接口。 这样将能在设备上安装 GPU 扩展。
查询设备上的内置订阅
对于 Azure 资源管理器,仅支持用户可见的单个固定订阅。 此订阅对于每个设备都是唯一的,且无法更改订阅名称和订阅 ID。
订阅包含创建 VM 所需的所有资源。
重要
从 Azure 门户启用 VM 时,将会创建订阅,该订阅位于设备的本地位置。
订阅用于部署 VM。
若要列出订阅,请运行以下命令:
Get-AzSubscription下面是一些示例输出:
PS C:\WINDOWS\system32> Get-AzSubscription

Name                          Id                                   TenantId
----                          --                                   --------
Default Provider Subscription ...                                  ...


PS C:\WINDOWS\system32>
获取在设备上运行的已注册资源提供程序的列表。 此列表通常包括计算、网络和存储。
Get-AzResourceProvider注意
资源提供程序是预先注册的,不能对其进行修改或更改。
下面是一些示例输出:
PS C:\WINDOWS\system32>  Get-AzResourceProvider

ProviderNamespace : Microsoft.AzureBridge
RegistrationState : Registered
ResourceTypes     : {locations, operations, locations/ingestionJobs}
Locations         : {DBELocal}

ProviderNamespace : Microsoft.Compute
RegistrationState : Registered
ResourceTypes     : {virtualMachines, virtualMachines/extensions, locations, operations...}
Locations         : {DBELocal}

ProviderNamespace : Microsoft.Network
RegistrationState : Registered
ResourceTypes     : {operations, locations, locations/operations, locations/usages...}
Locations         : {DBELocal}

ProviderNamespace : Microsoft.Resources
RegistrationState : Registered
ResourceTypes     : {tenants, locations, providers, checkresourcename...}
Locations         : {DBELocal}

ProviderNamespace : Microsoft.Storage
RegistrationState : Registered
ResourceTypes     : {storageaccounts, storageAccounts/blobServices, storageAccounts/tableServices,
                    storageAccounts/queueServices...}
Locations         : {DBELocal}

PS C:\WINDOWS\system32>
创建资源组
首先创建一个新的 Azure 资源组,并将其用作所有 VM 相关资源(例如存储帐户、磁盘、网络接口和托管磁盘)的逻辑容器。
重要
所有资源的创建位置与设备所在位置为同一位置,系统将该位置设置为“DBELocal”。
设置一些参数。
$ResourceGroupName = "<Resource group name>"为创建的用于 VM 的资源创建资源组。
New-AzResourceGroup -Name $ResourceGroupName -Location DBELocal下面是一些示例输出:
PS C:\WINDOWS\system32> New-AzResourceGroup -Name myaseazrg -Location DBELocal

ResourceGroupName : myaseazrg
Location          : dbelocal
ProvisioningState : Succeeded
Tags              :
ResourceId        : /subscriptions/.../resourceGroups/myaseazrg

PS C:\WINDOWS\system32>
创建本地存储帐户
使用现有资源组创建新的本地存储帐户。 使用此本地存储帐户在创建 VM 时上传虚拟磁盘映像。
在创建本地存储帐户之前,必须先将客户端配置为使用 Azure PowerShell 通过 Azure 资源管理器连接到设备。 有关详细说明,请参阅连接到 Azure Stack Edge 设备上的 Azure 资源管理器。
设置一些参数。
$StorageAccountName = "<Storage account name>"在设备上创建一个新本地存储帐户。
New-AzStorageAccount -Name $StorageAccountName -ResourceGroupName $ResourceGroupName -Location DBELocal -SkuName Standard_LRS注意
使用 Azure 资源管理器,只能创建本地存储帐户,例如本地冗余存储(标准或高级)。 若要创建分层存储帐户,请参阅教程:使用具有 GPU 的 Azure Stack Edge Pro 通过存储帐户传输数据。
下面是示例输出:
PS C:\WINDOWS\system32> New-AzStorageAccount -Name myaseazsa -ResourceGroupName myaseazrg -Location DBELocal -SkuName Standard_LRS

StorageAccountName ResourceGroupName PrimaryLocation SkuName      Kind    AccessTier CreationTime
------------------ ----------------- --------------- -------      ----    ---------- ------------
myaseazsa          myaseazrg         DBELocal        Standard_LRS Storage            6/10/2021 11:45...

PS C:\WINDOWS\system32>
要获取已创建的现有本地存储帐户的访问密钥,请提供关联的资源组名称和本地存储帐户名称。
Get-AzStorageAccountKey
下面是示例输出:
PS C:\WINDOWS\system32> Get-AzStorageAccountKey

cmdlet Get-AzStorageAccountKey at command pipeline position 1
Supply values for the following parameters:
(Type !? for Help.)
ResourceGroupName: myaseazrg
Name: myaseazsa

KeyName    Value                                                                                       Permissions
-------    -----                                                                                       ------
key1       gv3OF57tuPDyzBNc1M7fhil2UAiiwnhTT6zgiwE3TlF/CD217Cvw2YCPcrKF47joNKRvzp44leUe5HtVkGx8RQ==    Full
key2       kmEynIs3xnpmSxWbU41h5a7DZD7v4gGV3yXa2NbPbmhrPt10+QmE5PkOxxypeSqbqzd9si+ArNvbsqIRuLH2Lw==    Full

PS C:\WINDOWS\system32>
将 blob URI 添加到主机文件
在 Azure Stack Edge 设备上的 Azure 资源管理器的“修改主机文件以进行终结点名称解析”中,你已经向用于连接到 Azure Blob 存储的客户端的主机文件中添加了 Blob URI。 此条目用于添加 blob URI:
<Device IP address> <storage name>.blob.<appliance name>.<dnsdomain>
安装证书
如果使用的是 HTTPS,则需要在设备上安装相应证书。 此处,请安装 blob 终结点证书。 有关详细信息,请参阅将证书用于具有 GPU 的 Azure Stack Edge Pro 设备。
上传 VHD
将要使用的任何磁盘映像复制到之前创建的本地存储帐户中的页 blob 中。 可以使用 AzCopy 等工具将虚拟硬盘 (VHD) 上传到存储帐户。
将以下命令与 AzCopy 10 结合使用:
设置一些参数,包括适用于 AzCopy 的 API 的适当版本。 本示例使用了 AzCopy 10。
$Env:AZCOPY_DEFAULT_SERVICE_API_VERSION="2019-07-07"
$ContainerName = <Container name>
$ResourceGroupName = <Resource group name>
$StorageAccountName = <Storage account name>
$VHDPath = "Full VHD Path"
$VHDFile = <VHD file name>
将 VHD 从源(在本例中为“本地系统”)复制到你在前面步骤中在设备上创建的存储帐户。
$StorageAccountKey = (Get-AzStorageAccountKey -ResourceGroupName $ResourceGroupName -Name $StorageAccountName)[0].Value
$blobendpoint = (Get-AzEnvironment -Name Environment Name).StorageEndpointSuffix
$StorageAccountContext = New-AzStorageContext -StorageAccountName $StorageAccountName -StorageAccountKey $StorageAccountKey -Endpoint $blobendpoint
<Create the container if it does not exist>
$containerName = "con1"
$container = New-AzStorageContainer -Name $containerName -Context $StorageAccountContext -Permission Container
$StorageAccountSAS = New-AzStorageAccountSASToken -Service Blob -ResourceType Container,Service,Object -Permission "acdlrw" -Context $StorageAccountContext -Protocol HttpsOnly
$endPoint = (Get-AzStorageAccount -name $StorageAccountName -ResourceGroupName $ResourceGroupName).PrimaryEndpoints.Blob
<Path to azcopy.exe> cp "$VHDPath\$VHDFile" "$endPoint$ContainerName$StorageAccountSAS"
下面是示例输出:
PS C:\windows\system32> $ContainerName = "testcontainer1"
PS C:\windows\system32> $ResourceGroupName = "myaseazrg"
PS C:\windows\system32> $StorageAccountName = "myaseazsa"
PS C:\windows\system32> $VHDPath = "C:\Users\alkohli\Downloads\Ubuntu1604"
PS C:\windows\system32> $VHDFile = "ubuntu13.vhd"

PS C:\windows\system32> $StorageAccountKey = (Get-AzStorageAccountKey -ResourceGroupName $ResourceGroupName -Name $StorageAccountName)[0].Value
PS C:\windows\system32> $endPoint = (Get-AzStorageAccount -name $StorageAccountName -ResourceGroupName $ResourceGroupName).PrimaryEndpoints.Blob
PS C:\windows\system32> $StorageAccountContext = New-AzStorageContext -StorageAccountName $StorageAccountName -StorageAccountKey $StorageAccountKey -Endpoint $endpoint
PS C:\windows\system32> $StorageAccountSAS = New-AzStorageAccountSASToken -Service Blob -ResourceType Container,Service,Object -Permission "acdlrw" -Context $StorageAccountContext -Protocol HttpsOnly

PS C:\windows\system32> C:\azcopy\azcopy_windows_amd64_10.10.0\azcopy.exe cp "$VHDPath\$VHDFile" "$endPoint$ContainerName$StorageAccountSAS"
INFO: Scanning...
INFO: Any empty folders will not be processed, because source and/or destination doesn't have full folder support

Job 72a5e3dd-9210-3e43-6691-6bebd4875760 has started
Log file is located at: C:\Users\alkohli\.azcopy\72a5e3dd-9210-3e43-6691-6bebd4875760.log

INFO: azcopy.exe: A newer version 10.11.0 is available to download
从 VHD 创建托管磁盘
从上传的 VHD 创建托管磁盘。
设置一些参数。
$DiskName = "<Managed disk name>"
$HyperVGeneration = "<Generation of the image: V1 or V2>"
从上传的 VHD 创建托管磁盘。 若要获取 VHD 的源 URL,请转到存储资源管理器中包含 VHD 的存储帐户中的容器。 选择 VHD 并右键单击,然后选择“属性”。 在“Blob 属性”对话框中,选择“URI”。
$StorageAccountId = (Get-AzStorageAccount -ResourceGroupName $ResourceGroupName -Name $StorageAccountName).Id
$DiskConfig = New-AzDiskConfig -Location DBELocal -HyperVGeneration $HyperVGeneration -StorageAccountId $StorageAccountId -CreateOption Import -SourceUri "Source URL for your VHD"
New-AzDisk -ResourceGroupName $ResourceGroupName -DiskName $DiskName -Disk $DiskConfig
下面是示例输出:
PS C:\WINDOWS\system32> $DiskName = "myazmd"
PS C:\WINDOWS\system32  $HyperVGeneration = "V1"
PS C:\WINDOWS\system32> $StorageAccountId = (Get-AzStorageAccount -ResourceGroupName $ResourceGroupName -Name $StorageAccountName).Id
PS C:\WINDOWS\system32> $DiskConfig = New-AzDiskConfig -Location DBELocal -HyperVGeneration $HyperVGeneration -StorageAccountId $StorageAccountId -CreateOption Import -SourceUri "https://myaseazsa.blob.myasegpu.wdshcsso.com/testcontainer1/ubuntu13.vhd"
PS C:\WINDOWS\system32> New-AzDisk -ResourceGroupName $ResourceGroupName -DiskName $DiskName -Disk $DiskConfig

ResourceGroupName            : myaseazrg
ManagedBy                    :
Sku                          : Microsoft.Azure.Management.Compute.Models.DiskSku
Zones                        :
TimeCreated                  : 6/24/2021 12:19:56 PM
OsType                       :
HyperVGeneration             : V1
CreationData                 : Microsoft.Azure.Management.Compute.Models.CreationDat
                               a
DiskSizeGB                   : 30
DiskSizeBytes                : 32212254720
UniqueId                     : 53743801-cbf2-4d2f-acb4-971d037a9395
EncryptionSettingsCollection :
ProvisioningState            : Succeeded
DiskIOPSReadWrite            : 500
DiskMBpsReadWrite            : 60
DiskState                    : Unattached
Encryption                   : Microsoft.Azure.Management.Compute.Models.Encryption
Id                           : /subscriptions/.../r
                               esourceGroups/myaseazrg/providers/Microsoft.Compute/d
                               isks/myazmd
Name                         : myazmd
Type                         : Microsoft.Compute/disks
Location                     : DBELocal
Tags                         : {}

PS C:\WINDOWS\system32>
基于托管磁盘创建 VM 映像
现在,你将基于托管磁盘创建 VM 映像。
设置一些参数。
$DiskSize = "<Size greater than or equal to size of source managed disk>"
$OsType = "<linux or windows>"
$ImageName = "<Image name>"
创建 VM 映像。 支持的操作系统类型为 Linux 和 Windows。
$imageConfig = New-AzImageConfig -Location DBELocal -HyperVGeneration $hyperVGeneration
$ManagedDiskId = (Get-AzDisk -Name $DiskName -ResourceGroupName $ResourceGroupName).Id
Set-AzImageOsDisk -Image $imageConfig -OsType $OsType -OsState 'Generalized' -DiskSizeGB $DiskSize -ManagedDiskId $ManagedDiskId
New-AzImage -Image $imageConfig -ImageName $ImageName -ResourceGroupName $ResourceGroupName
下面是示例输出。
PS C:\WINDOWS\system32> $OsType = "linux"
PS C:\WINDOWS\system32> $ImageName = "myaseazlinuxvmimage"
PS C:\WINDOWS\system32> $DiskSize = 35
PS C:\WINDOWS\system32> $imageConfig = New-AzImageConfig -Location DBELocal
PS C:\WINDOWS\system32> $ManagedDiskId = (Get-AzDisk -Name $DiskName -ResourceGroupName $ResourceGroupName).Id
PS C:\WINDOWS\system32> Set-AzImageOsDisk -Image $imageConfig -OsType $OsType -OsState 'Generalized' -DiskSizeGB $DiskSize -ManagedDiskId $ManagedDiskId

ResourceGroupName    :
SourceVirtualMachine :
StorageProfile       : Microsoft.Azure.Management.Compute.Models.ImageStorageProfile
ProvisioningState    :
HyperVGeneration     : V1
Id                   :
Name                 :
Type                 :
Location             : DBELocal
Tags                 :

PS C:\WINDOWS\system32> New-AzImage -Image $imageConfig -ImageName $ImageName -ResourceGroupName $ResourceGroupName

ResourceGroupName    : myaseazrg
SourceVirtualMachine :
StorageProfile       : Microsoft.Azure.Management.Compute.Models.ImageStorageProfile
ProvisioningState    : Succeeded
HyperVGeneration     : V1
Id                   : /subscriptions/.../resourceG
                       roups/myaseazrg/providers/Microsoft.Compute/images/myaseazlin
                       uxvmimage
Name                 : myaseazlinuxvmimage
Type                 : Microsoft.Compute/images
Location             : dbelocal
Tags                 : {}

PS C:\WINDOWS\system32>
使用先前创建的资源创建 VM
在创建和部署 VM 之前,必须先创建一个虚拟网络并将某个虚拟网络接口与其关联。
重要
下列规则适用:
- 甚至可以在资源组中创建一个虚拟网络。 虚拟网络的地址空间必须与逻辑网络完全相同。
- 一个虚拟网络只能有一个子网。 子网的地址空间必须与虚拟网络完全相同。
- 创建虚拟网络接口卡时,只能使用静态分配方法。 用户需要提供专用 IP 地址。
查询自动创建的虚拟网络
从设备的本地 UI 启用计算时,将在 ASERG 资源组下自动创建一个名为 ASEVNET 的虚拟网络。
创建虚拟网络接口卡
你使用虚拟网络子网 ID 创建虚拟网络接口卡。
设置一些参数。
$IpConfigName = "<IP config name>"
$NicName = "<Network interface name>"
创建虚拟网络接口。
$ipConfig = New-AzNetworkInterfaceIpConfig -Name $IpConfigName -SubnetId $aRmVN.Subnets[0].Id
$Nic = New-AzNetworkInterface -Name $NicName -ResourceGroupName $ResourceGroupName -Location DBELocal -IpConfiguration $IpConfig
默认情况下会通过为计算启用的网络,向网络接口动态分配 IP。 如果要向网络接口分配静态 IP,请使用
-PrivateIpAddress parameter。下面是示例输出:
PS C:\WINDOWS\system32> $IpConfigName = "myazipconfig1"
PS C:\WINDOWS\system32> $NicName = "myaznic1"
PS C:\WINDOWS\system32> $ipConfig = New-AzNetworkInterfaceIpConfig -Name $IpConfigName -SubnetId $aRmVN.Subnets[0].Id
PS C:\WINDOWS\system32> $ipConfig = New-AzNetworkInterfaceIpConfig -Name $IpConfigName -SubnetId $aRmVN.Subnets[0].Id
PS C:\WINDOWS\system32> $Nic = New-AzNetworkInterface -Name $NicName -ResourceGroupName $ResourceGroupName -Location DBELocal -IpConfiguration $IpConfig
PS C:\WINDOWS\system32> $Nic

Name                        : myaznic1
ResourceGroupName           : myaseazrg
Location                    : dbelocal
Id                          : /subscriptions/.../re
                              sourceGroups/myaseazrg/providers/Microsoft.Network/net
                              workInterfaces/myaznic1
Etag                        : W/"0b20057b-2102-4f34-958b-656327c0fb1d"
ResourceGuid                : e7d4131f-6f01-4492-9d4c-a8ff1af7244f
ProvisioningState           : Succeeded
Tags                        :
VirtualMachine              : null
IpConfigurations            : [
                                {
                                  "Name": "myazipconfig1",
                                  "Etag":
                              "W/\"0b20057b-2102-4f34-958b-656327c0fb1d\"",
                                  "Id": "/subscriptions/.../resourceGroups/myaseazrg/providers/Microsoft.
                              Network/networkInterfaces/myaznic1/ipConfigurations/my
                              azipconfig1",
                                  "PrivateIpAddress": "10.126.76.60",
                                  "PrivateIpAllocationMethod": "Dynamic",
                                  "Subnet": {
                                    "Delegations": [],
                                    "Id": "/subscriptions/.../resourceGroups/ASERG/providers/Microsoft.Ne
                              twork/virtualNetworks/ASEVNET/subnets/ASEVNETsubNet",
                                    "ServiceAssociationLinks": []
                                  },
                                  "ProvisioningState": "Succeeded",
                                  "PrivateIpAddressVersion": "IPv4",
                                  "LoadBalancerBackendAddressPools": [],
                                  "LoadBalancerInboundNatRules": [],
                                  "Primary": true,
                                  "ApplicationGatewayBackendAddressPools": [],
                                  "ApplicationSecurityGroups": []
                                }
                              ]
DnsSettings                 : {
                                "DnsServers": [],
                                "AppliedDnsServers": [],
                                "InternalDomainNameSuffix": "auwlfcx0dhxurjgisct43fc
                              ywb.a--x.internal.cloudapp.net"
                              }
EnableIPForwarding          : False
EnableAcceleratedNetworking : False
NetworkSecurityGroup        : null
Primary                     :
MacAddress                  : 001DD84A58D1

PS C:\WINDOWS\system32>
在为 VM 创建虚拟网络接口卡时,可以选择传递公共 IP。 在这种情况下,公共 IP 会返回专用 IP。
New-AzPublicIPAddress -Name <Public IP> -ResourceGroupName <ResourceGroupName> -AllocationMethod Static -Location DBELocal
$publicIP = (Get-AzPublicIPAddress -Name <Public IP> -ResourceGroupName <Resource group name>).Id
$ipConfig = New-AzNetworkInterfaceIpConfig -Name <ConfigName> -PublicIpAddressId $publicIP -SubnetId $subNetId
创建 VM
现在可以使用 VM 映像来创建 VM,并将其附加到之前创建的虚拟网络中。
设置用户名和密码以登录到要创建的 VM。
$pass = ConvertTo-SecureString "<Password>" -AsPlainText -Force;
$cred = New-Object System.Management.Automation.PSCredential("<Enter username>", $pass)
创建并启动 VM 后,请使用前面的用户名和密码登录到该 VM。
设置参数。
$VmName = "<VM name>"
$ComputerName = "<VM display name>"
$OsDiskName = "<OS disk name>"
创建 VM。
$VirtualMachine =  New-AzVMConfig -VmName $VmName -VMSize "Standard_D1_v2"

$VirtualMachine =  Set-AzVMOperatingSystem -VM $VirtualMachine -Linux -ComputerName $ComputerName -Credential $cred

$VirtualMachine =  Set-AzVmOsDisk -VM $VirtualMachine -Name $OsDiskName -Caching "ReadWrite" -CreateOption "FromImage" -Linux -StorageAccountType Standard_LRS

$nicID = (Get-AzNetworkInterface -Name $NicName -ResourceGroupName $ResourceGroupName).Id

$VirtualMachine =  Add-AzVMNetworkInterface -Vm $VirtualMachine -Id $nicID

$image = ( Get-AzImage -ResourceGroupName $ResourceGroupName -ImageName $ImageName).Id

$VirtualMachine =  Set-AzVMSourceImage -VM $VirtualMachine -Id $image

New-AzVM -ResourceGroupName $ResourceGroupName -Location DBELocal -VM $VirtualMachine -Verbose
下面是示例输出。
PS C:\WINDOWS\system32> $pass = ConvertTo-SecureString "Password1" -AsPlainText -Force;
PS C:\WINDOWS\system32> $cred = New-Object System.Management.Automation.PSCredential("myazuser", $pass)
PS C:\WINDOWS\system32> $VmName = "myazvm"
>> $ComputerName = "myazvmfriendlyname"
>> $OsDiskName = "myazosdisk1"
PS C:\WINDOWS\system32> $VirtualMachine =  New-AzVMConfig -VmName $VmName -VMSize "Standard_D1_v2"
PS C:\WINDOWS\system32> $VirtualMachine =  Set-AzVMOperatingSystem -VM $VirtualMachine -Linux -ComputerName $ComputerName -Credential $cred
PS C:\WINDOWS\system32> $VirtualMachine =  Set-AzVmOsDisk -VM $VirtualMachine -Name $OsDiskName -Caching "ReadWrite" -CreateOption "FromImage" -Linux -StorageAccountType Standard_LRS
PS C:\WINDOWS\system32> $nicID = (Get-AzNetworkInterface -Name $NicName -ResourceGroupName $ResourceGroupName).Id
PS C:\WINDOWS\system32> $nicID/subscriptions/.../resourceGroups/myaseazrg/providers/Microsoft.Network/networkInterfaces/myaznic1
PS C:\WINDOWS\system32> $VirtualMachine =  Add-AzVMNetworkInterface -VM $VirtualMachine -Id $nicID
PS C:\WINDOWS\system32> $image = ( Get-AzImage -ResourceGroupName $ResourceGroupName -ImageName $ImageName).Id
PS C:\WINDOWS\system32> $VirtualMachine =  Set-AzVMSourceImage -VM $VirtualMachine -Id $image
PS C:\WINDOWS\system32> New-AzVM -ResourceGroupName $ResourceGroupName -Location DBELocal -VM $VirtualMachine -Verbose
WARNING: Since the VM is created using premium storage or managed disk, existing
standard storage account, myaseazsa, is used for boot diagnostics.
VERBOSE: Performing the operation "New" on target "myazvm".

RequestId IsSuccessStatusCode StatusCode ReasonPhrase
--------- ------------------- ---------- ------------
                         True         OK OK
若要确定分配给你创建的 VM 的 IP,请查询所创建的虚拟网络接口。 找到
PrivateIPAddress并复制 VM 的 IP。 下面是示例输出。PS C:\WINDOWS\system32> $Nic Name : myaznic1 ResourceGroupName : myaseazrg Location : dbelocal Id : /subscriptions/.../re sourceGroups/myaseazrg/providers/Microsoft.Network/net workInterfaces/myaznic1 Etag : W/"0b20057b-2102-4f34-958b-656327c0fb1d" ResourceGuid : e7d4131f-6f01-4492-9d4c-a8ff1af7244f ProvisioningState : Succeeded Tags : VirtualMachine : null IpConfigurations : [ { "Name": "myazipconfig1", "Etag": "W/\"0b20057b-2102-4f34-958b-656327c0fb1d\"", "Id": "/subscriptions/.../resourceGroups/myaseazrg/providers/Microsoft. Network/networkInterfaces/myaznic1/ipConfigurations/my azipconfig1", "PrivateIpAddress": "10.126.76.60", "PrivateIpAllocationMethod": "Dynamic", "Subnet": { "Delegations": [], "Id": "/subscriptions/.../resourceGroups/ASERG/providers/Microsoft.Ne twork/virtualNetworks/ASEVNET/subnets/ASEVNETsubNet", "ServiceAssociationLinks": [] }, "ProvisioningState": "Succeeded", "PrivateIpAddressVersion": "IPv4", "LoadBalancerBackendAddressPools": [], "LoadBalancerInboundNatRules": [], "Primary": true, "ApplicationGatewayBackendAddressPools": [], "ApplicationSecurityGroups": [] } ] DnsSettings : { "DnsServers": [], "AppliedDnsServers": [], "InternalDomainNameSuffix": "auwlfcx0dhxurjgisct43fc ywb.a--x.internal.cloudapp.net" } EnableIPForwarding : False EnableAcceleratedNetworking : False NetworkSecurityGroup : null Primary : MacAddress : 001DD84A58D1 PS C:\WINDOWS\system32>
连接到 VM
根据所创建的是 Windows VM 还是 Linux VM,连接说明可能会有所不同。
连接到 Linux VM
若要连接到 Linux VM,请执行以下操作:
使用 VM 创建期间传递的专用 IP 连接到 VM。
打开 SSH 会话以连接 IP 地址。
ssh -l <username> <ip address>根据提示,提供在创建 VM 时使用的密码。
如需提供 SSH 密钥,请使用此命令。
ssh -i c:/users/Administrator/.ssh/id_rsa Administrator@5.5.41.236下面是连接到 VM 时的输出示例:
PS C:\WINDOWS\system32> ssh -l myazuser "10.126.76.60"
The authenticity of host '10.126.76.60 (10.126.76.60)' can't be established.
ECDSA key fingerprint is SHA256:V649Zbo58zAYMKreeP7M6w7Na0Yf9QPg4SM7JZVV0E4.
Are you sure you want to continue connecting (yes/no/[fingerprint])? yes
Warning: Permanently added '10.126.76.60' (ECDSA) to the list of known hosts.
myazuser@10.126.76.60's password:
Welcome to Ubuntu 18.04.2 LTS (GNU/Linux 4.18.0-1013-azure x86_64)

 * Documentation:  https://help.ubuntu.com
 * Management:     https://landscape.canonical.com
 * Support:        https://ubuntu.com/advantage

 System information disabled due to load higher than 1.0

  Get cloud support with Ubuntu Advantage Cloud Guest:
    http://www.ubuntu.com/business/services/cloud

284 packages can be updated.
192 updates are security updates.

The programs included with the Ubuntu system are free software;
the exact distribution terms for each program are described in the
individual files in /usr/share/doc/*/copyright.

Ubuntu comes with ABSOLUTELY NO WARRANTY, to the extent permitted by
applicable law.

To run a command as administrator (user "root"), use "sudo <command>".
See "man sudo_root" for details.

myazuser@myazvmfriendlyname:~$ client_loop: send disconnect: Connection reset
PS C:\WINDOWS\system32>
如果在创建 VM 的过程中使用了公共 IP 地址,则可以使用该 IP 连接到 VM。 若要获取公共 IP,请运行以下命令:
$publicIp = Get-AzPublicIpAddress -Name $PublicIp -ResourceGroupName $ResourceGroupName
在此实例中,公共 IP 与创建虚拟网络接口期间传递的专用 IP 相同。
连接到 Windows VM
若要连接到 Windows VM,请执行以下操作:
通过在 VM 创建期间传递的 IP,使用远程桌面协议 (RDP) 连接到 Windows VM。
在客户端上,打开 RDP。
转到“开始”,然后输入 mstsc。
在“远程桌面连接”窗格上,输入 VM 的 IP 地址以及你在 VM 模板参数文件中使用的访问凭据。 然后选择“连接” 。
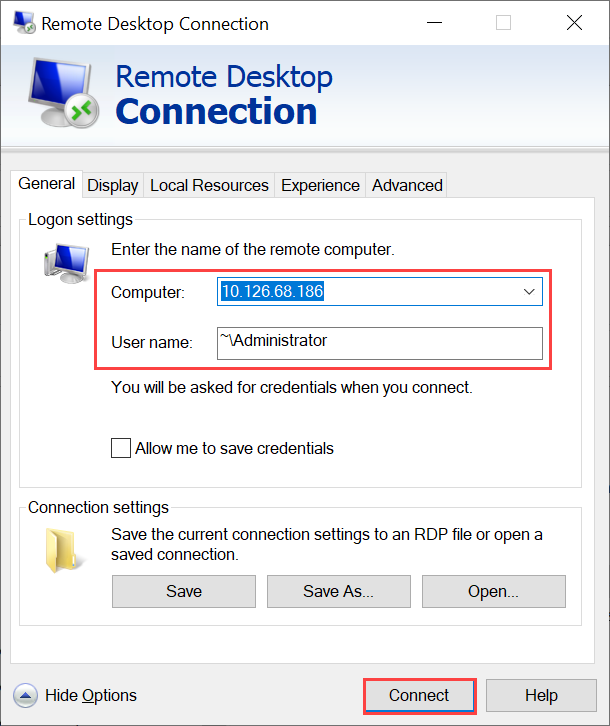
注意
可能需要批准连接到某个不受信任的计算机。
你现在已经登录到在设备上运行的 VM 了。
管理 VM
以下部分说明可以在 Azure Stack Edge Pro 设备上创建的一些常见操作。
列出在设备上运行的 VM
若要返回在 Azure Stack Edge 设备上运行的所有 VM 的列表,请运行以下命令:
打开 VM
若要打开在设备上运行的虚拟机,请运行以下 cmdlet:
Start-AzVM [-Name] <String> [-ResourceGroupName] <String>
有关此 cmdlet 的信息,请参阅 Start-AzVM。
暂停或关闭 VM
若要停止或关闭设备上正在运行的虚拟机,请运行以下 cmdlet:
Stop-AzVM [-Name] <String> [-StayProvisioned] [-ResourceGroupName] <String>
有关此 cmdlet 的详细信息,请参阅 Stop-AzVM cmdlet。
重设 VM 大小
若要调整现有虚拟机的大小,可运行以下 cmdlet:
重要
在调整其大小之前,停止无 -StayProvisioned 标志的 VM。
$vm = Get-AzVM [-Name] <String> [-ResourceGroupName] <String>

$vm.HardwareProfile.VmSize = <new size> - Example: "Standard_D3_v2"

$vm | Update-AzVM
添加数据磁盘
如果 VM 上的工作负载要求增加,建议添加数据磁盘。 为此,请运行以下命令:
Add-AzRmVMDataDisk -VM $VirtualMachine -Name "disk1" -VhdUri "https://contoso.blob.core.windows.net/vhds/diskstandard03.vhd" -LUN 0 -Caching ReadOnly -DiskSizeinGB 1 -CreateOption Empty

Update-AzVM -ResourceGroupName "<Resource Group Name string>" -VM $VirtualMachine
删除 VM
若要从设备中删除虚拟机,请运行以下 cmdlet:
Remove-AzVM [-Name] <String> [-ResourceGroupName] <String>
有关此 cmdlet 的详细信息,请参阅 Remove-AzVm cmdlet。