在本快速入门中,你将了解如何使用 Azure Developer CLI (azd) 模板和几个 azd 命令将应用资源预配和部署到 Azure。
azd 模板是标准代码存储库,其中包括应用程序源代码以及用于预配 Azure 资源的 azd 配置和基础结构文件。 若要详细了解 azd 模板以及它们可以如何加速 Azure 预配和部署过程,请参阅什么是 Azure Developer CLI 模板?。
选择并部署模板
对于接下来的步骤,你将使用以下模板在 Azure 上预配和部署应用:
还可以从 Awesome AZD 模板库网站中选择一个符合你偏好的模板。 无论你使用哪种模板,你最终都会在开发环境中获得模板代码,并能够在 Azure 中运行命令来构建、重新部署和监视应用程序。
选择首选环境以继续:
对于传统的开发工作流程来说,本地开发环境是一个不错的选择。 你将把模板存储库克隆到你的设备上,并对本地安装的 azd 运行命令。
先决条件
初始化项目
在文件资源管理器或终端中,创建新的空目录,并将其更改为该目录。
运行 azd init 命令并指定要用作参数的模板:
azd init --template todo-nodejs-mongo
azd init --template todo-python-mongo
azd init --template todo-csharp-cosmos-sql
azd init --template todo-java-mongo-aca
出现提示时输入环境名称,例如 azdquickstart,为要创建用于保存 Azure 资源的资源组设置命名前缀。
azd 中的环境名称是什么?
指定环境后,azd 将模板项目克隆到计算机并初始化项目。
预配和部署应用资源
运行 azd auth login 命令和 azd,启动浏览器以完成登录过程。
azd auth login
运行 azd up 命令:
azd up
登录到 Azure 后,系统将提示你输入以下信息:
| 参数 |
说明 |
Azure Location |
将在其中部署资源的 Azure 位置。 |
Azure Subscription |
将在其中部署资源的 Azure 订阅。 |
选择所需的值,然后按 Enter。
azd up 命令使用模板配置和基础结构文件处理以下任务:
- 创建和配置所有必要的 Azure 资源 (
azd provision),包括:
- 帐户的访问策略和角色
- 使用托管标识的服务到服务通信
- 打包并部署代码 (
azd deploy)
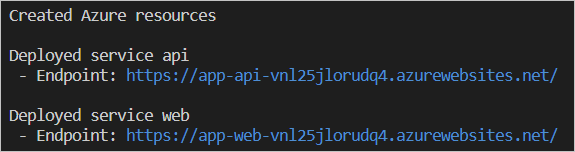
azd up 命令成功完成后,CLI 会显示两个链接以查看创建的资源:
- ToDo API 应用
- ToDo Web 应用前端
注意
可以调用 azd up 任意次数来预配和部署应用程序的更新。
由于资源在所选区域中不可部署,部署可能会失败。 由于这是一个快速入门,因此删除 .azure 目录并再次尝试 azd up 是安全的。 当系统询问时,请选择其他区域。 在更高级的情况下,可以选择性地编辑 .azure 目录中的文件以更改区域。
Azure 开发人员 CLI 提供 Visual Studio Code 扩展来简化对 azd 功能的使用。 例如,可以使用命令面板接口来运行 azd 命令。 需要安装适用于 Visual Studio Code 的 Azure 开发人员 CLI 扩展才能完成后续步骤。
安装 Azure 开发人员 CLI 扩展
打开 Visual Studio Code。
在 “视图 ”菜单中,选择“ 扩展”。
在搜索字段中,输入 Azure Developer CLI。

选择 “安装 ”并等待安装过程完成。
初始化新应用
在 Visual Studio Code 中打开空目录。
在 “视图 ”菜单中,选择 “命令面板...”。
搜索 Azure Developer CLI (azd): Initialize app (init) 命令,然后按 Enter。 该 azd up 命令指示 azd 预配和部署应用资源。

选择 选择模板 工作流。

克隆模板后,Visual Studio Code 会打开一个终端,提示你输入环境名称。 输入你选择的短名称,例如 azdvscode ,然后按 Enter。
Enter a new environment name: [? for help] azdvscode
环境名称会影响 Azure 中预配的资源的命名,并在模板目录中创建一个文件夹 .azure 来存储某些环境设置。
预配和部署应用资源
打开命令面板并搜索 Azure Developer CLI (azd): Package, Provision and Deploy(up) 命令,然后按 Enter。 该 azd up 命令指示 azd 预配和部署应用资源。
Visual Studio Code 将打开一个终端窗口,以显示预配和部署过程的进度。
azd 使用在部署资源的过程中 init 选择的订阅和位置设置。
部署过程完成后,选择通过浏览器启动站点时 azd 提供的输出窗口中的链接。
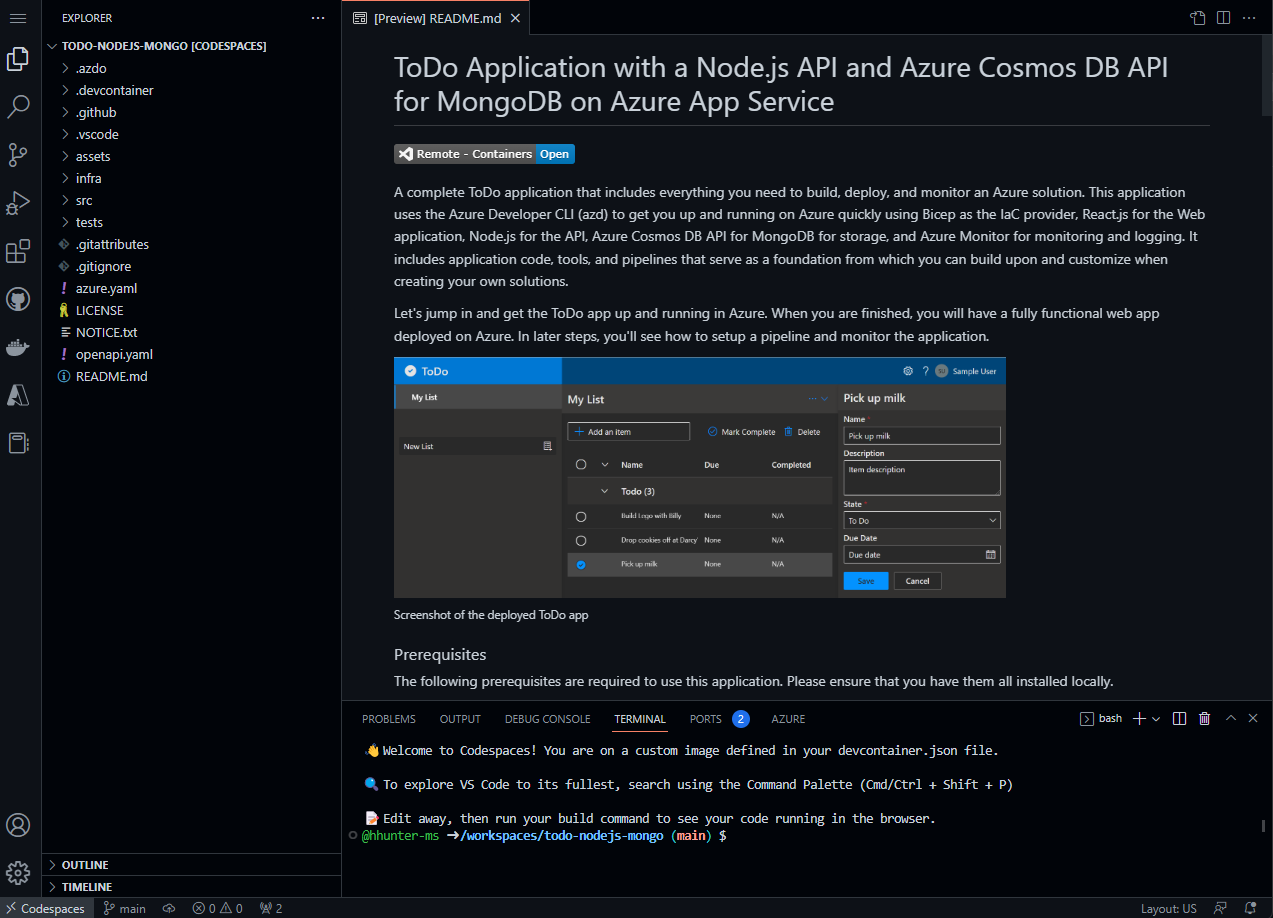
对于喜欢在容器化云环境中工作并避免在本地安装工具或依赖项的开发人员来说,Codespaces 是一个很好的选择。
设置 Codespace
- 在文件列表上方,单击使用此模板>在 Codespace 中打开。
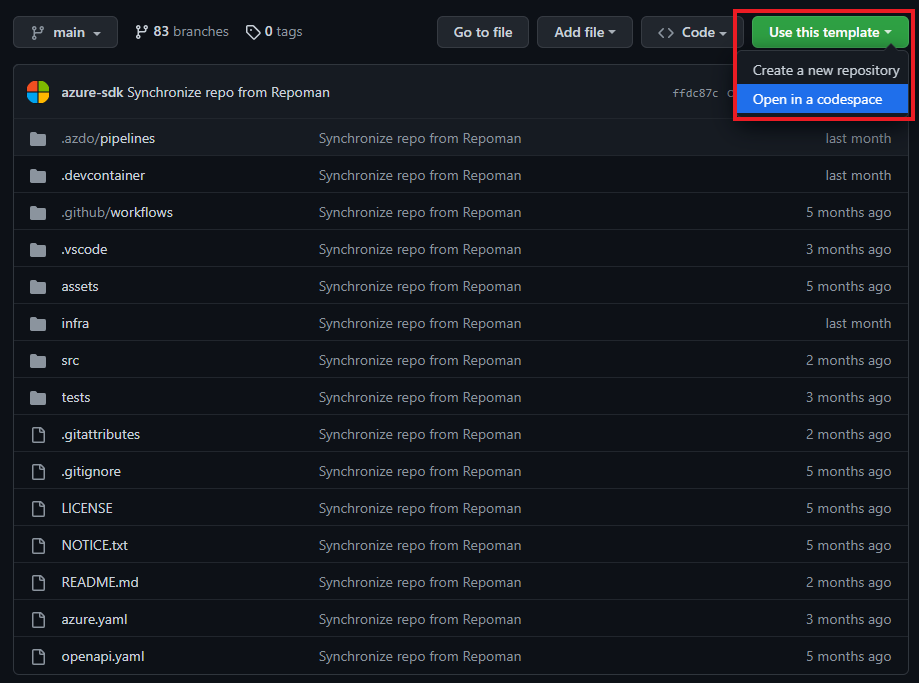
使用 Codespaces 时,会为你安装所有先决条件,包括 azd Visual Studio Code 扩展。
运行模板
创建 Codespace 后,右键单击根目录中的 azure.yaml。 从选项中选择已启动(预配资源并将代码部署到 Azure)。
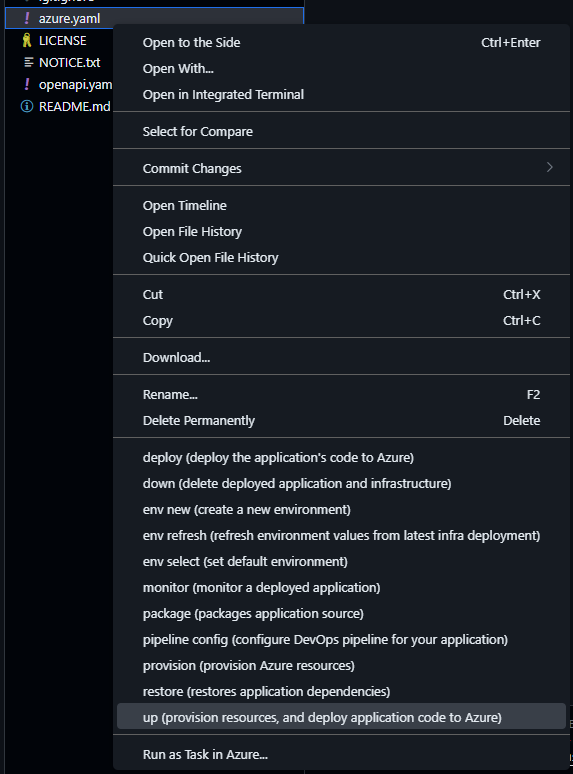
运行 azd up 此命令时,系统会提示你提供以下信息,并使用 Web 浏览器和身份验证代码登录:

| 参数 |
说明 |
Environment Name |
将为保存所有 Azure 资源而创建的资源组的前缀。
azd 中的环境名称是什么? 始终可以使用 azd env new 创建新环境。 |
Azure Location |
将在其中部署资源的 Azure 位置。 |
Azure Subscription |
将在其中部署资源的 Azure 订阅。 |
此过程可能需要一些时间才能完成,因为 azd up 命令处理以下任务:
- 创建和配置所有必要的 Azure 资源 (
azd provision)。
- 为帐户配置访问策略和角色。
- 使用托管标识实现服务到服务通信。
- 打包并部署代码 (
azd deploy)。
提供所需的参数,并且 azd up 命令完成后,CodeSpaces 终端会显示两个 Azure 门户链接,以查看创建的资源:
- ToDo API 应用
- ToDo Web 应用前端
发生了什么情况?
成功完成 azd up 命令后:
注意
- 可以调用
azd up 任意次数来预配和部署应用程序。
- 由于 GitHub Codespaces 已知限制,目前不支持需要启动 Web 浏览器的运行和调试。 为了获得更好的体验,我们建议在桌面中使用 Codespaces。
DevContainer 是一个 Docker 映像,其中包含在本地计算机上使用 azd 模板所需的所有先决条件。 对于那些更喜欢在本地设备上运行的容器化环境而不是像 GitHub Codespaces 这样的云服务的开发人员来说,这是一个不错的选择。
先决条件
初始化项目
打开一个终端,创建一个新的空目录,然后切换到其中。
运行以下命令来初始化项目:
azd init --template todo-nodejs-mongo
azd init --template todo-python-mongo
azd init --template todo-csharp-cosmos-sql
azd init --template todo-java-mongo-aca
运行 azd init 命令时,系统会提示你提供以下信息:
| 参数 |
说明 |
Environment Name |
将为保存所有 Azure 资源而创建的资源组的前缀。
azd 中的环境名称是什么? 始终可以使用 azd env new 创建新环境。 |
打开 DevContainer
- 在 VS Code 中打开项目。
- 按 F1 并选择:
Remote-Containers: Rebuild and Reopen in Container
运行 up 命令
运行下面的命令:
azd up
运行 azd up 命令时,系统会提示你提供以下信息:
| 参数 |
说明 |
Azure Location |
将在其中部署资源的 Azure 位置。 |
Azure Subscription |
将在其中部署资源的 Azure 订阅。 |
azd up 命令可能需要一些时间才能运行,因为它完成以下步骤:
- 创建和配置所有必要的 Azure 资源 (
azd provision),包括:
- 帐户的访问策略和角色
- 使用托管标识的服务到服务通信
- 打包并部署代码 (
azd deploy)
提供所需的参数,并且 azd up 命令完成后,CLI 会显示两个 Azure 门户链接,以查看创建的资源:
- ToDo API 应用
- ToDo Web 应用前端
注意
你可以根据需要多次运行 azd up,以便将应用程序预配和部署到同一区域,并使用你在第一次运行时提供的相同配置值。
清理资源
当不再需要本文中创建的 Azure 资源时,请运行以下命令关闭应用:
azd down
如果要重新部署到其他区域,请删除 .azure 目录,然后再次运行 azd up。 在更高级的情况下,可以选择性地编辑 .azure 目录中的文件以更改区域。
请求帮助
有关如何提交 bug、请求帮助或为 Azure Developer CLI 建议新功能的信息,请访问故障排除和支持页面。
后续步骤