将身份验证添加到 Xamarin.Android 应用
在本教程中,将使用 Microsoft Entra ID 将 Microsoft 身份验证添加到 TodoApp 项目。 在完成本教程之前,请确保已 创建项目并部署了后端。
提示
尽管我们使用 Microsoft Entra ID 进行身份验证,但你可以使用任何想要与 Azure 移动应用配合使用的身份验证库。
将身份验证添加到后端服务
后端服务是标准 ASP.NET 6 服务。 演示如何为 ASP.NET 6 服务启用身份验证的任何教程都适用于 Azure 移动应用。
若要为后端服务启用 Microsoft Entra 身份验证,需要:
- 使用 Microsoft Entra ID 注册应用程序。
- 将身份验证检查添加到 ASP.NET 6 后端项目。
注册应用程序
首先,在 Microsoft Entra 租户中注册 Web API,并通过执行以下步骤来添加范围:
登录 Azure 门户。
如果有权访问多个租户,请使用顶部菜单中的 “目录 + 订阅 ”筛选器切换到要在其中注册应用程序的租户。
搜索并选择 Microsoft Entra ID。
在“管理”下,选择“应用注册”>“新建注册” 。
- 名称:输入应用程序的名称;例如 TodoApp 快速入门。 应用的用户将看到此名称。 您可以稍后对此进行更改。
- 支持的帐户类型: 任何组织目录中的帐户(任何 Microsoft Entra 目录 - 多租户)和个人 Microsoft 帐户(例如 Skype、Xbox)
选择注册。
在“管理”下,选择“公开 API”>“添加范围” 。
对于应用程序 ID URI,选择“保存并继续”,接受默认值。
输入以下详细信息:
- 范围名称:
access_as_user - 谁能同意? :管理员和用户
- 管理员许可显示名称:
Access TodoApp - 管理员许可说明:
Allows the app to access TodoApp as the signed-in user. - 用户同意显示名称:
Access TodoApp - 用户同意说明:
Allow the app to access TodoApp on your behalf. - 状态:已启用
- 范围名称:
选择“添加范围”以完成范围添加。
请注意范围的值,类似于
api://<client-id>/access_as_user(称为 Web API 范围)。 配置客户端时需要作用域。选择“概述”。
请注意 Essentials 部分中的应用程序(客户端)ID(称为 Web API 应用程序 ID)。 需要此值才能配置后端服务。
打开 Visual Studio 并选择 TodoAppService.NET6 项目。
右键单击
TodoAppService.NET6项目,然后选择“ 管理 NuGet 包...”。在新选项卡中,选择“ 浏览”,然后在搜索框中输入 Microsoft.Identity.Web 。
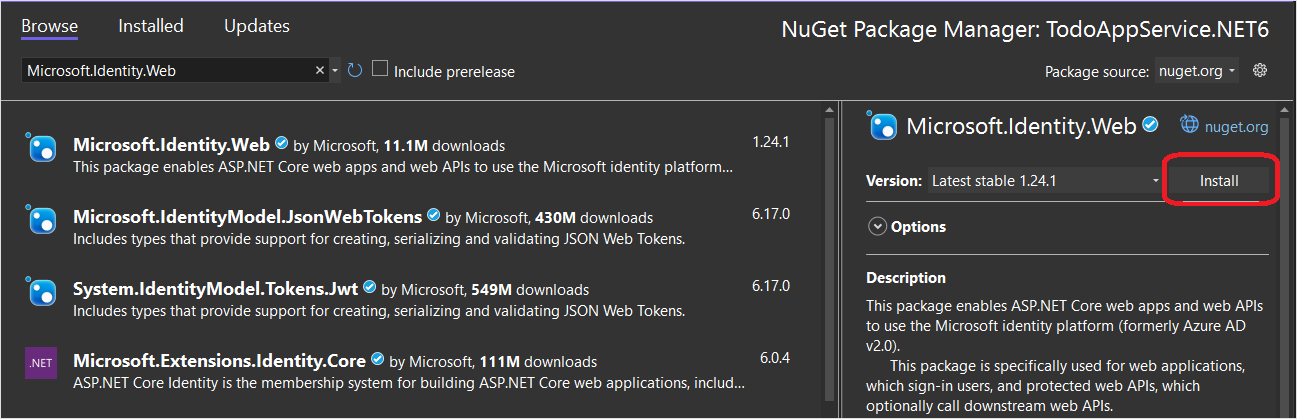
选择包
Microsoft.Identity.Web,然后按 “安装”。按照提示完成包的安装。
打开
Program.cs。 将以下内容添加到语句列表using:
using Microsoft.AspNetCore.Authentication.JwtBearer;
using Microsoft.Identity.Web;
- 将以下代码直接添加到调用
builder.Services.AddDbContext()的上方:
builder.Services.AddAuthentication(JwtBearerDefaults.AuthenticationScheme)
  .AddMicrosoftIdentityWebApi(builder.Configuration);
builder.Services.AddAuthorization();
- 将以下代码直接添加到调用
app.MapControllers()的上方:
app.UseAuthentication();
app.UseAuthorization();
Program.cs 现在应如下所示:
using Microsoft.AspNetCore.Datasync;
using Microsoft.EntityFrameworkCore;
using Microsoft.AspNetCore.Authentication.JwtBearer;
using Microsoft.Identity.Web;
using TodoAppService.NET6.Db;

var builder = WebApplication.CreateBuilder(args);
var connectionString = builder.Configuration.GetConnectionString("DefaultConnection");

if (connectionString == null)
{
  throw new ApplicationException("DefaultConnection is not set");
}

builder.Services.AddAuthentication(JwtBearerDefaults.AuthenticationScheme)
  .AddMicrosoftIdentityWebApi(builder.Configuration);
builder.Services.AddAuthorization();
builder.Services.AddDbContext<AppDbContext>(options => options.UseSqlServer(connectionString));
builder.Services.AddDatasyncControllers();

var app = builder.Build();

// Initialize the database
using (var scope = app.Services.CreateScope())
{
  var context = scope.ServiceProvider.GetRequiredService<AppDbContext>();
  await context.InitializeDatabaseAsync().ConfigureAwait(false);
}

// Configure and run the web service.
app.UseAuthentication();
app.UseAuthorization();
app.MapControllers();
app.Run();
- 编辑 .
Controllers\TodoItemController.cs将[Authorize]属性添加到类。 你的类应如下所示:
using Microsoft.AspNetCore.Authorization;
using Microsoft.AspNetCore.Datasync;
using Microsoft.AspNetCore.Datasync.EFCore;
using Microsoft.AspNetCore.Mvc;
using TodoAppService.NET6.Db;

namespace TodoAppService.NET6.Controllers
{
  [Authorize]
  [Route("tables/todoitem")]
  public class TodoItemController : TableController<TodoItem>
  {
    public TodoItemController(AppDbContext context)
      : base(new EntityTableRepository<TodoItem>(context))
    {
    }
  }
}
- 编辑 .
appsettings.json添加以下块:
  "AzureAd": {
    "Instance": "https://login.microsoftonline.com",
    "ClientId": "<client-id>",
    "TenantId": "common"
  },
将 <client-id> 前面记录的 Web API 应用程序 ID 替换为。 完成后,它应如下所示:
{
  "AzureAd": {
    "Instance": "https://login.microsoftonline.com",
    "ClientId": "<client-id>",
    "TenantId": "common"
  },
  "ConnectionStrings": {
    "DefaultConnection": "Server=(localdb)\\mssqllocaldb;Database=TodoApp;Trusted_Connection=True"
  },
  "Logging": {
    "LogLevel": {
      "Default": "Information",
      "Microsoft.AspNetCore": "Warning"
    }
  },
  "AllowedHosts": "*"
}
再次将服务发布到 Azure:
- 右键单击
TodoAppService.NET6项目,然后选择“ 发布...”。 - 选择 选项卡右上角的“发布 ”按钮。
在浏览器中打开 https://yoursite.azurewebsites.net/tables/todoitem?ZUMO-API-VERSION=3.0.0。 请注意,该服务现在返回一个 401 响应,指示需要身份验证。

将应用注册到标识服务
Microsoft 数据同步框架内置支持任何在 HTTP 事务标头中使用 Json Web 令牌(JWT)的身份验证提供程序。 此应用程序使用 Microsoft 身份验证库 (MSAL) 请求此类令牌,并向登录的用户授权到后端服务。
配置本机客户端应用程序
可以注册本机客户端,以允许使用客户端库(如 Microsoft 标识库 (MSAL))向应用中托管的 Web API 进行身份验证。
在Azure 门户中,选择“Microsoft Entra ID>应用注册>”新建注册”。
在 “注册应用程序 ”页中:
- 输入应用注册的名称。 你可能想要使用此名称来区分后端服务使用的名称
native-quickstart。 - 选择任何组织目录中的帐户(任何 Microsoft Entra 目录 - 多租户)和个人 Microsoft 帐户(例如 Skype、Xbox)。
- 在重定向 URI 中:
- 选择 公共客户端(移动和桌面)
- 输入 URL
quickstart://auth
- 输入应用注册的名称。 你可能想要使用此名称来区分后端服务使用的名称
选择“注册”。
选择“API 权限”>“添加权限”>“我的 API”。
选择之前为后端服务创建的应用注册。 如果未看到应用注册,请确保已添加 access_as_user 范围。
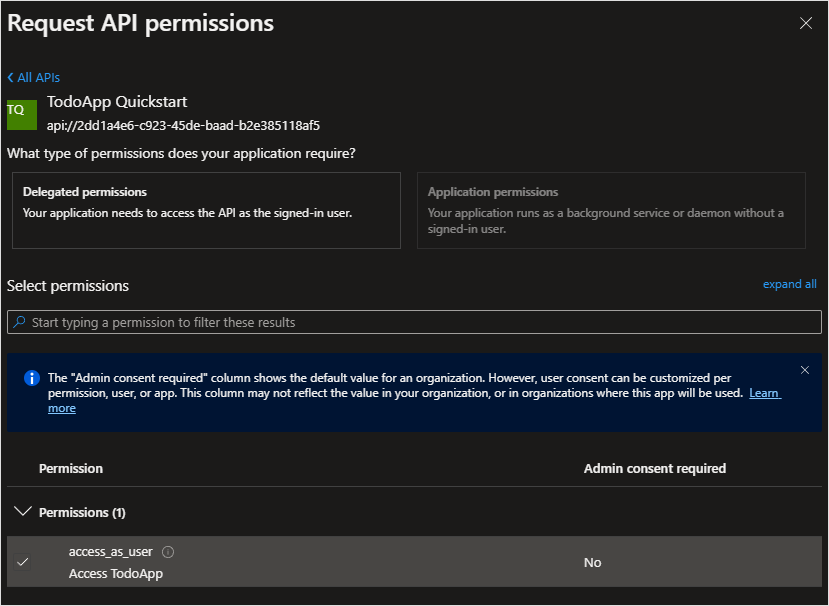
在“选择权限”下,选择access_as_user,然后选择“添加权限”。
选择“身份验证>移动”和“桌面应用程序”。
勾选
https://login.microsoftonline.com/common/oauth2/nativeclient旁边的复选框。选中(替换为
{client-id}应用程序 ID)旁边的msal{client-id}://auth框。选择“ 添加 URI”,然后在字段中添加
http://localhost额外的 URI。选择页面底部的“保存” 。
选择“概述”。 记下 应用程序(客户端)ID (称为 本机客户端应用程序 ID),因为你需要它来配置移动应用。
我们定义了三个重定向 URL:
http://localhost由 WPF 应用程序使用。https://login.microsoftonline.com/common/oauth2/nativeclient由 UWP 应用程序使用。msal{client-id}://auth由移动(Android 和 iOS)应用程序使用。
将 Microsoft 标识客户端添加到应用
TodoApp.sln在 Visual Studio 中打开解决方案,并将TodoApp.Android项目设置为启动项目。 将 Microsoft 标识库 (MSAL) 添加到 TodoApp.Android 项目:
将 Microsoft 标识库 (MSAL) 添加到平台项目:
右键单击项目,然后选择“管理 NuGet 包...”。
选择“浏览”选项卡。
在搜索框中,键入
Microsoft.Identity.Client,然后按 Enter。选择
Microsoft.Identity.Client结果,然后单击“安装”。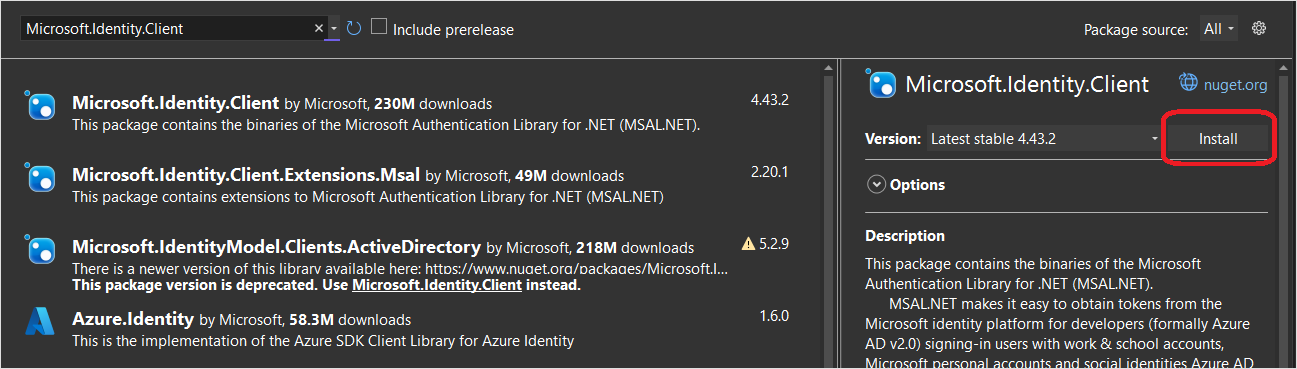
接受许可协议,完成安装。
将本机客户端 ID 和后端范围添加到配置。
TodoApp.Data打开项目并编辑Constants.cs文件。 添加常量和ApplicationIdScopes:
  public static class Constants
  {
      /// <summary>
      /// The base URI for the Datasync service.
      /// </summary>
      public static string ServiceUri = "https://demo-datasync-quickstart.azurewebsites.net";

      /// <summary>
      /// The application (client) ID for the native app within Microsoft Entra ID
      /// </summary>
      public static string ApplicationId = "<client-id>";

      /// <summary>
      /// The list of scopes to request
      /// </summary>
      public static string[] Scopes = new[]
      {
          "<scope>"
      };
  }
将<client-id>注册 Microsoft Entra ID <scope> 中的客户端应用程序时收到的本机客户端应用程序 ID 替换为在注册服务应用程序时使用公开 API 时复制的 Web API 范围。
打开 MainActivity.cs 项目中的文件 TodoApp.Android 。 在文件的顶部,添加以下 using 语句:
using Android.Content;
using Microsoft.Identity.Client;
using Microsoft.Datasync.Client;
using System.Linq;
using System.Threading.Tasks;
using Debug = System.Diagnostics.Debug;
在类顶部 MainActivity ,添加以下字段:
public IPublicClientApplication identityClient;
在方法中 OnCreate() ,更改以下项的定义 TodoService:
TodoService = new RemoteTodoService(GetAuthenticationToken);
添加以下代码以定义 GetAuthenticationToken() 方法:
public async Task<AuthenticationToken> GetAuthenticationToken()
{
    if (identityClient == null)
    {
        identityClient = PublicClientApplicationBuilder.Create(Constants.ApplicationId)
            .WithAuthority(AzureCloudInstance.AzurePublic, "common")
            .WithRedirectUri($"msal{Constants.ApplicationId}://auth")
            .WithParentActivityOrWindow(() => this)
            .Build();
    }

    var accounts = await identityClient.GetAccountsAsync();
    AuthenticationResult result = null;
    bool tryInteractiveLogin = false;

    try
    {
        result = await identityClient
            .AcquireTokenSilent(Constants.Scopes, accounts.FirstOrDefault())
            .ExecuteAsync();
    }
    catch (MsalUiRequiredException)
    {
        tryInteractiveLogin = true;
    }
    catch (Exception ex)
    {
        Debug.WriteLine($"MSAL Silent Error: {ex.Message}");
    }

    if (tryInteractiveLogin)
    {
        try
        {
            result = await identityClient
                .AcquireTokenInteractive(Constants.Scopes)
                .ExecuteAsync()
                .ConfigureAwait(false);
        }
        catch (Exception ex)
        {
            Debug.WriteLine($"MSAL Interactive Error: {ex.Message}");
        }
    }

    return new AuthenticationToken
    {
        DisplayName = result?.Account?.Username ?? "",
        ExpiresOn = result?.ExpiresOn ?? DateTimeOffset.MinValue,
        Token = result?.AccessToken ?? "",
        UserId = result?.Account?.Username ?? ""
    };
}
此方法 GetAuthenticationToken() 与 Microsoft 标识库(MSAL)一起使用,以获取一个适合授权已登录用户访问后端服务的访问令牌。 然后,此函数将 RemoteTodoService 传递给用于创建客户端的函数。 如果身份验证成功,则会 AuthenticationToken 生成具有授权每个请求所需的数据。 否则,将生成过期的错误的令牌。
通过添加以下方法处理标识客户端的回调:
protected override void OnActivityResult(int requestCode, [GeneratedEnum] Result resultCode, Intent data)
{
    base.OnActivityResult(requestCode, resultCode, data);
    // Return control to MSAL
    AuthenticationContinuationHelper.SetAuthenticationContinuationEventArgs(requestCode, resultCode, data);
}
使用以下代码创建新类 MsalActivity :
using Android.App;
using Android.Content;
using Microsoft.Identity.Client;

namespace TodoApp.Android
{
    [Activity(Exported = true)]
    [IntentFilter(new[] { Intent.ActionView },
        Categories = new[] { Intent.CategoryBrowsable, Intent.CategoryDefault },
        DataHost = "auth",
        DataScheme = "msal{client-id}")]
    public class MsalActivity : BrowserTabActivity
    {
    }
}
替换为 {client-id} 本机客户端的应用程序 ID(与该 ID 相同 Constants.ApplicationId)。
如果项目面向 Android 版本 11(API 版本 30)或更高版本,则必须更新你的 AndroidManifest.xml 内容以满足 Android 包可见性要求。 打开 Properties/AndroidManifest.xml 以下 queries/intent 节点并将其添加到 manifest 节点:
<manifest>
  ...
  <queries>
    <intent>
      <action android:name="android.support.customtabs.action.CustomTabsService" />
    </intent>
  </queries>
</manifest>
测试应用程序
运行或重启应用。
应用运行时,将打开浏览器以要求进行身份验证。 如果之前尚未向应用进行身份验证,应用会要求你同意。 身份验证完成后,系统浏览器将关闭,应用会像以前一样运行。
后续步骤
接下来,通过 实现脱机存储将应用程序配置为脱机运行。
其他阅读材料
反馈
即将发布:在整个 2024 年,我们将逐步淘汰作为内容反馈机制的“GitHub 问题”,并将其取代为新的反馈系统。 有关详细信息,请参阅:https://aka.ms/ContentUserFeedback。
提交和查看相关反馈