教程:使用 Azure 通知中心通过后端服务将推送通知发送到 Xamarin.Forms 应用
 下载示例
下载示例本教程使用
ASP.NET 核心 Web API 后端用于使用最新、最佳 安装 方法处理客户端 设备注册。 该服务还将以跨平台的方式发送推送通知。
这些操作使用 通知中心 SDK 来处理后端操作。 从应用后端注册 文档中提供了有关总体方法的更多详细信息。
本教程将引导你完成以下步骤:
先决条件
若要继续操作,需要:
- Azure 订阅,可在其中创建和管理资源。
- 安装了 Visual Studio for Mac 的 Mac 或运行 Visual Studio 2019的电脑。
Visual Studio 2019 用户还必须使用 .NET 和ASP.NET 和 Web 开发 工作负载进行移动开发。 - 能够在 Android(物理设备或仿真器设备)或 iOS(仅限物理设备)上运行应用。
对于 Android,必须具备:
- 开发人员解锁的物理设备或仿真器 (安装了 Google Play Services 的 API 26 及更高版本)。
对于 iOS,必须具备:
- 有效的 Apple 开发人员帐户。
(运行 iOS 13.0 及更高版本) 注册到开发人员帐户的物理 iOS 设备。 - .p12开发证书 安装在 密钥链 允许 你在物理设备上运行应用。
注意
iOS 模拟器不支持远程通知,因此在 iOS 上浏览此示例时需要物理设备。 但是,无需在 android
可以按照此第一原则示例中的步骤操作,无需事先体验。 但是,你将受益于熟悉以下方面。
- Apple 开发人员门户
- ASP.NET Core 和 Web API
- Google Firebase 控制台
- Microsoft Azure 和 使用 Azure 通知中心向 iOS 应用发送推送通知。
- Xamarin 和 Xamarin.Forms。
重要
提供的步骤特定于 Visual Studio for Mac。 可以使用 Visual Studio 2019 进行后续操作,但可能存在一些差异可以协调。 例如,用户界面和工作流、模板名称、环境配置等的说明。
设置推送通知服务和 Azure 通知中心
在本部分中,将设置 Firebase Cloud Messaging (FCM) 和 Apple Push Notification Services (APNS)。 然后,创建并配置通知中心以使用这些服务。
创建 Firebase 项目并启用适用于 Android 的 Firebase Cloud Messaging
登录到
Firebase 控制台。 创建一个新的 Firebase 项目,输入 PushDemo 作为 项目名称。 注意
将为你生成唯一名称。 默认情况下,它由你提供的名称的小写变体以及用短划线分隔的生成的数字组成。 如果想要提供它仍然全局唯一,则可以更改此项。
创建项目后,选择 将 Firebase 添加到 Android 应用。
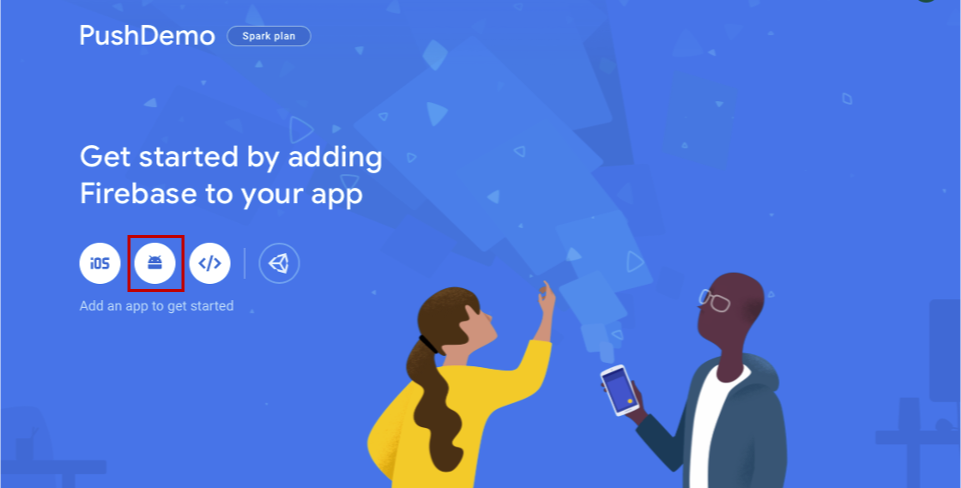
在 将 Firebase 添加到 Android 应用 页上,执行以下步骤。
对于 Android 包名称,请输入包的名称。 例如:
com.<organization_identifier>.<package_name>。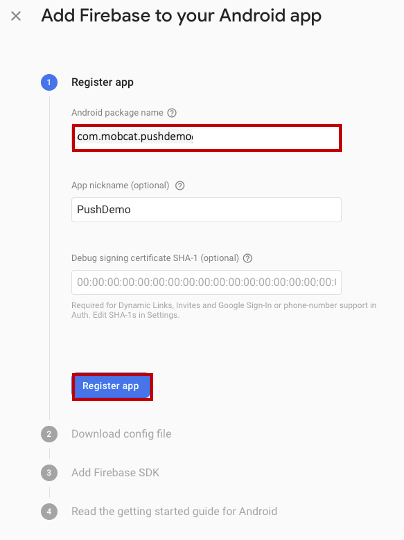
选择 注册应用。
选择 下载 google-services.json。 然后将该文件保存到本地文件夹中供稍后使用,然后选择“下一
”。 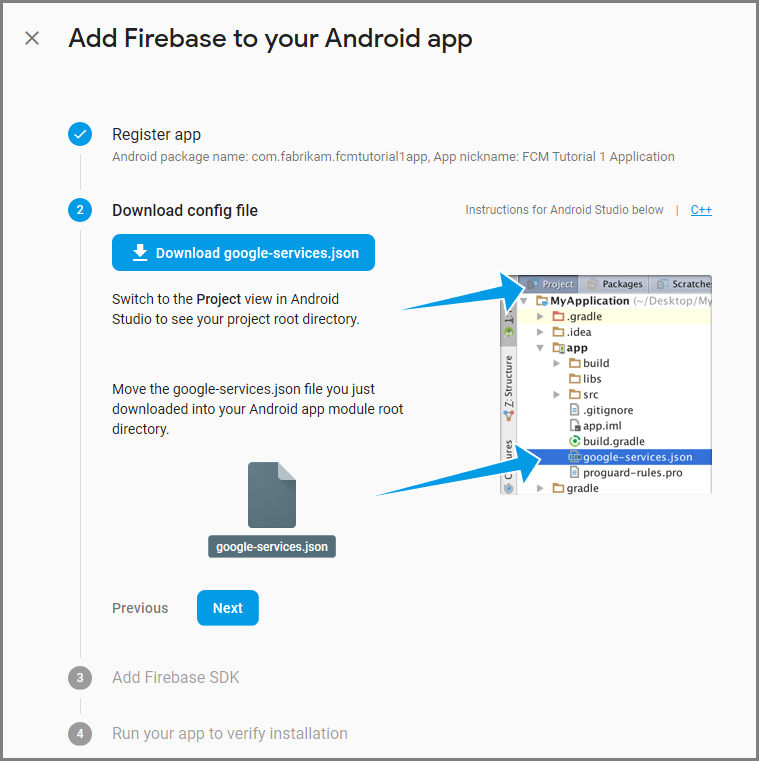
选择“下一”
。 选择 “继续”控制台
注意
如果未启用“继续控制台”按钮,由于 验证安装 检查,请选择“跳过此步骤。
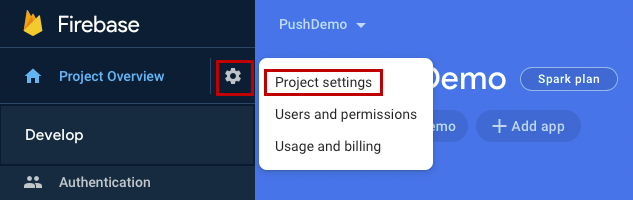
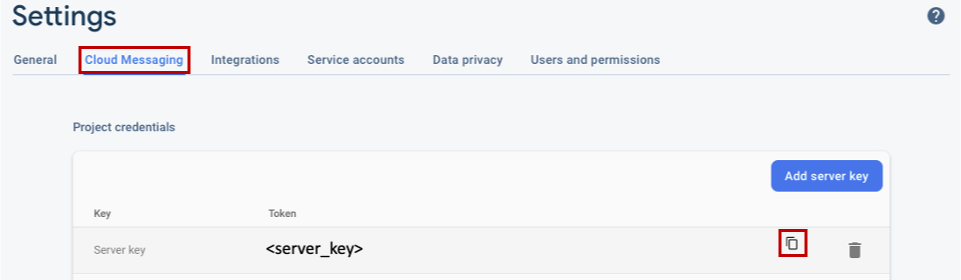
在 Firebase 控制台中,选择项目的齿轮。 然后选择 项目设置。
注意
如果尚未下载 google-services.json 文件,可以在此页上下载该文件。
切换到顶部的“Cloud Messaging”选项卡。 复制并保存 服务器密钥 供以后使用。 使用此值配置通知中心。
注册 iOS 应用以获取推送通知
若要将推送通知发送到 iOS 应用,请将应用程序注册到 Apple,并注册推送通知。
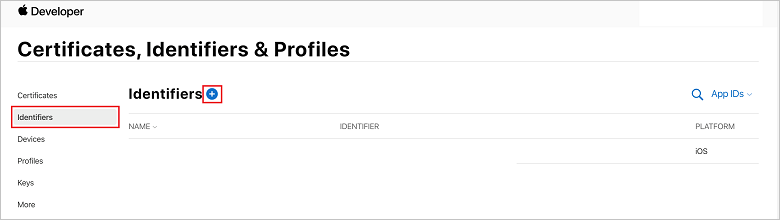
如果尚未注册应用,请在 Apple 开发人员中心浏览到 iOS 预配门户。 使用 Apple ID 登录到门户,导航到 证书、标识符 & 配置文件,然后选择 标识符。 单击 + 注册新应用。
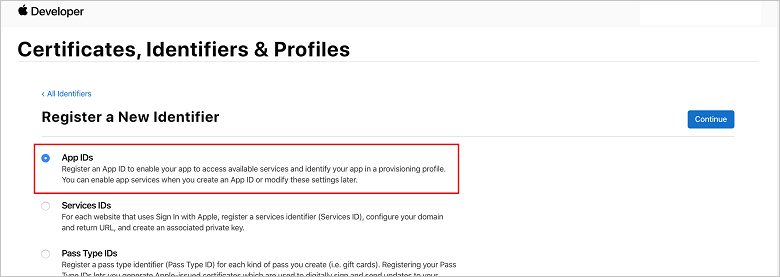
在“注册新标识符 屏幕上,选择 应用 ID 单选按钮。 然后选择 继续。
 注册新 ID 页
更新新应用的以下三个值,然后选择“继续”:
说明:键入应用的描述性名称。
捆绑 ID:输入 com 窗体的捆绑 ID。<organization_identifier>。应用分发指南中所述的<product_name>。 在以下屏幕截图中,
mobcat值用作组织标识符,PushDemo 值用作产品名称。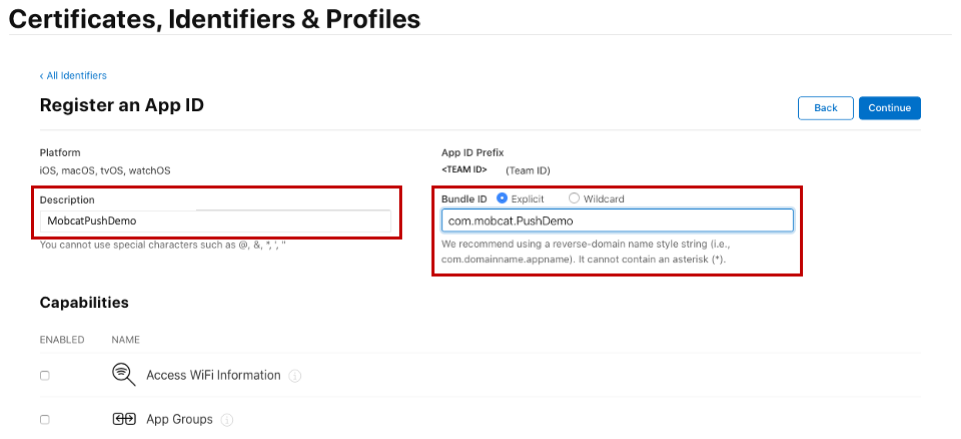
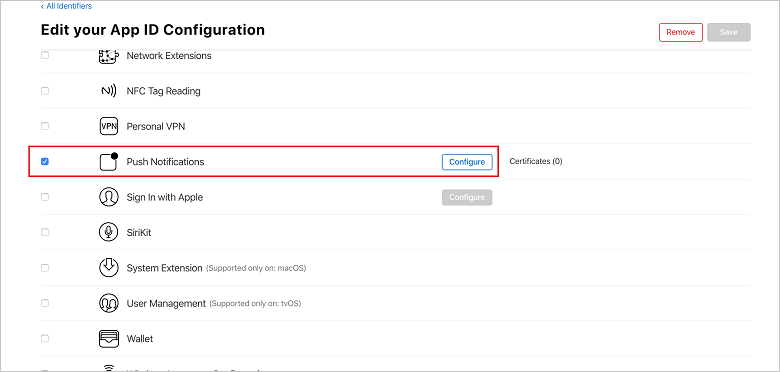
推送通知:在 功能 部分中选中“推送通知”选项。
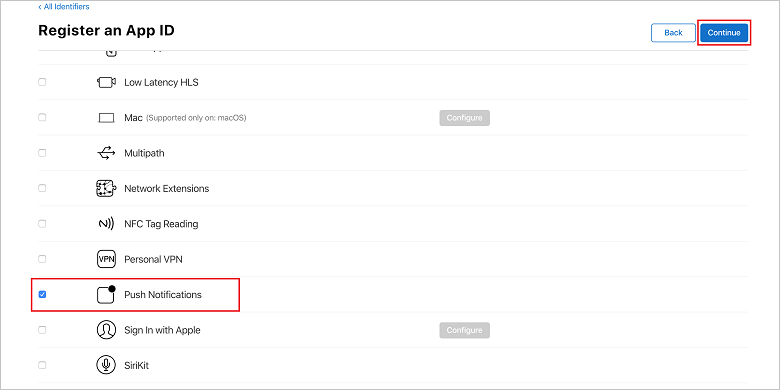
此操作将生成应用 ID 和确认信息的请求。 选择 继续,然后选择 注册 以确认新的应用 ID。
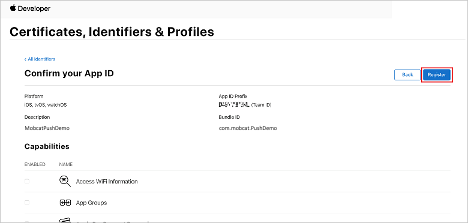
选择 注册后,可在 证书、标识符 & 配置文件 页中看到新的应用 ID 作为行项。
在“证书,标识符 & 配置文件”页的 标识符下,找到所创建的应用 ID 行项。 然后,选择其行以显示 “编辑应用 ID 配置” 屏幕。
为通知中心创建证书
需要证书才能使通知中心能够与 Apple Push Notification Services (APNS) 配合使用,可通过以下两种方式之一提供:
创建可直接上传到通知中心 的 p12 推送证书(原始方法)
创建可用于基于令牌的身份验证 的 p8 证书(较新的推荐方法)
较新的方法在 APNS的基于令牌的身份验证(HTTP/2)身份验证中记录了许多优势。 需要更少的步骤,但也要求针对特定方案执行这些步骤。 但是,已为这两种方法提供步骤,因为两种方法都适用于本教程。
选项 1:创建可直接上传到通知中心的 p12 推送证书
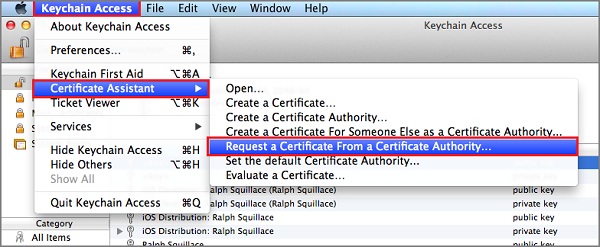
在 Mac 上,运行密钥链访问工具。 可以从 Utilities 文件夹或 Launchpad 上的 “其他”文件夹打开它。
选择 密钥链访问,展开 证书助手,然后选择 从证书颁发机构请求证书。
注意
默认情况下,Keychain Access 选择列表中的第一项。 如果你位于 证书 类别中,Apple Worldwide Developer Relations Certification Authority 不是列表中的第一项,则此问题可能是个问题。 在生成 CSR(证书签名请求)之前,请确保已选择非密钥项或 Apple 全球开发人员关系证书颁发机构 密钥。
选择
用户电子邮件地址 ,输入公用名 值,确保指定保存到磁盘,然后选择 继续 。 将 CA 电子邮件地址 保留为空,因为不需要。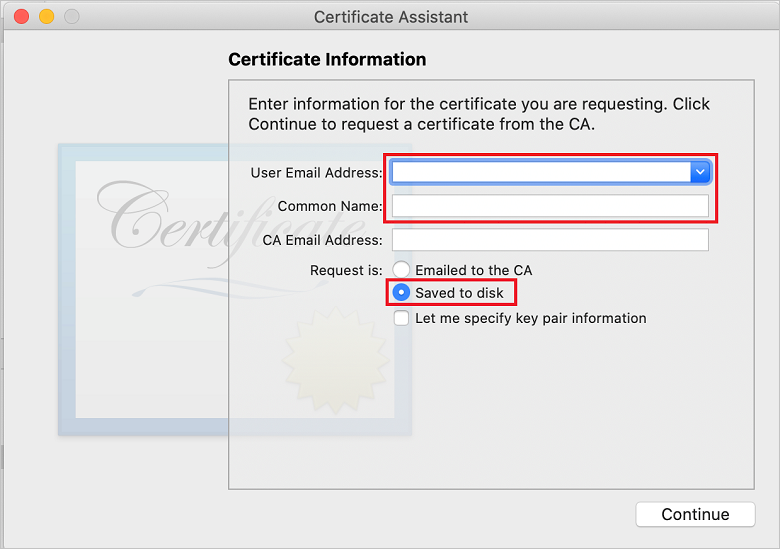
在
另存为 中输入证书签名请求(CSR) 文件的名称,选择位置,然后选择 保存 。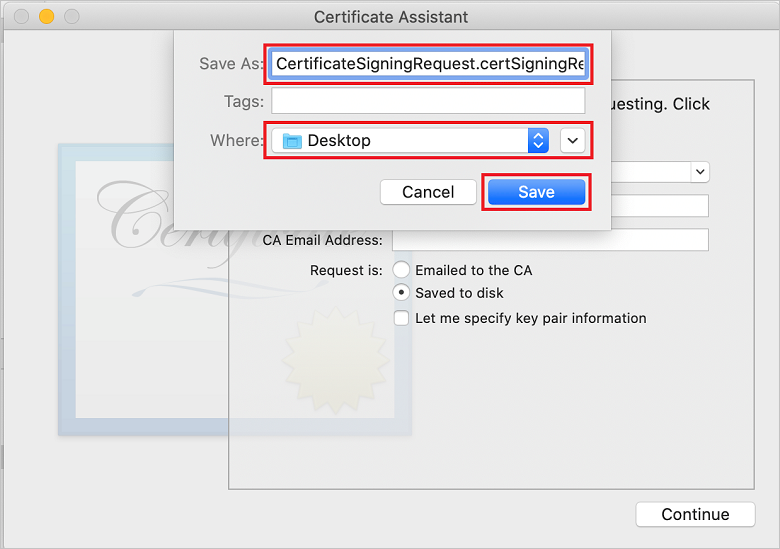 选择文件名
选择文件名此操作将 CSR 文件 保存在所选位置。 默认位置为桌面
。 请记住为文件选择的位置。 返回 证书、标识符 & 配置文件 页面 iOS 预配门户,向下滚动到选中的 推送通知 选项,然后选择 配置 以创建证书。
此时会显示 Apple 推送通知服务 TLS/SSL 证书 窗口。 选择 开发 TLS/SSL 证书 部分下的“创建证书”按钮。
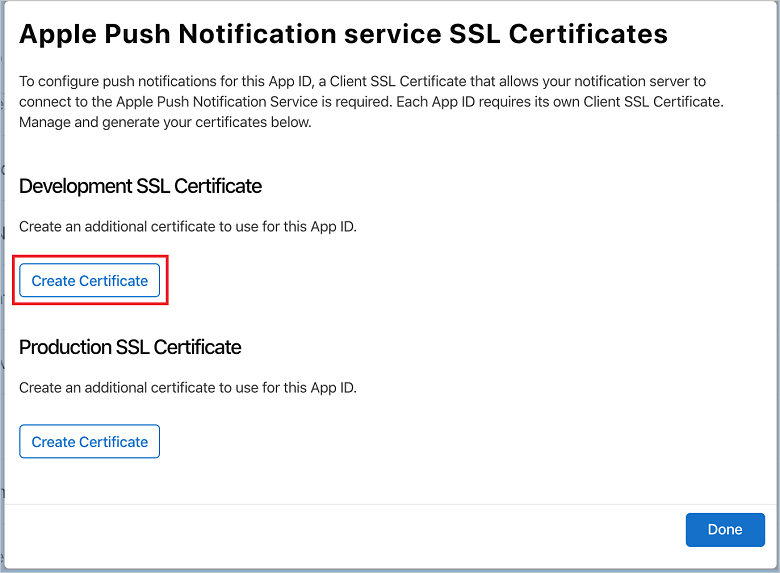
将显示 “创建新证书”屏幕。
注意
本教程使用开发证书。 注册生产证书时使用相同的过程。 只需确保在发送通知时使用相同的证书类型。
选择“选择文件,浏览到保存 CSR 文件的位置,然后双击证书名称将其加载。 然后选择 继续。
门户创建证书后,选择“下载”按钮
。 保存证书,并记住其保存到的位置。 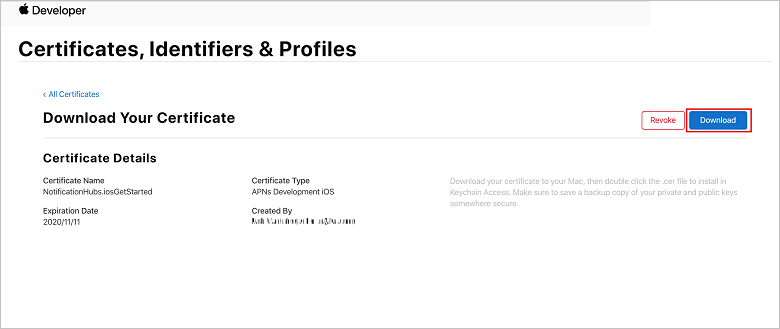
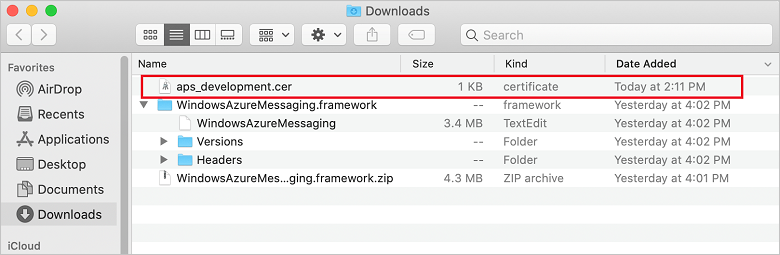
证书将下载并保存到 下载 文件夹中的计算机。
注意
默认情况下,下载的开发证书命名为 aps_development.cer。
双击下载的推送证书 aps_development.cer。 此操作在密钥链中安装新证书,如下图所示:
显示新证书 的
密钥链访问证书列表 注意
尽管证书中的名称可能不同,但名称将带有 Apple Development iOS 推送服务 前缀,并具有与之关联的相应捆绑标识符。
在密钥链访问中,控制 + 单击在 证书 类别中创建的新推送证书上的。 选择 导出,命名文件,选择 p12 格式,然后选择 保存。
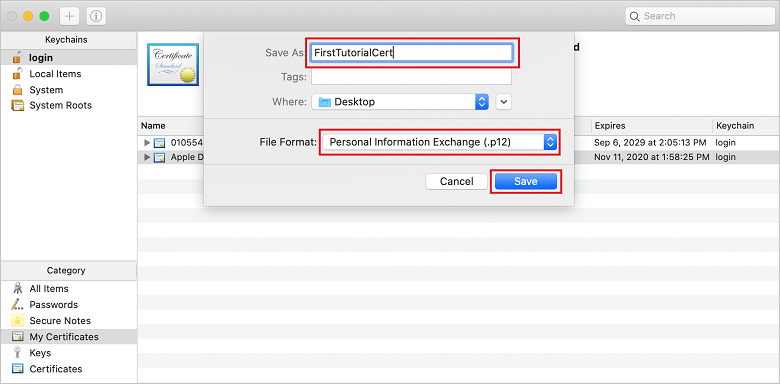
可以选择使用密码保护证书,但密码是可选的。 如果要绕过密码创建,请单击 确定。 记下导出的 p12 证书的文件名和位置。 它们用于通过 APN 启用身份验证。
注意
p12 文件名和位置可能与本教程中所示的内容不同。
选项 2:创建可用于基于令牌的身份验证的 p8 证书
记下以下详细信息:
- 应用 ID 前缀(团队 ID)
- 捆绑 ID
返回 证书、标识符 & 配置文件,单击 密钥。
注意
如果已为 APNS配置了密钥,则可以在创建后重新使用下载的 p8 证书。 如果是这样,则可以忽略 步骤 3 到 5 5。
单击 + 按钮(或 创建密钥 按钮)创建新密钥。
提供合适的
密钥名称 值,然后检查Apple Push Notifications 服务(APNS) 选项,然后单击“继续”,然后在下一屏幕上单击“ 注册 ”。单击 下载,然后将 p8 文件(前缀为 AuthKey_)移动到安全本地目录,然后单击 完成。
注意
请务必将 p8 文件保存在安全的位置(并保存备份)。 下载密钥后,无法重新下载密钥,因为删除了服务器副本。
在 密钥上,单击创建的密钥(或者选择使用该密钥的现有密钥)。
记下 密钥 ID 值。
在所选的合适应用程序中打开 p8 证书,例如 Visual Studio Code。 记下密钥值(在 ----- BEGIN PRIVATE KEY----- 和 ----- END PRIVATE KEY-----之间)。
-----BEGIN 私钥-----
<key_value>
-----END PRIVATE KEY-----注意
这是 令牌值,稍后将用于配置 通知中心。
在这些步骤结束时,应该有以下信息供稍后在 使用 APNS 信息配置通知中心:
- 团队 ID(请参阅步骤 1)
- 捆绑 ID(请参阅步骤 1)
- 密钥 ID(请参阅步骤 7)
- 令牌值(步骤 8 中获取的 p8 密钥值)
为应用创建预配配置文件
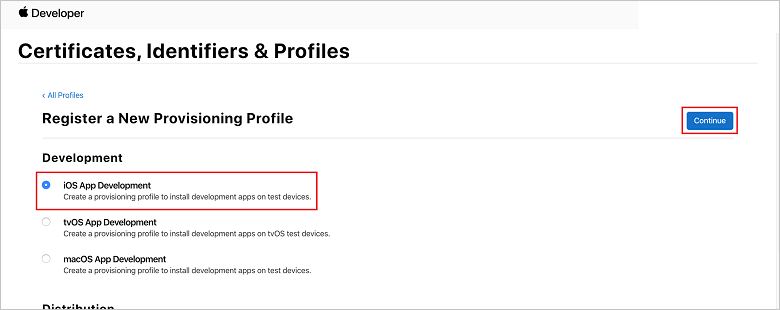
返回到 iOS 预配门户,选择 证书、标识符 & 配置文件,从左侧菜单中选择 配置文件,然后选择 + 创建新配置文件。 此时会显示“注册新的预配配置文件” 屏幕。
选择 开发 下的 iOS 应用开发 作为预配配置文件类型,然后选择 继续。
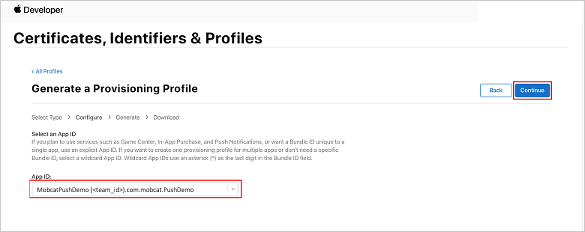
接下来,选择从 应用 ID 下拉列表中创建的应用 ID,然后选择 继续。
在“选择证书 窗口中,选择用于代码签名的开发证书,然后选择 继续。
注意
此证书不是在上 一步骤上一步中创建的推送证书。 这是开发证书。 如果不存在,则必须创建它,因为这是本教程
先决条件。 开发人员证书可以通过 Xcode 或 visual Studio在Apple 开发人员门户 中创建。 返回到 证书,标识符 & 配置文件 页,从左侧菜单中选择 配置文件,然后选择 + 创建新配置文件。 此时会显示“注册新的预配配置文件” 屏幕。
在“选择证书 窗口中,选择创建的开发证书。 然后选择 继续。
接下来,选择要用于测试的设备,然后选择 继续。
最后,在 预配配置文件名称中选择配置文件的名称,然后选择 生成。
创建新的预配配置文件时,请选择“下载
。 请记住保存它的位置。 浏览到预配配置文件的位置,然后双击它以在开发计算机上安装它。
创建通知中心
在本部分中,你将创建一个通知中心,并使用 APNS配置身份验证。 可以使用 p12 推送证书或基于令牌的身份验证。 如果要使用已创建的通知中心,可以跳到步骤 5。
登录到 Azure
。 单击 创建资源,然后搜索并选择 通知中心,然后单击 创建。
更新以下字段,然后单击“创建
: 基本详细信息
订阅: 从下拉列表中选择目标 订阅
资源组: 创建新的 资源组(或选取现有资源组)命名空间详细信息
通知中心Namespace: 输入 通知中心 命名空间的全局唯一名称
注意
确保为此字段选择了“新建”选项
。 通知中心详细信息
通知中心: 输入 通知中心 的名称
位置: 从下拉列表中选择合适的位置
定价层: 保留默认 免费 选项注意
除非已达到免费层上的最大中心数。
预配 通知中心 后,导航到该资源。
导航到新的 通知中心。
从列表中选择 访问策略(MANAGE下)。
记下 策略名称 值及其相应的 连接字符串 值。
使用 APNS 信息配置通知中心
在 通知服务下,选择 Apple,然后根据之前在 创建通知中心证书 部分中选择的方法执行相应的步骤。
注意
仅当想要向从应用商店购买应用的用户发送推送通知时,才对 应用程序模式 使用 生产。
选项 1:使用 .p12 推送证书
选择 证书。
选择文件图标。
选择之前导出的 .p12 文件,然后选择 打开。
如有必要,请指定正确的密码。
选择 沙盒 模式。
选择 保存。
选项 2:使用基于令牌的身份验证
选择 令牌。
输入之前获取的以下值:
- 密钥 ID
- 捆绑 ID
- 团队 ID
- 令牌
选择 沙盒。
选择 保存。
使用 FCM 信息配置通知中心
- 在左侧菜单中 设置 部分选择 Google (GCM/FCM)。
- 输入从 Google Firebase 控制台中记录的 服务器密钥。
- 选择工具栏上的 保存。
创建 ASP.NET Core Web API 后端应用程序
在本部分中,你将创建 ASP.NET Core Web API 后端来处理 设备注册 以及向 Xamarin.Forms 移动应用发送通知。
创建 Web 项目
在 Visual Studio中,选择 文件>新解决方案。
选择 .NET Core>应用>ASP.NET Core>API>下一。
在
配置新的 ASP.NET Core Web API 对话框中,选择.NET Core 3.1 目标框架。 为 项目名称 输入 PushDemoApi,然后选择 创建。
开始调试(命令 + Enter)以测试模板化应用。
注意
模板化应用配置为使用 WeatherForecastController 作为 launchUrl。 这在 属性>launchSettings.json中设置。
如果系统提示你出现 找不到开发证书 消息:
单击 是 同意运行“dotnet dev-certs https”工具解决此问题。 然后,“dotnet dev-certs https”工具提示输入证书的密码和密钥链的密码。
当系统提示 安装并信任新证书时,单击“是”,然后输入密钥链的密码。
展开 控制器 文件夹,然后删除 WeatherForecastController.cs。
删除 WeatherForecast.cs。
使用 Secret Manager 工具设置本地配置值。 将机密与解决方案分离可确保它们最终不会出现在源代码管理中。 打开 终端 然后转到项目文件的目录并运行以下命令:
dotnet user-secrets init
dotnet user-secrets set "NotificationHub:Name" <value>
dotnet user-secrets set "NotificationHub:ConnectionString" <value>
将占位符值替换为你自己的通知中心名称和连接字符串值。 在 创建通知中心 部分记下了这些通知。 否则,可以在 Azure
中查找它们。 NotificationHub:Name:
请参阅 概述顶部 概要 摘要中的 名称。NotificationHub:ConnectionString:
请参阅 访问策略 中的 DefaultFullSharedAccessSignature注意
对于生产方案,可以查看 Azure KeyVault 等选项来安全地存储连接字符串。 为简单起见,机密将添加到 Azure 应用服务 应用程序设置。
使用 API 密钥对客户端进行身份验证(可选)
API 密钥不如令牌那么安全,但对于本教程而言,API 密钥就足够了。 可以通过 ASP.NET 中间件轻松配置 API 密钥。
将 API 密钥 添加到本地配置值。
dotnet user-secrets set "Authentication:ApiKey" <value>注意
应将占位符值替换为你自己的占位符值,并记下它。
控制 在 pushDemoApi 项目中单击 ,从“ 添加 ”菜单中选择“新建文件夹 ”,然后使用身份验证 作为文件夹名称 单击添加 。控制 + 单击 身份验证 文件夹中的,然后从 “添加”菜单中选择 “新建文件...”
选择 常规>空类,输入 名称的 ApiKeyAuthOptions.cs,然后单击 “新建 添加以下实现”。
using Microsoft.AspNetCore.Authentication;

namespace PushDemoApi.Authentication
{
    public class ApiKeyAuthOptions : AuthenticationSchemeOptions
    {
        public const string DefaultScheme = "ApiKey";
        public string Scheme => DefaultScheme;
        public string ApiKey { get; set; }
    }
}
将另一个 空类 添加到名为 ApiKeyAuthHandler.cs的 身份验证 文件夹中,然后添加以下实现。
using System;
using System.Collections.Generic;
using System.Linq;
using System.Security.Claims;
using System.Text.Encodings.Web;
using System.Threading.Tasks;
using Microsoft.AspNetCore.Authentication;
using Microsoft.Extensions.Logging;
using Microsoft.Extensions.Options;

namespace PushDemoApi.Authentication
{
    public class ApiKeyAuthHandler : AuthenticationHandler<ApiKeyAuthOptions>
    {
        const string ApiKeyIdentifier = "apikey";

        public ApiKeyAuthHandler(
            IOptionsMonitor<ApiKeyAuthOptions> options,
            ILoggerFactory logger,
            UrlEncoder encoder,
            ISystemClock clock)
            : base(options, logger, encoder, clock) {}

        protected override Task<AuthenticateResult> HandleAuthenticateAsync()
        {
            string key = string.Empty;

            if (Request.Headers[ApiKeyIdentifier].Any())
            {
                key = Request.Headers[ApiKeyIdentifier].FirstOrDefault();
            }
            else if (Request.Query.ContainsKey(ApiKeyIdentifier))
            {
                if (Request.Query.TryGetValue(ApiKeyIdentifier, out var queryKey))
                    key = queryKey;
            }

            if (string.IsNullOrWhiteSpace(key))
                return Task.FromResult(AuthenticateResult.Fail("No api key provided"));

            if (!string.Equals(key, Options.ApiKey, StringComparison.Ordinal))
                return Task.FromResult(AuthenticateResult.Fail("Invalid api key."));

            var identities = new List<ClaimsIdentity> {
                new ClaimsIdentity("ApiKeyIdentity")
            };

            var ticket = new AuthenticationTicket(
                new ClaimsPrincipal(identities), Options.Scheme);

            return Task.FromResult(AuthenticateResult.Success(ticket));
        }
    }
}
注意
身份验证处理程序 是实现方案行为的类型,在本例中为自定义 API 密钥方案。
将另一个 空类 添加到名为 ApiKeyAuthenticationBuilderExtensions.cs的 身份验证 文件夹中,然后添加以下实现。
using System;
using Microsoft.AspNetCore.Authentication;

namespace PushDemoApi.Authentication
{
    public static class AuthenticationBuilderExtensions
    {
        public static AuthenticationBuilder AddApiKeyAuth(
            this AuthenticationBuilder builder,
            Action<ApiKeyAuthOptions> configureOptions)
        {
            return builder
                .AddScheme<ApiKeyAuthOptions, ApiKeyAuthHandler>(
                    ApiKeyAuthOptions.DefaultScheme,
                    configureOptions);
        }
    }
}
注意
此扩展方法简化了 Startup.cs 中的中间件配置代码,使其更易于阅读且通常更易于遵循。
在 Startup.cs中,更新 ConfigureServices 方法,以在调用 服务时配置 API 密钥身份验证。AddControllers 方法。
using PushDemoApi.Authentication;
using PushDemoApi.Models;
using PushDemoApi.Services;

public void ConfigureServices(IServiceCollection services)
{
    services.AddControllers();

    services.AddAuthentication(options =>
    {
        options.DefaultAuthenticateScheme = ApiKeyAuthOptions.DefaultScheme;
        options.DefaultChallengeScheme = ApiKeyAuthOptions.DefaultScheme;
    }).AddApiKeyAuth(Configuration.GetSection("Authentication").Bind);
}
仍在 Startup.cs中,更新 Configure 方法,以在应用的 IApplicationBuilder上调用 UseAuthentication 和 UseAuthorization 扩展方法。 确保在 UseRouting 之后和 应用之前调用这些方法。UseEndpoints。
public void Configure(IApplicationBuilder app, IWebHostEnvironment env)
{
    if (env.IsDevelopment())
    {
        app.UseDeveloperExceptionPage();
    }

    app.UseHttpsRedirection();

    app.UseRouting();

    app.UseAuthentication();

    app.UseAuthorization();

    app.UseEndpoints(endpoints =>
    {
        endpoints.MapControllers();
    });
}
注意
调用 UseAuthentication 注册使用以前注册的身份验证方案的中间件(ConfigureServices)。 必须在依赖于用户进行身份验证的任何中间件之前调用此功能。
添加依赖项并配置服务
ASP.NET Core 支持 依赖项注入(DI) 软件设计模式,这是实现类与其依赖项之间 控制反转(IoC) 的技术。
使用通知中心和用于后端操作的 通知中心 SDK 封装在服务中。 该服务通过适当的抽象进行注册和提供。
控制 + 单击 依赖项 文件夹上的,然后选择 “管理 NuGet 包...”。
搜索 Microsoft.Azure.NotificationHubs 并确保它已选中。
单击 添加包,然后在系统提示接受许可条款时单击 “接受”。
Control + Click on the PushDemoApi project, choose New Folder from the Add menu, then click Add using Models as the Folder Name.
控制 + 单击 模型 文件夹中的,然后从 “添加”菜单中选择“新建文件...”。
选择
“常规 空类 ,输入PushTemplates.cs 名称 ,然后单击”新建“ 添加以下实现。 namespace PushDemoApi.Models { public class PushTemplates { public class Generic { public const string Android = "{ \"notification\": { \"title\" : \"PushDemo\", \"body\" : \"$(alertMessage)\"}, \"data\" : { \"action\" : \"$(alertAction)\" } }"; public const string iOS = "{ \"aps\" : {\"alert\" : \"$(alertMessage)\"}, \"action\" : \"$(alertAction)\" }"; } public class Silent { public const string Android = "{ \"data\" : {\"message\" : \"$(alertMessage)\", \"action\" : \"$(alertAction)\"} }"; public const string iOS = "{ \"aps\" : {\"content-available\" : 1, \"apns-priority\": 5, \"sound\" : \"\", \"badge\" : 0}, \"message\" : \"$(alertMessage)\", \"action\" : \"$(alertAction)\" }"; } } }将另一个 空类 添加到名为 DeviceInstallation.cs的 Models 文件夹中,然后添加以下实现。
using System.Collections.Generic;
using System.ComponentModel.DataAnnotations;

namespace PushDemoApi.Models
{
    public class DeviceInstallation
    {
        [Required]
        public string InstallationId { get; set; }

        [Required]
        public string Platform { get; set; }

        [Required]
        public string PushChannel { get; set; }

        public IList<string> Tags { get; set; } = Array.Empty<string>();
    }
}
将另一个 空类 添加到名为 NotificationRequest.cs的 Models 文件夹中,然后添加以下实现。
using System;

namespace PushDemoApi.Models
{
    public class NotificationRequest
    {
        public string Text { get; set; }
        public string Action { get; set; }
        public string[] Tags { get; set; } = Array.Empty<string>();
        public bool Silent { get; set; }
    }
}
将另一个 空类 添加到名为 NotificationHubOptions.cs的 Models 文件夹中,然后添加以下实现。
using System.ComponentModel.DataAnnotations;

namespace PushDemoApi.Models
{
    public class NotificationHubOptions
    {
        [Required]
        public string Name { get; set; }

        [Required]
        public string ConnectionString { get; set; }
    }
}
将新文件夹添加到名为 Services的 PushDemoApi 项目。
将 空接口 添加到名为 INotificationService.cs的 Services 文件夹中,然后添加以下实现。
using System.Threading;
using System.Threading.Tasks;
using PushDemoApi.Models;

namespace PushDemoApi.Services
{
    public interface INotificationService
    {
        Task<bool> CreateOrUpdateInstallationAsync(DeviceInstallation deviceInstallation, CancellationToken token);
        Task<bool> DeleteInstallationByIdAsync(string installationId, CancellationToken token);
        Task<bool> RequestNotificationAsync(NotificationRequest notificationRequest, CancellationToken token);
    }
}
将 空类 添加到名为 NotificationHubsService.cs的 Services 文件夹中,然后添加以下代码来实现 INotificationService 接口:
using System;
using System.Collections.Generic;
using System.Linq;
using System.Threading;
using System.Threading.Tasks;
using Microsoft.Azure.NotificationHubs;
using Microsoft.Extensions.Logging;
using Microsoft.Extensions.Options;
using PushDemoApi.Models;

namespace PushDemoApi.Services
{
    public class NotificationHubService : INotificationService
    {
        readonly NotificationHubClient _hub;
        readonly Dictionary<string, NotificationPlatform> _installationPlatform;
        readonly ILogger<NotificationHubService> _logger;

        public NotificationHubService(IOptions<NotificationHubOptions> options, ILogger<NotificationHubService> logger)
        {
            _logger = logger;
            _hub = NotificationHubClient.CreateClientFromConnectionString(
                options.Value.ConnectionString,
                options.Value.Name);

            _installationPlatform = new Dictionary<string, NotificationPlatform>
            {
                { nameof(NotificationPlatform.Apns).ToLower(), NotificationPlatform.Apns },
                { nameof(NotificationPlatform.Fcm).ToLower(), NotificationPlatform.Fcm }
            };
        }

        public async Task<bool> CreateOrUpdateInstallationAsync(DeviceInstallation deviceInstallation, CancellationToken token)
        {
            if (string.IsNullOrWhiteSpace(deviceInstallation?.InstallationId) ||
                string.IsNullOrWhiteSpace(deviceInstallation?.Platform) ||
                string.IsNullOrWhiteSpace(deviceInstallation?.PushChannel))
                return false;

            var installation = new Installation()
            {
                InstallationId = deviceInstallation.InstallationId,
                PushChannel = deviceInstallation.PushChannel,
                Tags = deviceInstallation.Tags
            };

            if (_installationPlatform.TryGetValue(deviceInstallation.Platform, out var platform))
                installation.Platform = platform;
            else
                return false;

            try
            {
                await _hub.CreateOrUpdateInstallationAsync(installation, token);
            }
            catch
            {
                return false;
            }

            return true;
        }

        public async Task<bool> DeleteInstallationByIdAsync(string installationId, CancellationToken token)
        {
            if (string.IsNullOrWhiteSpace(installationId))
                return false;

            try
            {
                await _hub.DeleteInstallationAsync(installationId, token);
            }
            catch
            {
                return false;
            }

            return true;
        }

        public async Task<bool> RequestNotificationAsync(NotificationRequest notificationRequest, CancellationToken token)
        {
            if ((notificationRequest.Silent &&
                string.IsNullOrWhiteSpace(notificationRequest?.Action)) ||
                (!notificationRequest.Silent &&
                (string.IsNullOrWhiteSpace(notificationRequest?.Text)) ||
                string.IsNullOrWhiteSpace(notificationRequest?.Action)))
                return false;

            var androidPushTemplate = notificationRequest.Silent ?
                PushTemplates.Silent.Android :
                PushTemplates.Generic.Android;

            var iOSPushTemplate = notificationRequest.Silent ?
                PushTemplates.Silent.iOS :
                PushTemplates.Generic.iOS;

            var androidPayload = PrepareNotificationPayload(
                androidPushTemplate,
                notificationRequest.Text,
                notificationRequest.Action);

            var iOSPayload = PrepareNotificationPayload(
                iOSPushTemplate,
                notificationRequest.Text,
                notificationRequest.Action);

            try
            {
                if (notificationRequest.Tags.Length == 0)
                {
                    // This will broadcast to all users registered in the notification hub
                    await SendPlatformNotificationsAsync(androidPayload, iOSPayload, token);
                }
                else if (notificationRequest.Tags.Length <= 20)
                {
                    await SendPlatformNotificationsAsync(androidPayload, iOSPayload, notificationRequest.Tags, token);
                }
                else
                {
                    var notificationTasks = notificationRequest.Tags
                        .Select((value, index) => (value, index))
                        .GroupBy(g => g.index / 20, i => i.value)
                        .Select(tags => SendPlatformNotificationsAsync(androidPayload, iOSPayload, tags, token));

                    await Task.WhenAll(notificationTasks);
                }

                return true;
            }
            catch (Exception e)
            {
                _logger.LogError(e, "Unexpected error sending notification");
                return false;
            }
        }

        string PrepareNotificationPayload(string template, string text, string action) => template
            .Replace("$(alertMessage)", text, StringComparison.InvariantCulture)
            .Replace("$(alertAction)", action, StringComparison.InvariantCulture);

        Task SendPlatformNotificationsAsync(string androidPayload, string iOSPayload, CancellationToken token)
        {
            var sendTasks = new Task[]
            {
                _hub.SendFcmNativeNotificationAsync(androidPayload, token),
                _hub.SendAppleNativeNotificationAsync(iOSPayload, token)
            };

            return Task.WhenAll(sendTasks);
        }

        Task SendPlatformNotificationsAsync(string androidPayload, string iOSPayload, IEnumerable<string> tags, CancellationToken token)
        {
            var sendTasks = new Task[]
            {
                _hub.SendFcmNativeNotificationAsync(androidPayload, tags, token),
                _hub.SendAppleNativeNotificationAsync(iOSPayload, tags, token)
            };

            return Task.WhenAll(sendTasks);
        }
    }
}
注意
提供给 SendTemplateNotificationAsync 的标记表达式限制为 20 个标记。 对于大多数运算符,它限制为 6,但在这种情况下,表达式仅包含 OU(||)。 如果请求中有 20 多个标记,则必须将其拆分为多个请求。 有关更多详细信息,请参阅 路由和标记表达式 文档。
在 Startup.cs中,更新 ConfigureServices 方法,将 NotificationHubsService 添加为 INotificationService的单一实例实现。
using PushDemoApi.Models;
using PushDemoApi.Services;

public void ConfigureServices(IServiceCollection services)
{
    ...

    services.AddSingleton<INotificationService, NotificationHubService>();

    services.AddOptions<NotificationHubOptions>()
        .Configure(Configuration.GetSection("NotificationHub").Bind)
        .ValidateDataAnnotations();
}
创建通知 API
控制 + 单击 控制器 文件夹中的,然后 从“添加”菜单中选择 “新建文件...”。
选择 ASP.NET Core>Web API 控制器类,输入 NotificationsController名称,然后单击 “新建”。
注意
如果使用
Visual Studio 2019 ,请选择 模板API 控制器以及读写操作。 将以下命名空间添加到文件顶部。
using System.ComponentModel.DataAnnotations;
using System.Net;
using System.Threading;
using System.Threading.Tasks;
using Microsoft.AspNetCore.Authorization;
using Microsoft.AspNetCore.Mvc;
using PushDemoApi.Models;
using PushDemoApi.Services;
更新模板化控制器,使其派生自 ControllerBase,并使用 ApiController 属性进行修饰。
[ApiController]
[Route("api/[controller]")]
public class NotificationsController : ControllerBase
{
    // Templated methods here
}
注意
Controller 基类提供视图支持,但在这种情况下不需要这样做,因此可以改用 ControllerBase。 如果遵循 Visual Studio 2019,则可以跳过此步骤。
如果选择使用 API 密钥 部分完成
身份验证客户端,则还应使用 Authorize 属性修饰NotificationsController 。[Authorize]更新构造函数以接受注册的 INotificationService 实例 作为参数,并将其分配给只读成员。
readonly INotificationService _notificationService;

public NotificationsController(INotificationService notificationService)
{
    _notificationService = notificationService;
}
在 launchSettings.json(在 属性 文件夹中),将 launchUrl 从
weatherforecast更改为 api/notifications,以匹配 RegistrationsControllerRoute 属性中指定的 URL。启动调试(Command + Enter)以验证应用是否正在使用新的 NotificationsController,并返回 401 未经授权的 状态。
注意
Visual Studio 可能不会在浏览器中自动启动应用。 你将使用 Postman 从此开始测试 API。
在新的 Postman 选项卡上,将请求设置为 GET。 输入下面的地址,将占位符 <applicationUrl> 替换为在 Properties>launchSettings.json中找到的 https applicationUrl。
<applicationUrl>/api/notifications注意
默认配置文件 applicationUrl 应为“https://localhost:5001”。 如果使用的是 IIS(windows 上的 visual Studio 2019 中的默认值),则应改用 iisSettings 项中指定的 applicationUrl。 如果地址不正确,将收到 404 响应。
如果选择使用 API 密钥 部分完成
对客户端进行身份验证,请确保将请求标头配置为包含 apikey 值。钥匙 价值 apikey <your_api_key> 单击“发送”按钮
。 注意
应收到一些 JSON 内容 200 正常 状态。
如果收到
SSL 证书验证 警告,则可以在设置 中切换 postman 请求 SSL 证书验证。 将 NotificationsController.cs 中的模板化类方法替换为以下代码。
[HttpPut]
[Route("installations")]
[ProducesResponseType((int)HttpStatusCode.OK)]
[ProducesResponseType((int)HttpStatusCode.BadRequest)]
[ProducesResponseType((int)HttpStatusCode.UnprocessableEntity)]
public async Task<IActionResult> UpdateInstallation(
    [Required]DeviceInstallation deviceInstallation)
{
    var success = await _notificationService
        .CreateOrUpdateInstallationAsync(deviceInstallation, HttpContext.RequestAborted);

    if (!success)
        return new UnprocessableEntityResult();

    return new OkResult();
}

[HttpDelete()]
[Route("installations/{installationId}")]
[ProducesResponseType((int)HttpStatusCode.OK)]
[ProducesResponseType((int)HttpStatusCode.BadRequest)]
[ProducesResponseType((int)HttpStatusCode.UnprocessableEntity)]
public async Task<ActionResult> DeleteInstallation(
    [Required][FromRoute]string installationId)
{
    var success = await _notificationService
        .DeleteInstallationByIdAsync(installationId, CancellationToken.None);

    if (!success)
        return new UnprocessableEntityResult();

    return new OkResult();
}

[HttpPost]
[Route("requests")]
[ProducesResponseType((int)HttpStatusCode.OK)]
[ProducesResponseType((int)HttpStatusCode.BadRequest)]
[ProducesResponseType((int)HttpStatusCode.UnprocessableEntity)]
public async Task<IActionResult> RequestPush(
    [Required]NotificationRequest notificationRequest)
{
    if ((notificationRequest.Silent &&
        string.IsNullOrWhiteSpace(notificationRequest?.Action)) ||
        (!notificationRequest.Silent &&
        string.IsNullOrWhiteSpace(notificationRequest?.Text)))
        return new BadRequestResult();

    var success = await _notificationService
        .RequestNotificationAsync(notificationRequest, HttpContext.RequestAborted);

    if (!success)
        return new UnprocessableEntityResult();

    return new OkResult();
}
创建 API 应用
现在,在 Azure 应用服务 中创建用于托管后端服务的 API 应用。
登录到 Azure 门户。
单击 创建资源,然后搜索并选择 API 应用,然后单击 创建。
更新以下字段,然后单击 创建。
应用名称:
输入 API 应用 的全局唯一名称订阅:
在创建通知中心 选择同一目标订阅。 资源组:
在其中创建了通知中心,请选择相同的资源组。 应用服务计划/位置:
创建新的 应用服务计划注意
从默认选项更改为包含 SSL 支持的计划。 否则,在使用移动应用时,需要采取适当的步骤,以防止 http 请求被阻止。
Application Insights:
保留建议的选项(将使用该名称创建新资源)或选取现有资源。预配 API 应用 后,导航到该资源。
记下 概述顶部 Essentials 摘要中的 URL 属性。 此 URL 是 后端终结点,将在本教程后面部分使用。
注意
URL 使用前面指定的 API 应用名称,格式
https://<app_name>.azurewebsites.net。从列表中选择 配置(在 设置下)。
对于以下每个设置,请单击 “新建应用程序”设置 以输入 名称 和 值,然后单击 “确定”。
名字 价值 Authentication:ApiKey<api_key_value> NotificationHub:Name<hub_name_value> NotificationHub:ConnectionString<hub_connection_string_value> 注意
这些设置与之前在用户设置中定义的设置相同。 你应该能够复制这些内容。 仅当选择使用 API 密钥 部分完成
对客户端进行身份验证时,才需要 身份验证:ApiKey 设置。 对于生产方案,可以查看 Azure KeyVault等选项。 为了简单起见,这些设置已添加为应用程序设置。添加所有应用程序设置后,单击 保存,然后 继续。
发布后端服务
接下来,将应用部署到 API 应用,使其可从所有设备访问。
注意
以下步骤特定于 Visual Studio for Mac。 如果在 Windows 上使用 Visual Studio 2019 关注,发布流将有所不同。 请参阅 发布到 Windows上的 Azure 应用服务。
如果尚未这样做,请将配置从 调试 更改为 发布。
控制 + 单击 PushDemoApi 项目,然后从 “发布”菜单中选择“发布到 Azure...”。
如果系统提示这样做,请按照身份验证流进行操作。 使用在上一 中创建 API 应用 部分所用的帐户。
选择之前从列表中创建 Azure 应用服务 API 应用 作为发布目标,然后单击 发布。
完成向导后,它会将应用发布到 Azure,然后打开该应用。 如果尚未这样做,请记下 URL。 此 URL 是本教程稍后使用的 后端终结点。
验证已发布的 API
在 Postman 打开一个新选项卡,将请求设置为 PUT,然后输入以下地址。 将占位符替换为在上一 发布后端服务 部分记下的基本地址。
https://<app_name>.azurewebsites.net/api/notifications/installations注意
基址的格式应为
https://<app_name>.azurewebsites.net/如果选择使用 API 密钥 部分完成
对客户端进行身份验证,请确保将请求标头配置为包含 apikey 值。钥匙 价值 apikey <your_api_key> 为 正文选择 原始 选项,然后从格式选项列表中选择 JSON,然后包括一些占位符 JSON 内容:
{}单击 发送。
注意
应从服务收到 422 UnprocessableEntity 状态。
再次执行步骤 1-4,但这次指定请求终结点以验证收到 400 错误的请求 响应。
https://<app_name>.azurewebsites.net/api/notifications/requests
注意
目前无法使用有效的请求数据测试 API,因为这需要来自客户端移动应用的平台特定信息。
创建跨平台 Xamarin.Forms 应用程序
在本部分中,你将构建 Xamarin.Forms 移动应用程序,以跨平台方式实现推送通知。
它允许通过创建的后端服务从通知中心注册和取消注册。
指定操作且应用处于前台时,将显示警报。 否则,通知将显示在通知中心。
注意
通常在应用程序生命周期中的适当时间点(或作为首次运行体验的一部分)期间执行注册(和取消注册)操作,而无需显式用户注册/取消注册输入。 但是,此示例需要显式用户输入才能更轻松地浏览和测试此功能。
创建 Xamarin.Forms 解决方案
在 Visual Studio中,使用 空白窗体应用 作为模板创建新的 Xamarin.Forms 解决方案,并为 项目名称输入 PushDemo。
注意
在“配置空白窗体应用”对话框中,确保 组织标识符 与之前使用的值匹配,并检查 Android 和 iOS 目标。
控制 + 单击 PushDemo 解决方案上的,然后选择 更新 NuGet 包。
控制 + 单击 PushDemo 解决方案上的,然后选择“管理 NuGet 包”。。
搜索 Newtonsoft.Json 并确保选中。
单击 添加包,然后在系统提示接受许可条款时单击 “接受”。
在每个目标平台上生成并运行应用(Command + Enter),以测试在设备上运行的模板化应用。
实现跨平台组件
控件 + 单击 PushDemo 项目上的,从 “添加”菜单中选择 “新建文件夹”,然后单击 使用 模型 添加 作为 文件夹名称。
控制 + 单击 模型 文件夹中的,然后从 “添加”菜单中选择“新建文件...”。
选择 常规>空类,输入 DeviceInstallation.cs,然后添加以下实现。
using System.Collections.Generic;
using Newtonsoft.Json;

namespace PushDemo.Models
{
    public class DeviceInstallation
    {
        [JsonProperty("installationId")]
        public string InstallationId { get; set; }

        [JsonProperty("platform")]
        public string Platform { get; set; }

        [JsonProperty("pushChannel")]
        public string PushChannel { get; set; }

        [JsonProperty("tags")]
        public List<string> Tags { get; set; } = new List<string>();
    }
}
使用以下实现将 空枚举 添加到名为 PushDemoAction.cs 的 模型 文件夹中。
namespace PushDemo.Models
{
    public enum PushDemoAction
    {
        ActionA,
        ActionB
    }
}
将一个新文件夹添加到名为 Services 的 PushDemo 项目中,然后使用以下实现将 空类 添加到名为 ServiceContainer.cs 的文件夹。
using System;
using System.Collections.Generic;

namespace PushDemo.Services
{
   public static class ServiceContainer
   {
       static readonly Dictionary<Type, Lazy<object>> services
           = new Dictionary<Type, Lazy<object>>();

       public static void Register<T>(Func<T> function)
           => services[typeof(T)] = new Lazy<object>(() => function());

       public static T Resolve<T>()
           => (T)Resolve(typeof(T));

       public static object Resolve(Type type)
       {
           {
               if (services.TryGetValue(type, out var service))
                   return service.Value;

               throw new KeyNotFoundException($"Service not found for type '{type}'");
           }
       }
   }
}
注意
这是 XamCAT 存储库中 ServiceContainer 类的剪裁版本。 它将用作轻型 IoC(控制反转)容器。
将 空接口 添加到名为 IDeviceInstallationService.cs的 Services 文件夹中,然后添加以下代码。
using PushDemo.Models;

namespace PushDemo.Services
{
    public interface IDeviceInstallationService
    {
        string Token { get; set; }
        bool NotificationsSupported { get; }
        string GetDeviceId();
        DeviceInstallation GetDeviceInstallation(params string[] tags);
    }
}
注意
此接口稍后将由每个目标实现并启动,以提供特定于平台的功能,DeviceInstallation 后端服务所需的信息。
将另一个 空接口 添加到名为 INotificationRegistrationService.cs的 Services 文件夹中,然后添加以下代码。
using System.Threading.Tasks;

namespace PushDemo.Services
{
    public interface INotificationRegistrationService
    {
        Task DeregisterDeviceAsync();
        Task RegisterDeviceAsync(params string[] tags);
        Task RefreshRegistrationAsync();
    }
}
注意
这将处理客户端和后端服务之间的交互。
将另一个 空接口 添加到名为 INotificationActionService.cs的 Services 文件夹中,然后添加以下代码。
namespace PushDemo.Services
{
    public interface INotificationActionService
    {
        void TriggerAction(string action);
    }
}
注意
这用作集中处理通知操作的简单机制。
将 空接口 添加到名为 IPushDemoNotificationActionService.cs 的 Services 文件夹中,该文件夹派生自 INotificationActionService,实现如下。
using System;
using PushDemo.Models;

namespace PushDemo.Services
{
    public interface IPushDemoNotificationActionService : INotificationActionService
    {
        event EventHandler<PushDemoAction> ActionTriggered;
    }
}
注意
此类型特定于 PushDemo 应用程序,并使用 PushDemoAction 枚举来标识以强类型方式触发的操作。
使用以下代码将 空类 添加到名为 NotificationRegistrationService.cs 实现 INotificationRegistrationService 的 Services 文件夹中。
using System;
using System.Net.Http;
using System.Text;
using System.Threading.Tasks;
using Newtonsoft.Json;
using PushDemo.Models;
using Xamarin.Essentials;

namespace PushDemo.Services
{
    public class NotificationRegistrationService : INotificationRegistrationService
    {
        const string RequestUrl = "api/notifications/installations";
        const string CachedDeviceTokenKey = "cached_device_token";
        const string CachedTagsKey = "cached_tags";

        string _baseApiUrl;
        HttpClient _client;
        IDeviceInstallationService _deviceInstallationService;

        public NotificationRegistrationService(string baseApiUri, string apiKey)
        {
            _client = new HttpClient();
            _client.DefaultRequestHeaders.Add("Accept", "application/json");
            _client.DefaultRequestHeaders.Add("apikey", apiKey);

            _baseApiUrl = baseApiUri;
        }

        IDeviceInstallationService DeviceInstallationService
            => _deviceInstallationService ??
                (_deviceInstallationService = ServiceContainer.Resolve<IDeviceInstallationService>());

        public async Task DeregisterDeviceAsync()
        {
            var cachedToken = await SecureStorage.GetAsync(CachedDeviceTokenKey)
                .ConfigureAwait(false);

            if (cachedToken == null)
                return;

            var deviceId = DeviceInstallationService?.GetDeviceId();

            if (string.IsNullOrWhiteSpace(deviceId))
                throw new Exception("Unable to resolve an ID for the device.");

            await SendAsync(HttpMethod.Delete, $"{RequestUrl}/{deviceId}")
                .ConfigureAwait(false);

            SecureStorage.Remove(CachedDeviceTokenKey);
            SecureStorage.Remove(CachedTagsKey);
        }

        public async Task RegisterDeviceAsync(params string[] tags)
        {
            var deviceInstallation = DeviceInstallationService?.GetDeviceInstallation(tags);

            await SendAsync<DeviceInstallation>(HttpMethod.Put, RequestUrl, deviceInstallation)
                .ConfigureAwait(false);

            await SecureStorage.SetAsync(CachedDeviceTokenKey, deviceInstallation.PushChannel)
                .ConfigureAwait(false);

            await SecureStorage.SetAsync(CachedTagsKey, JsonConvert.SerializeObject(tags));
        }

        public async Task RefreshRegistrationAsync()
        {
            var cachedToken = await SecureStorage.GetAsync(CachedDeviceTokenKey)
                .ConfigureAwait(false);

            var serializedTags = await SecureStorage.GetAsync(CachedTagsKey)
                .ConfigureAwait(false);

            if (string.IsNullOrWhiteSpace(cachedToken) ||
                string.IsNullOrWhiteSpace(serializedTags) ||
                string.IsNullOrWhiteSpace(DeviceInstallationService.Token) ||
                cachedToken == DeviceInstallationService.Token)
                return;

            var tags = JsonConvert.DeserializeObject<string[]>(serializedTags);

            await RegisterDeviceAsync(tags);
        }

        async Task SendAsync<T>(HttpMethod requestType, string requestUri, T obj)
        {
            string serializedContent = null;

            await Task.Run(() => serializedContent = JsonConvert.SerializeObject(obj))
                .ConfigureAwait(false);

            await SendAsync(requestType, requestUri, serializedContent);
        }

        async Task SendAsync(
            HttpMethod requestType,
            string requestUri,
            string jsonRequest = null)
        {
            var request = new HttpRequestMessage(requestType, new Uri($"{_baseApiUrl}{requestUri}"));

            if (jsonRequest != null)
                request.Content = new StringContent(jsonRequest, Encoding.UTF8, "application/json");

            var response = await _client.SendAsync(request).ConfigureAwait(false);

            response.EnsureSuccessStatusCode();
        }
    }
}
注意
仅当选择使用 API 密钥 部分完成
对客户端进行身份验证时,才需要 apiKey 参数。将 空类 添加到名为 PushDemoNotificationActionService.cs 的 Services 文件夹中,该文件夹使用以下代码实现 IPushDemoNotificationActionService。
using System;
using System.Collections.Generic;
using System.Linq;
using PushDemo.Models;

namespace PushDemo.Services
{
    public class PushDemoNotificationActionService : IPushDemoNotificationActionService
    {
        readonly Dictionary<string, PushDemoAction> _actionMappings = new Dictionary<string, PushDemoAction>
        {
            { "action_a", PushDemoAction.ActionA },
            { "action_b", PushDemoAction.ActionB }
        };

        public event EventHandler<PushDemoAction> ActionTriggered = delegate { };

        public void TriggerAction(string action)
        {
            if (!_actionMappings.TryGetValue(action, out var pushDemoAction))
                return;

            List<Exception> exceptions = new List<Exception>();

            foreach (var handler in ActionTriggered?.GetInvocationList())
            {
                try
                {
                    handler.DynamicInvoke(this, pushDemoAction);
                }
                catch (Exception ex)
                {
                    exceptions.Add(ex);
                }
            }

            if (exceptions.Any())
                throw new AggregateException(exceptions);
        }
    }
}
使用以下实现将 Empty 类 添加到名为 Config.cs 的 PushDemo 项目。
namespace PushDemo
{
    public static partial class Config
    {
        public static string ApiKey = "API_KEY";
        public static string BackendServiceEndpoint = "BACKEND_SERVICE_ENDPOINT";
    }
}
注意
这用作将机密从源代码管理中排除的简单方法。 可以将这些值替换为自动生成的一部分,或使用本地分部类替代这些值。 在下一步中将执行此操作。
仅当选择使用 API 密钥 部分完成
身份验证客户端时,才需要 ApiKey 字段。这次将另一个 空类 添加到 PushDemo 项目中,这一次调用了以下实现 Config.local_secrets.cs。
namespace PushDemo
{
    public static partial class Config
    {
        static Config()
        {
            ApiKey = "<your_api_key>";
            BackendServiceEndpoint = "<your_api_app_url>";
        }
    }
}
注意
将占位符值替换为你自己的值。 生成后端服务时,应记下这些内容。 应
https://<api_app_name>.azurewebsites.net/API 应用 URL。 请记住将*.local_secrets.*添加到 gitignore 文件以避免提交此文件。仅当选择使用 API 密钥 部分完成
身份验证客户端时,才需要 ApiKey 字段。使用以下实现将 空类 添加到名为 Bootstrap.cs 的 PushDemo 项目中。
using System;
using PushDemo.Services;

namespace PushDemo
{
    public static class Bootstrap
    {
        public static void Begin(Func<IDeviceInstallationService> deviceInstallationService)
        {
            ServiceContainer.Register(deviceInstallationService);

            ServiceContainer.Register<IPushDemoNotificationActionService>(()
                => new PushDemoNotificationActionService());

            ServiceContainer.Register<INotificationRegistrationService>(()
                => new NotificationRegistrationService(
                    Config.BackendServiceEndpoint,
                    Config.ApiKey));
        }
    }
}
注意
当应用启动传入特定于平台的 IDeviceInstallationService实现时,每个平台都会调用 Begin 方法。
仅当选择使用 API 密钥 部分完成
客户端身份验证客户端时,才需要 NotificationRegistrationService apiKey 构造函数参数。
实现跨平台 UI
在 PushDemo 项目中,打开 MainPage.xaml,并将 StackLayout 控件替换为以下内容。
<StackLayout VerticalOptions="EndAndExpand"
             HorizontalOptions="FillAndExpand"
             Padding="20,40">
    <Button x:Name="RegisterButton"
            Text="Register"
            Clicked="RegisterButtonClicked" />
    <Button x:Name="DeregisterButton"
            Text="Deregister"
            Clicked="DeregisterButtonClicked" />
</StackLayout>
现在,在 MainPage.xaml.cs中,添加 只读 后备字段来存储对 INotificationRegistrationService 实现的引用。
readonly INotificationRegistrationService _notificationRegistrationService;在 MainPage 构造函数中,使用 ServiceContainer 解析 INotificationRegistrationService 实现,并将其分配给 notificationRegistrationService 支持字段。
public MainPage()
{
    InitializeComponent();

    _notificationRegistrationService =
        ServiceContainer.Resolve<INotificationRegistrationService>();
}
为 RegisterButton 和 DeregisterButton 按钮实现事件处理程序,Clicked 事件调用相应的 注册/取消注册 方法。
void RegisterButtonClicked(object sender, EventArgs e)
    => _notificationRegistrationService.RegisterDeviceAsync().ContinueWith((task)
        => { ShowAlert(task.IsFaulted ?
                task.Exception.Message :
                $"Device registered"); });

void DeregisterButtonClicked(object sender, EventArgs e)
    => _notificationRegistrationService.DeregisterDeviceAsync().ContinueWith((task)
        => { ShowAlert(task.IsFaulted ?
                task.Exception.Message :
                $"Device deregistered"); });

void ShowAlert(string message)
    => MainThread.BeginInvokeOnMainThread(()
        => DisplayAlert("PushDemo", message, "OK").ContinueWith((task)
            => { if (task.IsFaulted) throw task.Exception; }));
现在,在 App.xaml.cs中,请确保引用以下命名空间。
using PushDemo.Models;
using PushDemo.Services;
using Xamarin.Essentials;
using Xamarin.Forms;
为 IPushDemoNotificationActionServiceActionTriggered 事件实现事件处理程序。
void NotificationActionTriggered(object sender, PushDemoAction e)
    => ShowActionAlert(e);

void ShowActionAlert(PushDemoAction action)
    => MainThread.BeginInvokeOnMainThread(()
        => MainPage?.DisplayAlert("PushDemo", $"{action} action received", "OK")
            .ContinueWith((task) => { if (task.IsFaulted) throw task.Exception; }));
在 应用 构造函数中,使用 ServiceContainer 解析 IPushNotificationActionService 实现,并订阅 IPushDemoNotificationActionServiceActionTriggered 事件。
public App()
{
    InitializeComponent();

    ServiceContainer.Resolve<IPushDemoNotificationActionService>()
        .ActionTriggered += NotificationActionTriggered;

    MainPage = new MainPage();
}
注意
这只是为了演示推送通知操作的接收和传播。 通常,这些操作将以无提示方式进行处理,例如导航到特定视图或刷新某些数据,而不是通过根 页面显示警报,在本例中 MainPage。
为本机 Android 项目配置推送通知
验证包名称和权限
在 PushDemo.Android中,打开 项目选项,然后 从“生成”部分 Android 应用程序。
检查 包名称 是否与 Firebase 控制台PushDemo 项目中使用的值匹配。 包名称 的格式为
com.<organization>.pushdemo。将 最低 Android 版本 设置为 Android 8.0(API 级别 26),并将 目标 Android 版本 设置为最新的 API 级别。
注意
本教程仅支持运行 API 级别 26 及更高级别的设备,但你可以将其扩展以支持运行旧版本的设备。
确保 INTERNET 和 READ_PHONE_STATE 权限在 所需权限下启用。
单击“确定”
添加 Xamarin Google Play Services 基础和 Xamarin.Firebase.Messaging 包
在 PushDemo.Android中,控制 + 单击 包 文件夹中的,然后选择“管理 NuGet 包...”。
搜索 Xamarin.GooglePlayServices.Base(不 地下室),并确保检查它。
搜索 Xamarin.Firebase.Messaging 并确保选中它。
单击 添加包,然后在系统提示接受 许可条款时单击 接受。
添加 Google Services JSON 文件
控件 + 单击
PushDemo.Android项目上的,然后 从“添加”菜单中选择“现有文件...”。在 Firebase 控制台中设置 PushDemo 项目时,请选择之前下载的 google-services.json 文件,然后单击 打开。
出现提示时,选择 将文件复制到目录。
控制 + 从
PushDemo.Android项目中单击 google-services.json 文件上的,确保 GoogleServicesJson 设置为 生成操作。
处理适用于 Android 的推送通知
控制 + 单击
PushDemo.Android项目上的,从 “添加”菜单中选择 “新建文件夹”,然后单击 使用 服务 添加 作为 文件夹名称。控制 + 单击 服务 文件夹中的,然后从 “添加”菜单中选择“新建文件...”。
选择 常规>空类,输入 名称的 DeviceInstallationService.cs,然后单击 “新建” 添加以下实现。
using System;
using Android.App;
using Android.Gms.Common;
using PushDemo.Models;
using PushDemo.Services;
using static Android.Provider.Settings;

namespace PushDemo.Droid.Services
{
    public class DeviceInstallationService : IDeviceInstallationService
    {
        public string Token { get; set; }

        public bool NotificationsSupported
            => GoogleApiAvailability.Instance
                .IsGooglePlayServicesAvailable(Application.Context) == ConnectionResult.Success;

        public string GetDeviceId()
            => Secure.GetString(Application.Context.ContentResolver, Secure.AndroidId);

        public DeviceInstallation GetDeviceInstallation(params string[] tags)
        {
            if (!NotificationsSupported)
                throw new Exception(GetPlayServicesError());

            if (string.IsNullOrWhiteSpace(Token))
                throw new Exception("Unable to resolve token for FCM");

            var installation = new DeviceInstallation
            {
                InstallationId = GetDeviceId(),
                Platform = "fcm",
                PushChannel = Token
            };

            installation.Tags.AddRange(tags);

            return installation;
        }

        string GetPlayServicesError()
        {
            int resultCode = GoogleApiAvailability.Instance.IsGooglePlayServicesAvailable(Application.Context);

            if (resultCode != ConnectionResult.Success)
                return GoogleApiAvailability.Instance.IsUserResolvableError(resultCode) ?
                           GoogleApiAvailability.Instance.GetErrorString(resultCode) :
                           "This device is not supported";

            return "An error occurred preventing the use of push notifications";
        }
    }
}
注意
此类提供唯一 ID(使用 Secure.AndroidId)作为通知中心注册有效负载的一部分。
将另一个 空类 添加到名为 PushNotificationFirebaseMessagingService.cs的 Services 文件夹中,然后添加以下实现。
using Android.App;
using Android.Content;
using Firebase.Messaging;
using PushDemo.Services;

namespace PushDemo.Droid.Services
{
    [Service]
    [IntentFilter(new[] { "com.google.firebase.MESSAGING_EVENT" })]
    public class PushNotificationFirebaseMessagingService : FirebaseMessagingService
    {
        IPushDemoNotificationActionService _notificationActionService;
        INotificationRegistrationService _notificationRegistrationService;
        IDeviceInstallationService _deviceInstallationService;

        IPushDemoNotificationActionService NotificationActionService
            => _notificationActionService ??
                (_notificationActionService =
                ServiceContainer.Resolve<IPushDemoNotificationActionService>());

        INotificationRegistrationService NotificationRegistrationService
            => _notificationRegistrationService ??
                (_notificationRegistrationService =
                ServiceContainer.Resolve<INotificationRegistrationService>());

        IDeviceInstallationService DeviceInstallationService
            => _deviceInstallationService ??
                (_deviceInstallationService =
                ServiceContainer.Resolve<IDeviceInstallationService>());

        public override void OnNewToken(string token)
        {
            DeviceInstallationService.Token = token;

            NotificationRegistrationService.RefreshRegistrationAsync()
                .ContinueWith((task) => { if (task.IsFaulted) throw task.Exception; });
        }

        public override void OnMessageReceived(RemoteMessage message)
        {
            if(message.Data.TryGetValue("action", out var messageAction))
                NotificationActionService.TriggerAction(messageAction);
        }
    }
}
在 MainActivity.cs中,确保已将以下命名空间添加到文件顶部。
using System;
using Android.App;
using Android.Content;
using Android.Content.PM;
using Android.OS;
using Android.Runtime;
using Firebase.Iid;
using PushDemo.Droid.Services;
using PushDemo.Services;
在 MainActivity.cs中,将 LaunchMode 设置为 SingleTop,以便在打开时不会再次创建 mainActivity。
[Activity(
    Label = "PushDemo",
    LaunchMode = LaunchMode.SingleTop,
    Icon = "@mipmap/icon",
    Theme = "@style/MainTheme",
    MainLauncher = true,
    ConfigurationChanges = ConfigChanges.ScreenSize | ConfigChanges.Orientation)]
添加私有属性和相应的后备字段,以存储对 IPushNotificationActionService 和 IDeviceInstallationService 实现的引用。
IPushDemoNotificationActionService _notificationActionService;
IDeviceInstallationService _deviceInstallationService;

IPushDemoNotificationActionService NotificationActionService
    => _notificationActionService ??
        (_notificationActionService =
        ServiceContainer.Resolve<IPushDemoNotificationActionService>());

IDeviceInstallationService DeviceInstallationService
    => _deviceInstallationService ??
        (_deviceInstallationService =
        ServiceContainer.Resolve<IDeviceInstallationService>());
实现 IOnSuccessListener 接口,以检索和存储 Firebase 令牌。
public class MainActivity : global::Xamarin.Forms.Platform.Android.FormsAppCompatActivity, Android.Gms.Tasks.IOnSuccessListener
{
    ...

    public void OnSuccess(Java.Lang.Object result)
        => DeviceInstallationService.Token =
            result.Class.GetMethod("getToken").Invoke(result).ToString();
}
添加名为 ProcessNotificationActions 的新方法,用于检查给定的 意向 是否具有名为 操作的额外值。 使用 IPushDemoNotificationActionService 实现有条件地触发该操作。
void ProcessNotificationActions(Intent intent)
{
    try
    {
        if (intent?.HasExtra("action") == true)
        {
            var action = intent.GetStringExtra("action");

            if (!string.IsNullOrEmpty(action))
                NotificationActionService.TriggerAction(action);
        }
    }
    catch (Exception ex)
    {
        System.Diagnostics.Debug.WriteLine(ex.Message);
    }
}
重写 OnNewIntent 方法以调用 ProcessNotificationActions 方法。
protected override void OnNewIntent(Intent intent)
{
    base.OnNewIntent(intent);
    ProcessNotificationActions(intent);
}
注意
由于
活动 的LaunchMode 设置为SingleTop ,因此意向 将通过 实例发送到现有活动 实例OnNewIntent 方法,而不是OnCreate 方法,因此必须在onCreate 和OnNewIntent 方法中处理传入意向。更新 OnCreate 方法,在调用
base.OnCreate传入特定于平台的 IDeviceInstallationService后调用Bootstrap.Begin。Bootstrap.Begin(() => new DeviceInstallationService());在同一方法中,在调用
Bootstrap.Begin后立即在调用 FirebaseApp 实例上 GetInstanceId,将 MainActivity 添加为 IOnSuccessListener。if (DeviceInstallationService.NotificationsSupported) { FirebaseInstanceId.GetInstance(Firebase.FirebaseApp.Instance) .GetInstanceId() .AddOnSuccessListener(this); }仍在 onCreate的
中,调用 ProcessNotificationActions ,调用传入当前 意向 。... LoadApplication(new App()); ProcessNotificationActions(Intent);
注意
每次运行应用时,都必须重新注册该应用,并阻止它从调试会话中停止,以继续接收推送通知。
为推送通知配置本机 iOS 项目
配置 Info.plist 和 Entitlements.plist
确保在 Visual Studio
首选项中登录到 Apple 开发人员帐户 ... 发布 Apple 开发人员帐户 ,并下载相应的证书 和预配配置文件 。 应已创建这些资产,作为前面的步骤的一部分。在 PushDemo.iOS中,打开 Info.plist 并确保 BundleIdentifier 与 Apple 开发人员门户中相应预配配置文件使用的值匹配。 BundleIdentifier 的格式为
com.<organization>.PushDemo。在同一文件中,将 最低系统版本 设置为 13.0。
注意
出于本教程的目的,仅支持运行 iOS 13.0 及更高版本的设备,但你可以扩展它以支持运行旧版本的设备。
打开 PushDemo.iOS 的 项目选项(双击项目)。
在 项目选项中,在 生成 > iOS 捆绑签名下,确保开发人员帐户在 团队下选中。 然后,确保已选择“自动管理签名”,并自动选择签名证书和预配配置文件。
注意
如果尚未自动选择 签名证书 和 预配配置文件,请选择 手动预配,然后单击 捆绑签名选项。 确保为
签名标识 选择了团队 ,并且为两种情况下 平台 选择了Provisioning Profile PushDe mo平台 选择iPhone 。在 PushDemo.iOS中,打开 Entitlements.plist,并确保在“权利”选项卡中查看 启用推送通知。然后,确保在 源 选项卡中查看时,APS 环境 设置设置为 开发。
处理 iOS 的推送通知
控制 单击 pushDemo.iOS 项目的 ,从“添加 ”菜单中选择“新建文件夹 ”,然后使用Services 作为文件夹名称 单击添加 。控制 + 单击 服务 文件夹中的,然后从 “添加”菜单中选择“新建文件...”。
选择 常规>空类,输入 名称的 DeviceInstallationService.cs,然后单击 “新建” 添加以下实现。
using System;
using PushDemo.Models;
using PushDemo.Services;
using UIKit;

namespace PushDemo.iOS.Services
{
    public class DeviceInstallationService : IDeviceInstallationService
    {
        const int SupportedVersionMajor = 13;
        const int SupportedVersionMinor = 0;

        public string Token { get; set; }

        public bool NotificationsSupported
            => UIDevice.CurrentDevice.CheckSystemVersion(SupportedVersionMajor, SupportedVersionMinor);

        public string GetDeviceId()
            => UIDevice.CurrentDevice.IdentifierForVendor.ToString();

        public DeviceInstallation GetDeviceInstallation(params string[] tags)
        {
            if (!NotificationsSupported)
                throw new Exception(GetNotificationsSupportError());

            if (string.IsNullOrWhiteSpace(Token))
                throw new Exception("Unable to resolve token for APNS");

            var installation = new DeviceInstallation
            {
                InstallationId = GetDeviceId(),
                Platform = "apns",
                PushChannel = Token
            };

            installation.Tags.AddRange(tags);

            return installation;
        }

        string GetNotificationsSupportError()
        {
            if (!NotificationsSupported)
                return $"This app only supports notifications on iOS {SupportedVersionMajor}.{SupportedVersionMinor} and above. You are running {UIDevice.CurrentDevice.SystemVersion}.";

            if (Token == null)
                return $"This app can support notifications but you must enable this in your settings.";


            return "An error occurred preventing the use of push notifications";
        }
    }
}
注意
此类提供唯一 ID(使用 UIDevice.IdentifierForVendor 值)和通知中心注册有效负载。
将一个新文件夹添加到名为 Extensions 的 PushDemo.iOS 项目中,然后使用以下实现将 空类 添加到名为 NSDataExtensions.cs 的文件夹。
using System.Text;
using Foundation;

namespace PushDemo.iOS.Extensions
{
    internal static class NSDataExtensions
    {
        internal static string ToHexString(this NSData data)
        {
            var bytes = data.ToArray();

            if (bytes == null)
                return null;

            StringBuilder sb = new StringBuilder(bytes.Length * 2);

            foreach (byte b in bytes)
                sb.AppendFormat("{0:x2}", b);

            return sb.ToString().ToUpperInvariant();
        }
    }
}
在 AppDelegate.cs中,确保已将以下命名空间添加到文件顶部。
using System;
using System.Diagnostics;
using System.Threading.Tasks;
using Foundation;
using PushDemo.iOS.Extensions;
using PushDemo.iOS.Services;
using PushDemo.Services;
using UIKit;
using UserNotifications;
using Xamarin.Essentials;
添加私有属性及其各自的后备字段,以存储对 IPushDemoNotificationActionService、INotificationRegistrationService和 IDeviceInstallationService 实现的引用。
IPushDemoNotificationActionService _notificationActionService;
INotificationRegistrationService _notificationRegistrationService;
IDeviceInstallationService _deviceInstallationService;

IPushDemoNotificationActionService NotificationActionService
    => _notificationActionService ??
        (_notificationActionService =
        ServiceContainer.Resolve<IPushDemoNotificationActionService>());

INotificationRegistrationService NotificationRegistrationService
    => _notificationRegistrationService ??
        (_notificationRegistrationService =
        ServiceContainer.Resolve<INotificationRegistrationService>());

IDeviceInstallationService DeviceInstallationService
    => _deviceInstallationService ??
        (_deviceInstallationService =
        ServiceContainer.Resolve<IDeviceInstallationService>());
添加 RegisterForRemoteNotifications 方法以注册用户通知设置,然后使用 APNS注册远程通知。
void RegisterForRemoteNotifications()
{
    MainThread.BeginInvokeOnMainThread(() =>
    {
        var pushSettings = UIUserNotificationSettings.GetSettingsForTypes(
            UIUserNotificationType.Alert |
            UIUserNotificationType.Badge |
            UIUserNotificationType.Sound,
            new NSSet());

        UIApplication.SharedApplication.RegisterUserNotificationSettings(pushSettings);
        UIApplication.SharedApplication.RegisterForRemoteNotifications();
    });
}
添加 CompleteRegistrationAsync 方法以设置
IDeviceInstallationService.Token属性值。 刷新注册并缓存设备令牌(如果自上次存储以来已更新)。Task CompleteRegistrationAsync(NSData deviceToken) { DeviceInstallationService.Token = deviceToken.ToHexString(); return NotificationRegistrationService.RefreshRegistrationAsync(); }添加 ProcessNotificationActions 方法来处理 NSDictionary 通知数据,并有条件地调用 NotificationActionService.TriggerAction。
void ProcessNotificationActions(NSDictionary userInfo)
{
    if (userInfo == null)
        return;

    try
    {
        var actionValue = userInfo.ObjectForKey(new NSString("action")) as NSString;

        if (!string.IsNullOrWhiteSpace(actionValue?.Description))
            NotificationActionService.TriggerAction(actionValue.Description);
    }
    catch (Exception ex)
    {
        Debug.WriteLine(ex.Message);
    }
}
重写 RegisteredForRemoteNotifications 方法,该方法将 deviceToken 参数传递给 CompleteRegistrationAsync 方法。
public override void RegisteredForRemoteNotifications(
    UIApplication application,
    NSData deviceToken)
    => CompleteRegistrationAsync(deviceToken).ContinueWith((task)
        => { if (task.IsFaulted) throw task.Exception; });
重写 ReceivedRemoteNotification 方法,该方法将 userInfo 参数传递给 ProcessNotificationActions 方法。
public override void ReceivedRemoteNotification(
    UIApplication application,
    NSDictionary userInfo)
    => ProcessNotificationActions(userInfo);
重写 FailedToRegisterForRemoteNotifications 方法以记录错误。
public override void FailedToRegisterForRemoteNotifications(
    UIApplication application,
    NSError error)
    => Debug.WriteLine(error.Description);
注意
这是一个非常占位符。 你需要为生产方案实现正确的日志记录和错误处理。
更新 FinishedLaunching 方法,以在调用
Forms.Init传入特定于平台的 IDeviceInstallationService后调用Bootstrap.Begin。Bootstrap.Begin(() => new DeviceInstallationService());在同一方法中,在
Bootstrap.Begin后立即请求授权并注册远程通知。if (DeviceInstallationService.NotificationsSupported) { UNUserNotificationCenter.Current.RequestAuthorization( UNAuthorizationOptions.Alert | UNAuthorizationOptions.Badge | UNAuthorizationOptions.Sound, (approvalGranted, error) => { if (approvalGranted && error == null) RegisterForRemoteNotifications(); }); }仍在 FinishedLaunching中,调用 ProcessNotificationActions
LoadApplication,如果 选项 参数包含 UIApplication.LaunchOptionsRemoteNotificationKey 传入生成的 userInfo 对象。using (var userInfo = options?.ObjectForKey( UIApplication.LaunchOptionsRemoteNotificationKey) as NSDictionary) ProcessNotificationActions(userInfo);
测试解决方案
现在可以测试通过后端服务发送通知。
发送测试通知
在 Postman中打开一个新选项卡。
将请求设置为 POST,并输入以下地址:
https://<app_name>.azurewebsites.net/api/notifications/requests如果选择使用 API 密钥 部分完成
对客户端进行身份验证,请确保将请求标头配置为包含 apikey 值。钥匙 价值 apikey <your_api_key> 为 正文选择 原始 选项,然后从格式选项列表中选择 JSON,然后包括一些占位符 JSON 内容:
{
    "text": "Message from Postman!",
    "action": "action_a"
}
选择 代码 按钮,该按钮位于窗口右上角 “保存”按钮下。 当为 HTML 显示时,请求应类似于以下示例(具体取决于是否包含 apikey 标头):
POST /api/notifications/requests HTTP/1.1
Host: https://<app_name>.azurewebsites.net
apikey: <your_api_key>
Content-Type: application/json

{
    "text": "Message from backend service",
    "action": "action_a"
}
在一个或两个目标平台上运行 PushDemo 应用程序(Android 和 iOS)。
注意
如果在 android
上进行测试 请确保未在调试运行,或者通过运行应用程序部署应用,然后强制关闭应用并从启动器重新启动它。 在 PushDemo 应用中,点击“注册”按钮。
返回 Postman,关闭 生成代码片段 窗口(如果尚未这样做),然后单击 发送 按钮。
验证是否在
Postman 200 正常 响应,并且警报显示在显示收到ActionA 操作的应用中。 关闭 PushDemo 应用,然后在 Postman中再次 单击“发送”按钮。
验证是否在 Postman 中收到 200 正常 响应。 使用正确的消息验证 PushDemo 应用的通知区域中是否显示通知。
点击通知以确认它打开应用并显示 ActionA 操作已收到 警报。
返回 Postman,修改上一个请求正文以发送一个无提示通知,指定 action_b 而不是 操作 值的 action_a。
{
    "action": "action_b",
    "silent": true
}
应用仍然打开后,单击 Postman中的 发送 按钮。
验证是否在
Postman 200 正常 响应,并且警报显示在 收到的ActionB 操作,而不是收到的 actionA 操作 。 关闭 PushDemo 应用,然后在 Postman中再次 单击“发送”按钮。
验证是否在 Postman 中收到 200 正常 响应,并且无提示通知不会显示在通知区域中。
故障 排除
后端服务没有响应
在本地测试时,请确保后端服务正在运行并使用正确的端口。
如果针对 azure API 应用
确保在通过客户端测试时,在 Postman 或移动应用配置中正确检查基址。 在本地测试时,基址应指示 https://<api_name>.azurewebsites.net/ 或 https://localhost:5001/。
启动或停止调试会话后未在 Android 上收到通知
请确保在启动或停止调试会话后再次注册。 调试器将导致生成新的 Firebase 令牌。 还必须更新通知中心安装。
从后端服务接收 401 状态代码
验证是否设置 apikey 请求标头,此值与为后端服务配置的 apikey 匹配。
如果在本地测试时收到此错误,请确保在客户端配置中定义的密钥值与 API使用的 Authentication:ApiKey 用户设置值匹配。
如果要使用 API 应用进行测试,请确保客户端配置文件中的密钥值与 Authentication:ApiKey 应用程序设置匹配,API 应用。
注意
如果在部署后端服务后已创建或更改此设置,则必须重启服务才能生效。
如果选择不使用 API 密钥 部分完成
从后端服务接收 404 状态代码
验证终结点和 HTTP 请求方法是否正确。 例如,终结点应以指示方式为:
-
[PUT]
https://<api_name>.azurewebsites.net/api/notifications/installations -
[DELETE]
https://<api_name>.azurewebsites.net/api/notifications/installations/<installation_id> -
[POST]
https://<api_name>.azurewebsites.net/api/notifications/requests
或在本地测试时:
-
[PUT]
https://localhost:5001/api/notifications/installations -
[DELETE]
https://localhost:5001/api/notifications/installations/<installation_id> -
[POST]
https://localhost:5001/api/notifications/requests
在客户端应用中指定基址时,请确保其以 /结尾。 在本地测试时,基址应指示 https://<api_name>.azurewebsites.net/ 或 https://localhost:5001/。
无法注册并显示通知中心错误消息
验证测试设备是否具有网络连接。 然后,通过设置断点来检查 HttpResponse中的 StatusCode 属性值,从而确定 Http 响应状态代码。
根据状态代码查看前面的故障排除建议(如果适用)。
在返回相应 API 的这些特定状态代码的行上设置断点。 然后在本地调试时尝试调用后端服务。
使用适当的有效负载通过 Postman 验证后端服务是否按预期工作。 使用客户端代码为相关平台创建的实际有效负载。
查看特定于平台的配置部分,确保未错过任何步骤。 检查是否正在为相应平台的 installation id 和 token 变量解析合适的值。
无法解析设备错误消息的 ID
查看特定于平台的配置部分,确保未错过任何步骤。
相关链接
- Azure 通知中心概述
- 安装 Visual Studio for Mac
- 在 Windows 上安装 Xamarin
- 用于后端操作的通知中心 SDK
- GitHub 上的 通知中心 SDK
- 注册应用程序后端
- 注册管理
- 使用标记
- 使用自定义模板
后续步骤
现在,你应该有一个基本的 Xamarin.Forms 应用通过后端服务连接到通知中心,并且可以发送和接收通知。
可能需要调整本教程中使用的示例以适应自己的方案。 还建议实现更可靠的错误处理、重试逻辑和日志记录。
Visual Studio App Center 可以快速合并到移动应用中,提供 分析 和 诊断 来帮助进行故障排除。