Azure DevOps Services
开始使用 GitHub Actions 和 Azure Artifacts。 GitHub Actions 可帮助你从 GitHub 内部自动化软件开发工作流。 可以使用 GitHub Actions 部署到 Azure Artifacts 源。
先决条件
- 一个包含存储库的 GitHub 帐户。 加入 GitHub 并创建存储库。
- 你将从 GitHub 工作流将 NuGet 包推送到的 Azure Artifact 源。 NuGet 包入门。
- 使用关联的联合凭据设置用户分配的托管标识。
- 创建用户分配的托管标识。
- 复制客户端 ID、订阅 ID 和目录(租户)ID 的值,以便在 GitHub Actions 工作流中稍后使用。
- 为用户分配的托管标识分配适当的角色。
- 在用户分配的托管标识 上配置联合标识凭据,以信任 GitHub Actions 颁发给 GitHub 存储库的令牌。
- 有权将托管标识分配给 Azure DevOps 中的参与者 组。 项目管理员 和 集合管理员 都具有此权限。
注意
另一种方法是使用具有服务主体和联合身份验证凭据的 Microsoft Entra 应用程序来连接 Azure DevOps 和 GitHub Actions。 若要了解有关此方法的详细信息,请参阅 配置应用以信任外部标识提供者。
在 Azure DevOps 中为托管标识分配权限
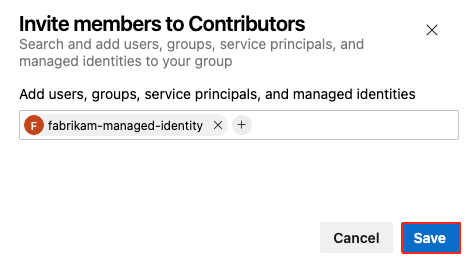
若要将托管标识分配给 参与者 团队,请执行以下步骤:
登录到你的项目 (
https://dev.azure.com/{Your_Organization/Your_Project})。转到“项目设置”。
选择“常规>权限”。
选择“参与者”组。
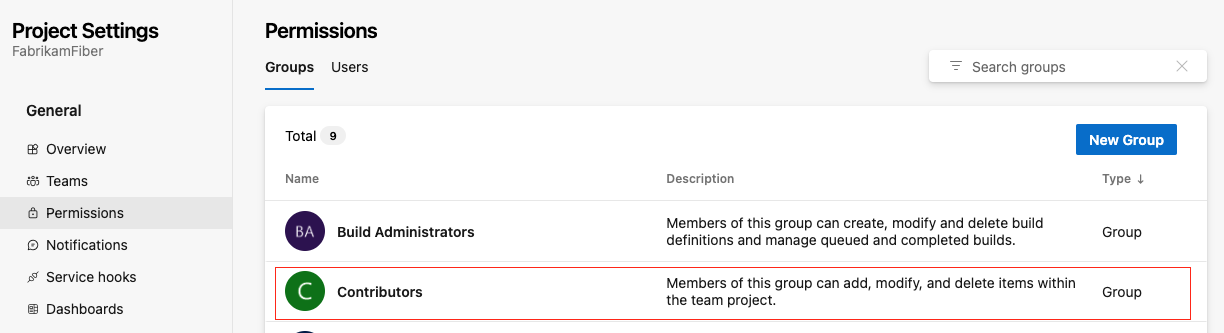
选择“成员”选项卡,然后选择“添加”。
搜索并查找托管标识。
选择“保存”,将标识添加到“参与者”组。

创建 GitHub 机密
需要向登录操作提供托管标识的 客户端 ID、 租户 ID 和 订阅 ID 。 这些值存储在 GitHub 机密中,并在工作流中引用。
在 GitHub 中,转到存储库。
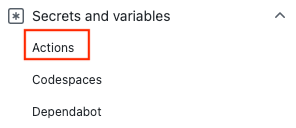
转到导航菜单中的“设置”。
选择“安全性”>“机密和变量”>“操作”。
选择“新建存储库机密”。
为
AZURE_CLIENT_ID、AZURE_TENANT_ID和AZURE_SUBSCRIPTION_ID创建机密。 将托管标识中的这些值用于 GitHub 机密:GitHub 机密 Microsoft Entra 应用程序 AZURE_CLIENT_ID 应用程序(客户端)ID AZURE_TENANT_ID 目录(租户)ID AZURE_SUBSCRIPTION_ID 订阅 ID 通过选择“添加机密”来保存每个机密。
创建生成项目的 GitHub 工作流
GitHub 工作流是一系列操作(类似于 Azure Pipelines 中的任务)。 此工作流使用托管标识和联合身份验证自动生成、测试、打包和发布 .NET 项目到 Azure Artifacts 的过程。 该工作流:
- 使用 azure/登录操作通过托管标识登录到 Azure。
- 安装 Azure Artifacts 的凭据提供程序。
- 使用 Azure CLI 提取访问令牌,并将身份验证提供程序配置为使用 Azure DevOps 令牌。
- 使用 setup-dotnet 操作设置 .NET Core CLI 环境。
- 还原依赖项,将项目及其依赖项生成到一组二进制文件中,并运行与项目关联的所有单元测试。
- 将代码打包到 NuGet 包中,其中包含版本号中包含的 GitHub Run ID 环境变量。
- 将 NuGet 包发布到 Azure Artifacts。
创建新的 YAML 文件
在 GitHub 上的存储库中,在
.github/workflows目录中创建新的 YAML 文件。将以下内容复制到 YAML 文件中。
AZURE_ARTIFACTS_FEED_URL自定义和BUILD_CONFIGURATIONDOTNET_VERSION值。- 设置为
AZURE_ARTIFACTS_FEED_URLAzure Artifacts 源的注册表 URL。 - 设置
BUILD_CONFIGURATION。 - 设置为
DOTNET_VERSION项目的版本。
name: Push a NuGet package to Azure Artifacts with managed identity and federated authentication on: push: branches: - main permissions: id-token: write # Require write permission to Fetch an federated identity token. contents: read # Require read permission to access the repository contents. env: AZURE_ARTIFACTS_FEED_URL: https://pkgs.dev.azure.com/myorg/nuget-artifact/_packaging/Fabrikam_Feed/nuget/v3/index.json BUILD_CONFIGURATION: 'Release' # set this to the appropriate build configuration DOTNET_VERSION: '6.0' NuGetDirectory: ${{ github.workspace}}/nuget VSS_NUGET_URI_PREFIXES: https://pkgs.dev.azure.com/myorg/ jobs: build: runs-on: ubuntu-latest steps: # Checkout the repo - uses: actions/checkout@v4 with: token: ${{ secrets.GITHUB_TOKEN }} - name: Azure CLI Login uses: azure/login@v2 with: client-id: ${{ secrets.AZURE_CLIENT_ID }} tenant-id: ${{ secrets.AZURE_TENANT_ID }} subscription-id: ${{ secrets.AZURE_SUBSCRIPTION_ID }} # Setup .NET Core SDK - name: Setup .NET Core uses: actions/setup-dotnet@v3 with: dotnet-version: ${{ env.DOTNET_VERSION }} # Run dotnet build and package - name: dotnet build and test run: | dotnet restore dotnet build --configuration '${{ env.BUILD_CONFIGURATION }}' dotnet test --configuration '${{ env.BUILD_CONFIGURATION }}' # Create the NuGet package in the folder from the environment variable NuGetDirectory - run: dotnet pack --configuration Release --output ${{ env.NuGetDirectory }} # Publish the NuGet package as an artifact, so they can be used in the following jobs - uses: actions/upload-artifact@v3 with: name: nuget if-no-files-found: error retention-days: 7 path: ${{ env.NuGetDirectory }}/*.nupkg az-artifacts-build-and-deploy: needs: build runs-on: ubuntu-latest steps: - uses: actions/checkout@v4 with: token: ${{ secrets.GITHUB_TOKEN }} - name: Azure CLI Login uses: azure/login@v2 with: client-id: ${{ secrets.AZURE_CLIENT_ID }} tenant-id: ${{ secrets.AZURE_TENANT_ID }} subscription-id: ${{ secrets.AZURE_SUBSCRIPTION_ID }} - uses: actions/download-artifact@v3 with: name: nuget path: ${{ env.NuGetDirectory }} - name: Setup .NET Core uses: actions/setup-dotnet@v3 with: dotnet-version: ${{ env.DOTNET_VERSION }} source-url: ${{ env.AZURE_ARTIFACTS_FEED_URL }} env: NUGET_AUTH_TOKEN: ${{secrets.GITHUB_TOKEN}} - name: Install credential provider for Azure Artifacts run: sh -c "$(curl -fsSL https://aka.ms/install-artifacts-credprovider.sh)" - name: Extract access token run: | accessToken=$(az account get-access-token --query accessToken --resource 499b84ac-1321-427f-aa17-267ca6975798 -o tsv) echo "::add-mask::$accessToken" echo "ACCESS_TOKEN=$accessToken" >> $GITHUB_ENV - name: Configure authentication provider to use Azure DevOps token run: | echo "VSS_NUGET_ACCESSTOKEN=$ACCESS_TOKEN" >> $GITHUB_ENV - name: dotnet build and publish run: | dotnet restore dotnet build --configuration '${{ env.BUILD_CONFIGURATION }}' dotnet pack --configuration '${{ env.BUILD_CONFIGURATION }}' --output ./nupkg --version-suffix ${{ github.run_id }} - name: 'Publish the package to Azure Artifacts' run: dotnet nuget push ${{ env.NuGetDirectory }}/*.nupkg --api-key AzureDevOps --source ${{ env.AZURE_ARTIFACTS_FEED_URL }}- 设置为
先决条件
- 一个包含存储库的 GitHub 帐户。 加入 GitHub 并创建存储库。
- 你将从 GitHub 工作流将 NuGet 包推送到的 Azure Artifact 源。 NuGet 包入门。
- 用于 GitHub 操作的 Azure DevOps 个人访问令牌(PAT)。 创建 PAT。
- PAT 需要具有读取、写入和管理 打包 权限。
使用 Azure Pipelines 进行身份验证
使用个人访问令牌 (PAT) 将 GitHub 帐户连接到 Azure DevOps。 可以从 Azure DevOps 中生成 PAT,然后将其存储为 GitHub 机密。 在 GitHub 工作流中引用此机密,以便 GitHub 操作可以使用 Azure DevOps 项目进行身份验证。
打开 GitHub 存储库并转到“设置”。
选择“安全性”>“机密和变量”>“操作”。
粘贴你的 PAT 并将其命名为
AZURE_DEVOPS_TOKEN。选择“添加机密”。
创建生成项目的 GitHub 工作流
GitHub 工作流是一系列操作(类似于 Azure Pipelines 中的任务)。 此工作流会执行以下操作:
- 使用 setup-dotnet 操作设置 .NET Core CLI 环境。
- 还原依赖项,将项目及其依赖项生成到一组二进制文件中,并运行与项目关联的所有单元测试。
- 将代码打包到 NuGet 包中,其中包含版本号中包含的 GitHub Run ID 环境变量。
- 将 NuGet 包发布到 Azure Artifacts。
创建新的 YAML 文件
在 GitHub 上的存储库中,在
.github/workflows目录中创建新的 YAML 文件。将以下内容复制到 YAML 文件中。
AZURE_ARTIFACTS_FEED_URL自定义和BUILD_CONFIGURATIONDOTNET_VERSION值。- 设置为
AZURE_ARTIFACTS_FEED_URLAzure Artifacts 源的注册表 URL。 - 设置
BUILD_CONFIGURATION。 - 设置为
DOTNET_VERSION项目的版本。
name: Push a NuGet package to Azure Artifacts on: push: branches: - main env: AZURE_ARTIFACTS_FEED_URL: https://pkgs.dev.azure.com/myorg/nuget-artifact/_packaging/Fabrikam_Feed/nuget/v3/index.json BUILD_CONFIGURATION: 'Release' # set this to the appropriate build configuration DOTNET_VERSION: '6.x' jobs: build: runs-on: ubuntu-latest steps: # Checkout the repo - uses: actions/checkout@v2 # Setup .NET Core SDK - name: Setup .NET Core uses: actions/setup-dotnet@v1 with: dotnet-version: ${{ env.DOTNET_VERSION }} # Run dotnet build and package - name: dotnet build and test run: | dotnet restore dotnet build --configuration '${{ env.BUILD_CONFIGURATION }}' dotnet test --configuration '${{ env.BUILD_CONFIGURATION }}' az-artifacts-build-and-deploy: needs: build runs-on: ubuntu-latest steps: # Checkout the repo - uses: actions/checkout@v2 # Setup .NET Core SDK - name: Setup .NET Core uses: actions/setup-dotnet@v1 with: dotnet-version: ${{ env.DOTNET_VERSION }} source-url: ${{ env.AZURE_ARTIFACTS_FEED_URL }} env: NUGET_AUTH_TOKEN: ${{ secrets.AZURE_DEVOPS_TOKEN }} # Run dotnet build and package - name: dotnet build and publish run: | dotnet restore dotnet build --configuration '${{ env.BUILD_CONFIGURATION }}' dotnet pack -c '${{ env.BUILD_CONFIGURATION }}' --version-suffix $GITHUB_RUN_ID # Publish the package to Azure Artifacts - name: 'dotnet publish' run: dotnet nuget push --api-key AzureArtifacts bin/Release/*.nupkg- 设置为
转到 Azure Artifacts 源,验证是否已看到推送的包。


清理资源
如果不打算继续使用 GitHub 工作流,请禁用该工作流。