Azure DevOps Services
Azure Artifacts 提供一个共享 PowerShell 脚本的简便解决方案。 使用 Azure Artifacts 源,可以从命令行无缝发布 PowerShell 模块,并通过源设置控制对这些模块的访问。 本文介绍如何将 Azure Artifacts 源设置为专用 PowerShell 存储库,以便存储和共享 PowerShell 模块。
本文将指导如何进行以下操作:
- 创建个人访问令牌
- 创建 PowerShell 模块
- 创建 SecretStore 保管库并注册存储库
- 从源发布和使用包
先决条件
如果你还没有源,请创建一个新源。
安装 PowerShell 6.0 或更高版本,以确保安装 PSResourceGet 所需的 PowerShellGet 版本。
安装 PSResourceGet。
注意
PSResourceGet 不支持 Azure Artifacts 凭据提供程序。
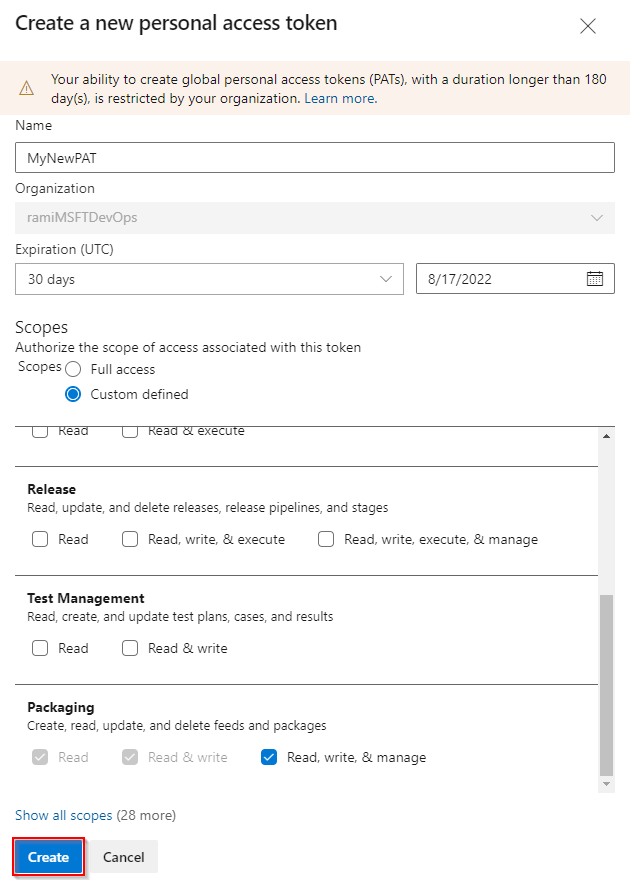
创建个人访问令牌
个人访问令牌充当数字标识,并充当使用 Azure DevOps 进行身份验证的替代密码。
导航到 Azure DevOps 组织
https://dev.azure.com/<ORGANIZATION_NAME>/选择“用户设置”图标,选择“个人访问令牌”,然后选择“新建令牌”。
输入 PAT 的名称,设置到期日期,选择“自定义”,然后选择打包>读取、写入和管理。
完成后选择“创建”,并确保将 PAT 复制并存储在安全位置。
创建 PowerShell 模块
如果没有自己的模块,请按照本节中的说明创建示例 PowerShell 模块。 否则,请跳到下一步:
创建新文件夹 PowerShell-Demo。 导航到文件夹并创建新文件 PowerShell-Demo.psm1。
将以下脚本粘贴到 PowerShell-Demo.psm1 文件中:
Function PowerShell-Demo{
    Write-Host "Hello World!"
}
通过在 PowerShell-Demo 目录中运行以下命令,生成模块清单:
New-ModuleManifest -Path .\PowerShell-Demo.psd1打开 PowerShell-Demo.psd1 文件并找到
RootModule变量。 此设置将指定导入模块时 PowerShell 将加载的主脚本文件。 将空字符串替换为 PowerShell-Demo.psm1 文件的路径:RootModule = 'PowerShell-Demo.psm1'FunctionsToExport部分指定导入模块时用户可以访问的函数。 包括 PowerShell-Demo 函数:FunctionsToExport = @('PowerShell-Demo')找到
FileList部分,其中列出了打包模块时包含的文件。 添加要使用模块打包的文件:FileList = @('./PowerShell-Demo.psm1')
注册存储库
运行以下命令,以创建凭据对象。 将占位符替换为正确的信息。
$username = "<USER_NAME>"
$patToken = "<PERSONAL_ACCESS_TOKEN>" | ConvertTo-SecureString -AsPlainText -Force

$credentials = New-Object System.Management.Automation.PSCredential($username, $patToken)
确保 SecretManagement 和 SecretStore 已安装,然后运行以下命令,以创建保管库和添加机密:
Register-SecretVault -Name "MySecretVault" -ModuleName Microsoft.PowerShell.SecretStore -DefaultVault

Set-Secret -Name "MyCredential" -Secret $credentials -Vault "MySecretVault"

$CredentialInfo = [Microsoft.PowerShell.PSResourceGet.UtilClasses.PSCredentialInfo]::new('MySecretVault', 'MyCredential')
若要验证保管库和机密是否已成功创建,请运行以下命令列出所有机密:
PS > Get-SecretInfo

Name            Type         VaultName
----            ----         ---------
MyCredential    PSCredential MySecretVault
运行以下命令,以注册 PowerShell 存储库。 可以通过导航到
SourceLocation>>,在项目设置部分 源 URL 下找到 > 链接。项目作用域的源:
Register-PSResourceRepository -Name "PowershellPSResourceRepository" `
    -Uri "https://pkgs.dev.azure.com/<ORGANIZATION_NAME>/<PROJECT_NAME>/_packaging/<FEED_NAME>/nuget/v3/index.json" `
    -Trusted `
    -CredentialInfo $CredentialInfo
组织作用域的源:
Register-PSResourceRepository -Name "PowershellPSResourceRepository" `
    -Uri "https://pkgs.dev.azure.com/<ORGANIZATION_NAME>/_packaging/<FEED_NAME>/nuget/v3/index.json" `
    -Trusted `
    -CredentialInfo $CredentialInfo
提示
某些 PowerShell 版本可能需要在运行
Register-PSResourceRepositorycmdlet 后启动新会话,以防止遇到“无法解析包源”警告。若要验证是否已成功注册存储库,请运行以下命令,以检索当前用户的所有已注册存储库:
Get-PSResourceRepository
注意
如果遇到错误:“响应状态代码未指示成功:404(未找到)。”,请确保源 URL 指向 nuget/v3/index.json,而不是指向 nuget/v2。
发布包
运行以下命令,以将包发布到源。 将占位符替换为包路径、存储库名称、前面创建的凭据对象,并为 ApiKey 提供任何字符串。
Publish-PSResource -Path <PACKAGE_PATH> -Repository <REPOSITORY_NAME> -Credential $credentials -ApiKey <ANY_STRING>
示例:
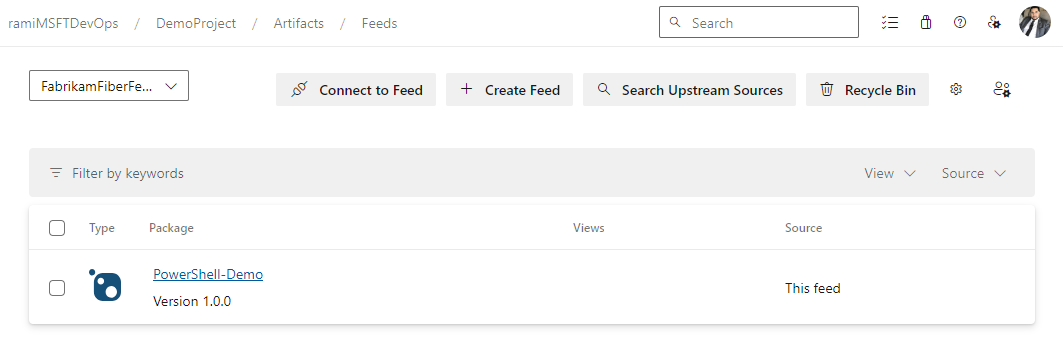
PS C:\AzureDevOps\Demos\PowerShellDemo> Publish-PSResource -Path .\scripts\ -Repository FabrikamFiberFeed -Credential $credentials -ApiKey az -verbose
VERBOSE: Performing the operation "Publish-PSResource" on target "Publish resource
'C:\AzureDevOps\Demos\PowerShellDemo\scripts\' from the machine".
VERBOSE: The newly created nuspec is:
C:\Users\xxxx\AppData\Local\Temp\xxxxxxxxx\PowerShell-Demo.nuspec
VERBOSE: credential successfully read from vault and set for repository: FabrikamFiberFeed
VERBOSE: Successfully packed the resource into a .nupkg
VERBOSE: Successfully published the resource to
'https://pkgs.dev.azure.com/ramiMSFTDevOps/DemoProject/_packaging/FabrikamFiberFeed/nuget/v3/index.json'
VERBOSE: Deleting temporary directory 'C:\Users\xxxx\AppData\Local\Temp\xxxxxxx'
安装包
若要确认模块是否在存储库中可用,请使用以下命令搜索该模块:
Find-PSResource -Name <RESOURCE_NAME> -Repository <REPOSITORY_NAME> -verbose运行以下命令,以安装模块的最新稳定版本:
Install-PSResource <MODULE_NAME>
提示
如果遇到错误:“调用‘WriteObject’时出现异常”,请启动新的 PowerShell 窗口并运行 Get-SecretInfo。 在运行 Find-PSResource 和 Install-PSResource 之前输入保管库密码,因为 SecretStore 超时期限可能会过期。 默认 PasswordTimeout 为 900 秒,但可以根据需要修改此值。 有关更多详细信息,请参阅在自动化中使用 SecretStore。
本文将指导如何进行以下操作:
- 创建个人访问令牌
- 创建、打包和发布 PowerShell 模块
- 作为 PowerShell 存储库连接到源
- 使用 Azure Pipelines 注册并安装 PowerShell 模块
先决条件
如果你还没有源,请创建一个新源。
使用以下选项之一安装 Windows MSBuild:
安装 NuGet(.exe) 版本 4.8.0.5385 或更高版本。
安装 dotnet 运行时版本 8.0.x 或更高版本。
安装 PowerShell 6.0 或更高版本,以确保具有相应的 PowerShellGet 和 PackageManagement 版本。
创建个人访问令牌
个人访问令牌充当数字标识,并充当使用 Azure DevOps 进行身份验证的替代密码。
导航到 Azure DevOps 组织
https://dev.azure.com/<ORGANIZATION_NAME>/选择“用户设置”图标,选择“个人访问令牌”,然后选择“新建令牌”。
输入 PAT 的名称,设置到期日期,选择“自定义”,然后选择打包>读取、写入和管理。
完成后选择“创建”,并确保将 PAT 复制并存储在安全位置。
创建 PowerShell 模块
如果没有自己的模块,请按照本节中的说明创建示例 PowerShell 模块。 否则,请跳到下一步:
创建新文件夹 Get-Hello。 导航到文件夹并创建新文件 Get-Hello.psm1。
将以下脚本粘贴到 Get-Hello.psm1 文件中:
Function Get-Hello{
    Write-Host "Hello Azure DevOps!"
}
通过在 Get-Hello 目录中运行以下命令,生成模块清单:
New-ModuleManifest -Path .\Get-Hello.psd1打开 Get-Hello.psd1 文件并找到
RootModule变量。 此设置将指定导入模块时 PowerShell 将加载的主脚本文件。 将空字符串替换为 Get-Hello.psm1 文件的路径:RootModule = 'Get-Hello.psm1'FunctionsToExport部分指定导入模块时用户可以访问的函数。 包括 Get-Hello 函数:FunctionsToExport = @('Get-Hello')找到
FileList部分,该部分指定打包模块时包含的文件。 添加要使用模块打包的文件:FileList = @('./Get-Hello.psm1')
打包和发布模块
为模块生成 nuspec 文件。 此命令将创建包含打包模块时所需元数据的 Get-Hello.nuspec 文件:
nuget spec Get-Hello运行以下命令,以打包模块:
nuget pack Get-Hello.nuspec运行以下命令,以添加源的源 URL。 确保在源的源 URL 中使用 V2,因为 NuGet V3 不受支持。
组织作用域的源:
nuget sources Add -Name "<FEED_NAME>" -Source "https://pkgs.dev.azure.com/<ORGANIZATION_NAME>/_packaging/<FEED_NAME>/nuget/v2" -username "<USER_NAME>" -password "<PERSONAL_ACCESS_TOKEN>"项目作用域的源:
nuget sources Add -Name "<FEED_NAME>" -Source "https://pkgs.dev.azure.com/<ORGANIZATION_NAME>/<PROJECT_NAME>/_packaging/<FEED_NAME>/nuget/v2" -username "<USER_NAME>" -password "<PERSONAL_ACCESS_TOKEN>"
将包发布到源:
nuget push -Source "<FEED_NAME>" -ApiKey "<ANY_STRING>" "<PACKAGE_PATH>"
重要说明
模块清单 (.psd1) 中的版本号必须与 .nuspec 文件中的版本号相同。
作为 PowerShell 存储库连接到源
本部分介绍如何使用源作为 PowerShell 存储库进行身份验证,以及如何使用源中托管的模块:
在 PowerShell 提示窗口中,运行以下命令,以设置凭据。 将占位符替换为适当的信息。
$patToken = "<PERSONAL_ACCESS_TOKEN>" | ConvertTo-SecureString -AsPlainText -Force

$credsAzureDevopsServices = New-Object System.Management.Automation.PSCredential("<USER_NAME>", $patToken)
注册 PowerShell 存储库。 可以通过导航到
SourceLocation>>,在项目设置部分 源 URL 下找到 > 链接。项目作用域的源:
Register-PSRepository -Name <REPOSITORY_NAME> -SourceLocation "https://pkgs.dev.azure.com/<ORGANIZATION_NAME>/<PROJECT_NAME>/_packaging/<FEED_NAME>/nuget/v2" -PublishLocation "https://pkgs.dev.azure.com/<ORGANIZATION_NAME>/<PROJECT_NAME>/_packaging/<FEED_NAME>/nuget/v2" -InstallationPolicy Trusted -Credential $credsAzureDevopsServices组织作用域的源:
Register-PSRepository -Name <REPOSITORY_NAME> -SourceLocation "https://pkgs.dev.azure.com/<ORGANIZATION_NAME>/_packaging/<FEED_NAME>/nuget/v2" -PublishLocation "https://pkgs.dev.azure.com/<ORGANIZATION_NAME>/_packaging/<FEED_NAME>/nuget/v2" -InstallationPolicy Trusted -Credential $credsAzureDevopsServices
提示
某些 PowerShell 版本可能需要在运行
Register-PSRepositorycmdlet 后启动新会话,以防止遇到“无法解析包源”警告。注册包源:
项目作用域的源:
Register-PackageSource -Name <REPOSITORY_NAME> -Location "https://pkgs.dev.azure.com/<ORGANIZATION_NAME>/<PROJECT_NAME>/_packaging/<FEED_NAME>/nuget/v2" -ProviderName NuGet -Trusted -SkipValidate -Credential $credsAzureDevopsServices组织作用域的源:
Register-PackageSource -Name <REPOSITORY_NAME> -Location "https://pkgs.dev.azure.com/<ORGANIZATION_NAME>/_packaging/<FEED_NAME>/nuget/v2" -ProviderName NuGet -Trusted -SkipValidate -Credential $credsAzureDevopsServices
注意
- Register-PSRepository:用于注册 PowerShell 存储库,以找到并安装模块。
- Register-PackageSource:用于注册包源,以找到并发布包。
若要验证是否已成功注册存储库,请运行以下命令,以检索当前用户的所有已注册存储库:
Get-PSRepository运行以下命令,以安装 Get-Hello 模块。
Install-Module -Name <PACKAGE_NAME> -Repository <REPOSITORY_NAME>
注意
如果贵组织使用防火墙或代理服务器,请确保允许访问 Azure Artifacts 域 URL 和 IP 地址。
从你的管道安装包
此示例介绍如何使用 Azure Artifacts 源进行身份验证,以及如何从管道安装 PowerShell 模块。 若要使用个人访问令牌,请添加个人访问令牌添加作为管道变量,具体如下所示:
登录到 Azure DevOps 组织,并导航到你的项目。
选择“管道”,选择管道定义,然后选择“编辑”,以修改管道。
选择右上角的“变量”,然后选择“新建变量”。
输入变量的“名称”,然后将个人访问令牌粘贴到“值”文本框中。
确保选中“将此值保密”复选框。 完成后,选择“确定”。
为 userName 添加第二个变量。 为变量输入一个名称,然后在值文本框中输入 userName。
完成时选择保存。
trigger:
- main

pool:
  vmImage: 'Windows-latest'

variables:
  PackageFeedEndpoint: 'https://pkgs.dev.azure.com/<ORGANIZATION_NAME>/<PROJECT_NAME>/_packaging/<FEED_NAME>/nuget/v2' ## For organization scoped feeds use'https://pkgs.dev.azure.com/<ORGANIZATION_NAME>/_packaging/<FEED_NAME>/nuget/v2'

steps:
- powershell: |
    $pat = ConvertTo-SecureString ${env:pat_token} -AsPlainText -Force
    $credential = New-Object System.Management.Automation.PSCredential("${env:userName}", $pat)
    Register-PSRepository -Name <REPOSITORY_NAME> -SourceLocation "$(PackageFeedEndpoint)" -InstallationPolicy Trusted -Credential $credential
  displayName: 'Register PSRepository'
  env:
    pat_token: $patToken
    userName: $userName

- powershell: |
    nuget install <PACKAGE_NAME> -Source "https://pkgs.dev.azure.com/<ORGANIZATION_NAME>/<PROJECT_NAME>/_packaging/<FEED_NAME>/nuget/v3/index.json"
  displayName: 'Install module'