你当前正在访问 Microsoft Azure Global Edition 技术文档网站。 如果需要访问由世纪互联运营的 Microsoft Azure 中国技术文档网站,请访问 https://docs.azure.cn。
注意
建议使用 Azure Az PowerShell 模块与 Azure 交互。 若要开始,请参阅安装 Azure PowerShell。 若要了解如何迁移到 Az PowerShell 模块,请参阅 将 Azure PowerShell 从 AzureRM 迁移到 Az。
在本快速入门中,你将使用 Azure PowerShell 创建你的第一个 DNS 区域和记录。 也可以使用 Azure 门户或 Azure CLI 执行这些步骤。
DNS 区域用来托管某个特定域的 DNS 记录。 若要开始在 Azure DNS 中托管域,需要为该域名创建 DNS 区域。 随后会在此 DNS 区域内为每个 DNS 记录创建域。 最后,要将 DNS 区域发布到 Internet,需要为域配置名称服务器。 上述每个步骤均可参见本文。

Azure DNS 还支持创建专用域。 有关如何创建第一个专用 DNS 区域和记录的分步说明,请参阅 Azure DNS 专用区域入门(使用 PowerShell)。
必备条件
- 具有活动订阅的 Azure 帐户。 免费创建帐户。
- 本地安装的 Azure PowerShell 或 Azure Cloud Shell
Azure Cloud Shell
Azure 托管 Azure Cloud Shell(一个可通过浏览器使用的交互式 shell 环境)。 可以将 Bash 或 PowerShell 与 Cloud Shell 配合使用来使用 Azure 服务。 可以使用 Cloud Shell 预安装的命令来运行本文中的代码,而不必在本地环境中安装任何内容。
若要启动 Azure Cloud Shell,请执行以下操作:
| 选项 | 示例/链接 |
|---|---|
| 选择代码或命令块右上角的“试用”。 选择“试用”不会自动将代码或命令复制到 Cloud Shell。 |

|
| 转到 https://shell.azure.com 或选择“启动 Cloud Shell”按钮可在浏览器中打开 Cloud Shell。 |

|
| 选择 Azure 门户右上角菜单栏上的 Cloud Shell 按钮。 |

|
若要使用 Azure Cloud Shell,请执行以下操作:
启动 Cloud Shell。
选择代码块(或命令块)上的“复制”按钮以复制代码或命令。
在 Windows 和 Linux 上选择 CtrlShift+V,或在 macOS 上选择 CmdShift+V 将代码或命令粘贴到 Cloud Shell 会话中。
选择“Enter”运行代码或命令。
创建资源组
在创建 DNS 区域之前,创建一个资源组来包含 DNS 区域:
New-AzResourceGroup -name MyResourceGroup -location "eastus"
创建 DNS 区域
通过使用 New-AzDnsZone cmdlet 创建 DNS 区域。 以下示例在名为 MyResourceGroup 的资源组中创建名为 contoso.xyz 的 DNS 区域。 使用该示例创建 DNS 区域,将相应的值替换成自己的值。
New-AzDnsZone -Name contoso.xyz -ResourceGroupName MyResourceGroup
创建 DNS 记录
可以使用 New-AzDnsRecordSet cmdlet 创建记录集。 以下示例在资源组 www 的 DNS 区域 contoso.xyz 中创建具有相对名称 MyResourceGroup 的记录集。 记录集的完全限定名称为 www.contoso.xyz。 记录类型为 A,IP 地址为 10.10.10.10,TTL 为 3600 秒。
New-AzDnsRecordSet -Name www -RecordType A -ZoneName contoso.xyz -ResourceGroupName MyResourceGroup -Ttl 3600 -DnsRecords (New-AzDnsRecordConfig -IPv4Address "10.10.10.10")
查看记录
若要列出区域中的 DNS 记录,请使用:
Get-AzDnsRecordSet -ZoneName contoso.xyz -ResourceGroupName MyResourceGroup
测试名称解析
现在,你已有一个测试 DNS 区域且其中有一个测试“A”记录,可以使用名为 nslookup 的工具来测试名称解析了。
测试 DNS 名称解析:
运行以下 cmdlet 以获取区域的名称服务器列表:
Get-AzDnsRecordSet -ZoneName contoso.xyz -ResourceGroupName MyResourceGroup -RecordType ns从上一步的输出中复制其中一个名称服务器名称。
打开一个命令提示符,并运行以下命令:
nslookup www.contoso.xyz <name server name>例如:
nslookup www.contoso.xyz ns1-08.azure-dns.com.应当会看到类似以下屏幕的内容:
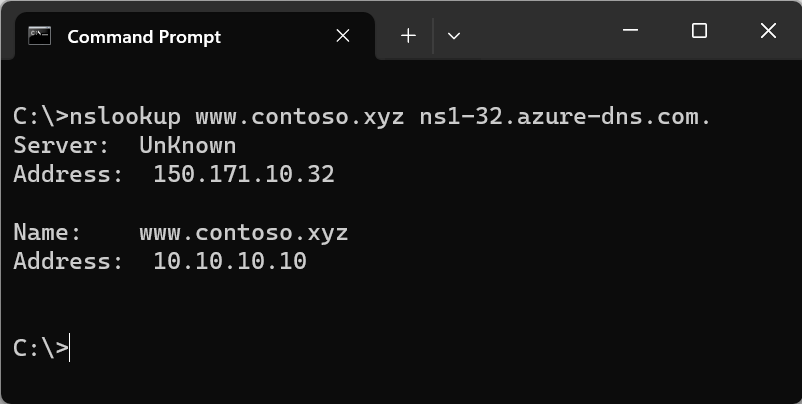
主机名 www.contoso.xyz 解析为 10.10.10.10,正如你配置的那样。 此结果表明名称解析正常工作。
清理资源
当不再需要时,可以通过删除资源组来删除本快速入门中创建的所有资源:
Remove-AzResourceGroup -Name MyResourceGroup
后续步骤
使用 Azure PowerShell 创建了第一个 DNS 区域和记录后,可以在自定义域中为 Web 应用创建记录。