你当前正在访问 Microsoft Azure Global Edition 技术文档网站。 如果需要访问由世纪互联运营的 Microsoft Azure 中国技术文档网站,请访问 https://docs.azure.cn。
本快速入门介绍如何使用 Azure.Messaging.EventHubs .NET 库通过架构验证向事件中心发送事件以及从事件中心接收事件。
Azure 架构注册表 是事件中心的一项功能。 注册表为以事件驱动和以消息传送为中心的应用程序的架构提供中心存储库。 它使生成者和使用者应用程序可以灵活地交换数据,而无需管理和共享架构。 它还为可重用架构提供了一个简单的治理框架,并通过分组构造(架构组)定义了架构之间的关系。 有关详细信息,请参阅事件中心中的 Azure 架构注册表。
先决条件
如果不熟悉 Azure 事件中心,请在阅读本快速入门之前参阅事件中心概述。
若要完成本快速入门,需要满足以下先决条件:
如果还没有 Azure 订阅,可以在开始前创建一个免费帐户。
Microsoft Visual Studio 2022。
Azure 事件中心客户端库使用 C# 8.0 中引入的功能。 仍然可以使用之前的 C# 语言版本的库,但新语法不可用。 若要使用完整的语法,建议使用 .NET Core SDK 3.0 或更高版本进行编译, 并将语言版本 设置为
latest。如果使用 Visual Studio,Visual Studio 2019 之前的版本与生成 C# 8.0 项目所需的工具不兼容。 若要下载 Visual Studio 2019 或 Visual Studio 2022(包括免费社区版),请参阅 Visual Studio。
创建事件中心
若要创建事件中心命名空间和事件中心,请按照 创建事件中心命名空间和事件中心的说明进行作。
若要获取事件中心命名空间的连接字符串,请按照 “获取连接字符串”中的说明作。
记下当前快速入门中使用的以下设置:
- 事件中心命名空间的连接字符串
- 事件中心的名称
创建架构
若要创建架构组和架构,请按照 使用架构注册表创建架构中的说明进行作。
使用架构注册表门户创建名为 contoso-sg 的架构组。 将 Avro 用作序列化类型,将 None 用于兼容性模式。
在该架构组中,使用架构名称创建新的 Avro 架构:
Microsoft.Azure.Data.SchemaRegistry.example.Order。 使用以下架构内容。{ "namespace": "Microsoft.Azure.Data.SchemaRegistry.example", "type": "record", "name": "Order", "fields": [ { "name": "id", "type": "string" }, { "name": "amount", "type": "double" }, { "name": "description", "type": "string" } ] }
将用户添加到架构注册表读取者角色
将用户帐户添加到命名空间级别的 架构注册表读取者 角色。 还可以使用 架构注册表参与者 角色,但本快速入门不需要这样做。
- 在“事件中心命名空间”页上的左侧菜单中,选择“访问控制”(IAM)。
- 在 “访问控制”(IAM) 页上,选择“ + 添加添加>角色分配”。
- 在“ 角色 ”页上,选择 “架构注册表读取者”,然后选择“ 下一步”。
- 使用 “+ 选择成员 ”链接将用户帐户添加到角色,然后选择“ 下一步”。
- 在“查看 + 分配”页面上,选择“查看 + 分配”。
使用架构验证向事件中心生成事件
为事件生成者创建控制台应用程序
启动 Visual Studio。
选择 “创建新项目”。
在“ 创建新项目 ”对话框中,执行以下步骤。 如果未看到此对话框,请选择菜单上的“ 文件 ”,选择“ 新建”,然后选择“ 项目”。
选择“C#”作为编程语言。
选择“控制台”作为应用程序类型。
从结果列表中选择“控制台应用程序”。
然后选择下一步。
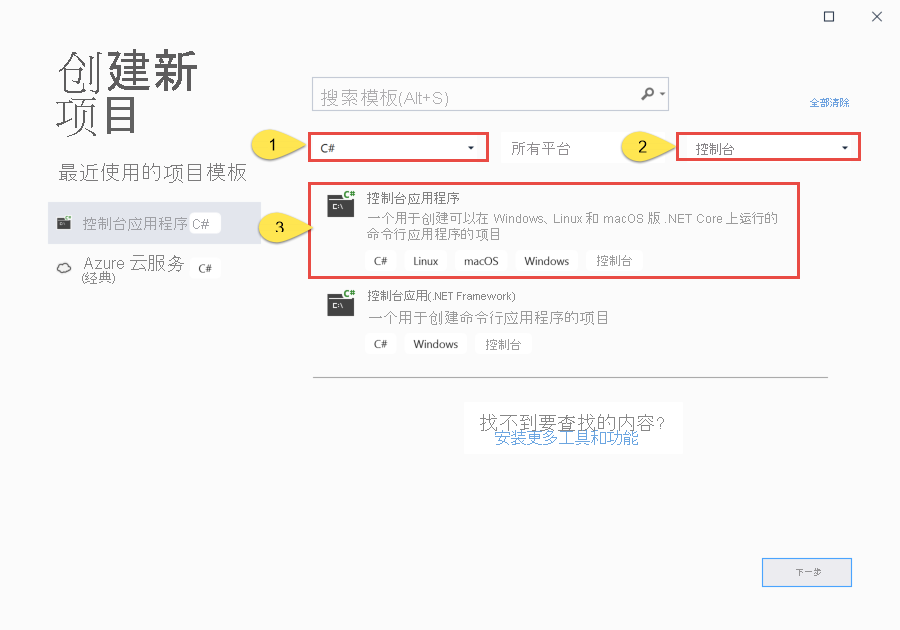
为项目名称输入 OrderProducer ,为解决方案名称输入 SRQuickStart ,然后选择“ 确定 ”以创建项目。
添加事件中心 NuGet 包
选择 工具>NuGet 包管理器>包管理器控制台。
运行以下命令以安装 Azure.Messaging.EventHubs 和其他 NuGet 包。 按 ENTER 运行最新命令。
Install-Package Azure.Messaging.EventHubs
Install-Package Azure.Identity
Install-Package Microsoft.Azure.Data.SchemaRegistry.ApacheAvro
Install-Package Azure.ResourceManager.Compute
使用 Visual Studio 对生成者应用程序进行身份验证以连接到 Azure。 有关详细信息,请参阅适用于 .NET 的 Azure 标识客户端库。
使用属于命名空间级别的角色成员的
Schema Registry Reader用户帐户登录到 Azure。 有关架构注册表角色的信息,请参阅 Azure 基于角色的访问控制。
使用 Avro 架构生成代码
- 使用用于创建架构以创建名为
的文件的相同内容。 将文件保存在项目或解决方案文件夹中。 - 使用此架构文件为 .NET 生成代码。 可以使用任何外部代码生成工具(例如 avrogen )生成代码。 例如,运行
avrogen -s .\Order.avsc .以生成代码。 - 生成代码后,会看到文件夹中命名
Order.cs\Microsoft\Azure\Data\SchemaRegistry\example的文件。 对于此处的 Avro 架构,它会在命名空间中Microsoft.Azure.Data.SchemaRegistry.example生成 C# 类型。 - 将
Order.cs文件添加到OrderProducer项目。
编写代码以序列化事件并将其发送到事件中心
将以下代码添加到
Program.cs文件。 有关详细信息,请参阅代码注释。 代码中的高级步骤包括:- 创建可用于将事件发送到事件中心的生成者客户端。
- 创建可用于序列化和验证对象中的数据
Order的架构注册表客户端。 - 使用生成的
Order类型创建新Order对象。 - 使用架构注册表客户端将对象序列化
Order为EventData. - 创建一批事件。
- 将事件数据添加到事件批处理。
- 使用生成者客户端将事件批处理发送到事件中心。
using Azure.Data.SchemaRegistry;
using Azure.Identity;
using Microsoft.Azure.Data.SchemaRegistry.ApacheAvro;
using Azure.Messaging.EventHubs;
using Azure.Messaging.EventHubs.Producer;

using Microsoft.Azure.Data.SchemaRegistry.example;

// connection string to the Event Hubs namespace
const string connectionString = "EVENTHUBSNAMESPACECONNECTIONSTRING";

// name of the event hub
const string eventHubName = "EVENTHUBNAME";

// Schema Registry endpoint
const string schemaRegistryEndpoint = "EVENTHUBSNAMESPACENAME.servicebus.windows.net";

// name of the consumer group
const string schemaGroup = "SCHEMAGROUPNAME";

// The Event Hubs client types are safe to cache and use as a singleton for the lifetime
// of the application, which is best practice when events are being published or read regularly.
EventHubProducerClient producerClient;

// Create a producer client that you can use to send events to an event hub
producerClient = new EventHubProducerClient(connectionString, eventHubName);

// Create a schema registry client that you can use to serialize and validate data.
var schemaRegistryClient = new SchemaRegistryClient(schemaRegistryEndpoint, new DefaultAzureCredential());

// Create an Avro object serializer using the Schema Registry client object.
var serializer = new SchemaRegistryAvroSerializer(schemaRegistryClient, schemaGroup, new SchemaRegistryAvroSerializerOptions { AutoRegisterSchemas = true });

// Create a new order object using the generated type/class 'Order'.
var sampleOrder = new Order { id = "1234", amount = 45.29, description = "First sample order." };
EventData eventData = (EventData)await serializer.SerializeAsync(sampleOrder, messageType: typeof(EventData));

// Create a batch of events
using EventDataBatch eventBatch = await producerClient.CreateBatchAsync();

// Add the event data to the event batch.
eventBatch.TryAdd(eventData);

// Send the batch of events to the event hub.
await producerClient.SendAsync(eventBatch);
Console.WriteLine("A batch of 1 order has been published.");
将以下占位符值替换为实际值。
-
EVENTHUBSNAMESPACECONNECTIONSTRING- 事件中心命名空间的连接字符串 -
EVENTHUBNAME- 事件中心的名称 -
EVENTHUBSNAMESPACENAME- 事件中心命名空间的名称 -
SCHEMAGROUPNAME- 架构组的名称
// connection string to the Event Hubs namespace const string connectionString = "EVENTHUBSNAMESPACECONNECTIONSTRING"; // name of the event hub const string eventHubName = "EVENTHUBNAME"; // Schema Registry endpoint const string schemaRegistryEndpoint = "EVENTHUBSNAMESPACENAME.servicebus.windows.net"; // name of the consumer group const string schemaGroup = "SCHEMAGROUPNAME";-
生成项目并确保没有错误。
运行程序并等待出现确认消息。
A batch of 1 order has been published.在 Azure 门户中,可以验证事件中心是否收到了事件。 切换到“指标”部分中的消息视图。 刷新页面以更新图表。 它可能需要几秒钟时间才能显示它收到了消息。


使用具有架构验证的事件中心的事件
本部分介绍如何编写一个 .NET Core 控制台应用程序,该应用程序从事件中心接收事件,并使用架构注册表反序列化事件数据。
其他先决条件
- 创建要使用的事件处理程序的存储帐户。
创建使用者应用程序
- 在“解决方案资源管理器”窗口中,右键单击 SRQuickStart 解决方案,选择“ 添加”,然后选择“ 新建项目”。
- 选择控制台应用程序,然后选择下一步。
- 输入 Project 名称的 OrderConsumer,然后选择“创建”。
- 在 “解决方案资源管理器” 窗口中,右键单击 OrderConsumer,然后选择“ 设置为启动项目”。
添加事件中心 NuGet 包
选择 工具>NuGet 包管理器>包管理器控制台。
在“包管理器控制台”窗口中,确认为默认项目选择了 OrderConsumer。 否则,请使用下拉列表选择 OrderConsumer。
运行以下命令以安装所需的 NuGet 包。 按 ENTER 运行最新命令。
Install-Package Azure.Messaging.EventHubs
Install-Package Azure.Messaging.EventHubs.Processor
Install-Package Azure.Identity
Install-Package Microsoft.Azure.Data.SchemaRegistry.ApacheAvro
Install-Package Azure.ResourceManager.Compute
使用 Visual Studio 对生成者应用程序进行身份验证以连接到 Azure,如 适用于 .NET 的 Azure 标识客户端库所示。
使用属于命名空间级别的角色成员的
Schema Registry Reader用户帐户登录到 Azure。 有关架构注册表角色的信息,请参阅 Azure 基于角色的访问控制。将
Order.cs作为创建者应用的一部分生成的文件添加到 OrderConsumer 项目。右键单击 OrderConsumer 项目,然后选择“ 设置为启动项目”。
编写代码以接收事件并使用架构注册表反序列化它们
将以下代码添加到
Program.cs文件。 有关详细信息,请参阅代码注释。 代码中的高级步骤包括:- 创建可用于将事件发送到事件中心的使用者客户端。
- 为 Azure Blob 存储中的 Blob 容器创建 Blob 容器客户端。
- 创建事件处理程序客户端并注册事件和错误处理程序。
- 在事件处理程序中,创建一个架构注册表客户端,可用于将事件数据反序列化为对象
Order。 - 使用序列化程序将事件数据反序列化为对象
Order。 - 打印有关收到的订单的信息。
using Azure.Data.SchemaRegistry;
using Azure.Identity;
using Microsoft.Azure.Data.SchemaRegistry.ApacheAvro;
using Azure.Storage.Blobs;
using Azure.Messaging.EventHubs;
using Azure.Messaging.EventHubs.Consumer;
using Azure.Messaging.EventHubs.Processor;

using Microsoft.Azure.Data.SchemaRegistry.example;


// connection string to the Event Hubs namespace
const string connectionString = "EVENTHUBSNAMESPACECONNECTIONSTRING";

// name of the event hub
const string eventHubName = "EVENTHUBNAME";

// Schema Registry endpoint
const string schemaRegistryEndpoint = "EVENTHUBSNAMESPACENAME.servicebus.windows.net";

// name of the consumer group
const string schemaGroup = "SCHEMAGROUPNAME";

// connection string for the Azure Storage account
const string blobStorageConnectionString = "AZURESTORAGECONNECTIONSTRING";

// name of the blob container that will be used as a checkpoint store
const string blobContainerName = "BLOBCONTAINERNAME";

// Create a blob container client that the event processor will use
BlobContainerClient storageClient = new BlobContainerClient(blobStorageConnectionString, blobContainerName);

// Create an event processor client to process events in the event hub
EventProcessorClient processor = new EventProcessorClient(storageClient, EventHubConsumerClient.DefaultConsumerGroupName, connectionString, eventHubName);

// Register handlers for processing events and handling errors
processor.ProcessEventAsync += ProcessEventHandler;
processor.ProcessErrorAsync += ProcessErrorHandler;

// Start the processing
await processor.StartProcessingAsync();

// Wait for 30 seconds for the events to be processed
await Task.Delay(TimeSpan.FromSeconds(30));

// Stop the processing
await processor.StopProcessingAsync();

static async Task ProcessEventHandler(ProcessEventArgs eventArgs)
{
    // Create a schema registry client that you can use to serialize and validate data.
    var schemaRegistryClient = new SchemaRegistryClient(schemaRegistryEndpoint, new DefaultAzureCredential());

    // Create an Avro object serializer using the Schema Registry client object.
    var serializer = new SchemaRegistryAvroSerializer(schemaRegistryClient, schemaGroup, new SchemaRegistryAvroSerializerOptions { AutoRegisterSchemas = true });

    // Deserialized data in the received event using the schema
    Order sampleOrder = (Order)await serializer.DeserializeAsync(eventArgs.Data, typeof(Order));

    // Print the received event
    Console.WriteLine($"Received order with ID: {sampleOrder.id}, amount: {sampleOrder.amount}, description: {sampleOrder.description}");

       await eventArgs.UpdateCheckpointAsync(eventArgs.CancellationToken);
    }

    static Task ProcessErrorHandler(ProcessErrorEventArgs eventArgs)
{
    // Write details about the error to the console window
    Console.WriteLine($"\tPartition '{eventArgs.PartitionId}': an unhandled exception was encountered. This was not expected to happen.");
    Console.WriteLine(eventArgs.Exception.Message);
    return Task.CompletedTask;
}
将以下占位符值替换为实际值。
-
EVENTHUBSNAMESPACE-CONNECTIONSTRING- 事件中心命名空间的连接字符串 -
EVENTHUBNAME- 事件中心的名称 -
EVENTHUBSNAMESPACENAME- 事件中心命名空间的名称 -
SCHEMAGROUPNAME- 架构组的名称 -
AZURESTORAGECONNECTIONSTRING- Azure 存储帐户的连接字符串 -
BLOBCONTAINERNAME- Blob 容器的名称
// connection string to the Event Hubs namespace const string connectionString = "EVENTHUBSNAMESPACE-CONNECTIONSTRING"; // name of the event hub const string eventHubName = "EVENTHUBNAME"; // Schema Registry endpoint const string schemaRegistryEndpoint = "EVENTHUBSNAMESPACENAME.servicebus.windows.net"; // name of the consumer group const string schemaGroup = "SCHEMAGROUPNAME"; // Azure storage connection string const string blobStorageConnectionString = "AZURESTORAGECONNECTIONSTRING"; // Azure blob container name const string blobContainerName = "BLOBCONTAINERNAME";-
生成项目并确保没有错误。
运行接收器应用程序。
应会看到事件中心收到事件的消息。
Received order with ID: 1234, amount: 45.29, description: First sample order.这些事件是前面通过运行发送器程序发送到事件中心的三个事件。
示例
请参阅 适用于 .NET 的 Azure 架构注册表 Apache Avro 客户端库。
清理资源
删除事件中心命名空间或删除包含命名空间的资源组。