你当前正在访问 Microsoft Azure Global Edition 技术文档网站。 如果需要访问由世纪互联运营的 Microsoft Azure 中国技术文档网站,请访问 https://docs.azure.cn。
计划和广播作业 (Python)
使用 Azure IoT 中心来计划和跟踪可更新数百万台设备的作业。 使用作业可以:
- 更新所需属性
- 更新标记
- 调用直接方法
从概念上讲,作业包装这些操作之一,并跟踪针对一组设备执行(由设备孪生查询定义)的进度。 例如,后端应用可使用作业重启 10,000 台设备(由设备孪生查询指定并计划在将来执行)。 该应用程序随后可以在其中每个设备接收和执行重新启动方法时跟踪进度。
可在以下文章中了解有关所有这些功能的详细信息:
设备孪生和属性:设备孪生入门和在 IoT 中心了解并使用设备孪生
直接方法:IoT 中心开发人员指南 - 直接方法
注意
本文所述的功能只能用于 IoT 中心的标准层。 有关 IoT 中心基本层和标准/免费层的详细信息,请参阅选择适合你的解决方案的 IoT 中心层。
本文介绍如何创建两个 Python 应用:
一个 Python 模拟设备应用 simDevice.py,它实现一个称为 lockDoor 的直接方法,可供后端应用调用。
一个 Python 控制台应用 scheduleJobService.py,它创建两个作业。 一个作业调用 lockDoor 直接方法,另一个作业将所需的属性更新发送到多个设备。
注意
有关可用于生成设备和后端应用的 SDK 工具的详细信息,请参阅 Azure IoT SDK。
先决条件
有效的 Azure 帐户。 (如果没有帐户,只需几分钟即可创建一个免费帐户。)
已注册的设备。 在 Azure 门户中注册一个。
建议使用 Python 版本 3.7 或更高版本。 请确保根据安装程序的要求,使用 32 位或 64 位安装。 在安装过程中出现提示时,请确保将 Python 添加到特定于平台的环境变量中。
创建模拟设备应用程序
本部分将创建一个 Python 控制台应用,用于响应通过云调用的方法,这会触发模拟 lockDoor 方法。
在命令提示符处,运行以下命令以安装 azure-iot-device 包:
pip install azure-iot-device使用文本编辑器,在工作目录中创建一个 simDevice.py 文件。
在 simDevice.py 文件的开头添加以下
import语句和变量。 将deviceConnectionString替换为上述创建的设备的连接字符串:import time from azure.iot.device import IoTHubDeviceClient, MethodResponse CONNECTION_STRING = "{deviceConnectionString}"定义以下函数,该函数会实例化客户端并将其配置为响应 lockDoor 方法,以及接收设备孪生更新:
def create_client():
    # Instantiate the client
    client = IoTHubDeviceClient.create_from_connection_string(CONNECTION_STRING)

    # Define behavior for responding to the lockDoor direct method
    def method_request_handler(method_request):
        if method_request.name == "lockDoor":
            print("Locking Door!")

            resp_status = 200
            resp_payload = {"Response": "lockDoor called successfully"}
            method_response = MethodResponse.create_from_method_request(
                method_request=method_request,
                status=resp_status,
                payload=resp_payload
            )
            client.send_method_response(method_response)

    # Define behavior for receiving a twin patch
    def twin_patch_handler(twin_patch):
        print("")
        print("Twin desired properties patch received:")
        print(twin_patch)

    # Set the handlers on the client
    try:
        print("Beginning to listen for 'lockDoor' direct method invocations...")
        client.on_method_request_received = method_request_handler
        print("Beginning to listen for updates to the Twin desired properties...")
        client.on_twin_desired_properties_patch_received = twin_patch_handler
    except:
        # If something goes wrong while setting the handlers, clean up the client
        client.shutdown()
        raise
添加以下代码以运行该示例:
def main():
    print ("Starting the IoT Hub Python jobs sample...")
    client = create_client()

    print ("IoTHubDeviceClient waiting for commands, press Ctrl-C to exit")
    try:
        while True:
            time.sleep(100)
    except KeyboardInterrupt:
        print("IoTHubDeviceClient sample stopped!")
    finally:
        # Graceful exit
        print("Shutting down IoT Hub Client")
        client.shutdown()


if __name__ == '__main__':
    main()
保存并关闭 simDevice.py 文件。
注意
为简单起见,本文不实现重试策略。 在生产代码中,应该按文章 Transient Fault Handling(暂时性故障处理)中所述实施重试策略(例如指数性的回退)。
获取 IoT 中心连接字符串
在本文中,你将创建一个在设备上调用直接方法并更新设备孪生的后端服务。 服务需要“服务连接”权限才能在设备上调用直接方法。 服务还需要“注册表读取”和“注册表写入”权限才能读取和写入标识注册表。 没有仅包含这些权限的默认共享访问策略,因此需要创建一个。
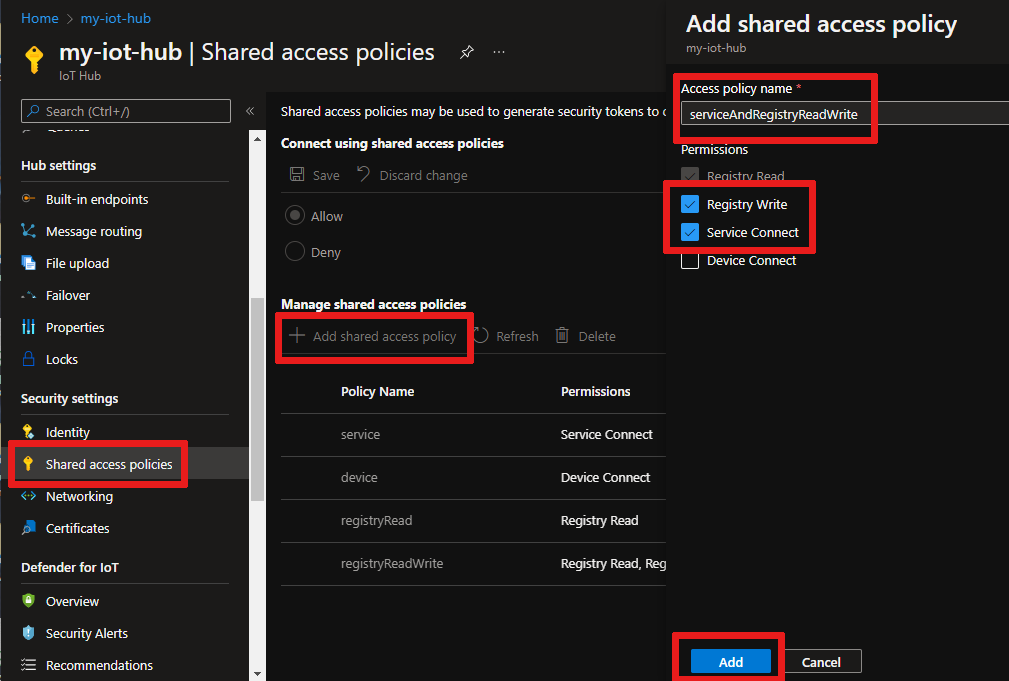
若要创建授予“服务连接”、“注册表读取”和“注册表写入”权限的共享访问策略,并获取此策略的连接字符串,请执行以下步骤:
在 Azure 门户中打开 IoT 中心。 若要转到 IoT 中心,最简单的方法是选择“资源组”,接着选择 IoT 中心所在的资源组,然后从资源列表中选择该 IoT 中心。
在 IoT 中心的左侧窗格上,选择“共享访问策略”。
在策略列表上方的顶部菜单中,选择“添加共享访问策略”。
在“添加共享访问策略”窗格中,为策略输入一个说明性名称,例如 serviceAndRegistryReadWrite。 在“权限”下,选择“服务连接”和“注册表写入”(选择“注册表写入”时,会自动选择“注册表读取”),然后选择“添加”。
回到“共享访问策略”页面,从策略列表中选择新的策略。
在出现的新窗格中,选择“主连接字符串”的复制图标并保存值。


有关 IoT 中心共享访问策略和权限的详细信息,请参阅访问控制和权限。
安排作业,用于调用直接方法和更新设备孪生的属性
在本部分中,将创建一个 Python 控制台应用,该应用使用直接方法在设备上启动远程 lockDoor,还更新设备孪生所需的属性。
在命令提示符处,运行以下命令以安装 azure-iot-hub 包:
pip install azure-iot-hub使用文本编辑器,在工作目录中创建一个 scheduleJobService.py 文件。
在 scheduleJobService.py 文件的开头添加以下
import语句和变量。 将{IoTHubConnectionString}占位符替换为先前在获取 IoT 中心连接字符串中复制的 IoT 中心连接字符串。 将{deviceId}占位符替换为已注册设备中的设备 ID(名称):import os import sys import datetime import time import threading import uuid import msrest from azure.iot.hub import IoTHubJobManager, IoTHubRegistryManager from azure.iot.hub.models import JobProperties, JobRequest, Twin, TwinProperties, CloudToDeviceMethod CONNECTION_STRING = "{IoTHubConnectionString}" DEVICE_ID = "{deviceId}" METHOD_NAME = "lockDoor" METHOD_PAYLOAD = "{\"lockTime\":\"10m\"}" UPDATE_PATCH = {"building":43,"floor":3} TIMEOUT = 60 WAIT_COUNT = 5 # Create IoTHubJobManager iothub_job_manager = IoTHubJobManager.from_connection_string(CONNECTION_STRING)添加以下方法,用于运行调用直接方法和设备孪生的作业:
def device_method_job(job_id, device_id, execution_time):
    print ( "" )
    print ( "Scheduling job: " + str(job_id) )

    job_request = JobRequest()
    job_request.job_id = job_id
    job_request.type = "scheduleDeviceMethod"
    job_request.start_time = datetime.datetime.utcnow().isoformat()
    job_request.cloud_to_device_method = CloudToDeviceMethod(method_name=METHOD_NAME, payload=METHOD_PAYLOAD)
    job_request.max_execution_time_in_seconds = execution_time
    job_request.query_condition = "DeviceId in ['{}']".format(device_id)

    new_job_response = iothub_job_manager.create_scheduled_job(job_id, job_request)

def device_twin_job(job_id, device_id, execution_time):
    print ( "" )
    print ( "Scheduling job " + str(job_id) )

    job_request = JobRequest()
    job_request.job_id = job_id
    job_request.type = "scheduleUpdateTwin"
    job_request.start_time = datetime.datetime.utcnow().isoformat()
    job_request.update_twin = Twin(etag="*", properties=TwinProperties(desired=UPDATE_PATCH))
    job_request.max_execution_time_in_seconds = execution_time
    job_request.query_condition = "DeviceId in ['{}']".format(device_id)

    new_job_response = iothub_job_manager.create_scheduled_job(job_id, job_request)
添加以下代码以安排作业和更新作业状态。 此外还包含
main例程:def iothub_jobs_sample_run(): try: method_job_id = uuid.uuid4() device_method_job(method_job_id, DEVICE_ID, TIMEOUT) print ( "" ) print ( "Direct method called with Job Id: " + str(method_job_id) ) twin_job_id = uuid.uuid4() device_twin_job(twin_job_id, DEVICE_ID, TIMEOUT) print ( "" ) print ( "Device twin called with Job Id: " + str(twin_job_id) ) while True: print ( "" ) method_job_status = iothub_job_manager.get_scheduled_job(method_job_id) print ( "...job " + str(method_job_id) + " " + method_job_status.status ) twin_job_status = iothub_job_manager.get_scheduled_job(twin_job_id) print ( "...job " + str(twin_job_id) + " " + twin_job_status.status ) print ( "Job status posted, press Ctrl-C to exit" ) time.sleep(WAIT_COUNT) except msrest.exceptions.HttpOperationError as ex: print ( "" ) print ( "Http error {}".format(ex.response.text) ) return except Exception as ex: print ( "" ) print ( "Unexpected error {}".format(ex) ) return except KeyboardInterrupt: print ( "" ) print ( "IoTHubService sample stopped" ) if __name__ == '__main__': print ( "Starting the IoT Hub jobs Python sample..." ) print ( " Connection string = {0}".format(CONNECTION_STRING) ) print ( " Device ID = {0}".format(DEVICE_ID) ) iothub_jobs_sample_run()保存并关闭 scheduleJobService.py 文件。
运行应用程序
现在,已准备就绪,可以运行应用程序了。
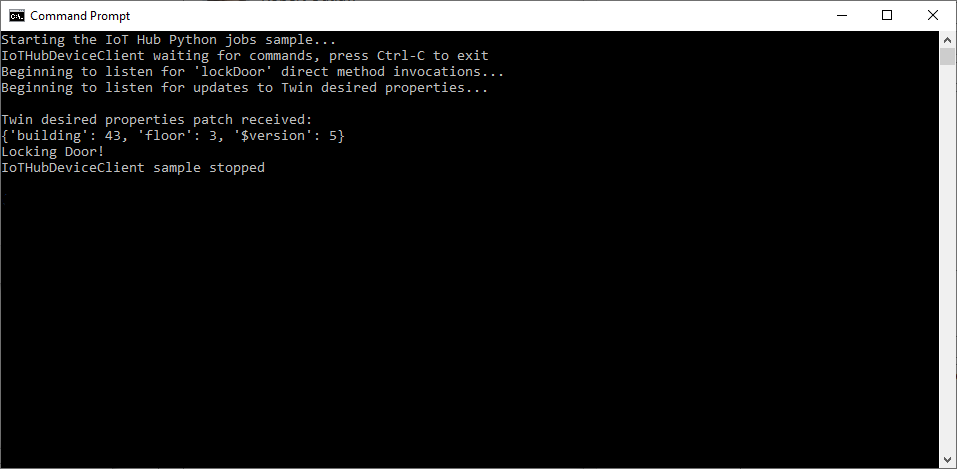
在工作目录的命令提示符处,运行以下命令以开始侦听重启直接方法:
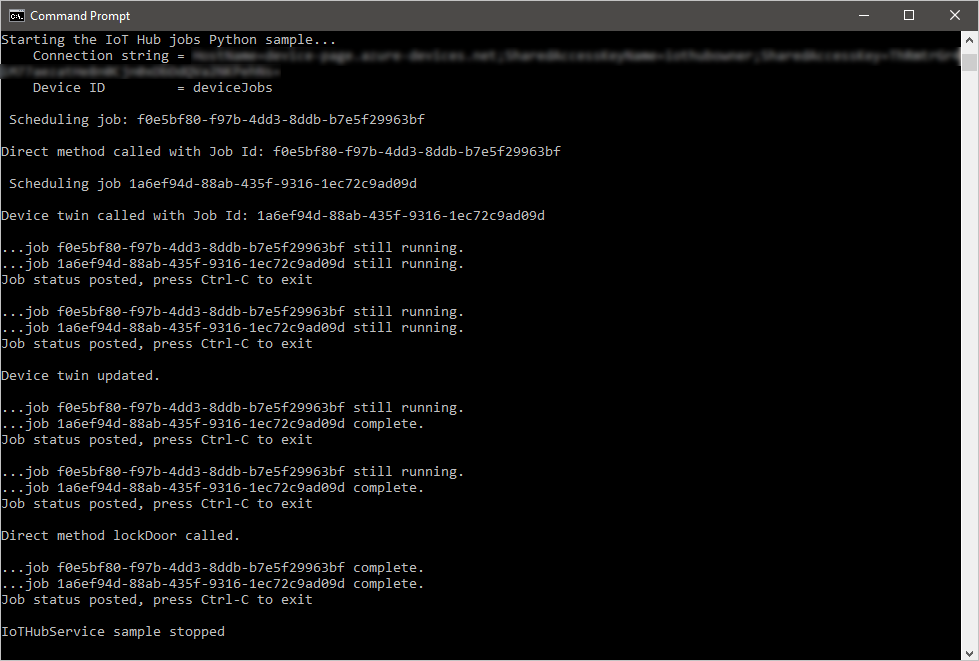
python simDevice.py在工作目录的另一命令提示符处运行以下命令,以触发作业进行锁门和孪生项的更新:
python scheduleJobService.py可在控制台查看针对直接方法和设备孪生的设备响应。
后续步骤
在本文中,你安排了作业以运行直接方法并更新设备孪生的属性。
若要继续探索 IoT 中心和设备管理模式,请在使用 Raspberry Pi 3 B + Reference Image 的 Device Update for Azure IoT Hub 教程中更新映像。