你当前正在访问 Microsoft Azure Global Edition 技术文档网站。 如果需要访问由世纪互联运营的 Microsoft Azure 中国技术文档网站,请访问 https://docs.azure.cn。
概述
重要
自 2024 年 6 月起,FCM 旧版 API 不再受到支持,并且会停用。 要避免推送通知服务发生任何中断,必须尽快迁移到 FCM v1 协议。
本教程介绍如何使用 Azure 通知中心将突发新闻通知广播到 Android 应用。 完成时,可以注册感兴趣的突发新闻类别并仅接收这些类别的推送通知。 此方案对于很多应用来说是常见模式,在这些应用中必须将通知发送到以前声明过对它们感兴趣的用户组,这样的应用包括 RSS 阅读器、针对音乐迷的应用等。
在通知中心创建注册时,通过加入一个或多个标记来启用广播方案。 将通知发送到标签时,已注册该标签的所有设备将接收通知。 因为标签是简单的字符串,它们不必提前设置。 有关标记的详细信息,请参阅通知中心路由和标记表达式。
在本教程中,将执行以下操作:
- 向移动应用添加类别选择。
- 已注册带标记的通知。
- 发送带标记的通知。
- 测试应用程序
先决条件
本教程基于在教程:使用 Azure 通知中心和 Firebase Cloud Messaging 将通知推送到 Android 设备。 在开始本教程之前,请完成教程:使用 Azure 通知中心和 Firebase Cloud Messaging 将通知推送到 Android 设备。
向应用程序中添加类别选择
第一步是向现有主活动添加 UI 元素,以允许用户选择要注册的类别。 用户选择的类别存储在设备上。 应用程序启动时,使用所选类别作为标签在通知中心创建设备注册。
打开
res/layout/activity_main.xml file,将其中的内容替换为以下内容:<LinearLayout xmlns:android="http://schemas.android.com/apk/res/android" xmlns:tools="http://schemas.android.com/tools" android:layout_width="match_parent" android:layout_height="match_parent" tools:context="com.example.breakingnews.MainActivity" android:orientation="vertical"> <CheckBox android:id="@+id/worldBox" android:layout_width="wrap_content" android:layout_height="wrap_content" android:text="@string/label_world" /> <CheckBox android:id="@+id/politicsBox" android:layout_width="wrap_content" android:layout_height="wrap_content" android:text="@string/label_politics" /> <CheckBox android:id="@+id/businessBox" android:layout_width="wrap_content" android:layout_height="wrap_content" android:text="@string/label_business" /> <CheckBox android:id="@+id/technologyBox" android:layout_width="wrap_content" android:layout_height="wrap_content" android:text="@string/label_technology" /> <CheckBox android:id="@+id/scienceBox" android:layout_width="wrap_content" android:layout_height="wrap_content" android:text="@string/label_science" /> <CheckBox android:id="@+id/sportsBox" android:layout_width="wrap_content" android:layout_height="wrap_content" android:text="@string/label_sports" /> <Button android:layout_width="wrap_content" android:layout_height="wrap_content" android:onClick="subscribe" android:text="@string/button_subscribe" /> <TextView android:layout_width="wrap_content" android:layout_height="wrap_content" android:text="Hello World!" android:id="@+id/text_hello" /> </LinearLayout>打开
res/values/strings.xml文件,添加以下行:<string name="button_subscribe">Subscribe</string> <string name="label_world">World</string> <string name="label_politics">Politics</string> <string name="label_business">Business</string> <string name="label_technology">Technology</string> <string name="label_science">Science</string> <string name="label_sports">Sports</string>main_activity.xml的图形布局应如下图所示: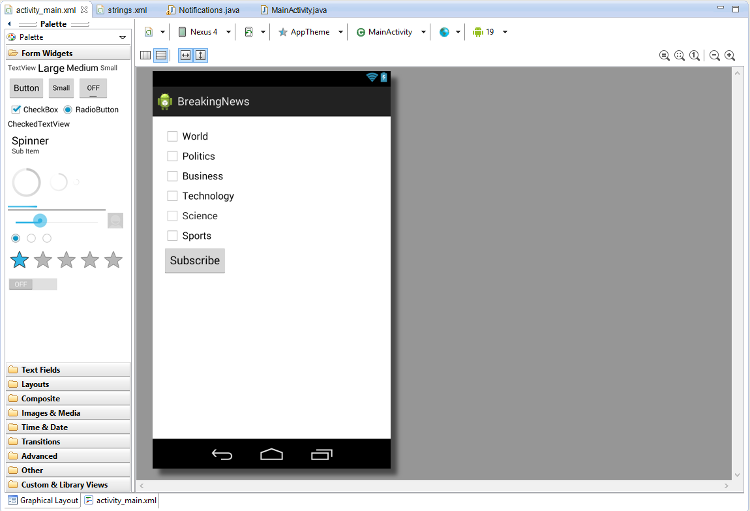
在与
MainActivity类相同的包中创建Notifications类。import java.util.HashSet; import java.util.Set; import java.util.concurrent.TimeUnit; import android.content.Context; import android.content.SharedPreferences; import android.os.AsyncTask; import android.util.Log; import android.widget.Toast; import com.google.android.gms.tasks.OnSuccessListener; import com.google.firebase.iid.FirebaseInstanceId; import com.google.firebase.iid.InstanceIdResult; import com.microsoft.windowsazure.messaging.NotificationHub; public class Notifications { private static final String PREFS_NAME = "BreakingNewsCategories"; private FirebaseInstanceId fcm; private NotificationHub hub; private Context context; private String senderId; public static String FCM_token = ""; private static final String TAG = "Notifications"; public Notifications(Context context, String hubName, String listenConnectionString) { this.context = context; this.senderId = senderId; fcm = FirebaseInstanceId.getInstance(); hub = new NotificationHub(hubName, listenConnectionString, context); } public void storeCategoriesAndSubscribe(Set<String> categories) { SharedPreferences settings = context.getSharedPreferences(PREFS_NAME, 0); settings.edit().putStringSet("categories", categories).commit(); subscribeToCategories(categories); } public Set<String> retrieveCategories() { SharedPreferences settings = context.getSharedPreferences(PREFS_NAME, 0); return settings.getStringSet("categories", new HashSet<String>()); } public void subscribeToCategories(final Set<String> categories) { new AsyncTask<Object, Object, Object>() { @Override protected Object doInBackground(Object... params) { try { FirebaseInstanceId.getInstance().getInstanceId().addOnSuccessListener(new OnSuccessListener<InstanceIdResult>() { @Override public void onSuccess(InstanceIdResult instanceIdResult) { FCM_token = instanceIdResult.getToken(); Log.d(TAG, "FCM Registration Token: " + FCM_token); } }); TimeUnit.SECONDS.sleep(1); String templateBodyFCM = "{\"data\":{\"message\":\"$(messageParam)\"}}"; hub.registerTemplate(FCM_token,"simpleFCMTemplate", templateBodyFCM, categories.toArray(new String[categories.size()])); } catch (Exception e) { Log.e("MainActivity", "Failed to register - " + e.getMessage()); return e; } return null; } protected void onPostExecute(Object result) { String message = "Subscribed for categories: " + categories.toString(); Toast.makeText(context, message, Toast.LENGTH_LONG).show(); } }.execute(null, null, null); } }此类使用本地存储区存储此设备必须接收的新闻类别。 它还包含注册这些类别所用的方法。
在
MainActivity类中,为Notifications添加一个字段:private Notifications notifications;然后,如以下代码所示更新
onCreate方法。 在 Notifications 类的 subscribeToCategories 方法中向通知中心进行注册。@Override protected void onCreate(Bundle savedInstanceState) { super.onCreate(savedInstanceState); setContentView(R.layout.activity_main); mainActivity = this; FirebaseService.createChannelAndHandleNotifications(getApplicationContext()); notifications = new Notifications(this, NotificationSettings.HubName, NotificationSettings.HubListenConnectionString); notifications.subscribeToCategories(notifications.retrieveCategories()); }确认已在 NotificationSettings 类中正确设置中心名称和连接字符串。
注意
由于使用客户端应用程序分发的凭据通常是不安全的,只应使用客户端应用程序分发具有侦听访问权限的密钥。 侦听访问权限允许应用程序注册通知,但是无法修改现有注册,也无法发送通知。 在受保护的后端服务中使用完全访问权限密钥,以便发送通知和更改现有注册。
然后,添加以下导入内容:
import android.widget.CheckBox;
import java.util.HashSet;
import java.util.Set;
import android.view.View;
添加以下
subscribe方法以处理订阅按钮单击事件:public void subscribe(View sender) { final Set<String> categories = new HashSet<String>(); CheckBox world = (CheckBox) findViewById(R.id.worldBox); if (world.isChecked()) categories.add("world"); CheckBox politics = (CheckBox) findViewById(R.id.politicsBox); if (politics.isChecked()) categories.add("politics"); CheckBox business = (CheckBox) findViewById(R.id.businessBox); if (business.isChecked()) categories.add("business"); CheckBox technology = (CheckBox) findViewById(R.id.technologyBox); if (technology.isChecked()) categories.add("technology"); CheckBox science = (CheckBox) findViewById(R.id.scienceBox); if (science.isChecked()) categories.add("science"); CheckBox sports = (CheckBox) findViewById(R.id.sportsBox); if (sports.isChecked()) categories.add("sports"); notifications.storeCategoriesAndSubscribe(categories); }此方法创建一个类别列表并使用
Notifications类将该列表存储在本地存储中,将相应的标签注册到通知中心。 更改类别时,使用新类别重新创建注册。
应用程序现在可以将一组类别存储在设备的本地存储区中了,每当用户更改所选类别时,会将这些类别注册到通知中心。
注册通知
这些步骤用于在启动时会在本地存储区中存储的类别注册到通知中心。
确认在
MainActivity类中onCreate方法的末尾存在以下代码:notifications.subscribeToCategories(notifications.retrieveCategories());此代码确保每次应用程序启动时,它从本地存储检索类别并请求注册这些类别。
然后更新
MainActivity类的onStart()方法,如下所示:@Override protected void onStart() { super.onStart(); isVisible = true; Set<String> categories = notifications.retrieveCategories(); CheckBox world = (CheckBox) findViewById(R.id.worldBox); world.setChecked(categories.contains("world")); CheckBox politics = (CheckBox) findViewById(R.id.politicsBox); politics.setChecked(categories.contains("politics")); CheckBox business = (CheckBox) findViewById(R.id.businessBox); business.setChecked(categories.contains("business")); CheckBox technology = (CheckBox) findViewById(R.id.technologyBox); technology.setChecked(categories.contains("technology")); CheckBox science = (CheckBox) findViewById(R.id.scienceBox); science.setChecked(categories.contains("science")); CheckBox sports = (CheckBox) findViewById(R.id.sportsBox); sports.setChecked(categories.contains("sports")); }此代码会基于以前保存的类别状态更新主活动。
应用程序现在已完成,可以在设备的本地存储区中存储一组类别了,每当用户更改所选类别时会使用这些类别注册到通知中心。 接下来,请定义一个后端,以便将类别通知发送到此应用。
发送带标记的通知
本部分说明如何从 .NET 控制台应用以标记模板通知的形式发送突发新闻。
在 Visual Studio 中创建新的 Visual C# 控制台应用程序:
- 在菜单中,选择“文件”>“新建”>“项目”。
- 在“创建新项目”中,选择模板列表中适用于 C# 的“控制台应用(.NET Framework)”,然后选择“下一步”。
- 输入应用程序的名称。
- 对于“解决方案”,选择“添加到解决方案”,然后选择“创建”以创建项目。
选择“工具”>“NuGet 包管理器”>“包管理器控制台”,然后在控制台窗口中运行以下命令 :
Install-Package Microsoft.Azure.NotificationHubs此操作会使用 Microsoft.Azure.NotificationHubs 包添加对 Azure 通知中心 SDK 的引用。
打开文件 Program.cs 并添加以下
using语句:using Microsoft.Azure.NotificationHubs;在
Program类中,添加以下方法,或替换此方法(如果已存在):private static async void SendTemplateNotificationAsync() { // Define the notification hub. NotificationHubClient hub = NotificationHubClient.CreateClientFromConnectionString("<connection string with full access>", "<hub name>"); // Apple requires the apns-push-type header for all requests var headers = new Dictionary<string, string> {{"apns-push-type", "alert"}}; // Create an array of breaking news categories. var categories = new string[] { "World", "Politics", "Business", "Technology", "Science", "Sports"}; // Send the notification as a template notification. All template registrations that contain // "messageParam" and the proper tags will receive the notifications. // This includes APNS, GCM/FCM, WNS, and MPNS template registrations. Dictionary<string, string> templateParams = new Dictionary<string, string>(); foreach (var category in categories) { templateParams["messageParam"] = "Breaking " + category + " News!"; await hub.SendTemplateNotificationAsync(templateParams, category); } }此代码将针对字符串数组中的所有 6 个标记发送模板通知。 使用标记是为了确保设备仅接收已注册类别的通知。
在前面的代码中,将
<hub name>和<connection string with full access>占位符替换为通知中心名称和从通知中心仪表板获取的 DefaultFullSharedAccessSignature 的连接字符串。在
Main()方法中添加以下行:SendTemplateNotificationAsync(); Console.ReadLine();生成控制台应用。
测试应用程序
在 Android Studio 中的 Android 设备或模拟器上运行应用。 应用 UI 提供了一组开关,可以使用它们选择要订阅的类别。
启用一个或多个类别开关,并单击“订阅”。 应用程序将所选类别转换为标签并针对所选标签从通知中心请求注册新设备。 返回注册的类别并显示在 toast 通知中。

运行 .NET 控制台应用,以便针对每个类别发送通知。 所选类别的通知作为 toast 通知显示。

后续步骤
在本教程中,已向注册类别的特定 Android 设备发送了广播通知。 若要了解如何向特定的用户推送通知,请转到以下教程: