你当前正在访问 Microsoft Azure Global Edition 技术文档网站。 如果需要访问由世纪互联运营的 Microsoft Azure 中国技术文档网站,请访问 https://docs.azure.cn。
本文概述为演示 Azure 通知中心在多个平台上的功能而构建的 Azure 通知中心示例应用程序。 该应用程序使用土地调查方案,其中桌面 Contoso Land Survey 应用程序可发送 Android 和 iOS Contoso 应用程序皆可接收的通知。
你可以从 GitHub 下载完整示例。
先决条件
若要构建示例,需满足以下先决条件:
- Azure 订阅。 如果还没有 Azure 订阅,可以在开始前创建一个免费 Azure 帐户。
- Microsoft Visual Studio 2019 或更高版本。 此示例使用 Visual Studio 2019。
- 使用以下工作负载安装 Visual Studio 2019:
- .NET 5.0 SDK
- ASP.NET 和 Web 开发
- Azure 开发
- Node.js 开发
- UWP 应用开发工具
- Firebase 帐户,用于为 Android 启用推送通知。
- Apple 开发人员帐户,用于为 iOS 启用推送通知。
- 托管在 Azure 上的 SQL Server 数据库实例。
- Azure 通知中心命名空间和中心。
示例体系结构
该解决方案由以下组件构成:
- Azure 通知中心实例:在 Azure 门户上配置的 ANH 命名空间和中心。
- SQL Server 数据库:在 Azure 门户上配置的 SQL Server 数据库实例。
- ASP.NET 应用后端:基于 .NET 5.0 构建的 Web API 后端,其与通知中心连接,并托管为 Azure 应用服务。
- Windows UWP 应用程序:使用 React Native 构建的 UWP 应用程序,可用作将新闻和调查信息发送给不同用户和调查组的“管理器”应用程序。 该应用程序还有助于创建新用户及编辑用户获分配的组。
- Android 和 iOS 客户端应用:使用 React Native 构建的“Land Survey”应用程序。 此类应用可向用户显示 UWP 管理器应用程序发送的信息。
示例文件夹结构
GitHub 上的示例应用程序包含以下文件夹:
- NotificationHub.Sample.API:Visual Studio 2019 ASP.NET Web API 解决方案,可用作后端。
- 应用:跨平台 React Native 应用程序,支持以管理员身份登录发送通知,然后以调查用户身份登录接收通知。
- azure-template:Azure 资源管理模板( 和
parameters.json),你可以用来在 Azure 订阅中部署所有必要资源,以完成此部署的配置。 有关资源管理器模板部署的信息,请参阅使用 Azure 门户创建和部署 ARM 模板。
示例概述
以下部分概述构成此示例的组件。
控制器
身份验证
你可以使用 AuthenticateController.cs 中的下列方法来验证已登录用户的身份:
[HttpPost]
[Route("login")]
public async Task<IActionResult> Login([FromBody] LoginModel model)
{
   var user = await userManager.FindByNameAsync(model.Username);
    if (user != null && await userManager.CheckPasswordAsync(user, model.Password))
    {
        var userRoles = await userManager.GetRolesAsync(user);

        var authClaims = new List<Claim>
        {
            new Claim(ClaimTypes.Name, user.UserName),
            new Claim(JwtRegisteredClaimNames.Jti, Guid.NewGuid().ToString()),
        };

        foreach (var userRole in userRoles)
        {
            authClaims.Add(new Claim(ClaimTypes.Role, userRole));
        }

        var authSigningKey = new SymmetricSecurityKey(Encoding.UTF8.GetBytes(_configuration["JWT:Secret"]));

        var token = new JwtSecurityToken(
            issuer: _configuration["JWT:ValidIssuer"],
            audience: _configuration["JWT:ValidAudience"],
            expires: DateTime.Now.AddHours(3),
            claims: authClaims,
            signingCredentials: new SigningCredentials(authSigningKey, SecurityAlgorithms.HmacSha256)
            );

        UserDetails userDetails = new UserDetails();
        userDetails.FirstName = model.Username;
        userDetails.LastName = model.Username;
        userDetails.UserName = model.Username;

        return Ok(new
        {
            token = new JwtSecurityTokenHandler().WriteToken(token),
            expiration = token.ValidTo,
            username = model.Username,
            email = user.Email,
            role = userRoles != null ? userRoles[0] : "Site-Manager",
            user = userDetails
        });
    }
    return Unauthorized();
}

[HttpPost]
[Route("register")]
public async Task<IActionResult> Register([FromBody] RegisterModel model)
{
    var userExists = await userManager.FindByNameAsync(model.Username);
    if (userExists != null)
        return StatusCode(StatusCodes.Status500InternalServerError, new Response { Status = "Error", Message = "User already exists!" });

    ApplicationUser user = new ApplicationUser()
    {
        Email = model.Email,
        SecurityStamp = Guid.NewGuid().ToString(),
        UserName = model.Username
    };
    var result = await userManager.CreateAsync(user, model.Password);
    if (!result.Succeeded)
        return StatusCode(StatusCodes.Status500InternalServerError, new Response { Status = "Error", Message = "User creation failed! Please check user details and try again." });

    if (!await roleManager.RoleExistsAsync(UserRoles.SiteManager))
        await roleManager.CreateAsync(new IdentityRole(UserRoles.SiteManager));

    if (await roleManager.RoleExistsAsync(UserRoles.SiteManager))
    {
        await userManager.AddToRoleAsync(user, UserRoles.SiteManager);
    }

    return Ok(new Response { Status = "Success", Message = "User created successfully!" });
}
仪表板
DashboardController.cs 中的仪表板控制器将返回所有通知信息:
public class DashboardController : ControllerBase
{
    private readonly ApplicationDbContext _db;
    private readonly INotificationService _notificationService;

    public DashboardController(ApplicationDbContext dbContext, INotificationService notificationService)
    {
        _db = dbContext;
        _notificationService = notificationService;
    }

    [HttpGet("insights")]
    public async Task<IActionResult> GetDashboardInsight(string duration)
    {
        DashboardInsight dashboardInsight = new DashboardInsight();

        dashboardInsight.DeviceTrends = await _notificationService.GetAllRegistrationInfoAsync();

        var notificationMessages = _db.NotificationMessages.ToList();

        switch (duration)
        {
            case "Daily":
                {
                    dashboardInsight.NotificationTrends = _db.NotificationMessages
                                                            .GroupBy(m => m.SentTime.Date)
                                                            .Select(m => new NotificationTrend()
                                                            {
                                                                Timestamp = m.Key.ToShortDateString(),
                                                                NotificationsSent = m.Count()
                                                            }).ToList();
                }
                break;
            case "Weekly":
                {
                    dashboardInsight.NotificationTrends = notificationMessages
                                                            .GroupBy(m => WeekNumber(m.SentTime.Date))
                                                            .Select(m => new NotificationTrend()
                                                            {
                                                                Timestamp = FirstDateOfWeekISO8601(DateTime.Now.Year, m.Key).ToShortDateString(),
                                                                NotificationsSent = m.Count()
                                                            }).ToList();
                }
                break;
            case "Monthly":
                {
                    dashboardInsight.NotificationTrends = _db.NotificationMessages
                                                            .GroupBy(m => m.SentTime.Date.Month)
                                                            .Select(m => new NotificationTrend()
                                                            {
                                                                Timestamp = m.Key + "-" + DateTime.Now.Year,
                                                                NotificationsSent = m.Count()
                                                            }).ToList();
                }
                break;
            default:
                break;
        }

        dashboardInsight.TotalGroups = _db.SurveyGroups.Count();
        dashboardInsight.TotalUsers = _db.Users.Count();
        dashboardInsight.TotalNotificationsSent = _db.NotificationMessages.Count();

        return Ok(dashboardInsight);
    }
前端
若要调用任何后端 API,可通过此示例创建 notification.service.js 服务来实际调用 API。 此代码位于 app\data\services\notification.service.js:
export const sendNotificationAPI = async (userInfo) => {
  let url = `${api}notification/send`;
  let authHeader = await getAuthHeaders();
  return await post(url, userInfo, { ...authHeader });
};

export const getNotificationsAPI = async () => {
  let url = `${api}notification/get`;
  let authHeader = await getAuthHeaders();
  return await get(url, { ...authHeader });
};
管理器应用程序
此示例包含使用 React Native 构建的 UWP 应用程序,该应用程序可用作将新闻和调查信息发送给不同用户和调查组的“管理器”应用程序。 该应用程序还有助于创建新用户及编辑用户获分配的组。
若以管理员身份登录,请使用以下终结点和 POST 正文生成你选择的用户凭据。 你可以使用自己选择的任何 HTTP REST 客户端:
端点
POST {{endpoint}}api/authenticate/register-admin
正文
{
  "username": "<USER_NAME>",
  "email": "<EMAIL>",
  "password": "<PASSWORD>"
}
完成注册后,你应该便可使用相同凭据登录到 UWP 应用程序。
通知控制器
NotificationController.cs 中的以下代码可用于接收及发送通知:
[Produces("application/json")]
[Consumes("application/json")]
[HttpPost("send")]
public async Task<ActionResult> SendNotification([FromBody] NotificationMessage notificationMessage)
{
    try
    {
        List<string> tags = new List<string>();

        // attach survey group and user information with notificationMessage
        notificationMessage.SurveyGroupTags.ForEach(surveyGroupId =>
        {
            var group = _db.SurveyGroups.Where(g => g.Id == surveyGroupId).FirstOrDefault();
            if (group != null)
            {
                notificationMessage.SurveyGroups.Add(group);
                tags.Add($"group:{group.GroupName.Replace(' ', '-')}");
            }
        });

        notificationMessage.UserTags.ForEach(userId =>
        {
            var user = _db.Users.Where(u => u.Id == userId).FirstOrDefault();
            if (user != null)
            {
                notificationMessage.Users.Add(user);
                tags.Add($"username:{user.UserName}");
            }
        });
        _db.NotificationMessages.Add(notificationMessage);

        // send template notification
        var notification = new Dictionary<string, string>();
        notification.Add("title", notificationMessage.NotificationTitle);
        notification.Add("message", notificationMessage.NotificationDescription);

        var res = await _notificationService.RequestNotificationAsync(notificationMessage, tags, HttpContext.RequestAborted);

        await _db.SaveChangesAsync();
        return Ok(notificationMessage);
    }
    catch (Exception ex)
    {
        return BadRequest(ex.Message);
    }
}

[Produces("application/json")]
[HttpGet("get")]
public async Task<ActionResult> Get()
{
    try
    {
        var surveyGroups = _db.NotificationMessages.Include(message => message.SurveyGroups).Include(message => message.Users).ToList();
        return Ok(surveyGroups);
    }
    catch (Exception ex)
    {
        return BadRequest();
    }
}
通知服务
NotificationHub.Sample.API/NotificationHub.Sample.API/Services/Notifications/INotificationService.cs 中的通知服务可提供创建和删除安装的方法。 此外,还有一种方法可向所有已注册用户发送通知,并获取所有注册信息:
public interface INotificationService
{
   Task<bool> CreateOrUpdateInstallationAsync(DeviceInstallation deviceInstallation, CancellationToken cancellationToken);
   Task<bool> DeleteInstallationByIdAsync(string installationId, CancellationToken cancellationToken);
   Task<bool> RequestNotificationAsync(NotificationMessage notificationMessage, IList<string> tags, CancellationToken cancellationToken);
   Task<List<DeviceTrend>> GetAllRegistrationInfoAsync();
}
部署解决方案
若要运行此示例,必需满足以下先决条件:
- Azure 订阅。 如果没有 Azure 订阅,请先创建免费的 Azure 帐户。
- Firebase 帐户,用于为 Android 设置推送通知。
- Apple 开发人员帐户,用于为 iOS 设置推送通知。
- 一台已安装 Visual Studio 2019 的 Windows 计算机,并且具备 ASP.NET Core 和 UWP 应用程序开发支持。
- 在开发计算机上安装 Android SDK 和 Android Studio(用于运行 Android 应用程序)。
- Mac OSX 计算机,并且已安装 XCode 和最新的 iOS SDK(用于运行 iOS 应用程序)。
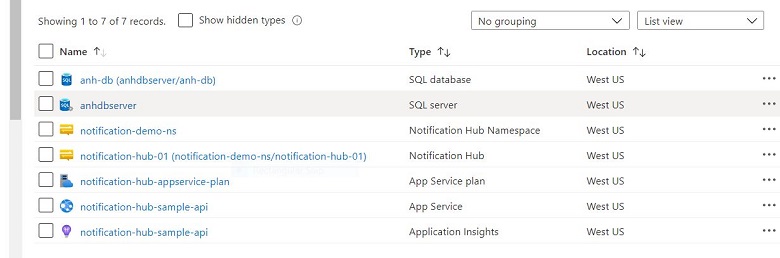
部署资源
- Azure 通知中心实例:在 Azure 上配置的通知中心。
- SQL Server 数据库实例:托管在 Azure 上的 SQL Server 数据库。
- ASP.NET 应用后端:通过 .NET 5.0 构建的 Web API 后端,可与托管为 Azure 应用服务的 Azure 通知中心连接。 有关详细信息,请参阅快速入门:部署 ASP.NET Web 应用。
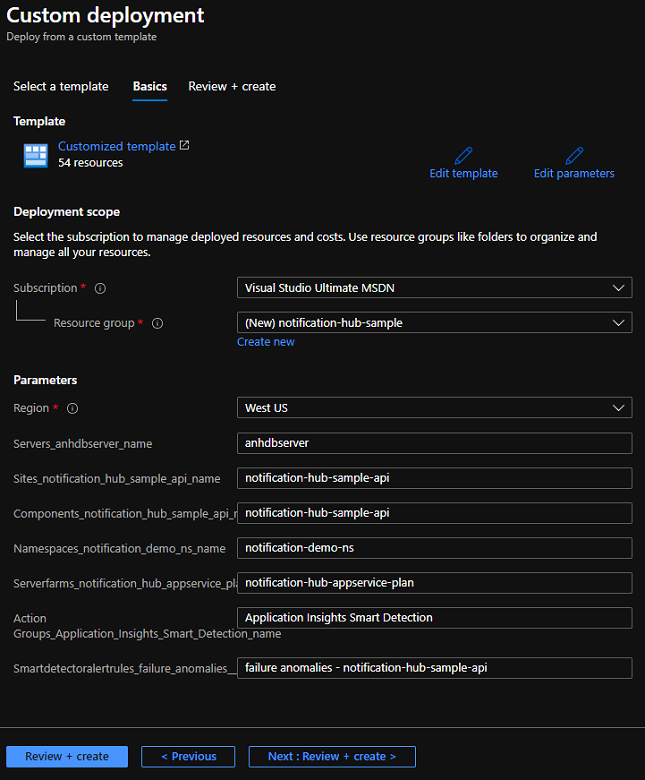
如果不想手动部署所有资源,可以使用 GitHub 存储库中提供的 Azure 资源管理器 template.json 文件在其中一个操作步骤中部署所有必要的实例。 此模板文件可从 /azure-template 的存储库中获取。 有关如何使用资源管理器模板的信息,请参阅教程:使用 Azure 快速入门模板。
为 Android 和 iOS 设置通知
- Firebase:若要在 Android 上接收通知,应配置 Firebase 服务,并将其与 Azure 通知中心实例连接。 有关详细信息,请参阅配置 Google Firebase 设置。
- Apple Push Notification 服务 (APNS):若要在 iOS 上接收通知,应使用 Apple 开发人员帐户配置 APNS 服务,并将其与 Azure 通知中心实例连接。 有关详细信息,请参阅配置 Apple Push Notification 服务设置。
生成解决方案
请按照以下步骤构建示例。
创建资源:SQL 数据库
在 Azure 门户中创建 SQL Server 数据库实例。 例如:
创建资源:通知中心
在 Azure 门户中创建通知中心,如下所示:
登录到 Azure 门户。
在左侧菜单中,选择“所有服务” 。
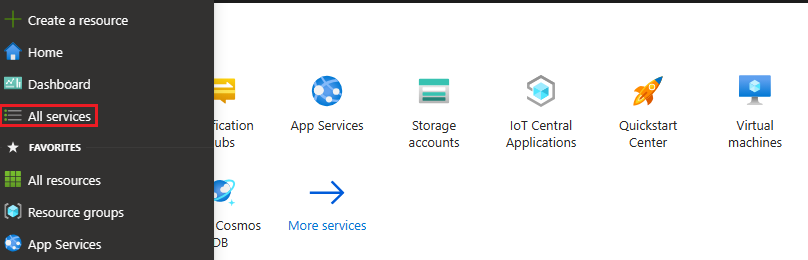
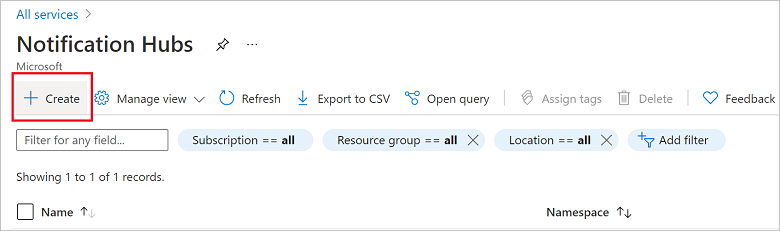
在“筛选器服务”文本框中键入“通知中心”。 选择服务名称旁边的星形图标,以便将服务添加到左侧菜单上的“收藏夹”部分。 选择“通知中心”。

在“通知中心”页面上,在工具栏上选择“创建”。
在“通知中心”页面上的“基本信息”选项卡中,执行以下步骤:
在订阅中,选择要使用的 Azure 订阅的名称,然后选择现有资源组或创建新资源组。
在命名空间详细信息中为新命名空间输入唯一名称。
命名空间包含一个或多个通知中心,因此请在通知中心详细信息中键入中心的名称。
从位置下拉列表框中选择值。 此值指定要在其中创建中心的位置。
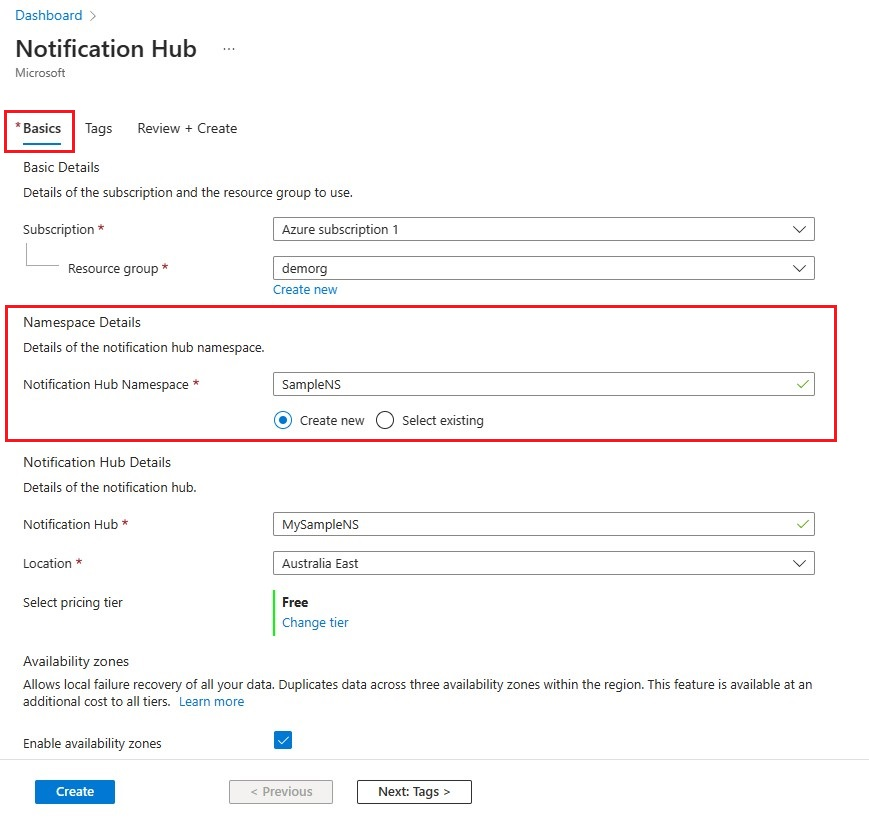
查看“可用性区域”选项。 如果选择了具有可用性区域的区域,则默认会选中该复选框。 可用性区域是一项付费功能,因此会向你的层级添加额外费用。
选择“灾难恢复”选项:“无”、“配对恢复区域”或“灵活恢复区域”。 如果选择“配对恢复区域”,则会显示故障转移区域。 如果选择“灵活恢复区域”,请使用下拉列表从恢复区域列表中选择。

选择“创建” 。
部署完成后,选择“转到资源”。


配置后端
若要配置应用后端,请找到 /NotificationHub.Sample.API/appsettings.json 文件,并配置 SQL Server 连接字符串。
你可以在本地或在任何 IIS 服务器上运行 API 解决方案,或将其部署为 Azure Web 应用服务。 请将 API 的 URL 随时备用。
构建 NotificationHub.Sample.API 应用程序
在 Visual Studio 中,加载 /NotificationHubSample/NotificationHub.Sample.API/NotificationHub.Sample.API.sln 解决方案。
从“构建”菜单中,选择“构建解决方案”。
将解决方案发布到 Azure:在解决方案资源管理器中,右键单击 NotificationHub.Sample.API 项目,然后选择“发布”。
在发布对话框中,选择Azure(第一个选项),然后选择下一步。
选择“Azure 应用服务 (Windows)”,然后选择“下一步”。
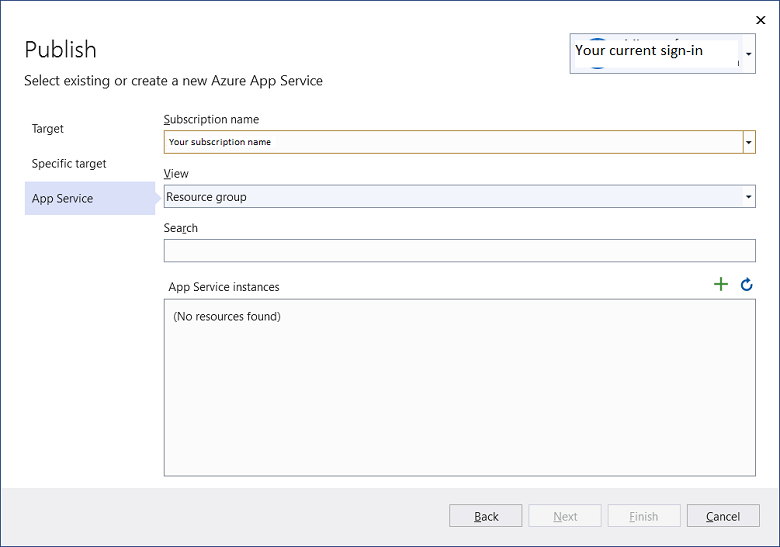
系统会将你重定向到以下对话框,你可以从中选择适当的订阅名称和 AppService 实例。 系统会将你的后端部署到 Azure,并将你重定向到新的 URL。
发布后端后,将生成的 URL 添加到 config.js(位于 /app 文件夹下)。 请务必在 URL 后面追加
/api/。
运行适用于 Windows 的 React 本机前端应用程序
该应用程序要求同时运行移动应用程序(Android 或 iOS)以及 UWP 管理器应用程序。 请按照以下步骤运行上述两个应用程序:
在首选终端或 shell 窗口中打开应用文件夹。 然后执行以下操作:
Windows
- 运行
npm install以安装所有包依赖项。 - 运行
npm run start以在一个控制台窗口中启动 Metro 服务器。 - 打开另一个终端窗口,然后运行
npx react-native run-windows以运行 UWP 应用程序。 - 如果部署或构建失败,请参阅相关故障排除指南。
Android
- 在 React-Native 项目上配置 Firebase,以确保你能够使用通知功能。
- 成功配置 Firebase 项目后,从 Firebase 门户下载 google-services.json 文件。
- 将 ./app/android/app/google-services.json 替换为此新文件。 确保应用程序包名称与 Firebase 中配置的其中一个名称匹配。 包名称配置于该 AndroidManifest.xml 文件。
- 有关在 React Native 应用程序中配置通知的方式,请参阅教程:向 React Native 发送推送通知。
- 配置通知后,运行
npm run start以在一个控制台窗口中启动 Metro 服务器。 如果 Windows 应用程序已在运行,可以跳过这一步。 - 在新控制台窗口中运行
npx react-native run-android,以运行 Android 应用程序。
iOS
- 在 React-Native 项目上配置 APNS,以确保你能够使用通知功能。
- 在 iOS 中,只有通过 App Store 或 TestFlight 签名及安装的应用程序才能接收通知。 而且,你必须使用 Apple 开发人员帐户创建应用程序。 苹果开发者帐户中配置的应用程序捆绑标识符需要在应用程序的 Info.plist 和 Entitlements.plist 文件中进行配置。
- 有关在 React Native 应用程序中配置通知的方式,请参阅教程:向 React Native 发送推送通知。
- 配置通知后,运行
npm run start以在一个控制台窗口中启动 Metro 服务器。 如果 Windows 应用程序已在运行,可以跳过这一步。 - 在新控制台窗口中运行
npx react-native run-ios,以运行 iOS 应用程序。 如前所述,若在本地部署,则通知功能将无法在 iOS 上正常工作。 你也将无法在 iOS 模拟器中接收通知。
疑难解答
你可能会在运行适用于 Windows 应用程序的 React Native 时遇到以下错误:
error MSB4057: The target "Deploy" does not exist in the project
此为 React Native Windows 的一个已知问题。 若要解决此问题,先从 app/windows 文件夹打开 app.sln,然后在 Visual Studio 中卸载 CheckboxWindows 和 ReactNativeAsyncStorage 项目的 .csproj 文件 。 然后,打开 app.csproj 文件并在 前面添加下行内容,再重新加载项目:
<Target Name="Deploy"/>