了解如何在用户开始在搜索框中键入内容时实现自动完成(typeahead 查询和建议的结果)。 在本教程中,我们将分别显示自动完成的查询和建议的结果,然后一起显示。 用户可能只需要键入两到三个字符才能找到所有可用结果。
本教程中,您将学习如何:
- 添加建议
- 向建议添加突出显示
- 添加自动完成功能
- 合并自动完成和建议
概述
本教程在之前的 “向搜索结果添加分页” 教程中,增加了自动完成和建议结果功能。
可以在以下项目中找到本教程中代码的完成版本:
先决条件
- 2a-add-paging (GitHub) 解决方案。 此项目可以是上一教程中构建的你自己的版本,也可以是 GitHub 的副本。
添加建议
让我们从向用户提供替代项的最简单情况开始:建议的结果下拉列表。
在 index.cshtml 文件中,将 TextBoxFor 语句更改为
@idazureautosuggest。@Html.TextBoxFor(m => m.searchText, new { @class = "searchBox", @id = "azureautosuggest" }) <input value="" class="searchBoxSubmit" type="submit">在此语句后面,在结束 </div> 后输入此脚本。 此脚本利用开源 jQuery UI 库中的 “自动完成”小组件 来显示建议结果的下拉列表。
<script>
    $("#azureautosuggest").autocomplete({
        source: "/Home/SuggestAsync?highlights=false&fuzzy=false",
        minLength: 2,
        position: {
            my: "left top",
            at: "left-23 bottom+10"
        }
    });
</script>
ID
"azureautosuggest"将上述脚本连接到搜索框。 小组件的源选项指定为一个建议方法,该方法调用具有两个查询参数的建议 API:突出显示和模糊,这两者在本例中都设置为 false。 此外,至少需要两个字符来触发搜索。
向视图添加对 jQuery 脚本的引用
若要访问 jQuery 库,请将视图文件的头>部分更改为<以下代码:
<head>
    <meta charset="utf-8">
    <title>Typeahead</title>
    <link href="https://code.jquery.com/ui/1.12.1/themes/start/jquery-ui.css"
          rel="stylesheet">
    <script src="https://code.jquery.com/jquery-1.10.2.js"></script>
    <script src="https://code.jquery.com/ui/1.12.1/jquery-ui.js"></script>

    <link rel="stylesheet" href="~/css/hotels.css" />
</head>
由于我们引入了新的 jQuery 引用,因此还需要删除或注释掉 _Layout.cshtml 文件中的默认 jQuery 引用(在 Views/Shared 文件夹中)。 找到以下行,并注释掉第一个脚本行,如下所示。 此更改可避免对 jQuery 的引用发生冲突。
<environment include="Development">
    <!-- <script src="~/lib/jquery/dist/jquery.js"></script> -->
    <script src="~/lib/bootstrap/dist/js/bootstrap.js"></script>
    <script src="~/js/site.js" asp-append-version="true"></script>
</environment>
现在,可以使用预定义的 Autocomplete jQuery 函数。
将“建议”动作添加到控制器
在主页控制器中,添加 SuggestAsync 操作(在 PageAsync 操作之后)。
public async Task<ActionResult> SuggestAsync(bool highlights, bool fuzzy, string term)
{
    InitSearch();

    // Setup the suggest parameters.
    var options = new SuggestOptions()
    {
        UseFuzzyMatching = fuzzy,
        Size = 8,
    };

    if (highlights)
    {
        options.HighlightPreTag = "<b>";
        options.HighlightPostTag = "</b>";
    }

    // Only one suggester can be specified per index. It is defined in the index schema.
    // The name of the suggester is set when the suggester is specified by other API calls.
    // The suggester for the hotel database is called "sg", and simply searches the hotel name.
    var suggestResult = await _searchClient.SuggestAsync<Hotel>(term, "sg", options).ConfigureAwait(false);

    // Convert the suggested query results to a list that can be displayed in the client.
    List<string> suggestions = suggestResult.Value.Results.Select(x => x.Text).ToList();

    // Return the list of suggestions.
    return new JsonResult(suggestions);
}
Size 参数指定要返回的结果数(如果未指定,则默认值为 5)。 创建索引时,在搜索索引上指定 建议器 。 在Microsoft托管的示例酒店索引中,建议器名称为“sg”,并在 HotelName 字段中专门搜索建议的匹配项。
模糊匹配允许在输出中包含“近似匹配”,编辑距离最多为一个。 如果 突出显示 参数设置为 true,则会将粗体 HTML 标记添加到输出中。 我们将在下一部分中将这两个参数设置为 true。
可能会遇到一些语法错误。 如果是,请将以下两个 using 语句添加到文件顶部。
using System.Collections.Generic;
using System.Linq;
运行应用。 例如,输入“po”时是否获得一系列选项? 现在,请尝试“pa”。
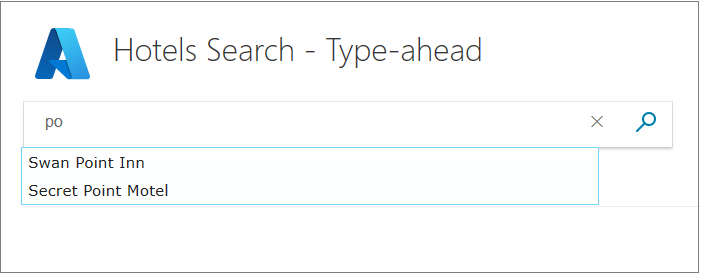
请注意,输入的字母 必须 开始一个单词,而不只是包含在单词中。
在视图脚本中,将 &模糊 设置为 true,然后再次运行应用。 现在输入“po”。 请注意,搜索假设你错了一个字母。
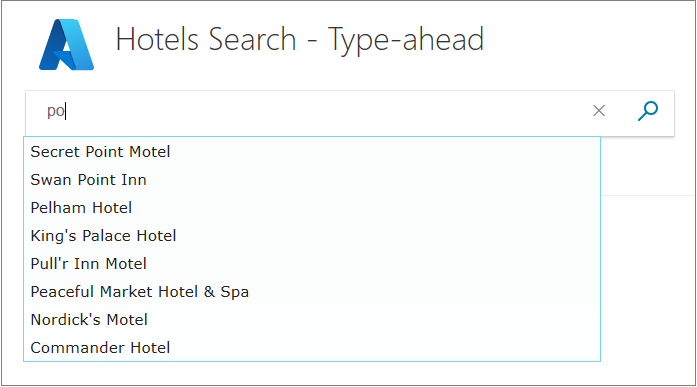
如果你感兴趣, Azure 认知搜索中的 Lucene 查询语法 详细描述了模糊搜索中使用的逻辑。
对建议加以突出显示
通过将 突出显示 参数设置为 true,我们可以改进用户的建议外观。 但是,首先需要向视图添加一些代码以显示加粗文本。
在视图(index.cshtml)中,在前面所述的脚本后面
"azureautosuggest"添加以下脚本。<script> var updateTextbox = function (event, ui) { var result = ui.item.value.replace(/<\/?[^>]+(>|$)/g, ""); $("#azuresuggesthighlights").val(result); return false; }; $("#azuresuggesthighlights").autocomplete({ html: true, source: "/home/suggest?highlights=true&fuzzy=false&", minLength: 2, position: { my: "left top", at: "left-23 bottom+10" }, select: updateTextbox, focus: updateTextbox }).data("ui-autocomplete")._renderItem = function (ul, item) { return $("<li></li>") .data("item.autocomplete", item) .append("<a>" + item.label + "</a>") .appendTo(ul); }; </script>现在更改文本框的 ID,使其显示如以下所示。
@Html.TextBoxFor(m => m.searchText, new { @class = "searchBox", @id = "azuresuggesthighlights" }) <input value="" class="searchBoxSubmit" type="submit">再次运行应用程序,你应该看到建议中输入的文本加粗。 请尝试键入“pa”。

在上述代码突出显示脚本中使用的逻辑并不可靠。 如果输入同名中出现两次的术语,则粗体结果并不完全是你想要的。 请尝试键入“mo”。
开发人员需要回答的问题之一是,当脚本工作“足够好”时,以及何时应解决其怪癖。 我们不会在本教程中进一步涉及突出显示,但是如果突出显示对你的数据无效,找到一个精确的算法是值得考虑的。 有关详细信息,请参阅命中突出显示。
添加自动完成功能
与建议略有不同的另一个变化是自动完成(有时称为“键入提示”),该功能用于完成查询词。 同样,在改进用户体验之前,我们将从最简单的实现开始。
在视图中输入以下脚本,按照之前的脚本继续操作。
<script>
    $("#azureautocompletebasic").autocomplete({
        source: "/Home/Autocomplete",
        minLength: 2,
        position: {
            my: "left top",
            at: "left-23 bottom+10"
        }
    });
</script>
现在更改文本框的 ID,使其如下所示。
@Html.TextBoxFor(m => m.searchText, new { @class = "searchBox", @id = "azureautocompletebasic" }) <input value="" class="searchBoxSubmit" type="submit">在主控制器中,在SuggestAsync动作之后输入AutocompleteAsync动作。
public async Task<ActionResult> AutoCompleteAsync(string term) { InitSearch(); // Setup the autocomplete parameters. var ap = new AutocompleteOptions() { Mode = AutocompleteMode.OneTermWithContext, Size = 6 }; var autocompleteResult = await _searchClient.AutocompleteAsync(term, "sg", ap).ConfigureAwait(false); // Convert the autocompleteResult results to a list that can be displayed in the client. List<string> autocomplete = autocompleteResult.Value.Results.Select(x => x.Text).ToList(); return new JsonResult(autocomplete); }请注意,我们在自动完成搜索中使用与建议相同的建议函数,称为“sg”,所以我们只是尝试补全酒店名称。
有一系列 AutocompleteMode 设置,我们使用的是 OneTermWithContext。 有关其他选项的说明,请参阅 自动完成 API 。
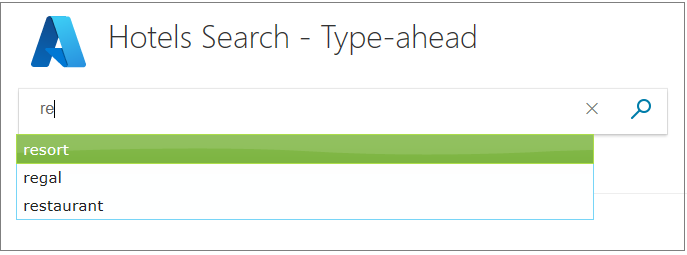
运行应用。 请注意下拉列表中显示的选项范围是单字。 尝试键入以“re”开头的单词。 请注意,随着键入更多字母,选项的数量会减少。
正如所言,前面运行的建议脚本可能比此自动完成脚本更有用。 若要使自动完成更加用户友好,请考虑将其与建议的结果一起使用。
合并自动完成和建议
将自动完成与建议相结合是我们所有选项中最复杂的,而且可能提供最佳的用户体验。 我们想要的是在键入的文本中内联显示 Azure 认知搜索用于自动完成文本的首选项。 此外,我们希望一系列建议作为下拉列表。
提供此功能的库通常称为“内联自动完成”或类似名称。 但是,我们将以原生方式实现此功能,以便您探索 API。 在本示例中,我们将首先开始处理控制器。
为控制器添加一个操作,该操作仅返回一个自动完成结果和指定数量的建议。 我们将此动作命名为AutoCompleteAndSuggestAsync。 在 Home 控制器中,添加以下动作,并与其他新动作保持一致。
public async Task<ActionResult> AutoCompleteAndSuggestAsync(string term)
{
    InitSearch();

    // Setup the type-ahead search parameters.
    var ap = new AutocompleteOptions()
    {
        Mode = AutocompleteMode.OneTermWithContext,
        Size = 1,
    };
    var autocompleteResult = await _searchClient.AutocompleteAsync(term, "sg", ap);

    // Setup the suggest search parameters.
    var sp = new SuggestOptions()
    {
        Size = 8,
    };

    // Only one suggester can be specified per index. The name of the suggester is set when the suggester is specified by other API calls.
    // The suggester for the hotel database is called "sg" and simply searches the hotel name.
    var suggestResult = await _searchClient.SuggestAsync<Hotel>(term, "sg", sp).ConfigureAwait(false);

    // Create an empty list.
    var results = new List<string>();

    if (autocompleteResult.Value.Results.Count > 0)
    {
        // Add the top result for type-ahead.
        results.Add(autocompleteResult.Value.Results[0].Text);
    }
    else
    {
        // There were no type-ahead suggestions, so add an empty string.
        results.Add("");
    }

    for (int n = 0; n < suggestResult.Value.Results.Count; n++)
    {
        // Now add the suggestions.
        results.Add(suggestResult.Value.Results[n].Text);
    }

    // Return the list.
    return new JsonResult(results);
}
在结果列表顶部返回一个自动完成选项,后跟所有建议。
在视图中,我们首先实现一个技巧,使浅灰色自动完成词被呈现在用户输入的较粗文本正下方。 HTML 包括用于此目的的相对定位。 将 TextBoxFor 语句(及其周围的 <div> 语句)更改为以下内容,指出标识为下方的第二个搜索框位于正常搜索框 正下方 ,方法是将此搜索框从默认位置拉取 39 像素!
<div id="underneath" class="searchBox" style="position: relative; left: 0; top: 0">
</div>

<div id="searchinput" class="searchBoxForm" style="position: relative; left: 0; top: -39px">
    @Html.TextBoxFor(m => m.searchText, new { @class = "searchBox", @id = "azureautocomplete" }) <input value="" class="searchBoxSubmit" type="submit">
</div>
请注意,我们将再次将 ID 更改为 azureautocomplete ,在本例中。
在视图中,在您到目前为止输入的所有脚本之后,输入以下脚本。 由于脚本处理的各种输入行为,脚本非常冗长且复杂。
<script>
    $('#azureautocomplete').autocomplete({
        delay: 500,
        minLength: 2,
        position: {
            my: "left top",
            at: "left-23 bottom+10"
        },

        // Use Ajax to set up a "success" function.
        source: function (request, response) {
            var controllerUrl = "/Home/AutoCompleteAndSuggestAsync?term=" + $("#azureautocomplete").val();
            $.ajax({
                url: controllerUrl,
                dataType: "json",
                success: function (data) {
                    if (data && data.length > 0) {

                        // Show the autocomplete suggestion.
                        document.getElementById("underneath").innerHTML = data[0];

                        // Remove the top suggestion as it is used for inline autocomplete.
                        var array = new Array();
                        for (var n = 1; n < data.length; n++) {
                            array[n - 1] = data[n];
                        }

                        // Show the drop-down list of suggestions.
                        response(array);
                    } else {

                        // Nothing is returned, so clear the autocomplete suggestion.
                        document.getElementById("underneath").innerHTML = "";
                    }
                }
            });
        }
    });

    // Complete on TAB.
    // Clear on ESC.
    // Clear if backspace to less than 2 characters.
    // Clear if any arrow key hit as user is navigating the suggestions.
    $("#azureautocomplete").keydown(function (evt) {

        var suggestedText = document.getElementById("underneath").innerHTML;
        if (evt.keyCode === 9 /* TAB */ && suggestedText.length > 0) {
            $("#azureautocomplete").val(suggestedText);
            return false;
        } else if (evt.keyCode === 27 /* ESC */) {
            document.getElementById("underneath").innerHTML = "";
            $("#azureautocomplete").val("");
        } else if (evt.keyCode === 8 /* Backspace */) {
            if ($("#azureautocomplete").val().length < 2) {
                document.getElementById("underneath").innerHTML = "";
            }
        } else if (evt.keyCode >= 37 && evt.keyCode <= 40 /* Any arrow key */) {
            document.getElementById("underneath").innerHTML = "";
        }
    });

    // Character replace function.
    function setCharAt(str, index, chr) {
        if (index > str.length - 1) return str;
        return str.substr(0, index) + chr + str.substr(index + 1);
    }

    // This function is needed to clear the "underneath" text when the user clicks on a suggestion, and to
    // correct the case of the autocomplete option when it does not match the case of the user input.
    // The interval function is activated with the input, blur, change, or focus events.
    $("#azureautocomplete").on("input blur change focus", function (e) {

        // Set a 2 second interval duration.
        var intervalDuration = 2000,
            interval = setInterval(function () {

                // Compare the autocorrect suggestion with the actual typed string.
                var inputText = document.getElementById("azureautocomplete").value;
                var autoText = document.getElementById("underneath").innerHTML;

                // If the typed string is longer than the suggestion, then clear the suggestion.
                if (inputText.length > autoText.length) {
                    document.getElementById("underneath").innerHTML = "";
                } else {

                    // If the strings match, change the case of the suggestion to match the case of the typed input.
                    if (autoText.toLowerCase().startsWith(inputText.toLowerCase())) {
                        for (var n = 0; n < inputText.length; n++) {
                            autoText = setCharAt(autoText, n, inputText[n]);
                        }
                        document.getElementById("underneath").innerHTML = autoText;

                    } else {
                        // The strings do not match, so clear the suggestion.
                        document.getElementById("underneath").innerHTML = "";
                    }
                }

                // If the element loses focus, stop the interval checking.
                if (!$input.is(':focus')) clearInterval(interval);

            }, intervalDuration);
    });
</script>
请注意,如何使用 间隔函数 来清除不再与用户输入匹配的基础文本,并将用户输入的大小写(无论是大写还是小写)进行匹配,比如在搜索时“pa”可以匹配“PA”、“pA”、“Pa”,以确保显示文本整洁。
通读脚本中的注释,以更全面地理解。
最后,我们需要对两个 HTML 类进行轻微调整,使其透明。 将以下行添加到 hotels.css 文件中的 searchBoxForm 和 searchBox 类。
background: rgba(0,0,0,0);现在运行应用。 在搜索框中输入“pa”。 您是否获得“宫殿”作为自动完成建议,以及包含“pa”的两家酒店?

尝试按 Tab 键接受自动完成建议,并尝试使用箭头键和选项卡键选择建议,然后再次使用鼠标和单击一次。 验证脚本是否整齐地处理所有这些情况。
你可能会决定,加载一个提供此功能的库更简单,但现在你至少知道一种方法可以实现内联自动完成的工作。
外卖
请考虑此项目中的以下要点:
- 自动完成(也称为“提前键入”)和建议可让用户仅键入几个键来查找所需内容。
- 自动完成和建议协同工作可提供丰富的用户体验。
- 始终使用所有形式的输入测试自动完成函数。
- 使用 setInterval 函数可用于验证和更正 UI 元素。
后续步骤
在下一教程中,我们将探讨另一种改进用户体验的方法,即使用分面功能实现单击缩小搜索范围。