你当前正在访问 Microsoft Azure Global Edition 技术文档网站。 如果需要访问由世纪互联运营的 Microsoft Azure 中国技术文档网站,请访问 https://docs.azure.cn。
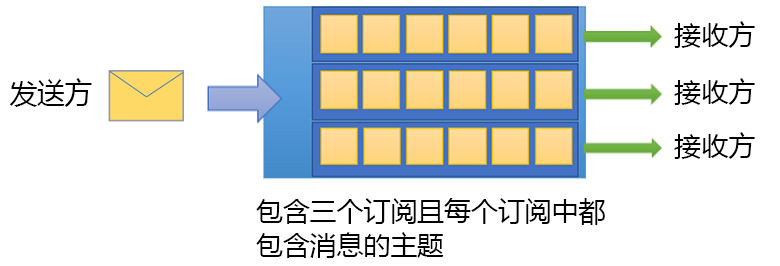
本教程介绍如何在零售库存方案中使用服务总线主题和订阅。 它包括使用 Azure 门户和 .NET 的发布/订阅通道。 此方案的一个示例是为多个零售商店更新库存分类。 在此方案中,每个商店或商店组都获取适用于它们的消息来更新其分类。
Azure 服务总线是多个租户云消息传送服务,用于在应用程序和服务之间发送信息。 异步操作可实现灵活的中转消息传送、结构化的先进先出 (FIFO) 消息传送以及发布/订阅功能。 有关概述,请参阅 什么是服务总线?
本教程展示了如何使用订阅和筛选器实现此方案。 首先,创建一个包含三个订阅的主题,添加一些规则和筛选器,然后从主题和订阅发送和接收消息。
本教程介绍如何执行下列操作:
- 使用 Azure 门户创建一个服务总线主题和三个对该主题的订阅
- 使用 .NET 代码为订阅添加筛选器
- 创建具有不同内容的消息
- 发送消息并验证它们是否已到达预期的订阅
- 从订阅接收消息
先决条件
要完成本教程,请确保做好以下准备:
- 一份 Azure 订阅。 要使用 Azure 服务(包括 Azure 服务总线),需要一个订阅。 请在开始之前创建一个免费帐户。
- Visual Studio 2019 或更高版本。
服务总线主题和订阅
每个对主题的订阅都可以接收每条消息的副本。 主题在协议和语义方面与服务总线队列完全兼容。 服务总线主题支持一系列选择规则,这些规则具有筛选条件和用来设置或修改消息属性的可选操作。 规则每次匹配时,都会生成一条消息。 若要详细了解规则、筛选器和操作,请参阅 主题筛选器和操作。
在 Azure 门户中创建命名空间
若要开始使用 Azure 中的服务总线消息传送实体,请创建一个名称在 Azure 中唯一的命名空间。 命名空间为应用程序中的服务总线资源(例如队列和主题)提供范围容器。
要创建命名空间,请:
登录 Azure 门户。
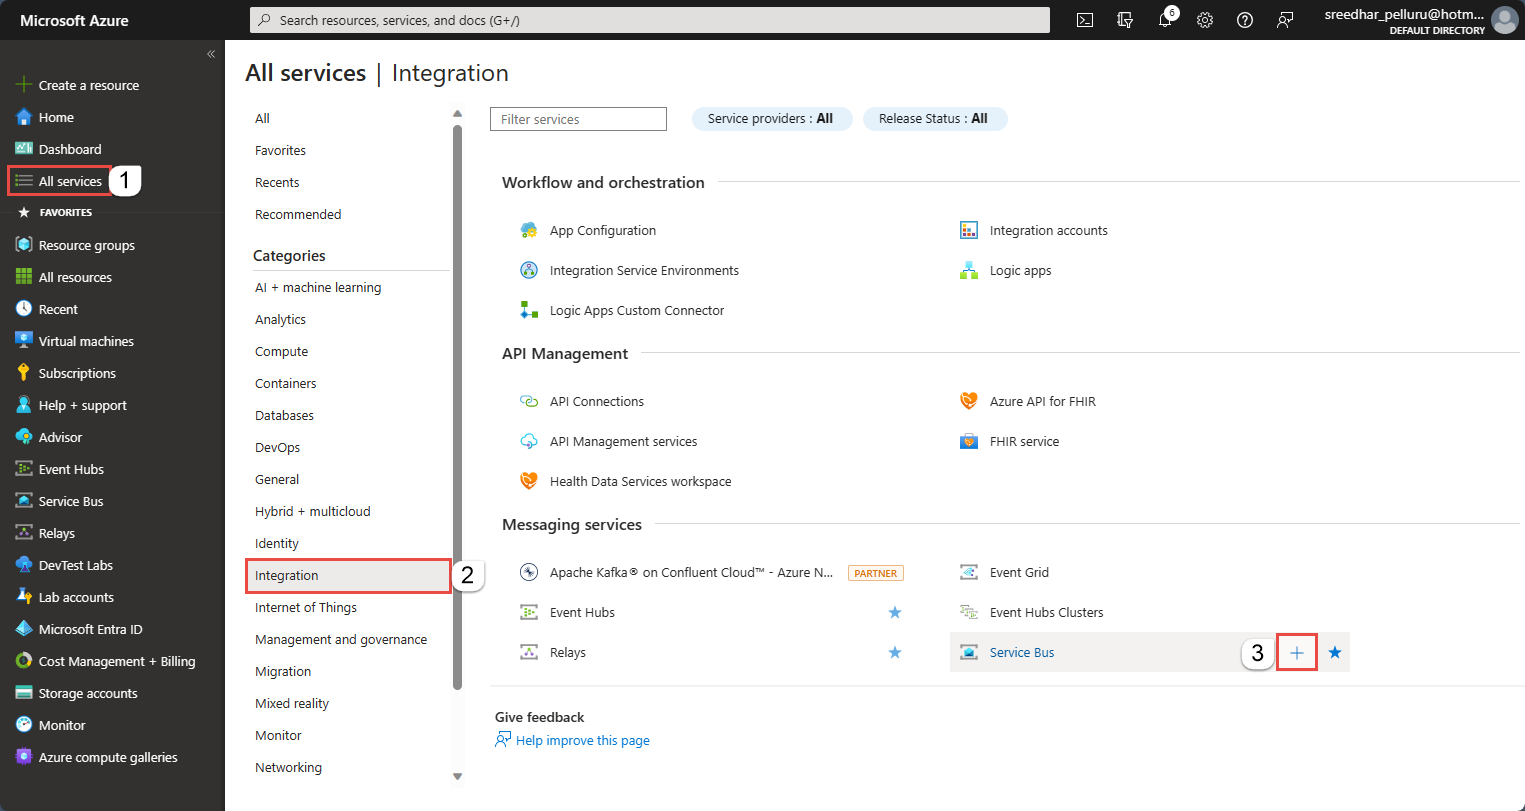
从左上角选择浮出控件菜单,然后导航到 “所有服务 ”页。
在左侧导航栏上,选择 “集成”。
向下滚动到 消息服务服务>总线 ,然后选择“ 创建”。
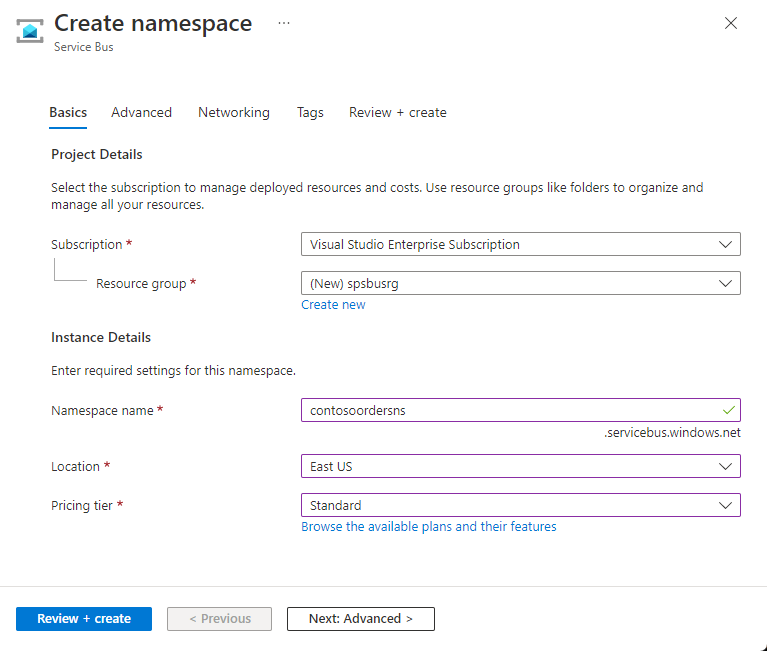
在“创建命名空间”页的“基本信息”选项卡中,执行以下步骤:
对于“订阅”,请选择要在其中创建命名空间的 Azure 订阅。
对于“资源组”,选择现有资源组或创建新的资源组。
输入符合以下命名约定的 命名空间名称 :
- 该名称在 Azure 中必须唯一。 系统会立即检查该名称是否可用。
- 名称长度最少为 6 个字符,最多为 50 个字符。
- 名称只能包含字母、数字、连字符
-。 - 名称必须以字母开头,并且必须以字母或数字结尾。
- 名称不以
-sb或-mgmt结尾。
对于 “位置”,请选择要托管命名空间的区域。
对于“定价层”,请选择命名空间的定价层(“基本”、“标准”或“高级”)。 对于本快速入门,请选择“标准”。
如果选择 “高级 ”层,则可以为命名空间启用 异地复制 。 异地复制功能可确保命名空间的元数据和数据从主要区域持续复制到一个或多个次要区域。
重要说明
要使用主题和订阅,请选择“标准”或“高级”。 基本定价层不支持主题和订阅。
如果选择了“高级”定价层,请指定“消息传送单元”数。 高级层在 CPU 和内存级别提供资源隔离,使每个工作负载在隔离的环境中运行。 此资源容器称为 消息传送单元。 高级命名空间至少具有一个消息传送单元。 可为每个服务总线高级命名空间选择 1、2、4、8 或 16 个消息传送单元。 有关详细信息,请参阅 服务总线高级消息传送层。
在页面底部选择“查看 + 创建”。
在“查看 + 创建”页上查看设置,然后选择“创建”。
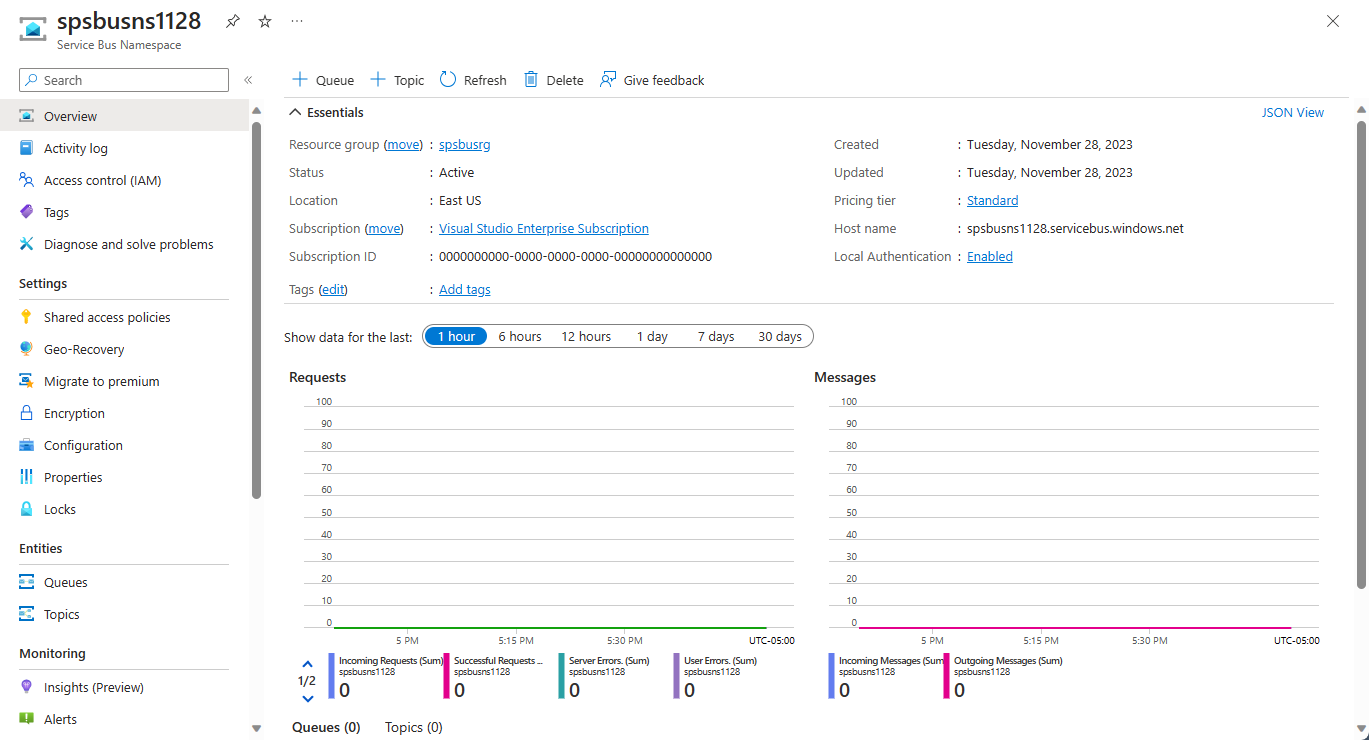
部署资源成功后,在部署页上选择 “转到资源 ”。

将会看到服务总线命名空间的主页。


获取命名空间的连接字符串(Azure 门户)
创建新命名空间会自动生成初始共享访问签名 (SAS) 策略。 该策略包括主密钥和辅助密钥,以及主连接字符串和辅助连接字符串,每个都授予对命名空间各个方面的完全控制权。 有关如何为常规发送方和接收方创建具有更多约束权限的规则的详细信息,请参阅 服务总线身份验证和授权。
客户端可以使用连接字符串连接到服务总线命名空间。 要复制命名空间的主要连接字符串,请执行以下步骤:
在 “服务总线命名空间 ”页上,展开 “设置”,然后选择“ 共享访问策略”。
在“共享访问策略”页,选择“RootManageSharedAccessKey”。
在 SAS 策略:RootManageSharedAccessKey 窗口中,选择 主连接字符串旁边的复制按钮。 此操作会将连接字符串复制到剪贴板,供以后使用。 将此值粘贴到记事本或其他某个临时位置。
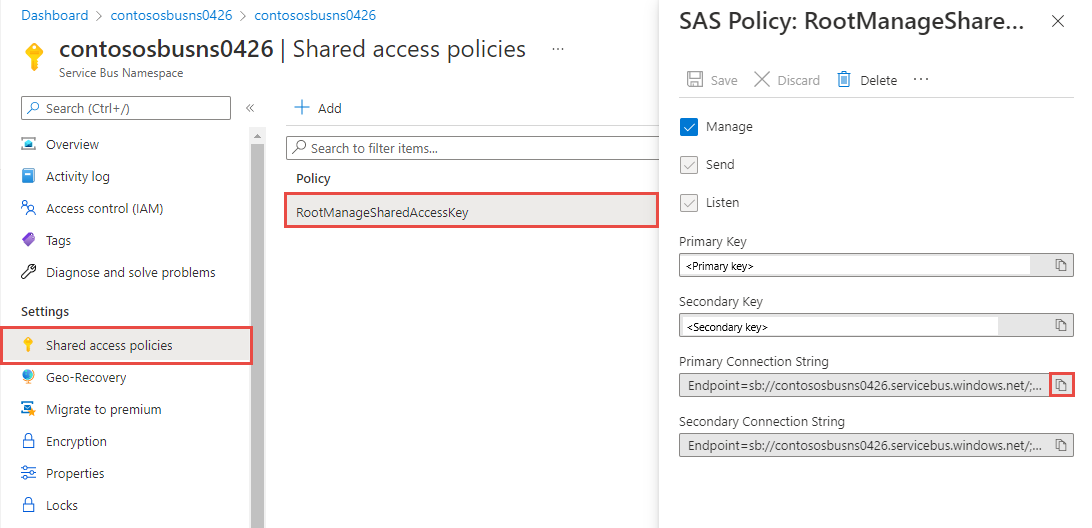
可使用此页面复制主密钥、辅助密钥、主连接字符串和辅助连接字符串。

使用 Azure 门户创建主题
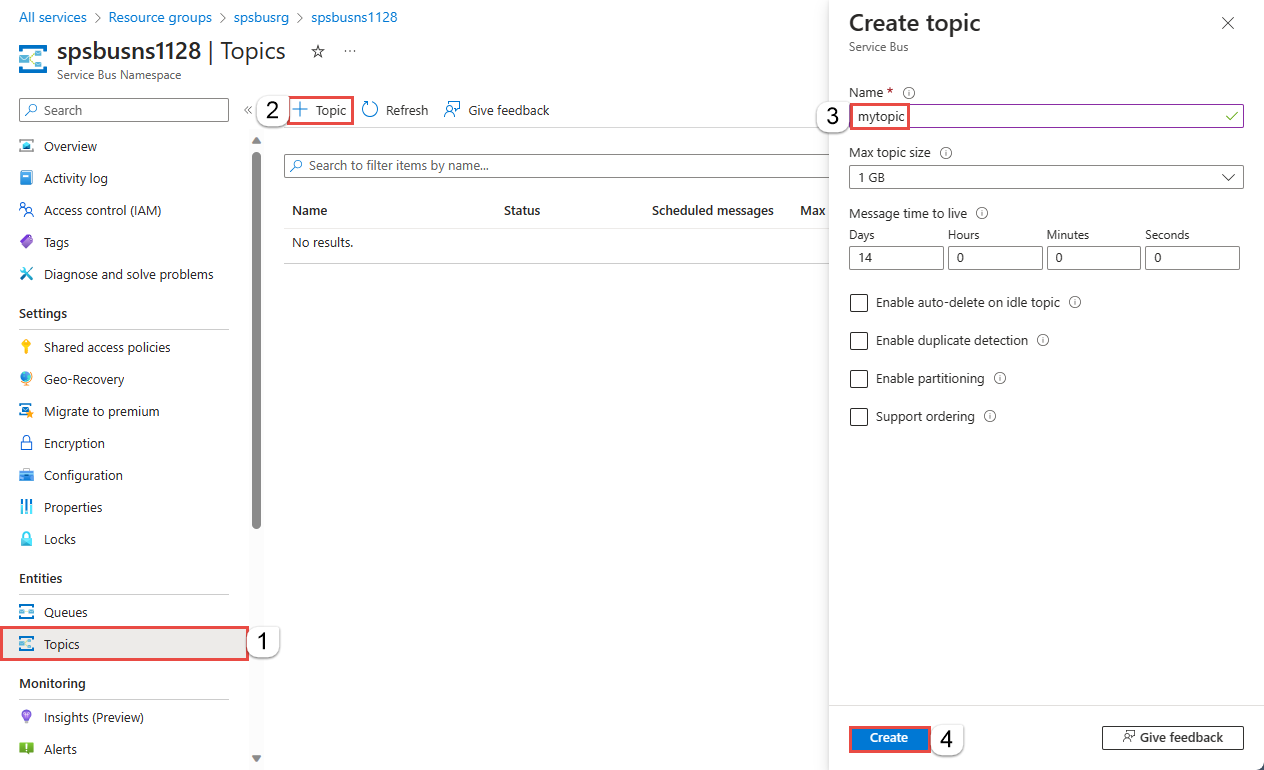
在 “服务总线命名空间 ”页上,展开左侧导航菜单上的 “实体 ”,然后选择 “主题”。
选择 “+ 主题”。
输入主题名称。 将其他选项保留默认值。
选择“创建”。

创建主题订阅
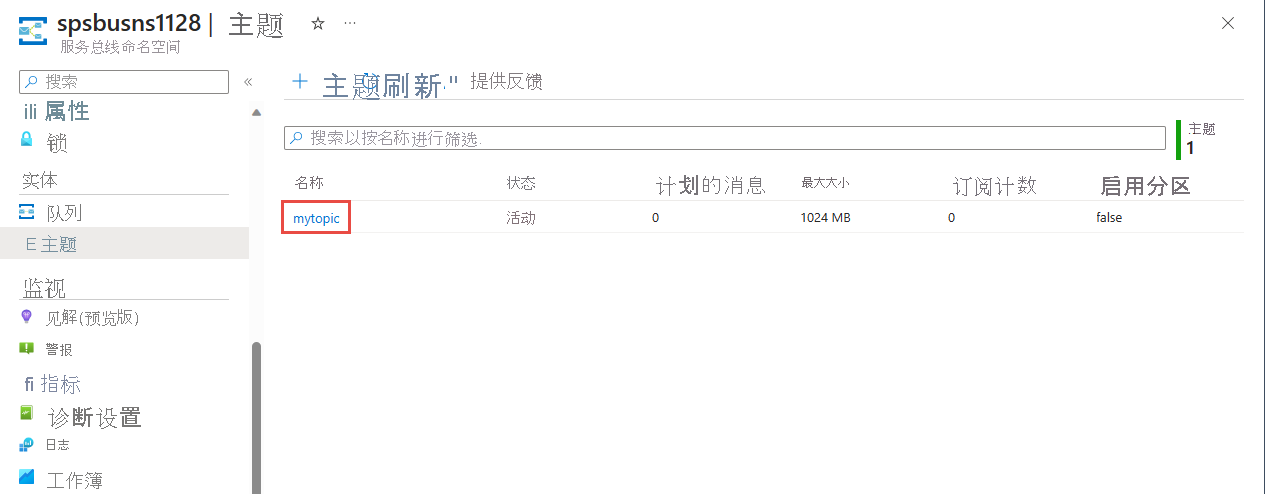
选择在上一部分创建的主题。
在服务总线主题页上,选择+ 订阅。
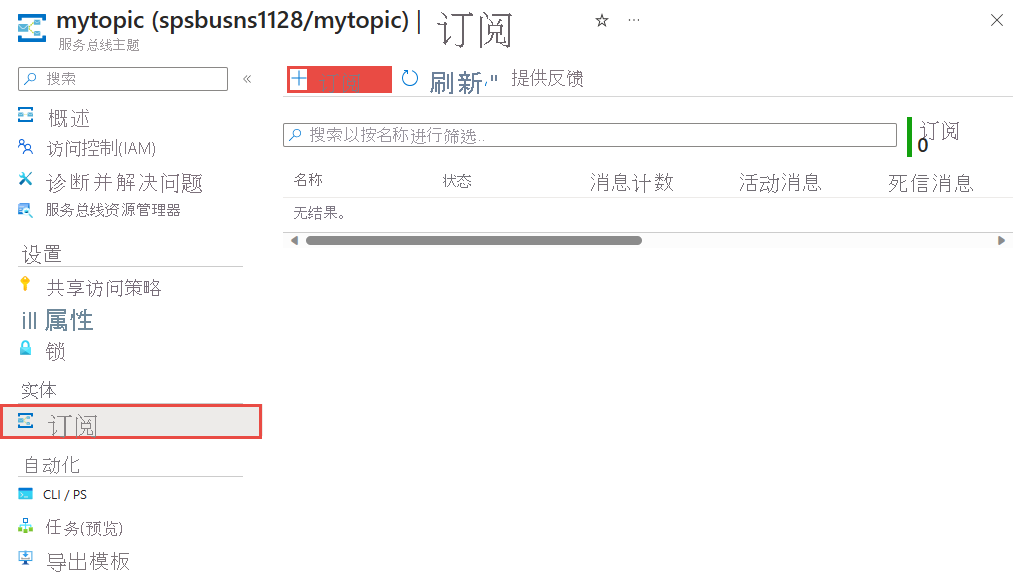
在“创建订阅”页上执行以下步骤:
输入 S1 作为订阅的名称。
然后,选择“创建”以创建订阅。
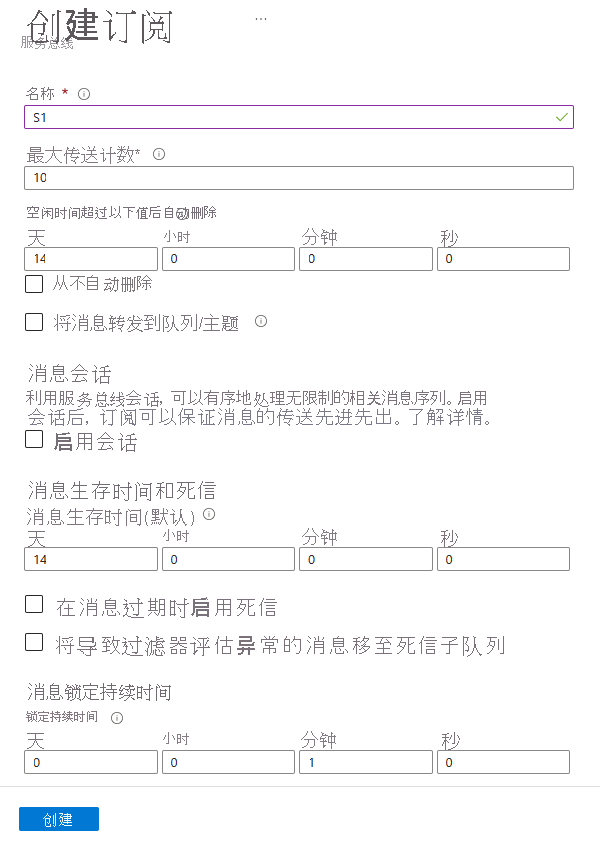
重复上述步骤两次,创建名为 S2 和 S3 的订阅。


在订阅上创建筛选规则
预配命名空间、主题和订阅并获取命名空间的连接字符串后,即可在订阅上创建筛选器规则。 之后,发送和接收消息。 可以在此 GitHub 示例文件夹中检查代码。
发送和接收消息
要运行代码,请执行以下步骤:
在命令提示符窗口中或在 PowerShell 提示符处克隆 服务总线 GitHub 存储库:
git clone https://github.com/Azure/azure-service-bus.git导航到示例文件夹
azure-service-bus\samples\DotNet\Azure.Messaging.ServiceBus\BasicSendReceiveTutorialWithFilters。获取本教程前面部分复制到记事本的连接字符串。 还需要创建的主题的名称。
在命令提示符下键入以下命令:
dotnet build导航到
BasicSendReceiveTutorialWithFilters\bin\Debug\netcoreapp3.1文件夹。若要运行程序,请输入以下命令。 请务必将
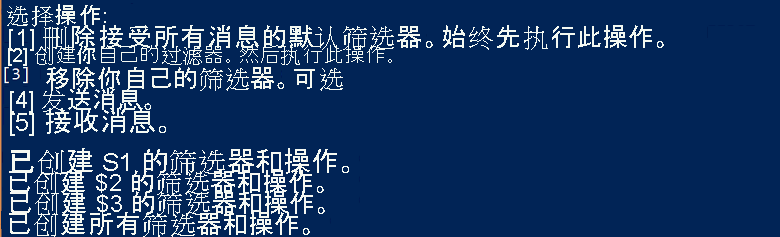
myConnectionString替换为你的值,并将myTopicName替换为你创建的主题的名称。dotnet --roll-forward Major BasicSendReceiveTutorialWithFilters.dll -ConnectionString "myConnectionString" -TopicName "myTopicName"首先按控制台中的说明选择筛选器创建操作。 在创建筛选器时,其中一项操作是移除默认筛选器。 使用 PowerShell 或 CLI 时,无需删除默认筛选器。 如果使用代码创建筛选器,请先删除默认筛选器。 控制台命令 1 和 3 用于管理以前创建的订阅上的筛选器:
- 执行操作 1:移除默认筛选器。
- 执行操作 2:添加自己的筛选器。
- 执行操作 3:本教程跳过该步骤。 此选项可以选择性地移除自己的筛选器。 它不会重新创建默认筛选器。
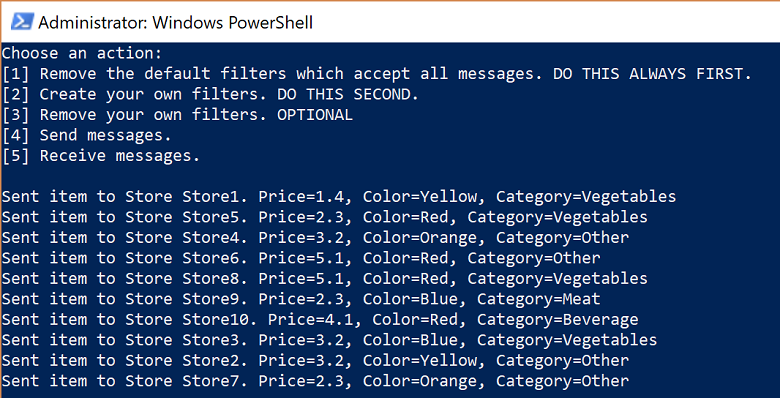
创建筛选器以后,即可发送消息。 按 4 即可观察到 10 条消息发送到主题:
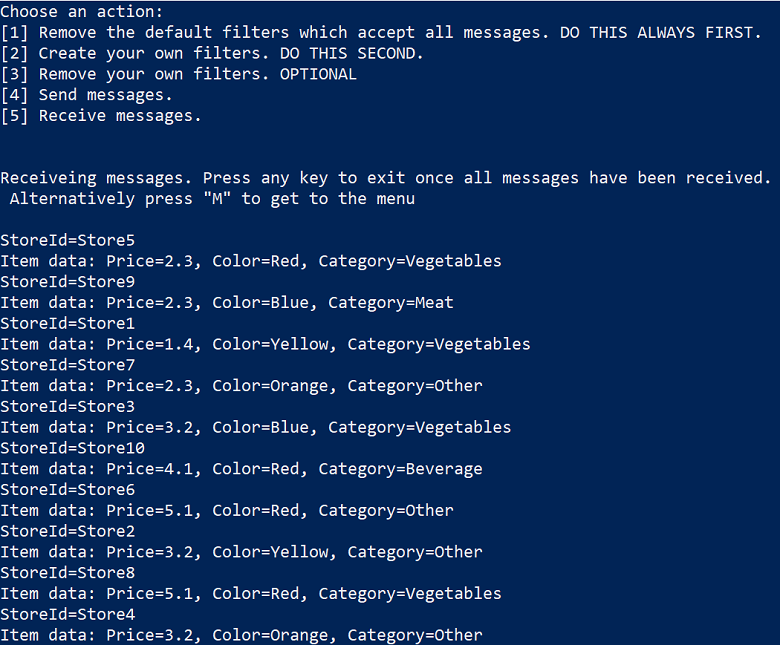
按 5 即可观察到这些消息被接收。 如果没有返回 10 条消息,请按“m”以显示菜单,然后再次按 5。
清理资源
请按照以下步骤清理不再需要的资源。
- 在 Azure 门户中导航到自己的命名空间。
- 在“服务总线命名空间”页上,从命令栏中选择“删除”以删除命名空间和其中的资源(队列、主题和订阅)。
了解示例代码
此部分包含有关示例代码功能的更多详细信息。
获取连接字符串和主题
首先,此代码声明一组变量,这些变量推动程序的剩余执行操作。
string ServiceBusConnectionString;
string TopicName;

static string[] Subscriptions = { "S1", "S2", "S3" };
static IDictionary<string, string[]> SubscriptionFilters = new Dictionary<string, string[]> {
    { "S1", new[] { "StoreId IN('Store1', 'Store2', 'Store3')", "StoreId = 'Store4'"} },
    { "S2", new[] { "sys.To IN ('Store5','Store6','Store7') OR StoreId = 'Store8'" } },
    { "S3", new[] { "sys.To NOT IN ('Store1','Store2','Store3','Store4','Store5','Store6','Store7','Store8') OR StoreId NOT IN ('Store1','Store2','Store3','Store4','Store5','Store6','Store7','Store8')" } }
};
// You can have only have one action per rule and this sample code supports only one action for the first filter, which is used to create the first rule.
static IDictionary<string, string> SubscriptionAction = new Dictionary<string, string> {
    { "S1", "" },
    { "S2", "" },
    { "S3", "SET sys.Label = 'SalesEvent'"  }
};
static string[] Store = { "Store1", "Store2", "Store3", "Store4", "Store5", "Store6", "Store7", "Store8", "Store9", "Store10" };
static string SysField = "sys.To";
static string CustomField = "StoreId";
static int NrOfMessagesPerStore = 1; // Send at least 1.
连接字符串和主题名称是使用命令行参数传入的,如下所示。 它们通过 Main() 方法读取:
static void Main(string[] args)
{
    string ServiceBusConnectionString = "";
    string TopicName = "";

    for (int i = 0; i < args.Length; i++)
    {
        if (args[i] == "-ConnectionString")
        {
            Console.WriteLine($"ConnectionString: {args[i + 1]}");
            ServiceBusConnectionString = args[i + 1]; // Alternatively enter your connection string here.
        }
        else if (args[i] == "-TopicName")
        {
            Console.WriteLine($"TopicName: {args[i + 1]}");
            TopicName = args[i + 1]; // Alternatively enter your queue name here.
        }
    }

    if (ServiceBusConnectionString != "" && TopicName != "")
    {
        Program P = StartProgram(ServiceBusConnectionString, TopicName);
        P.PresentMenu().GetAwaiter().GetResult();
    }
    else
    {
        Console.WriteLine("Specify -Connectionstring and -TopicName to execute the example.");
        Console.ReadKey();
    }
}
移除默认筛选器
创建订阅时,服务总线会为每个订阅创建默认筛选器。 该筛选器允许接收发送到主题的每条消息。 要使用自定义筛选器,可移除默认筛选器,如以下代码所示:
private async Task RemoveDefaultFilters()
{
    Console.WriteLine($"Starting to remove default filters.");

    try
    {
        var client = new ServiceBusAdministrationClient(ServiceBusConnectionString);
        foreach (var subscription in Subscriptions)
        {
            await client.DeleteRuleAsync(TopicName, subscription, CreateRuleOptions.DefaultRuleName);
            Console.WriteLine($"Default filter for {subscription} has been removed.");
        }

        Console.WriteLine("All default Rules have been removed.\n");
    }
    catch (Exception ex)
    {
        Console.WriteLine(ex.ToString());
    }

    await PresentMenu();
}
创建筛选器
以下代码添加在本教程中定义的自定义筛选器:
private async Task CreateCustomFilters()
{
    try
    {
        for (int i = 0; i < Subscriptions.Length; i++)
        {
            var client = new ServiceBusAdministrationClient(ServiceBusConnectionString);
            string[] filters = SubscriptionFilters[Subscriptions[i]];
            if (filters[0] != "")
            {
                int count = 0;
                foreach (var myFilter in filters)
                {
                    count++;

                    string action = SubscriptionAction[Subscriptions[i]];
                    if (action != "")
                    {
                        await client.CreateRuleAsync(TopicName, Subscriptions[i], new CreateRuleOptions
                        {
                            Filter = new SqlRuleFilter(myFilter),
                            Action = new SqlRuleAction(action),
                            Name = $"MyRule{count}"
                        });
                    }
                    else
                    {
                        await client.CreateRuleAsync(TopicName, Subscriptions[i], new CreateRuleOptions
                        {
                            Filter = new SqlRuleFilter(myFilter),
                            Name = $"MyRule{count}"
                        });
                    }
                }
            }

            Console.WriteLine($"Filters and actions for {Subscriptions[i]} have been created.");
        }

        Console.WriteLine("All filters and actions have been created.\n");
    }
    catch (Exception ex)
    {
        Console.WriteLine(ex.ToString());
    }

    await PresentMenu();
}
移除创建的自定义筛选器
要删除订阅上的所有筛选器,请执行下述演示了详细操作方法的代码:
private async Task CleanUpCustomFilters()
{
    foreach (var subscription in Subscriptions)
    {
        try
        {
            var client = new ServiceBusAdministrationClient(ServiceBusConnectionString);
            IAsyncEnumerator<RuleProperties> rules = client.GetRulesAsync(TopicName, subscription).GetAsyncEnumerator();
            while (await rules.MoveNextAsync())
            {
                await client.DeleteRuleAsync(TopicName, subscription, rules.Current.Name);
                Console.WriteLine($"Rule {rules.Current.Name} has been removed.");
            }
        }
        catch (Exception ex)
        {
            Console.WriteLine(ex.ToString());
        }
    }
    Console.WriteLine("All default filters have been removed.\n");

    await PresentMenu();
}
发送消息
向主题发送消息类似于向队列发送消息。 此示例演示如何使用任务列表和异步处理来发送消息:
public async Task SendMessages()
{
    try
    {
        await using var client = new ServiceBusClient(ServiceBusConnectionString);
        var taskList = new List<Task>();
        for (int i = 0; i < Store.Length; i++)
        {
            taskList.Add(SendItems(client, Store[i]));
        }

        await Task.WhenAll(taskList);
    }
    catch (Exception ex)
    {
        Console.WriteLine(ex.ToString());
    }
    Console.WriteLine("\nAll messages sent.\n");
}

private async Task SendItems(ServiceBusClient client, string store)
{
    // create the sender
    ServiceBusSender tc = client.CreateSender(TopicName);

    for (int i = 0; i < NrOfMessagesPerStore; i++)
    {
        Random r = new Random();
        Item item = new Item(r.Next(5), r.Next(5), r.Next(5));

        // Note the extension class which is serializing an deserializing messages
        ServiceBusMessage message = item.AsMessage();
        message.To = store;
        message.ApplicationProperties.Add("StoreId", store);
        message.ApplicationProperties.Add("Price", item.GetPrice().ToString());
        message.ApplicationProperties.Add("Color", item.GetColor());
        message.ApplicationProperties.Add("Category", item.GetItemCategory());

        await tc.SendMessageAsync(message);
        Console.WriteLine($"Sent item to Store {store}. Price={item.GetPrice()}, Color={item.GetColor()}, Category={item.GetItemCategory()}"); ;
    }
}
接收消息
使用任务列表再次接收消息,代码使用批处理。 可以使用批处理进行发送和接收,但此示例仅演示如何进行批量接收。 事实上,你不会从循环中脱离出来,而是继续进行循环并设置更大的时间范围,例如一分钟。 对代理的接收调用在这段时间内保持打开状态。 如果消息到达,它们将立即返回。 发出新的接收呼叫。
此概念称为长轮询。 使用接收泵(可在存储库中的多个示例中看到)是一个更典型的选项。 有关详细信息,请参阅 使用 Azure 门户创建服务总线命名空间和队列。
public async Task Receive()
{
    var taskList = new List<Task>();
    for (var i = 0; i < Subscriptions.Length; i++)
    {
        taskList.Add(this.ReceiveMessages(Subscriptions[i]));
    }

    await Task.WhenAll(taskList);
}

private async Task ReceiveMessages(string subscription)
{
    await using var client = new ServiceBusClient(ServiceBusConnectionString);
    ServiceBusReceiver receiver = client.CreateReceiver(TopicName, subscription);

    // In reality you would not break out of the loop like in this example but would keep looping. The receiver keeps the connection open
    // to the broker for the specified amount of seconds and the broker returns messages as soon as they arrive. The client then initiates
    // a new connection. So in reality you would not want to break out of the loop.
    // Also note that the code shows how to batch receive, which you would do for performance reasons. For convenience you can also always
    // use the regular receive pump which we show in our Quick Start and in other GitHub samples.
    while (true)
    {
        try
        {
            //IList<Message> messages = await receiver.ReceiveAsync(10, TimeSpan.FromSeconds(2));
            // Note the extension class which is serializing an deserializing messages and testing messages is null or 0.
            // If you think you did not receive all messages, just press M and receive again via the menu.
            IReadOnlyList<ServiceBusReceivedMessage> messages = await receiver.ReceiveMessagesAsync(maxMessages: 100);

            if (messages.Any())
            {
                foreach (ServiceBusReceivedMessage message in messages)
                {
                    lock (Console.Out)
                    {
                        Item item = message.As<Item>();
                        IReadOnlyDictionary<string, object> myApplicationProperties = message.ApplicationProperties;
                        Console.WriteLine($"StoreId={myApplicationProperties["StoreId"]}");
                        if (message.Subject != null)
                        {
                            Console.WriteLine($"Subject={message.Subject}");
                        }
                        Console.WriteLine(
                            $"Item data: Price={item.GetPrice()}, Color={item.GetColor()}, Category={item.GetItemCategory()}");
                    }

                    await receiver.CompleteMessageAsync(message);
                }
            }
            else
            {
                break;
            }
        }
        catch (Exception ex)
        {
            Console.WriteLine(ex.ToString());
        }
    }
}
注意
可以使用服务总线资源管理器管理服务总线资源。 服务总线资源管理器允许用户连接到服务总线命名空间并以一种简单的方式管理消息传送实体。 该工具提供导入/导出功能等高级功能或测试主题、队列、订阅、中继服务、通知中心和事件中心的功能。
相关内容
本教程介绍了如何使用 Azure 门户预配资源,然后从服务总线主题及其订阅发送并接收消息。 你已了解如何执行以下操作:
- 使用 Azure 门户创建一个服务总线主题和一个或多个对该主题的订阅
- 使用 .NET 代码添加主题筛选器
- 创建两条具有不同内容的消息
- 发送消息并验证它们是否已到达预期的订阅
- 从订阅接收消息
有关发送和接收消息的更多示例,请参阅 GitHub 上的服务总线示例。
要详细了解如何使用服务总线的发布/订阅功能,请转到下一教程。