你当前正在访问 Microsoft Azure Global Edition 技术文档网站。 如果需要访问由世纪互联运营的 Microsoft Azure 中国技术文档网站,请访问 https://docs.azure.cn。
利用虚拟机规模集,可以部署和管理一组自动缩放的虚拟机。 可以手动缩放虚拟机规模集中的 VM 数,也可以定义规则,以便根据资源使用情况(如 CPU、内存需求或网络流量)进行自动缩放。 然后,Azure 负载均衡器会将流量分配到虚拟机规模集中的 VM 实例。 在本快速入门中,我们将使用 Bicep 创建虚拟机规模集并部署一个示例应用程序。
Bicep 是一种特定于域的语言 (DSL),使用声明性语法来部署 Azure 资源。 它提供简明的语法、可靠的类型安全性以及对代码重用的支持。 Bicep 会针对你的 Azure 基础结构即代码解决方案提供最佳创作体验。
先决条件
如果没有 Azure 订阅,请在开始之前创建一个免费帐户。
查阅 Bicep 文件
本快速入门中使用的 Bicep 文件来自 Azure 快速入门模板。
@description('String used as a base for naming resources. Must be 3-61 characters in length and globally unique across Azure. A hash is prepended to this string for some resources, and resource-specific information is appended.')
@minLength(3)
@maxLength(61)
param vmssName string

@description('Size of VMs in the VM Scale Set.')
param vmSku string = 'Standard_D2s_v3'

@description('The Windows version for the VM. This will pick a fully patched image of this given Windows version. Allowed values: 2008-R2-SP1, 2012-Datacenter, 2012-R2-Datacenter & 2016-Datacenter, 2019-Datacenter.')
@allowed([
  '2019-DataCenter-GenSecond'
  '2016-DataCenter-GenSecond'
  '2022-datacenter-azure-edition'
])
param windowsOSVersion string = '2022-datacenter-azure-edition'

@description('Security Type of the Virtual Machine.')
@allowed([
  'Standard'
  'TrustedLaunch'
])
param securityType string = 'TrustedLaunch'

@description('Number of VM instances (100 or less).')
@minValue(1)
@maxValue(100)
param instanceCount int = 3

@description('When true this limits the scale set to a single placement group, of max size 100 virtual machines. NOTE: If singlePlacementGroup is true, it may be modified to false. However, if singlePlacementGroup is false, it may not be modified to true.')
param singlePlacementGroup bool = true

@description('Admin username on all VMs.')
param adminUsername string = 'vmssadmin'

@description('Admin password on all VMs.')
@secure()
param adminPassword string

@description('The base URI where artifacts required by this template are located. For example, if stored on a public GitHub repo, you\'d use the following URI: https://raw.githubusercontent.com/Azure/azure-quickstart-templates/master/201-vmss-windows-webapp-dsc-autoscale/.')
param _artifactsLocation string = deployment().properties.templateLink.uri

@description('The sasToken required to access _artifactsLocation.  If your artifacts are stored on a public repo or public storage account you can leave this blank.')
@secure()
param _artifactsLocationSasToken string = ''

@description('Location of the PowerShell DSC zip file relative to the URI specified in the _artifactsLocation, i.e. DSC/IISInstall.ps1.zip')
param powershelldscZip string = 'DSC/InstallIIS.zip'

@description('Location of the  of the WebDeploy package zip file relative to the URI specified in _artifactsLocation, i.e. WebDeploy/DefaultASPWebApp.v1.0.zip')
param webDeployPackage string = 'WebDeploy/DefaultASPWebApp.v1.0.zip'

@description('Version number of the DSC deployment. Changing this value on subsequent deployments will trigger the extension to run.')
param powershelldscUpdateTagVersion string = '1.0'

@description('Location for all resources.')
param location string = resourceGroup().location

@description('Fault Domain count for each placement group.')
param platformFaultDomainCount int = 1

var vmScaleSetName = toLower(substring('vmssName${uniqueString(resourceGroup().id)}', 0, 9))
var longvmScaleSet = toLower(vmssName)
var addressPrefix = '10.0.0.0/16'
var subnetPrefix = '10.0.0.0/24'
var vNetName = '${vmScaleSetName}vnet'
var publicIPAddressName = '${vmScaleSetName}pip'
var subnetName = '${vmScaleSetName}subnet'
var loadBalancerName = '${vmScaleSetName}lb'
var publicIPAddressID = publicIPAddress.id
var lbProbeID = resourceId('Microsoft.Network/loadBalancers/probes', loadBalancerName, 'tcpProbe')
var natPoolName = '${vmScaleSetName}natpool'
var bePoolName = '${vmScaleSetName}bepool'
var lbPoolID = resourceId('Microsoft.Network/loadBalancers/backendAddressPools', loadBalancerName, bePoolName)
var natStartPort = 50000
var natEndPort = 50119
var natBackendPort = 3389
var nicName = '${vmScaleSetName}nic'
var ipConfigName = '${vmScaleSetName}ipconfig'
var frontEndIPConfigID = resourceId('Microsoft.Network/loadBalancers/frontendIPConfigurations', loadBalancerName, 'loadBalancerFrontEnd')
var osType = {
  publisher: 'MicrosoftWindowsServer'
  offer: 'WindowsServer'
  sku: windowsOSVersion
  version: 'latest'
}
var securityProfileJson = {
  uefiSettings: {
    secureBootEnabled: true
    vTpmEnabled: true
  }
  securityType: securityType
}
var imageReference = osType
var webDeployPackageFullPath = uri(_artifactsLocation, '${webDeployPackage}${_artifactsLocationSasToken}')
var powershelldscZipFullPath = uri(_artifactsLocation, '${powershelldscZip}${_artifactsLocationSasToken}')

resource loadBalancer 'Microsoft.Network/loadBalancers@2023-04-01' = {
  name: loadBalancerName
  location: location
  properties: {
    frontendIPConfigurations: [
      {
        name: 'LoadBalancerFrontEnd'
        properties: {
          publicIPAddress: {
            id: publicIPAddressID
          }
        }
      }
    ]
    backendAddressPools: [
      {
        name: bePoolName
      }
    ]
    inboundNatPools: [
      {
        name: natPoolName
        properties: {
          frontendIPConfiguration: {
            id: frontEndIPConfigID
          }
          protocol: 'Tcp'
          frontendPortRangeStart: natStartPort
          frontendPortRangeEnd: natEndPort
          backendPort: natBackendPort
        }
      }
    ]
    loadBalancingRules: [
      {
        name: 'LBRule'
        properties: {
          frontendIPConfiguration: {
            id: frontEndIPConfigID
          }
          backendAddressPool: {
            id: lbPoolID
          }
          protocol: 'Tcp'
          frontendPort: 80
          backendPort: 80
          enableFloatingIP: false
          idleTimeoutInMinutes: 5
          probe: {
            id: lbProbeID
          }
        }
      }
    ]
    probes: [
      {
        name: 'tcpProbe'
        properties: {
          protocol: 'Tcp'
          port: 80
          intervalInSeconds: 5
          numberOfProbes: 2
        }
      }
    ]
  }
}

resource vmScaleSet 'Microsoft.Compute/virtualMachineScaleSets@2023-09-01' = {
  name: vmScaleSetName
  location: location
  sku: {
    name: vmSku
    tier: 'Standard'
    capacity: instanceCount
  }
  properties: {
    overprovision: true
    upgradePolicy: {
      mode: 'Automatic'
    }
    singlePlacementGroup: singlePlacementGroup
    platformFaultDomainCount: platformFaultDomainCount
    virtualMachineProfile: {
      storageProfile: {
        osDisk: {
          caching: 'ReadWrite'
          createOption: 'FromImage'
        }
        imageReference: imageReference
      }
      osProfile: {
        computerNamePrefix: vmScaleSetName
        adminUsername: adminUsername
        adminPassword: adminPassword
      }
      securityProfile: ((securityType == 'TrustedLaunch') ? securityProfileJson : null)
      networkProfile: {
        networkInterfaceConfigurations: [
          {
            name: nicName
            properties: {
              primary: true
              ipConfigurations: [
                {
                  name: ipConfigName
                  properties: {
                    subnet: {
                      id: vNet.properties.subnets[0].id
                    }
                    loadBalancerBackendAddressPools: [
                      {
                        id: lbPoolID
                      }
                    ]
                  }
                }
              ]
            }
          }
        ]
      }
      extensionProfile: {
        extensions: [
          {
            name: 'Microsoft.Powershell.DSC'
            properties: {
              publisher: 'Microsoft.Powershell'
              type: 'DSC'
              typeHandlerVersion: '2.9'
              autoUpgradeMinorVersion: true
              forceUpdateTag: powershelldscUpdateTagVersion
              settings: {
                configuration: {
                  url: powershelldscZipFullPath
                  script: 'InstallIIS.ps1'
                  function: 'InstallIIS'
                }
                configurationArguments: {
                  nodeName: 'localhost'
                  WebDeployPackagePath: webDeployPackageFullPath
                }
              }
            }
          }
        ]
      }
    }
  }
}

resource publicIPAddress 'Microsoft.Network/publicIPAddresses@2023-04-01' = {
  name: publicIPAddressName
  location: location
  properties: {
    publicIPAllocationMethod: 'Static'
    dnsSettings: {
      domainNameLabel: longvmScaleSet
    }
  }
}

resource vNet 'Microsoft.Network/virtualNetworks@2023-04-01' = {
  name: vNetName
  location: location
  properties: {
    addressSpace: {
      addressPrefixes: [
        addressPrefix
      ]
    }
    subnets: [
      {
        name: subnetName
        properties: {
          addressPrefix: subnetPrefix
        }
      }
    ]
  }
}

resource autoscalehost 'Microsoft.Insights/autoscalesettings@2022-10-01' = {
  name: 'autoscalehost'
  location: location
  properties: {
    name: 'autoscalehost'
    targetResourceUri: vmScaleSet.id
    enabled: true
    profiles: [
      {
        name: 'Profile1'
        capacity: {
          minimum: '1'
          maximum: '10'
          default: '1'
        }
        rules: [
          {
            metricTrigger: {
              metricName: 'Percentage CPU'
              metricResourceUri: vmScaleSet.id
              timeGrain: 'PT1M'
              statistic: 'Average'
              timeWindow: 'PT5M'
              timeAggregation: 'Average'
              operator: 'GreaterThan'
              threshold: 50
            }
            scaleAction: {
              direction: 'Increase'
              type: 'ChangeCount'
              value: '1'
              cooldown: 'PT5M'
            }
          }
          {
            metricTrigger: {
              metricName: 'Percentage CPU'
              metricResourceUri: vmScaleSet.id
              timeGrain: 'PT1M'
              statistic: 'Average'
              timeWindow: 'PT5M'
              timeAggregation: 'Average'
              operator: 'LessThan'
              threshold: 30
            }
            scaleAction: {
              direction: 'Decrease'
              type: 'ChangeCount'
              value: '1'
              cooldown: 'PT5M'
            }
          }
        ]
      }
    ]
  }
}

output applicationUrl string = uri('http://${publicIPAddress.properties.dnsSettings.fqdn}', '/MyApp')
Bicep 文件中定义了以下资源:
- Microsoft.Network/virtualNetworks
- Microsoft.Network/publicIPAddresses
- Microsoft.Network/loadBalancers
- Microsoft.Compute/virtualMachineScaleSets
- Microsoft.Insights/autoscaleSettings
定义规模集
若要使用 Bicep 文件创建虚拟机规模集,请定义相应的资源。 虚拟机规模集资源类型的核心部件包括:
| 属性 | 属性说明 | 示例模板值 |
|---|---|---|
| type | 要创建的 Azure 资源类型 | Microsoft.Compute/virtualMachineScaleSets |
| name | 规模集名称 | myScaleSet |
| location | 要创建规模集的位置 | 美国东部 |
| sku.name | 每个规模集实例的 VM 大小 | Standard_A1 |
| sku.capacity | 一开始需要创建的 VM 实例数 | 2 |
| upgradePolicy.mode | 更改发生时的 VM 实例升级模式 | 自动 |
| imageReference | 用于 VM 实例的平台或自定义映像 | Microsoft Windows Server 2016 Datacenter |
| osProfile.computerNamePrefix | 每个 VM 实例的名称前缀 | myvmss |
| osProfile.adminUsername | 每个 VM 实例的用户名 | azureuser |
| osProfile.adminPassword | 每个 VM 实例的密码 | P@ssw0rd! |
若要自定义虚拟机规模集 Bicep 文件,可以更改 VM 大小或初始容量。 另一选项是使用其他平台或自定义映像。
添加示例应用程序
若要测试虚拟机规模集,请安装一个基本的 Web 应用程序。 部署虚拟机规模集时,可以通过 VM 扩展来完成部署后配置和自动化任务,例如安装某个应用。 可以从 GitHub 下载脚本,或者在扩展运行时将脚本提供给 Azure 门户。 若要对虚拟机规模集应用某个扩展,请将 extensionProfile 节添加到上面的资源示例中。 扩展配置文件通常定义以下属性:
- 扩展类型
- 扩展发布者
- 扩展版本
- 配置或安装脚本的位置
- 可在 VM 实例上执行的命令
Bicep 文件使用 PowerShell DSC 扩展来安装在 IIS 中运行的 ASP.NET MVC 应用。
安装脚本从 url 中定义的 GitHub 下载。 扩展然后运行 IISInstall.ps1 脚本中的 InstallIIS(在 function 和 Script 中定义)。 ASP.NET 应用本身作为 Web 部署包提供,该包也从 WebDeployPackagePath 中定义的 GitHub 下载:
部署 Bicep 文件
将该 Bicep 文件在本地计算机上另存为
main.bicep。使用 Azure CLI 或 Azure PowerShell 来部署该 Bicep 文件。
az group create --name exampleRG --location eastus az deployment group create --resource-group exampleRG --template-file main.bicep --parameters vmssName=<vmss-name>将 <vmss-name> 替换为虚拟机规模集的名称。 其长度必须为 3-61 个字符,且在 Azure 中全局唯一。 系统将提示你输入
adminPassword。注意
部署完成后,应会看到一条指出部署成功的消息。 创建虚拟机规模集并应用扩展来配置应用可能需要 10-15 分钟。
验证部署
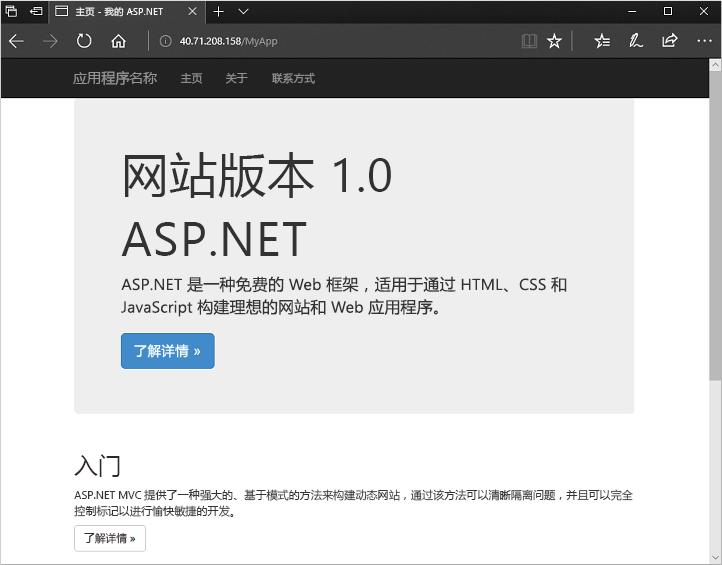
若要查看虚拟机规模集的运用,请在 Web 浏览器中访问示例 Web 应用程序。 使用 Azure CLI 或 Azure PowerShell 获取负载均衡器的公共 IP 地址。
az network public-ip show --resource-group exampleRG
以 http://publicIpAddress/MyApp 格式将负载均衡器的公共 IP 地址输入到 Web 浏览器中。 负载均衡器将流量分发到某个 VM 实例,如以下示例所示:
清理资源
如果不再需要资源组及其资源,请使用 Azure 门户、Azure CLI 或 Azure PowerShell 将其删除。
az group delete --name exampleRG
后续步骤
在本快速入门中,你已使用 Bicep 文件创建了 Windows 虚拟机规模集,并已使用 PowerShell DSC 扩展在 VM 实例上安装了基本的 ASP.NET 应用。 若要了解详细信息,请继续学习有关如何创建和管理 Azure 虚拟机规模集的教程。