你当前正在访问 Microsoft Azure Global Edition 技术文档网站。 如果需要访问由世纪互联运营的 Microsoft Azure 中国技术文档网站,请访问 https://docs.azure.cn。
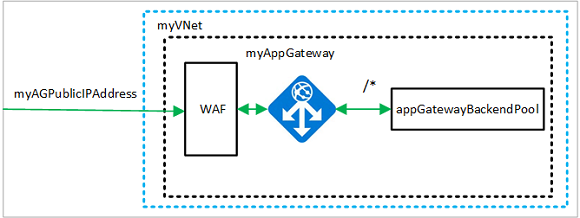
你可以使用 Web 应用程序防火墙 (WAF) 限制应用程序网关上的流量。 WAF 使用 OWASP 规则保护应用程序。 这些规则包括针对各种攻击(例如 SQL 注入、跨站点脚本攻击和会话劫持)的保护。
在本文中,学习如何:
- 设置网络
- 创建启用 WAF 的应用程序网关
- 创建虚拟机规模集
- 创建存储帐户和配置诊断
如果愿意,可以使用 Azure 门户或 Azure CLI 来完成本文。
如果没有 Azure 订阅,请在开始之前创建一个免费帐户。
注意
建议使用 Azure Az PowerShell 模块与 Azure 交互。 若要开始,请参阅安装 Azure PowerShell。 若要了解如何迁移到 Az PowerShell 模块,请参阅 将 Azure PowerShell 从 AzureRM 迁移到 Az。
Azure Cloud Shell
Azure 托管 Azure Cloud Shell(一个可通过浏览器使用的交互式 shell 环境)。 可以将 Bash 或 PowerShell 与 Cloud Shell 配合使用来使用 Azure 服务。 可以使用 Cloud Shell 预安装的命令来运行本文中的代码,而不必在本地环境中安装任何内容。
若要启动 Azure Cloud Shell,请执行以下操作:
| 选项 | 示例/链接 |
|---|---|
| 选择代码或命令块右上角的“试用”。 选择“试用”不会自动将代码或命令复制到 Cloud Shell。 |

|
| 转到 https://shell.azure.com 或选择“启动 Cloud Shell”按钮可在浏览器中打开 Cloud Shell。 |

|
| 选择 Azure 门户右上角菜单栏上的 Cloud Shell 按钮。 |

|
若要使用 Azure Cloud Shell,请执行以下操作:
启动 Cloud Shell。
选择代码块(或命令块)上的“复制”按钮以复制代码或命令。
在 Windows 和 Linux 上选择 CtrlShift+V,或在 macOS 上选择 CmdShift+V 将代码或命令粘贴到 Cloud Shell 会话中。
选择“Enter”运行代码或命令。
如果选择在本地安装并使用 PowerShell,则本文需要 Azure PowerShell 模块 1.0.0 或更高版本。 运行 Get-Module -ListAvailable Az 即可查找版本。 如果需要进行升级,请参阅 Install Azure PowerShell module(安装 Azure PowerShell 模块)。 如果在本地运行 PowerShell,则还需运行 Login-AzAccount 以创建与 Azure 的连接。
创建资源组
资源组是在其中部署和管理 Azure 资源的逻辑容器。 使用 New-AzResourceGroup 创建 Azure 资源组。
$location = "eastus"
$rgname = New-AzResourceGroup -Name myResourceGroupAG -Location $location
创建网络资源
使用 New-AzVirtualNetworkSubnetConfig 创建名为 myBackendSubnet 和 myAGSubnet 的子网配置。 使用 New-AzVirtualNetwork 和子网配置创建名为 myVNet 的虚拟网络。 最后使用 New-AzPublicIpAddress 创建名为 myAGPublicIPAddress 的公共 IP 地址。 这些资源用于提供与应用程序网关及其关联资源的网络连接。
$backendSubnetConfig = New-AzVirtualNetworkSubnetConfig `
  -Name myBackendSubnet `
  -AddressPrefix 10.0.1.0/24

$agSubnetConfig = New-AzVirtualNetworkSubnetConfig `
  -Name myAGSubnet `
  -AddressPrefix 10.0.2.0/24

$vnet = New-AzVirtualNetwork `
  -ResourceGroupName myResourceGroupAG `
  -Location eastus `
  -Name myVNet `
  -AddressPrefix 10.0.0.0/16 `
  -Subnet $backendSubnetConfig, $agSubnetConfig

$pip = New-AzPublicIpAddress `
  -ResourceGroupName myResourceGroupAG `
  -Location eastus `
  -Name myAGPublicIPAddress `
  -AllocationMethod Static `
  -Sku Standard
创建应用程序网关
在本部分中,将创建支持应用程序网关的资源,并最终创建它和一个 WAF。 创建的资源包括:
- IP 配置和前端端口 - 将先前创建的子网关联到应用程序网关,并分配一个端口以用于访问它。
- 默认池 - 所有应用程序网关必须至少具有一个后端服务器池。
- 默认侦听器和规则 - 默认侦听器侦听已分配的端口上的流量,默认规则将流量发送到默认池。
创建 IP 配置和前端端口
使用 New-AzApplicationGatewayIPConfiguration 将前面创建的 myAGSubnet 关联到应用程序网关。 使用 New-AzApplicationGatewayFrontendIPConfig 将 myAGPublicIPAddress 分配给应用程序网关。
$vnet = Get-AzVirtualNetwork `
  -ResourceGroupName myResourceGroupAG `
  -Name myVNet

$subnet=$vnet.Subnets[1]

$gipconfig = New-AzApplicationGatewayIPConfiguration `
  -Name myAGIPConfig `
  -Subnet $subnet

$fipconfig = New-AzApplicationGatewayFrontendIPConfig `
  -Name myAGFrontendIPConfig `
  -PublicIPAddress $pip

$frontendport = New-AzApplicationGatewayFrontendPort `
  -Name myFrontendPort `
  -Port 80
创建后端池和设置
使用 New-AzApplicationGatewayBackendAddressPool 为应用程序网关创建名为 appGatewayBackendPool 的后端池。 使用 New-AzApplicationGatewayBackendHttpSettings 配置后端地址池的设置。
$defaultPool = New-AzApplicationGatewayBackendAddressPool `
  -Name appGatewayBackendPool

$poolSettings = New-AzApplicationGatewayBackendHttpSettings `
  -Name myPoolSettings `
  -Port 80 `
  -Protocol Http `
  -CookieBasedAffinity Enabled `
  -RequestTimeout 120
创建默认侦听器和规则
应用程序网关需要侦听器才能适当地将流量路由到后端地址池。 在此示例中,将一个创建基本侦听器以侦听根 URL 上的流量。
使用 New-AzApplicationGatewayHttpListener 以及前面创建的前端配置和前端端口创建名为 mydefaultListener 的侦听器。 侦听器需要使用规则来了解哪个后端池使用传入流量。 使用 New-AzApplicationGatewayRequestRoutingRule 创建一个名为 rule1 的基本规则。
$defaultlistener = New-AzApplicationGatewayHttpListener `
  -Name mydefaultListener `
  -Protocol Http `
  -FrontendIPConfiguration $fipconfig `
  -FrontendPort $frontendport

$frontendRule = New-AzApplicationGatewayRequestRoutingRule `
  -Name rule1 `
  -RuleType Basic `
  -Priority 1000 `
  -HttpListener $defaultlistener `
  -BackendAddressPool $defaultPool `
  -BackendHttpSettings $poolSettings
创建具有 WAF 的应用程序网关
现在已创建所需的支持资源,请使用 New-AzApplicationGatewaySku 为应用程序网关指定参数。 使用 New-AzApplicationGatewayFirewallPolicy 指定防火墙策略。 然后,使用 New-AzApplicationGateway 创建名为 myAppGateway 的应用程序网关。
$sku = New-AzApplicationGatewaySku `
  -Name WAF_v2 `
  -Tier WAF_v2 `
  -Capacity 2

$policySetting = New-AzApplicationGatewayFirewallPolicySetting `
   -Mode Prevention -State Enabled `
   -MaxRequestBodySizeInKb 100 -MaxFileUploadInMb 256

$wafPolicy = New-AzApplicationGatewayFirewallPolicy -Name wafpolicyNew -ResourceGroup myResourceGroupAG `
   -Location $location -PolicySetting $PolicySetting

$appgw = New-AzApplicationGateway `
  -Name myAppGateway `
  -ResourceGroupName myResourceGroupAG `
  -Location eastus `
  -BackendAddressPools $defaultPool `
  -BackendHttpSettingsCollection $poolSettings `
  -FrontendIpConfigurations $fipconfig `
  -GatewayIpConfigurations $gipconfig `
  -FrontendPorts $frontendport `
  -HttpListeners $defaultlistener `
  -RequestRoutingRules $frontendRule `
  -Sku $sku `
  -FirewallPolicy $wafPolicy
创建虚拟机规模集
在此示例中,将创建虚拟机规模集,以便为应用程序网关的后端池提供服务器。 配置 IP 设置时将规模集分配给后端池。
在运行之前,将 <username> 和 password< 替换为你的值。
$vnet = Get-AzVirtualNetwork `
  -ResourceGroupName myResourceGroupAG `
  -Name myVNet

$appgw = Get-AzApplicationGateway `
  -ResourceGroupName myResourceGroupAG `
  -Name myAppGateway

$backendPool = Get-AzApplicationGatewayBackendAddressPool `
  -Name appGatewayBackendPool `
  -ApplicationGateway $appgw

$ipConfig = New-AzVmssIpConfig `
  -Name myVmssIPConfig `
  -SubnetId $vnet.Subnets[0].Id `
  -ApplicationGatewayBackendAddressPoolsId $backendPool.Id

$vmssConfig = New-AzVmssConfig `
  -Location eastus `
  -SkuCapacity 2 `
  -SkuName Standard_DS2 `
  -UpgradePolicyMode Automatic

Set-AzVmssStorageProfile $vmssConfig `
  -ImageReferencePublisher MicrosoftWindowsServer `
  -ImageReferenceOffer WindowsServer `
  -ImageReferenceSku 2016-Datacenter `
  -ImageReferenceVersion latest `
  -OsDiskCreateOption FromImage

Set-AzVmssOsProfile $vmssConfig `
  -AdminUsername <username> `
  -AdminPassword "<password>" `
  -ComputerNamePrefix myvmss

Add-AzVmssNetworkInterfaceConfiguration `
  -VirtualMachineScaleSet $vmssConfig `
  -Name myVmssNetConfig `
  -Primary $true `
  -IPConfiguration $ipConfig

New-AzVmss `
  -ResourceGroupName myResourceGroupAG `
  -Name myvmss `
  -VirtualMachineScaleSet $vmssConfig
安装 IIS
$publicSettings = @{ "fileUris" = (,"https://raw.githubusercontent.com/Azure/azure-docs-powershell-samples/master/application-gateway/iis/appgatewayurl.ps1");
  "commandToExecute" = "powershell -ExecutionPolicy Unrestricted -File appgatewayurl.ps1" }

$vmss = Get-AzVmss -ResourceGroupName myResourceGroupAG -VMScaleSetName myvmss

Add-AzVmssExtension -VirtualMachineScaleSet $vmss `
  -Name "customScript" `
  -Publisher "Microsoft.Compute" `
  -Type "CustomScriptExtension" `
  -TypeHandlerVersion 1.8 `
  -Setting $publicSettings

Update-AzVmss `
  -ResourceGroupName myResourceGroupAG `
  -Name myvmss `
  -VirtualMachineScaleSet $vmss
创建存储帐户和配置诊断
在本文中,应用程序网关使用存储帐户来存储用于检测和防范目的的数据。 也可以使用 Azure Monitor 日志或事件中心来记录数据。
创建存储帐户
使用 New-AzStorageAccount 创建名为 myagstore1 的存储帐户。
$storageAccount = New-AzStorageAccount `
  -ResourceGroupName myResourceGroupAG `
  -Name myagstore1 `
  -Location eastus `
  -SkuName "Standard_LRS"
配置诊断
使用 Set-AzDiagnosticSetting 配置诊断以将数据记录到 ApplicationGatewayAccessLog、ApplicationGatewayPerformanceLog 和 ApplicationGatewayFirewallLog 日志中。
$appgw = Get-AzApplicationGateway `
  -ResourceGroupName myResourceGroupAG `
  -Name myAppGateway

$store = Get-AzStorageAccount `
  -ResourceGroupName myResourceGroupAG `
  -Name myagstore1

Set-AzDiagnosticSetting `
  -ResourceId $appgw.Id `
  -StorageAccountId $store.Id `
  -Category ApplicationGatewayAccessLog, ApplicationGatewayPerformanceLog, ApplicationGatewayFirewallLog `
  -Enabled $true `
  -RetentionEnabled $true `
  -RetentionInDays 30
测试应用程序网关
可以使用 Get-AzPublicIPAddress 获取应用程序网关的公共 IP 地址。 复制该公共 IP 地址,并将其粘贴到浏览器的地址栏。
Get-AzPublicIPAddress -ResourceGroupName myResourceGroupAG -Name myAGPublicIPAddress

清理资源
如果不再需要资源组、应用程序网关和所有相关资源,可以使用 Remove-AzResourceGroup 将其删除。
Remove-AzResourceGroup -Name myResourceGroupAG
