本分步演练介绍如何使用 Visual Studio IDE 创建以 Microsoft C++(MSVC)编写的自己的动态链接库(DLL),以及如何从另一个C++应用中使用该 DLL。 DLL(也称为基于 UNIX 的作系统中的 共享库 )是最有用的 Windows 组件类型之一。 可以使用它们共享代码和资源,以及缩小应用的大小。 DLL 甚至可以更轻松地服务和扩展应用。
在本演练中,你将创建一个实现某些数学函数的 DLL。 然后,创建使用 DLL 中的函数的控制台应用。 你还将介绍 Windows DLL 中使用的一些编程技术和约定。
本指南介绍以下步骤:
- 在 Visual Studio 中创建 DLL 项目。
- 将导出的函数和变量添加到 DLL。
- 在 Visual Studio 中创建控制台应用项目。
- 使用从控制台应用中的 DLL 导入的函数和变量。
- 运行已完成的应用。
与静态链接库一样,DLL 按名称 导出 变量、函数和资源。 客户端应用 导入 名称以使用这些变量、函数和资源。 与静态链接库不同,Windows 会在加载时或运行时将应用中的导入连接到 DLL 中的导出,而不是在链接时连接它们。 Windows 需要不属于标准C++编译模型的附加信息才能建立这些连接。 MSVC 编译器实现了一些微软特定的 C++ 扩展,以提供此额外信息。 我们将随着进程解释这些扩展。
本演练创建两个 Visual Studio 解决方案:一个用于生成 DLL,一个用于生成客户端应用。 DLL 使用 C 调用约定。 只要平台、调用约定和链接约定匹配,就可以从以其他编程语言编写的应用调用它。 客户端应用使用 隐式链接,其中 Windows 在加载时将应用链接到 DLL。 通过此链接,应用可以调用 DLL 提供的函数,就像静态链接库中的函数一样。
本教程不涉及一些常见情况。 该代码不显示其他编程语言使用 C++ DLL。 它没有说明如何 创建仅限资源的 DLL,也没有说明如何使用 显式链接 在运行时加载 DLL,而不是在加载时加载。 放心,可以使用 MSVC 和 Visual Studio 执行所有这些作。
即使 DLL 的代码是用C++编写的,但我们还是使用 C 样式接口来导出的函数。 有两个主要原因:首先,许多其他语言支持导入 C 样式函数。 客户端应用不必用C++编写。 其次,它避免了与导出的类和成员函数相关的一些常见陷阱。 导出类时很容易出现难以诊断的错误,因为类声明中涉及的所有内容必须具有也必须被导出的实例化。 此限制适用于 DLL,但不适用于静态库。 如果类是纯旧数据样式,则不应遇到此问题。
有关 DLL 的详细信息的链接,请参阅 在 Visual Studio 中创建 C/C++ DLL。 有关隐式链接和显式链接的详细信息,请参阅 确定要使用的链接方法。 有关创建用于使用 C 语言链接约定的编程语言的C++ DLL 的信息,请参阅 导出C++函数以在 C 语言可执行文件中使用。 有关如何创建用于 .NET 语言的 DLL 的信息,请参阅 从 Visual Basic 应用程序调用 DLL 函数。
先决条件
- Microsoft Windows 7 或更高版本。 建议使用最新版本的 Windows 来获得最佳开发体验。
Visual Studio。 若要了解如何下载和安装 Visual Studio,请参阅 “安装 Visual Studio”。 运行安装程序时,请确保已选中 桌面开发(含C++工作负载)。 如果安装 Visual Studio 时未安装此工作负载,请不要担心。 可以再次运行安装程序并立即安装它。
- Visual Studio。 有关如何下载和安装 Visual Studio 2015 的信息,请参阅 安装 Visual Studio 2015。 使用 自定义 安装来安装 C++ 编译器和工具,因为它们默认不安装。
了解使用 Visual Studio IDE 的基础知识。 如果以前使用过 Windows 桌面应用,则可能可以跟上。 有关简介,请参阅 Visual Studio IDE 功能教程。
对C++语言有一定的熟悉程度。 别担心,我们不会做太复杂的事。
注释
本演练假定你使用的是 Visual Studio 2017 版本 15.9 或更高版本。 某些早期版本的 Visual Studio 2017 在代码模板中存在缺陷,或者使用了不同的用户界面对话框。 若要避免问题,请使用 Visual Studio 安装程序将 Visual Studio 2017 更新到版本 15.9 或更高版本。
创建 DLL 项目
在以下一组任务中,为 DLL 创建项目、添加代码并生成项目。 若要开始,请启动 Visual Studio IDE,如果需要,请登录。 根据所使用的 Visual Studio 版本,这些说明略有不同。 若要查看首选版本的 Visual Studio 的步骤,请使用位于此页面目录顶部 的版本 选择器。
在 Visual Studio 中创建 DLL 项目
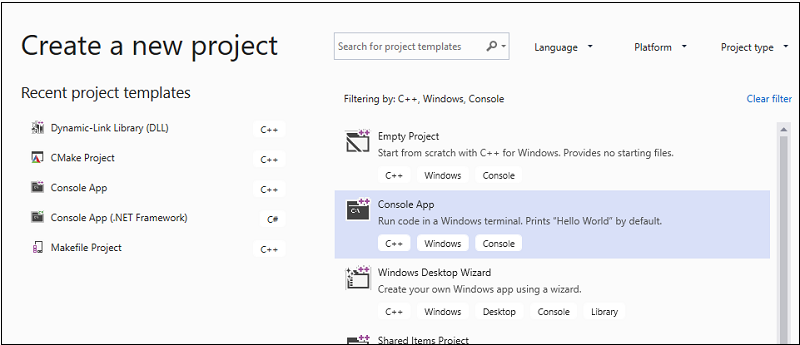
在菜单栏上,选择“文件”“新建”>“项目”,打开“创建新项目”对话框 。
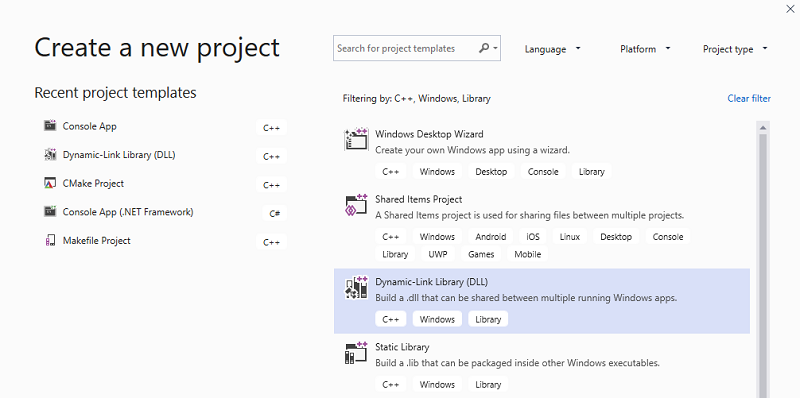
在对话框顶部,将 语言 设置为 C++,将 平台 设置为 Windows,并将 项目类型 设置为 库。
从筛选的项目类型列表中,选择 “动态链接库”(DLL),然后选择“ 下一步”。
在“配置新项目”页中,在“项目名称”框中输入 MathLibrary 以指定项目的名称。 保留默认位置和解决方案名称值。 将 解决方案 设置为 “创建新解决方案”。 如果已选中,请取消选中 将解决方案和项目置于同一目录。
选择“创建”按钮创建项目。
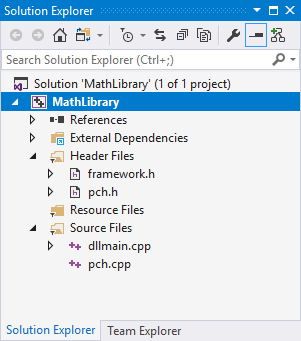
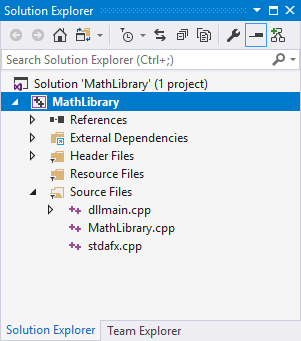
创建解决方案后,可以在 Visual Studio 的“解决方案资源管理器” 窗口中看到生成的项目和源文件。
在 Visual Studio 2017 中创建 DLL 项目
在菜单栏上,选择“文件”“新建”>“项目”,打开“新建项目”对话框>。
在“ 新建项目 ”对话框的左窗格中,选择 “已安装>的 Visual C++>Windows Desktop”。 在中心窗格中,选择 Dynamic-Link 库(DLL)。 在“名称”框中输入 MathLibrary 以指定项目的名称。 保留默认位置和解决方案名称值。 将 解决方案 设置为 “创建新解决方案”。 如果未选中“为解决方案创建目录”,请勾选。
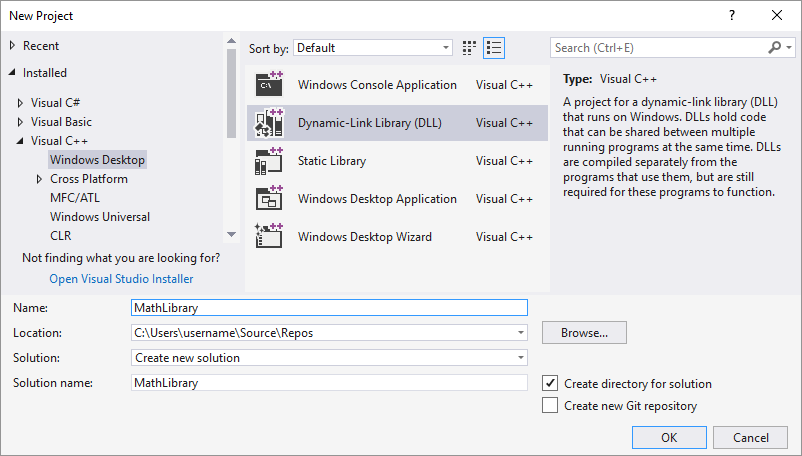
选择 “确定 ”按钮以创建项目。
创建解决方案后,可以在 Visual Studio 的“解决方案资源管理器” 窗口中看到生成的项目和源文件。
在 Visual Studio 2015 和更早版本中创建 DLL 项目
在菜单栏上,依次选择“文件”“新建”>“项目”。
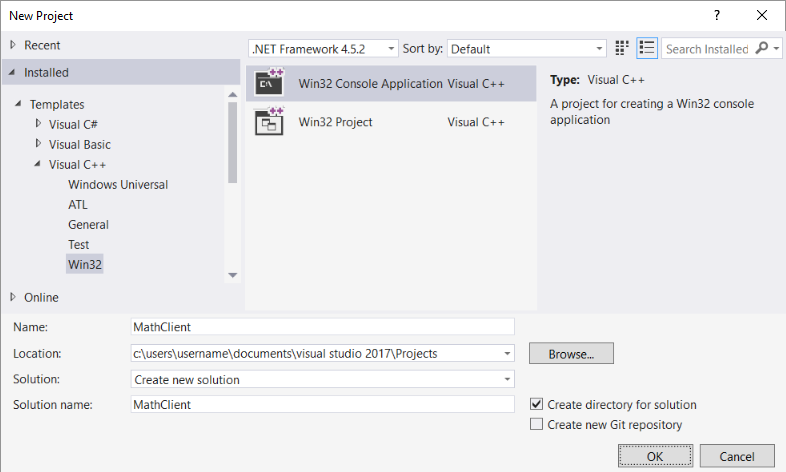
在 “新建项目 ”对话框的左窗格中,展开 “已安装>的模板”,然后选择 “视觉C++”,然后在中心窗格中选择 “Win32 控制台应用程序”。 在“名称”编辑框中输入 MathLibrary 以指定项目的名称。 保留默认位置和解决方案名称值。 将 解决方案 设置为 “创建新解决方案”。 如果‘为解决方案创建目录’未选中, 请勾选它。
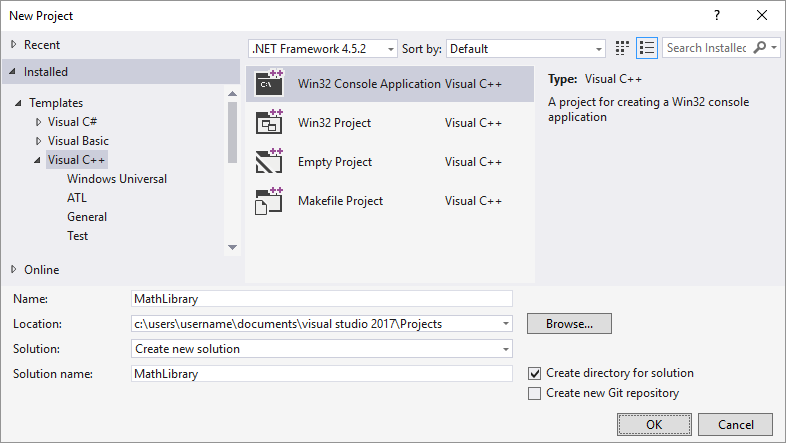
选择 “确定 ”按钮以消除 “新建项目 ”对话框并启动 Win32 应用程序向导。

选择“下一步”按钮 。 在 “应用程序设置” 页上的 “应用程序类型”下,选择 DLL。
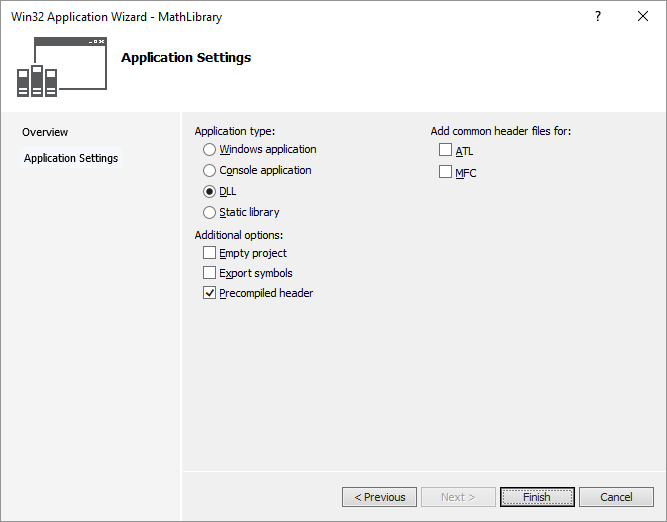
选择“ 完成 ”按钮以创建项目。
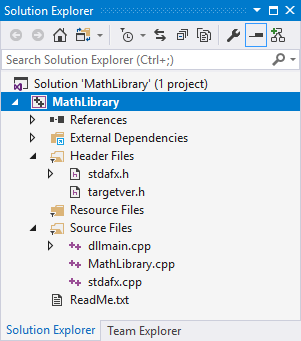
向导完成解决方案后,可以在 Visual Studio 的“解决方案资源管理器” 窗口中看到生成的项目和源文件。
现在,此 DLL 没有太多功能。 接下来,你将创建一个头文件来声明 DLL 导出的函数,然后将函数定义添加到 DLL,使其更有用。
将头文件添加到 DLL
若要为函数创建头文件,请在菜单栏上选择 “项目>添加新项”。
在“ 添加新项 ”对话框中的左窗格中,选择 “视觉对象C++”。 在中心窗格中,选择“头文件”(.h)。 指定
MathLibrary.h为头文件的名称。
选择 “添加 ”按钮以生成空白头文件,该文件显示在新的编辑器窗口中。
将头文件的内容替换为以下代码:
// MathLibrary.h - Contains declarations of math functions
#pragma once

#ifdef MATHLIBRARY_EXPORTS
#define MATHLIBRARY_API __declspec(dllexport)
#else
#define MATHLIBRARY_API __declspec(dllimport)
#endif

// The Fibonacci recurrence relation describes a sequence F
// where F(n) is { n = 0, a
//               { n = 1, b
//               { n > 1, F(n-2) + F(n-1)
// for some initial integral values a and b.
// If the sequence is initialized F(0) = 1, F(1) = 1,
// then this relation produces the well-known Fibonacci
// sequence: 1, 1, 2, 3, 5, 8, 13, 21, 34, ...

// Initialize a Fibonacci relation sequence
// such that F(0) = a, F(1) = b.
// This function must be called before any other function.
extern "C" MATHLIBRARY_API void fibonacci_init(
    const unsigned long long a, const unsigned long long b);

// Produce the next value in the sequence.
// Returns true on success and updates current value and index;
// false on overflow, leaves current value and index unchanged.
extern "C" MATHLIBRARY_API bool fibonacci_next();

// Get the current value in the sequence.
extern "C" MATHLIBRARY_API unsigned long long fibonacci_current();

// Get the position of the current value in the sequence.
extern "C" MATHLIBRARY_API unsigned fibonacci_index();
此头文件声明一些函数以生成通用化 Fibonacci 序列,给定两个初始值。 调用 fibonacci_init(1, 1) 生成熟悉的 Fibonacci 序列。
请注意文件顶部的预处理器语句。 DLL 项目的新项目模板将 <PROJECTNAME>_EXPORTS 添加到预处理器宏定义中。 在此示例中,当构建 MathLibrary DLL 项目时,Visual Studio 定义 MATHLIBRARY_EXPORTS。
定义了宏MATHLIBRARY_EXPORTS时,宏MATHLIBRARY_API会在函数声明中设置__declspec(dllexport)修饰符。 此修饰符告知编译器和链接器从 DLL 导出函数或变量以供其他应用程序使用。
MATHLIBRARY_EXPORTS如果未定义,例如,当客户端应用程序包含头文件时,MATHLIBRARY_API将__declspec(dllimport)修饰符应用于声明。 此修饰符优化应用程序中函数或变量的导入。 有关详细信息,请参阅 dllexport、dllimport。
向 DLL 模块添加实现
在 解决方案资源管理器中,右键单击 “源文件 ”节点,然后选择“ 添加新>项”。 创建名为
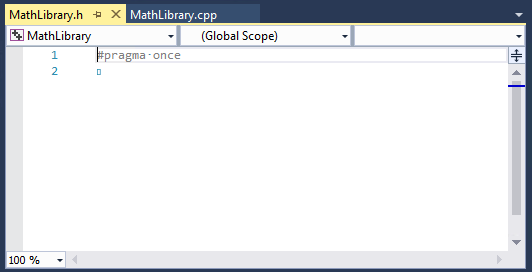
.cpp的新MathLibrary.cpp文件,就像在上一步中添加新头文件一样。请在编辑器窗口中选择选项卡
MathLibrary.cpp(如果已打开)。 否则,在解决方案资源管理器中,双击MathLibrary.cppMathLibrary 项目的“源文件”文件夹将其打开。在编辑器中,将文件的内容
MathLibrary.cpp替换为以下代码:// MathLibrary.cpp : Defines the exported functions for the DLL. #include "pch.h" // use stdafx.h in Visual Studio 2017 and earlier #include <utility> #include <limits.h> #include "MathLibrary.h" // DLL internal state variables: static unsigned long long previous_; // Previous value, if any static unsigned long long current_; // Current sequence value static unsigned index_; // Current seq. position // Initialize a Fibonacci relation sequence // such that F(0) = a, F(1) = b. // This function must be called before any other function. void fibonacci_init( const unsigned long long a, const unsigned long long b) { index_ = 0; current_ = a; previous_ = b; // see special case when initialized } // Produce the next value in the sequence. // Returns true on success, false on overflow. bool fibonacci_next() { // check to see if we'd overflow result or position if ((ULLONG_MAX - previous_ < current_) || (UINT_MAX == index_)) { return false; } // Special case when index == 0, just return b value if (index_ > 0) { // otherwise, calculate next sequence value previous_ += current_; } std::swap(current_, previous_); ++index_; return true; } // Get the current value in the sequence. unsigned long long fibonacci_current() { return current_; } // Get the current index position in the sequence. unsigned fibonacci_index() { return index_; }
在编辑器窗口中,选择 MathLibrary.cpp 选项卡(如果已打开)。 否则,在解决方案资源管理器中,双击源文件文件夹中的MathLibrary.cpp以打开MathLibrary项目。
在编辑器中,将文件的内容
MathLibrary.cpp替换为以下代码:// MathLibrary.cpp : Defines the exported functions for the DLL. #include "stdafx.h" // use pch.h in Visual Studio 2019 and later #include <utility> #include <limits.h> #include "MathLibrary.h" // DLL internal state variables: static unsigned long long previous_; // Previous value, if any static unsigned long long current_; // Current sequence value static unsigned index_; // Current seq. position // Initialize a Fibonacci relation sequence // such that F(0) = a, F(1) = b. // This function must be called before any other function. void fibonacci_init( const unsigned long long a, const unsigned long long b) { index_ = 0; current_ = a; previous_ = b; // see special case when initialized } // Produce the next value in the sequence. // Returns true on success, false on overflow. bool fibonacci_next() { // check to see if we'd overflow result or position if ((ULLONG_MAX - previous_ < current_) || (UINT_MAX == index_)) { return false; } // Special case when index == 0, just return b value if (index_ > 0) { // otherwise, calculate next sequence value previous_ += current_; } std::swap(current_, previous_); ++index_; return true; } // Get the current value in the sequence. unsigned long long fibonacci_current() { return current_; } // Get the current index position in the sequence. unsigned fibonacci_index() { return index_; }
若要验证到目前为止一切是否正常工作,请编译 DLL。 若要编译,请在菜单栏上选择 “生成>生成解决方案 ”。 DLL 和相关编译器输出放置在一个名为 Debug 的文件夹中,该文件夹位于解决方案文件夹的正下方。 如果创建 Release 构建,输出被放在一个名为 Release 的文件夹中。 输出应如下所示:
1>------ Build started: Project: MathLibrary, Configuration: Debug Win32 ------
1>pch.cpp
1>dllmain.cpp
1>MathLibrary.cpp
1>Generating Code...
1>   Creating library C:\Users\username\Source\Repos\MathLibrary\Debug\MathLibrary.lib and object C:\Users\username\Source\Repos\MathLibrary\Debug\MathLibrary.exp
1>MathLibrary.vcxproj -> C:\Users\username\Source\Repos\MathLibrary\Debug\MathLibrary.dll
========== Build: 1 succeeded, 0 failed, 0 up-to-date, 0 skipped ==========
1>------ Build started: Project: MathLibrary, Configuration: Debug Win32 ------
1>stdafx.cpp
1>dllmain.cpp
1>MathLibrary.cpp
1>Generating Code...
1>   Creating library C:\Users\username\Source\Repos\MathLibrary\Debug\MathLibrary.lib and object C:\Users\username\Source\Repos\MathLibrary\Debug\MathLibrary.exp
1>MathLibrary.vcxproj -> C:\Users\username\Source\Repos\MathLibrary\Debug\MathLibrary.dll
========== Build: 1 succeeded, 0 failed, 0 up-to-date, 0 skipped ==========
1>------ Build started: Project: MathLibrary, Configuration: Debug Win32 ------
1>MathLibrary.cpp
1>dllmain.cpp
1>Generating Code...
1>   Creating library C:\Users\username\Source\Repos\MathLibrary\Debug\MathLibrary.lib and object C:\Users\username\Source\Repos\MathLibrary\Debug\MathLibrary.exp
1>MathLibrary.vcxproj -> C:\Users\username\Source\Repos\MathLibrary\Debug\MathLibrary.dll
1>MathLibrary.vcxproj -> C:\Users\username\Source\Repos\MathLibrary\Debug\MathLibrary.pdb (Partial PDB)
========== Build: 1 succeeded, 0 failed, 0 up-to-date, 0 skipped ==========
恭喜,你已使用 Visual Studio 创建了 DLL! 接下来,你将创建一个使用 DLL 导出的函数的客户端应用。
创建使用 DLL 的客户端应用
创建 DLL 时,请考虑客户端应用如何使用它。 若要调用函数或访问 DLL 导出的数据,客户端源代码必须在编译时提供声明。 在链接时,链接器需要信息来解析函数调用或数据访问。 DLL 在 导入库中提供此信息,该文件包含有关如何查找函数和数据的信息,而不是实际代码。 在运行时,DLL 必须可供客户端使用,位于作系统可以找到的位置。
无论是你自己的还是来自第三方,客户端应用项目都需要几条信息才能使用 DLL。 它需要查找声明 DLL 导出的标头、链接器导入库和 DLL 本身。 一种解决方案是将所有这些文件复制到客户端项目中。 对于在客户程序开发过程中不太可能更改的第三方 DLL,此方法可能是使用它们的最佳方式。 但是,在生成 DLL 时,最好避免重复。 如果对正在开发的 DLL 文件进行本地副本,可能会意外地更改一个副本中的头文件,而不是另一个副本,或使用过时的库。
为了避免代码不同步,建议在客户端项目中设置包含路径,以便直接从 DLL 项目中包含 DLL 头文件。 此外,将客户端项目中的库路径设置为包含 DLL 项目中的 DLL 导入库。 最后,将生成的 DLL 从 DLL 项目复制到客户端生成输出目录中。 此步骤允许客户端应用使用生成的同一 DLL 代码。
在 Visual Studio 中创建客户端应用
在菜单栏上,选择“ 文件>新建>项目 ”以打开“ 创建新项目 ”对话框。
在对话框顶部,将“语言”设置为“C++”,将“平台”设置为“Windows”,并将“项目类型”设置为“控制台”。
从筛选的项目类型列表中,选择“控制台应用”,然后选择“下一步” 。
在“配置新项目”页中,在“项目名称”框中输入 MathClient 以指定项目的名称。 保留默认位置和解决方案名称值。 将 解决方案 设置为 “创建新解决方案”。 取消选中将解决方案和项目放在同一目录中(如果已选中)。
选择“创建”按钮创建客户端项目。
将为你创建一个最小的控制台应用程序项目。 主源文件的名称与前面输入的项目名称相同。 在此示例中,它被命名为 MathClient.cpp。 可以构建它,但它尚未使用你的 DLL。
在 Visual Studio 2017 中创建客户端应用
若要创建使用所创建 DLL 的C++应用,请在菜单栏上选择“ 文件>新建>项目”。
在“新建项目”对话框的左窗格中,选择“已安装”中的Visual C++下的Windows 桌面。 在中心窗格中,选择 “Windows 控制台应用程序”。 在“名称”编辑框中指定项目的名称 MathClient。 保留默认位置和解决方案名称值。 将 解决方案 设置为 “创建新解决方案”。 确保“为解决方案创建目录”已选中。
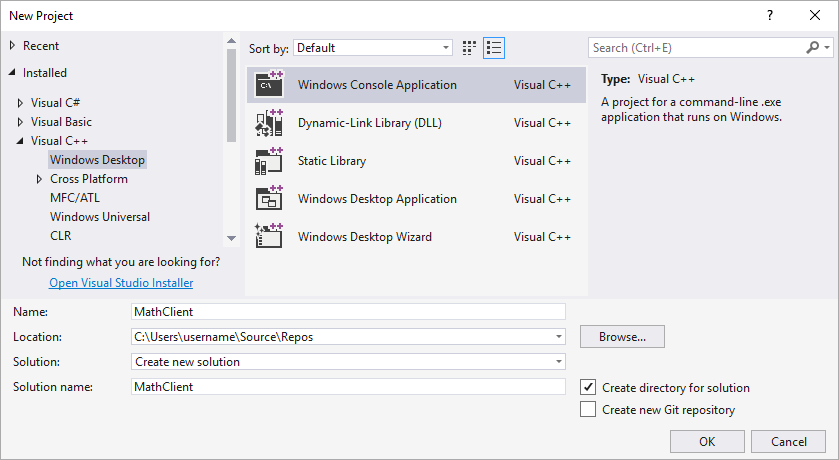
选择 “确定” 以创建客户端应用项目。
将为你创建一个最小的控制台应用程序项目。 主源文件的名称与前面输入的项目名称相同。 在此示例中,它被命名为 MathClient.cpp。 可以生成它,但它尚未使用你的 DLL。
在 Visual Studio 2015 中创建客户端应用
若要创建使用所创建 DLL 的C++应用,请在菜单栏上选择“ 文件>新建>项目”。
在“新建项目”对话框的左窗格中,在已安装>的模板下选择Visual C++中的Win32。 在中心窗格中,选择 “Win32 控制台应用程序”。 在“名称”编辑框中指定项目的名称 MathClient。 保留默认位置和解决方案名称值。 将 解决方案 设置为 “创建新解决方案”。 如果没有选中“为解决方案创建目录”,请选中它。
选择 “确定 ”按钮以消除 “新建项目 ”对话框并启动 Win32 应用程序向导。 在“Win32 应用程序向导”对话框的“概述”页上,选择“下一步”按钮。
在 “应用程序设置” 页上的 “应用程序类型”下,选择“ 控制台应用程序 ”(如果尚未选择)。
选择“ 完成 ”按钮以创建项目。
向导完成后,会为你创建一个最小的控制台应用程序项目。 主源文件的名称与前面输入的项目名称相同。 在此示例中,MathClient.cpp 被命名为。 可以生成它,但它尚未使用 DLL。
接下来,若要在源代码中调用 MathLibrary 函数,项目必须包含 MathLibrary.h 该文件。 可以将此头文件复制到客户端应用项目中,然后将其作为现有项添加到项目中。 对于第三方库,此方法是一个不错的选择。 但是,如果同时处理 DLL 和客户端的代码,头文件可能会不同步。若要避免此问题,请将项目中 的“其他包含目录 ”路径设置为包含原始标头的路径。
将 DLL 头文件添加到包含路径
右键单击解决方案资源管理器中的 MathClient 节点以打开“属性页”对话框。
在 “配置 ”下拉列表框中,选择“ 所有配置 ”(如果尚未选择)。
在左窗格中,选择 “配置属性>C/C++>General”。
在属性窗格中,选择 “其他包含目录 ”编辑框旁边的下拉列表控件,然后选择“ 编辑”。

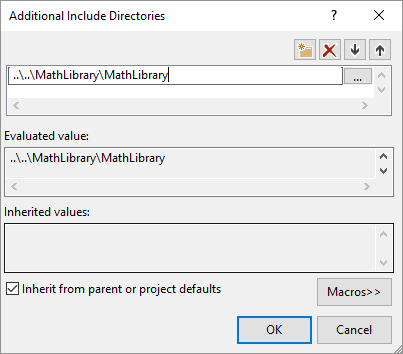
双击“ 其他包含目录 ”对话框顶部窗格以启用编辑控件。 或者,选择文件夹图标以创建新条目。
在编辑控件中,指定头文件
MathLibrary.h所在位置的路径。 可以选择省略号 (...) 控件以浏览到正确的文件夹。还可以将客户端源文件中的相对路径输入到包含 DLL 头文件的文件夹。 如果您按照说明将客户端项目放置在与 DLL 分开的解决方案中,相对路径应如下所示:
..\..\MathLibrary\MathLibrary如果 DLL 和客户端项目位于同一解决方案中,则相对路径可能如下所示:
..\MathLibrary当 DLL 和客户端项目位于其他文件夹中时,请调整相对路径以匹配。 或者,使用省略号控件浏览文件夹。
在“ 其他包含目录 ”对话框中输入头文件的路径后,选择“ 确定 ”按钮。 在“ 属性页 ”对话框中,选择“ 确定 ”按钮保存所做的更改。
现在可以包含 MathLibrary.h 该文件并使用它在客户端应用程序中声明的函数。 使用此代码替换 MathClient.cpp 的内容:
// MathClient.cpp : Client app for MathLibrary DLL.
// #include "pch.h" Uncomment for Visual Studio 2017 and earlier
#include <iostream>
#include "MathLibrary.h"

int main()
{
    // Initialize a Fibonacci relation sequence.
    fibonacci_init(1, 1);
    // Write out the sequence values until overflow.
    do {
        std::cout << fibonacci_index() << ": "
            << fibonacci_current() << std::endl;
    } while (fibonacci_next());
    // Report count of values written before overflow.
    std::cout << fibonacci_index() + 1 <<
        " Fibonacci sequence values fit in an " <<
        "unsigned 64-bit integer." << std::endl;
}
可以编译此代码,但不能链接。 如果现在生成客户端应用,则错误列表会显示多个LNK2019错误。 项目之所以缺少一些信息,是因为尚未指定该项目依赖于 MathLibrary.lib 库。 而且,你尚未告知链接器如何查找 MathLibrary.lib 文件。
若要解决此问题,可以将库文件直接复制到客户端应用项目中。 链接器会自动找到并使用它。 如果库和客户端应用程序同时在开发中,这可能会导致一个版本的更改未反映到另一个版本中。 若要避免此问题,可以设置 “其他依赖项 ”属性,告知生成系统项目所依赖 MathLibrary.lib。 还可以在项目中设置 其他库目录 路径,以在链接时包含原始库的路径。
将 DLL 导入库添加到项目
右键单击解决方案资源管理器中的 MathClient 节点,然后选择“属性”以打开“属性页”对话框。
在 “配置 ”下拉列表框中,选择“ 所有配置 ”(如果尚未选择)。 它可确保任何属性更改都适用于调试和发布版本。
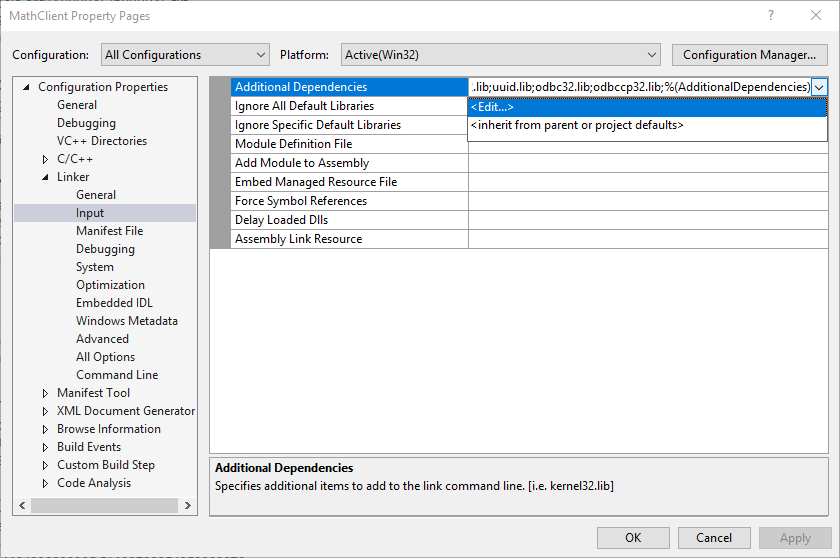
在左窗格中,选择 “配置属性>链接器>输入”。 在属性窗格中,选择 “其他依赖项 ”编辑框旁边的下拉列表控件,然后选择“ 编辑”。
在 “其他依赖项” 对话框中,将
MathLibrary.lib添加到顶部编辑控件中的列表。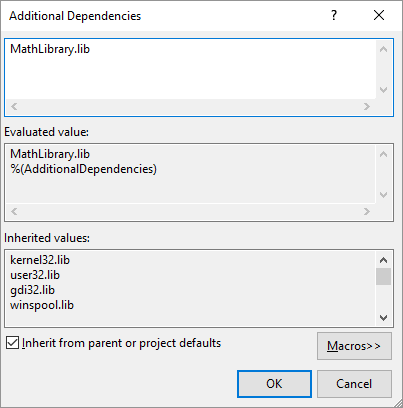
选择 “确定 ”以返回到“ 属性页 ”对话框。
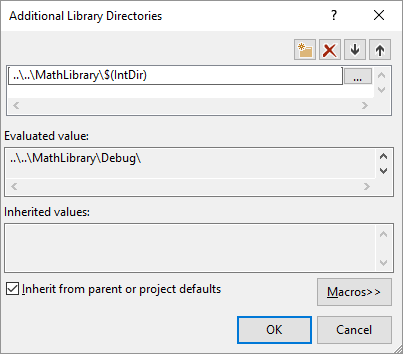
在左窗格中,选择 “配置属性>链接器>常规”。 在属性窗格中,选择 “其他库目录 ”编辑框旁边的下拉列表控件,然后选择“ 编辑”。
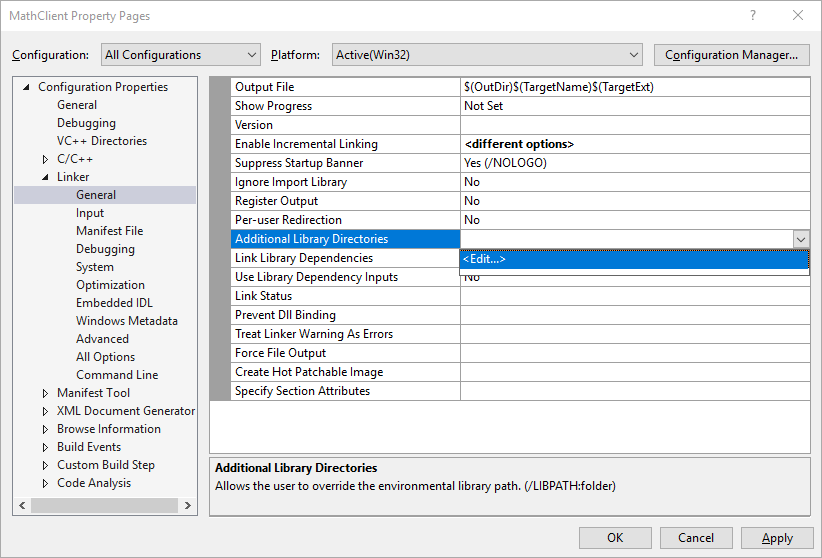
双击“ 其他库目录 ”对话框顶部窗格以启用编辑控件。 在编辑框中,指定
MathLibrary.lib文件位置的路径。 默认情况下,它位于 DLL 解决方案文件夹下的名为 “调试” 的文件夹中。 如果创建发布版本,该文件将放置在名为 Release 的文件夹中。 可以使用$(IntDir)宏,以便链接器可以查找您的 DLL,无论您创建哪种类型的构建。 如果按照说明将客户端项目置于与 DLL 项目的单独解决方案中,相对路径应如下所示:..\..\MathLibrary\$(IntDir)如果 DLL 和客户端项目位于其他位置,请调整相对路径以匹配。
在“ 其他库目录 ”对话框中输入库文件的路径后,选择“ 确定 ”按钮返回到 “属性页 ”对话框。 选择 “确定” 保存属性更改。
客户端应用现在可以成功编译和链接,但它仍然没有运行所需的一切。 当操作系统加载您的应用程序时,它会查找 MathLibrary 动态链接库 (DLL)。 如果在某些系统目录、环境路径或本地应用目录中找不到 DLL,则加载将失败。 根据作系统,你将看到如下所示的错误消息:
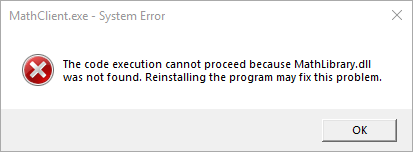
避免此问题的一种方法是将 DLL 复制到包含客户端可执行文件的目录,作为生成过程的一部分。 可以将 生成后事件 添加到项目,以添加将 DLL 复制到生成输出目录的命令。 此处指定的命令仅在 DLL 缺失或更改时才复制该 DLL。 它根据生成配置使用宏在调试或发布位置之间进行复制。
在生成后事件中复制 DLL
右键单击解决方案资源管理器中的 MathClient 节点,然后选择“属性”以打开“属性页”对话框。
在 “配置 ”下拉列表框中,选择“ 所有配置 ”(如果尚未选择)。
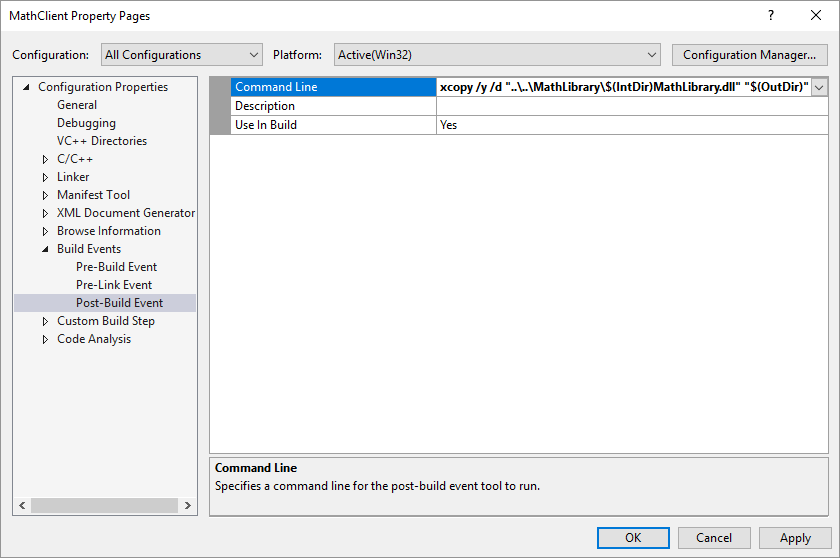
在左窗格中,选择“配置属性>生成事件>”。
在属性窗格中,选择 “命令行 ”字段中的编辑控件。 如果按照说明将客户端项目置于与 DLL 项目的单独解决方案中,请输入以下命令:
xcopy /y /d "..\..\MathLibrary\$(IntDir)MathLibrary.dll" "$(OutDir)"如果 DLL 和客户端项目位于其他目录中,请更改 DLL 的相对路径以匹配。
选择 “确定 ”按钮以保存对项目属性所做的更改。
现在,客户端应用拥有生成和运行所需的一切。 通过在菜单栏上选择“生成解决方案”>生成应用程序。 Visual Studio 中的 “输出 ”窗口应具有类似于以下示例的内容,具体取决于 Visual Studio 的版本:
1>------ Build started: Project: MathClient, Configuration: Debug Win32 ------
1>MathClient.cpp
1>MathClient.vcxproj -> C:\Users\username\Source\Repos\MathClient\Debug\MathClient.exe
1>1 File(s) copied
========== Build: 1 succeeded, 0 failed, 0 up-to-date, 0 skipped ==========
恭喜,你已创建了一个在 DLL 中调用函数的应用程序。 现在运行应用程序以查看它的作用。 在菜单栏上,选择 “调试”>不带调试启动。 Visual Studio 打开要在其中运行的程序的命令窗口。 输出的最后一部分应如下所示:
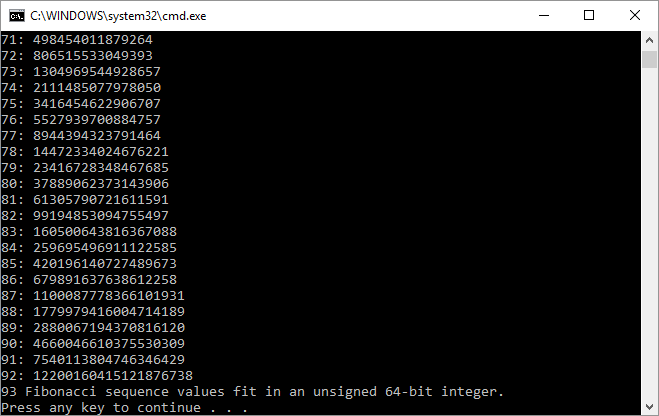
按任意键关闭命令窗口。
创建 DLL 和客户端应用程序后,可以试验。 尝试在客户端应用的代码中设置断点,并在调试器中运行该应用。 查看进入库调用时会发生什么情况。 将其他函数添加到库,或编写使用 DLL 的另一个客户端应用。
部署应用时,还必须部署其使用的 DLL。 最简单的方法来使您构建的 DLL 或从第三方包含的 DLL 可用,是将它们放在与应用相同的目录中。 它称为 应用本地部署。 有关部署的详细信息,请参阅 Microsoft C++中的部署。