注意
如果你是美国政府客户,请使用美国政府客户Microsoft Defender for Endpoint中列出的 URI。
提示
为了获得更好的性能,请使用离地理位置更近的服务器,而不是使用 api.security.microsoft.com:
- us.api.security.microsoft.com
- eu.api.security.microsoft.com
- uk.api.security.microsoft.com
- au.api.security.microsoft.com
- swa.api.security.microsoft.com
- ina.api.security.microsoft.com
- aea.api.security.microsoft.com
使用简单的 PowerShell 脚本获取警报
完成此示例需要多长时间?
只需在两个步骤中完成 5 分钟:
- 应用程序注册
- 使用示例:只需复制/粘贴简短的 PowerShell 脚本
是否需要连接权限?
对于应用程序注册阶段,必须在Microsoft Entra租户中分配适当的角色。 有关角色的更多详细信息,请参阅 权限选项。
步骤 1 - 在 Microsoft Entra ID 中创建应用
登录 Azure 门户。
导航到Microsoft Entra ID>应用注册>“新建注册”。
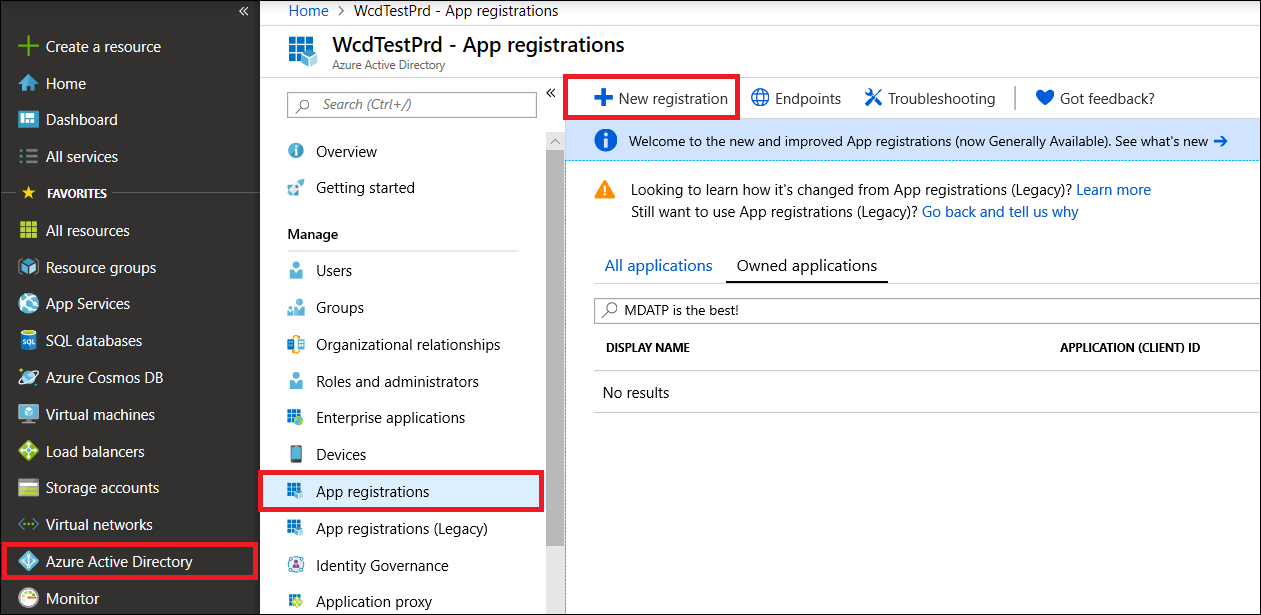
在注册表单中,选择应用程序的名称,然后选择“ 注册”。
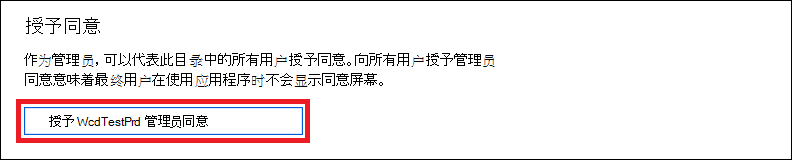
允许应用程序访问 Defender for Endpoint 并为其分配 “读取所有警报” 权限:
选择“ 授予同意”。
注意
每次添加权限时,都必须单击“ 授予同意 ”,新权限才能生效。
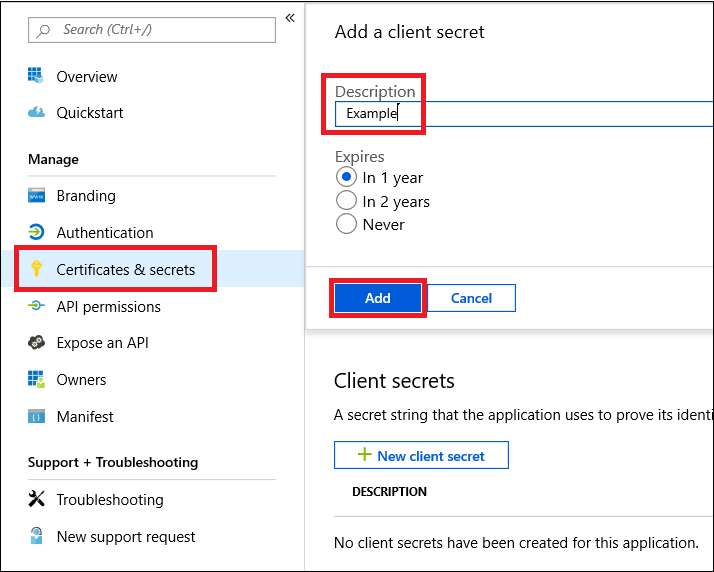
将机密添加到应用程序。
选择“ 证书 & 机密”,向机密添加说明,然后选择“ 添加”。
重要
单击“添加”后, 复制生成的机密值。 离开后将无法检索!
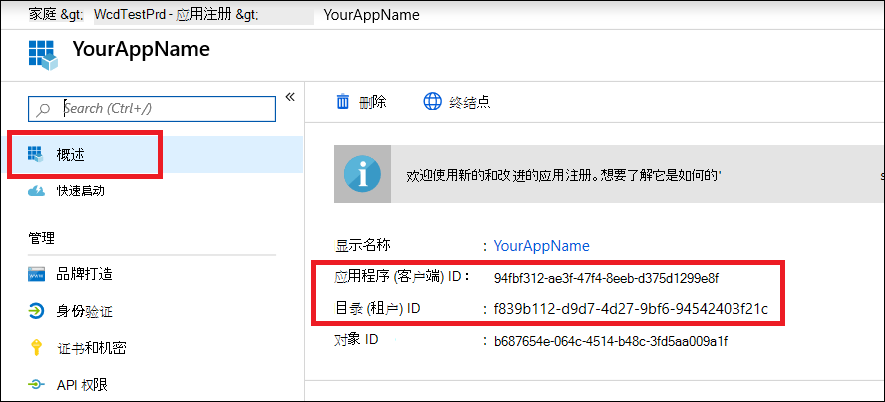
记下应用程序 ID 和租户 ID。
在应用程序页上,转到 “概述” 并复制以下内容:


完成! 已成功注册应用程序!
步骤 2 - 使用应用获取令牌,并使用此令牌访问 API
提示
某些Microsoft Defender for Endpoint API 继续要求为旧资源 https://api.securitycenter.microsoft.com颁发访问令牌。 如果令牌访问群体与 API 所需的资源不匹配,即使 API 终结点使用 https://api.security.microsoft.com,请求也会失败。403 Forbidden 在获取令牌时使用 https://api.securitycenter.microsoft.com 作为资源或范围。
将以下脚本复制到 PowerShell ISE 或文本编辑器,并将其另存为 Get-Token.ps1。 运行此脚本会生成一个令牌,并将其保存在名为 Latest-token.txt下的工作文件夹中。
# This code gets the application context token and saves it to a file named "Latest-token.txt" in the current directory.

$tenantId = '' ### Paste your tenant ID here
$appId = '' ### Paste your Application (client) ID here
$appSecret = '' ### Paste your Application secret (App key) here to test, and then store it in a safe place!

$resourceAppIdUri = 'https://api.securitycenter.microsoft.com/'
$oAuthUri = "https://login.microsoftonline.com/$TenantId/oauth2/token"
$authBody = [Ordered] @{
  resource = "$resourceAppIdUri"
  client_id = "$appId"
  client_secret = "$appSecret"
  grant_type = 'client_credentials'
}
$authResponse = Invoke-RestMethod -Method Post -Uri $oAuthUri -Body $authBody -ErrorAction Stop
$token = $authResponse.access_token
Out-File -FilePath "./Latest-token.txt" -InputObject $token
return $token
验证令牌
- 运行脚本以生成
Latest-token.txt文件。 - 在 Web 浏览器中,打开 https://jwt.ms/,然后在“在下面输入令牌”框中复制令牌 () 的内容
Latest-token.txt。 - 在“ 解码令牌 ”选项卡上,找到 “角色 ”部分,并验证它是否包含 Alert.Read.All 权限,如下图所示:

获取警报!
- 以下脚本使用
Get-Token.ps1访问 API 并获取过去 48 小时的警报。 - 将此脚本保存在保存上一个脚本
Get-Token.ps1的同一文件夹中。 - 该脚本 (json 和 csv) 创建两个文件,其中数据与脚本位于同一文件夹中。
# Returns Alerts created in the past 48 hours.

$token = ./Get-Token.ps1       #run the script Get-Token.ps1  - make sure you are running this script from the same folder of Get-Token.ps1

# Get Alert from the last 48 hours. Make sure you have alerts in that time frame.
$dateTime = (Get-Date).ToUniversalTime().AddHours(-48).ToString("o")

# The URL contains the type of query and the time filter we created previously.
# Learn more about other query options and filters: https://learn.microsoft.com/defender-endpoint/api/get-alerts.
$url = "https://api.security.microsoft.com/api/alerts?`$filter=alertCreationTime ge $dateTime"

# Set the WebRequest headers
$headers = @{
  'Content-Type' = 'application/json'
  Accept = 'application/json'
  Authorization = "Bearer $token"
}

# Send the web request and get the results.
$response = Invoke-WebRequest -Method Get -Uri $url -Headers $headers -ErrorAction Stop

# Extract the alerts from the results.
$alerts =  ($response | ConvertFrom-Json).value | ConvertTo-Json

# Get string with the execution time. We concatenate that string to the output file to avoid overwrite the file.
$dateTimeForFileName = Get-Date -Format o | foreach {$_ -replace ":", "."}

# Save the result as json and as csv.
$outputJsonPath = "./Latest Alerts $dateTimeForFileName.json"
$outputCsvPath = "./Latest Alerts $dateTimeForFileName.csv"

Out-File -FilePath $outputJsonPath -InputObject $alerts
($alerts | ConvertFrom-Json) | Export-CSV $outputCsvPath -NoTypeInformation
你都完成了! 成功:
- 已创建并注册和应用程序。
- 授予该应用程序读取警报的权限。
- 已连接 API。
- 使用 PowerShell 脚本返回过去 48 小时内创建的警报。
相关文章
- Microsoft Defender for Endpoint API
- 使用应用程序上下文访问Microsoft Defender for Endpoint
- 使用用户上下文访问Microsoft Defender for Endpoint
提示
想要了解更多信息? 请在我们的技术社区中与 Microsoft 安全社区互动:Microsoft Defender for Endpoint 技术社区。