在本快速入门中,你将使用 适用于 MCP 的 C# SDK 创建最小模型上下文协议(MCP)服务器,使用 GitHub Copilot 连接到它,并将其发布到 NuGet(仅限 stdio 传输)。 MCP 服务器是通过模型上下文协议(MCP)向客户端公开功能的服务。
注释
模板 Microsoft.McpServer.ProjectTemplates 包目前为预览版。
先决条件
- .NET 10.0 SDK
- Visual Studio Code (可选)
- C# 开发工具包扩展
- 适用于 Visual Studio Code 的 GitHub Copilot 扩展
- NuGet.org 帐户
- .NET 10.0 SDK
- Visual Studio Code (可选)
- Visual Studio (可选)
- GitHub Copilot / 适用于 Visual Studio Code 的 GitHub Copilot 扩展
- NuGet.org 帐户
创建项目
在终端窗口中,安装 MCP 服务器模板:
dotnet new install Microsoft.McpServer.ProjectTemplates注释
安装
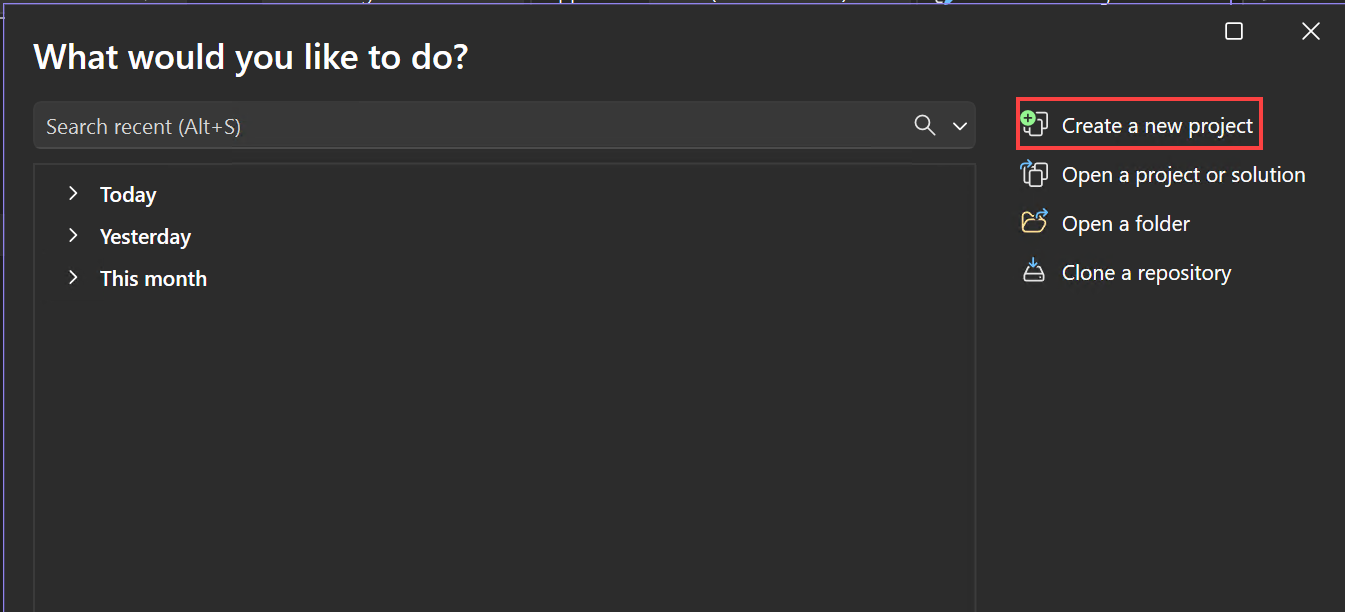
Microsoft.McpServer.ProjectTemplates需要 .NET 10.0 SDK 或更高版本。打开 Visual Studio,然后在“开始”窗口中选择“创建新 项目 ”(或从 Visual Studio 内部选择“ 文件>新建>项目/解决方案 ”)。
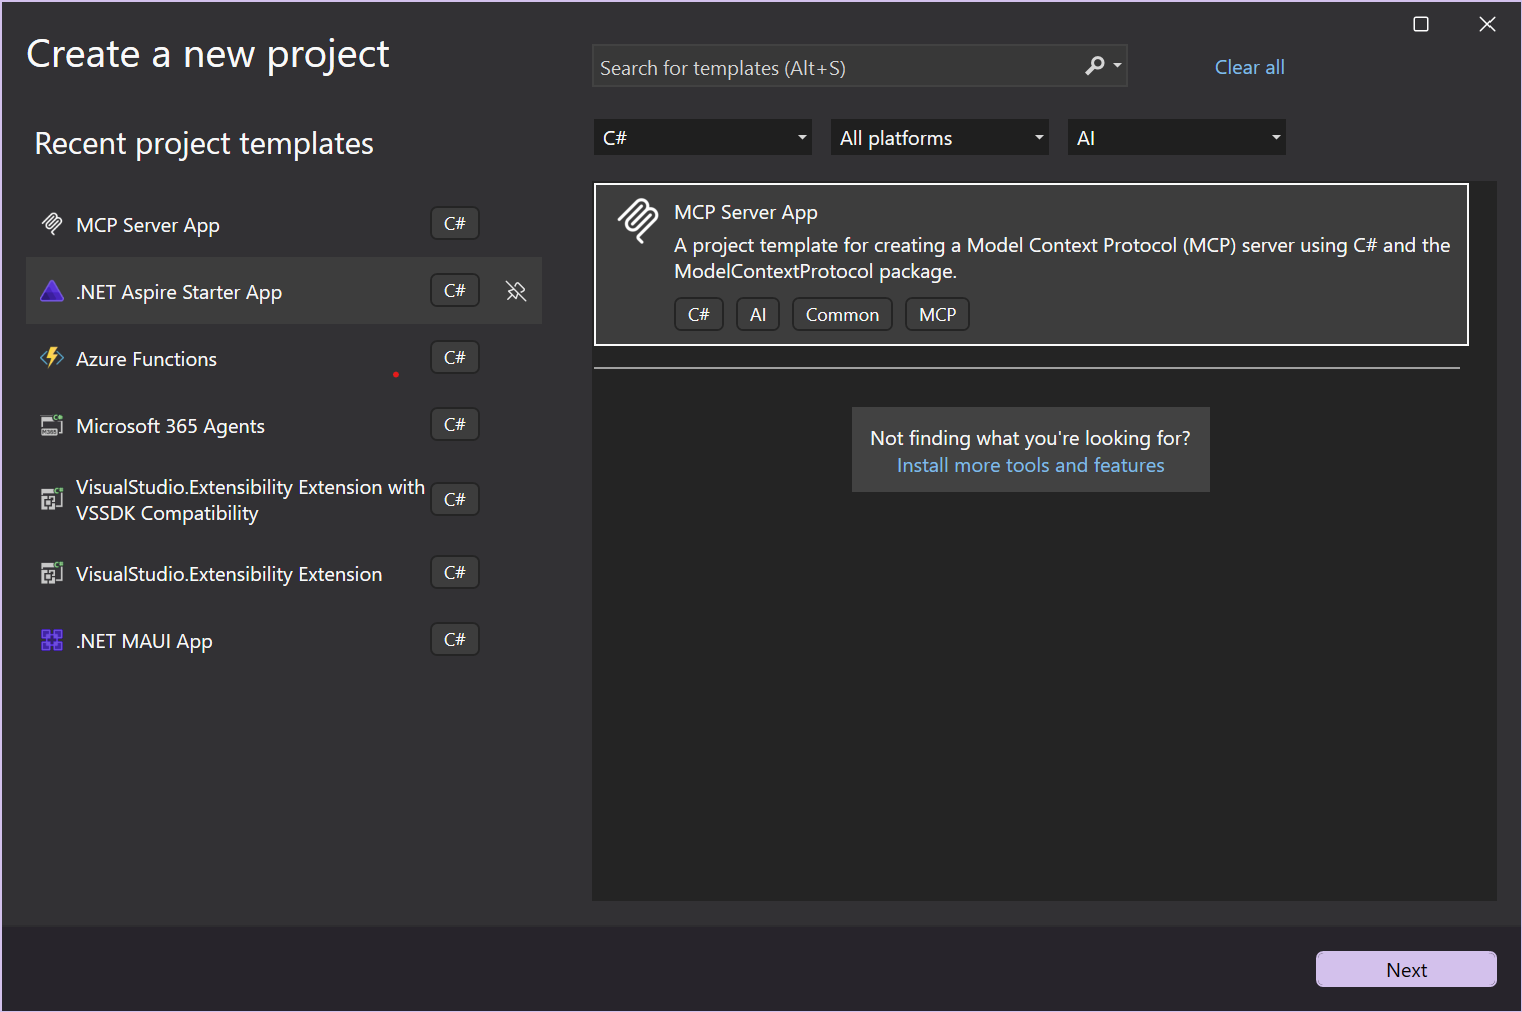
在“创建新项目”窗口中,从“语言”列表和“所有项目类型”列表中选择 AI# 。 应用语言和项目类型筛选器后,选择 MCP 服务器应用 模板,然后选择“ 下一步”。
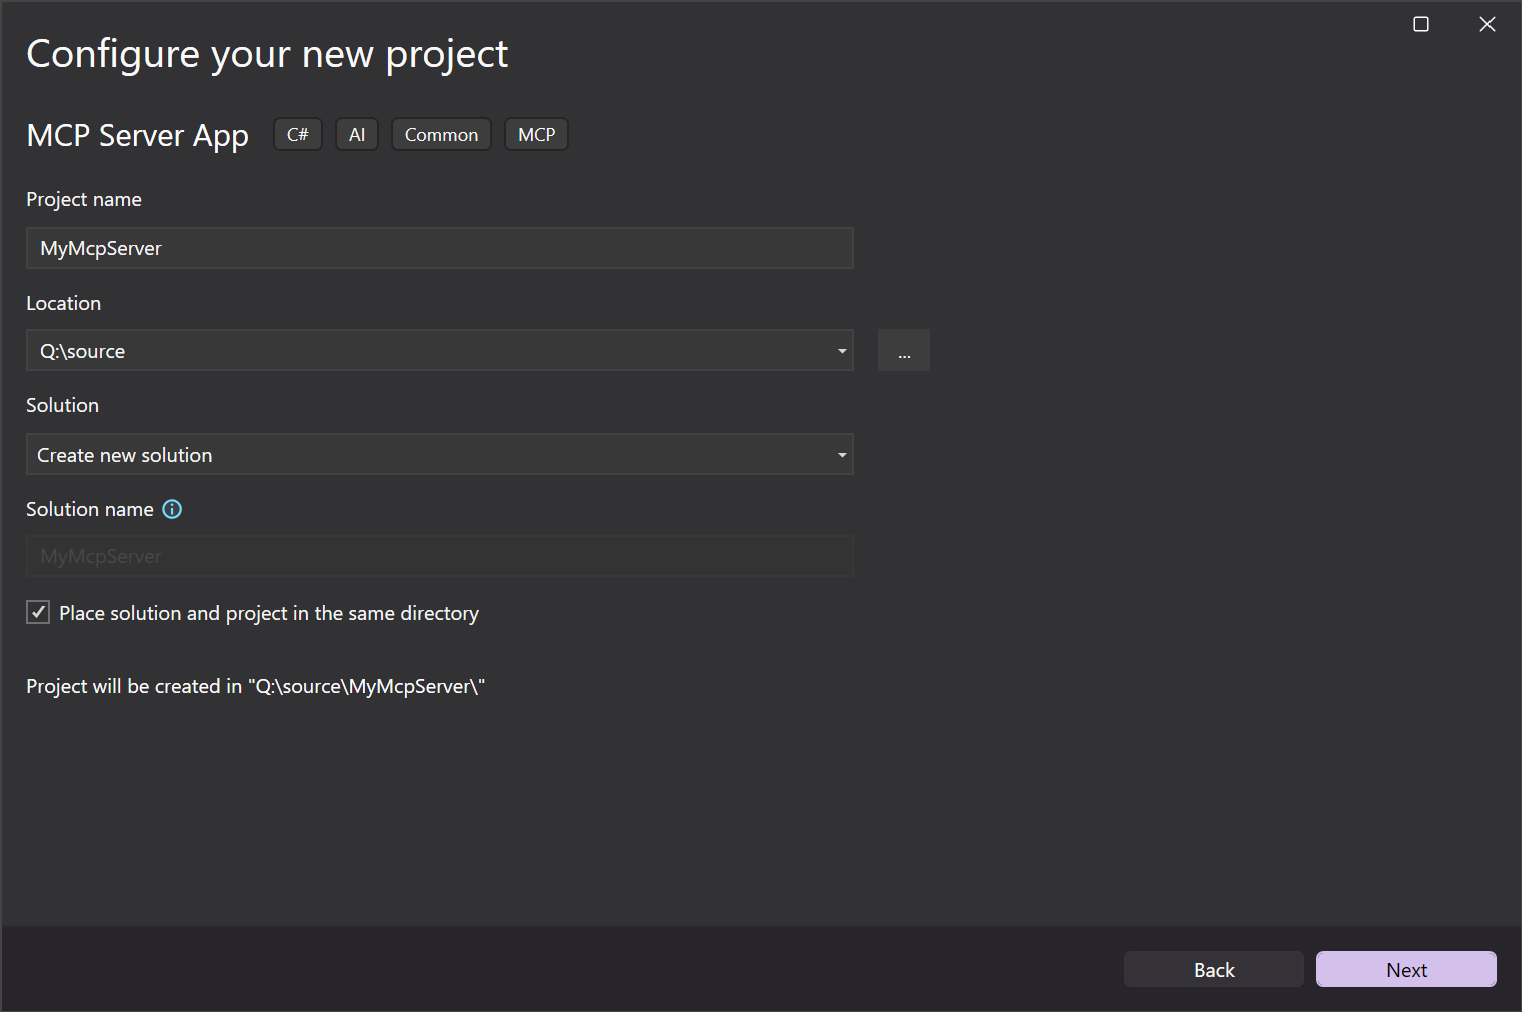
在“配置新项目”窗口中,在“项目名称”字段中输入 MyMcpServer。 然后选择下一步。
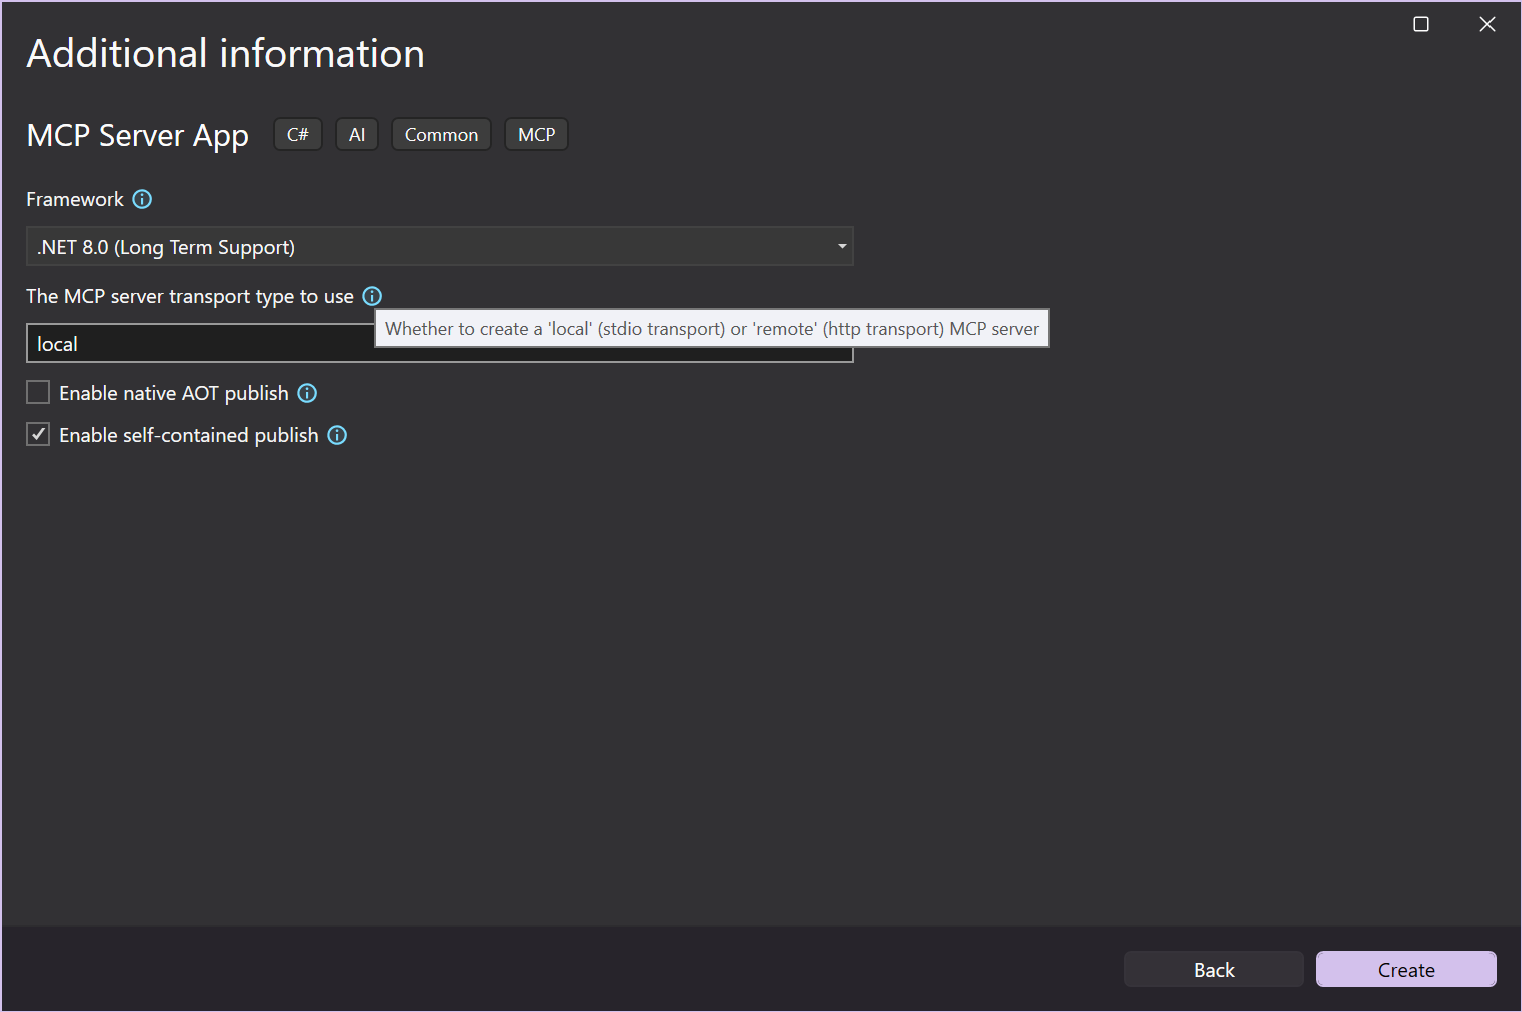
在 “其他信息 ”窗口中,可以配置以下选项:
- 框架:选择目标 .NET Framework。
- MCP 服务器传输类型:在创建 本地 (stdio)或 远程 (http) MCP 服务器之间进行选择。
- 启用本机 AOT(预先编译)发布:使 MCP 服务器能够自足运行并编译为本机代码。 有关详细信息,请参阅 本机 AOT 部署指南。
- 启用自包含发布:允许 MCP 服务器发布为自包含可执行文件。 有关详细信息,请参阅 .NET 应用程序发布指南的“独立部署”部分。
选择首选选项或保留默认选项,然后选择“ 创建”。
Visual Studio 打开了你的新项目。
更新
<PackageId>文件中的.csproj,以便在 NuGet.org 中实现唯一,例如<NuGet.org username>.SampleMcpServer。
在终端窗口中,安装 MCP 服务器模板:
dotnet new install Microsoft.McpServer.ProjectTemplates注释
安装
Microsoft.McpServer.ProjectTemplates需要 .NET 10.0 SDK 或更高版本。打开 Visual Studio Code。
转到 资源管理器 视图,然后选择“ 创建 .NET 项目”。 或者,可以使用 Ctrl+Shift+P (MacOS 上的 Command+Shift+P )打开命令面板,然后键入“.NET”以查找并选择 .NET:新建项目 命令。
此操作将显示 .NET 项目的下拉列表。
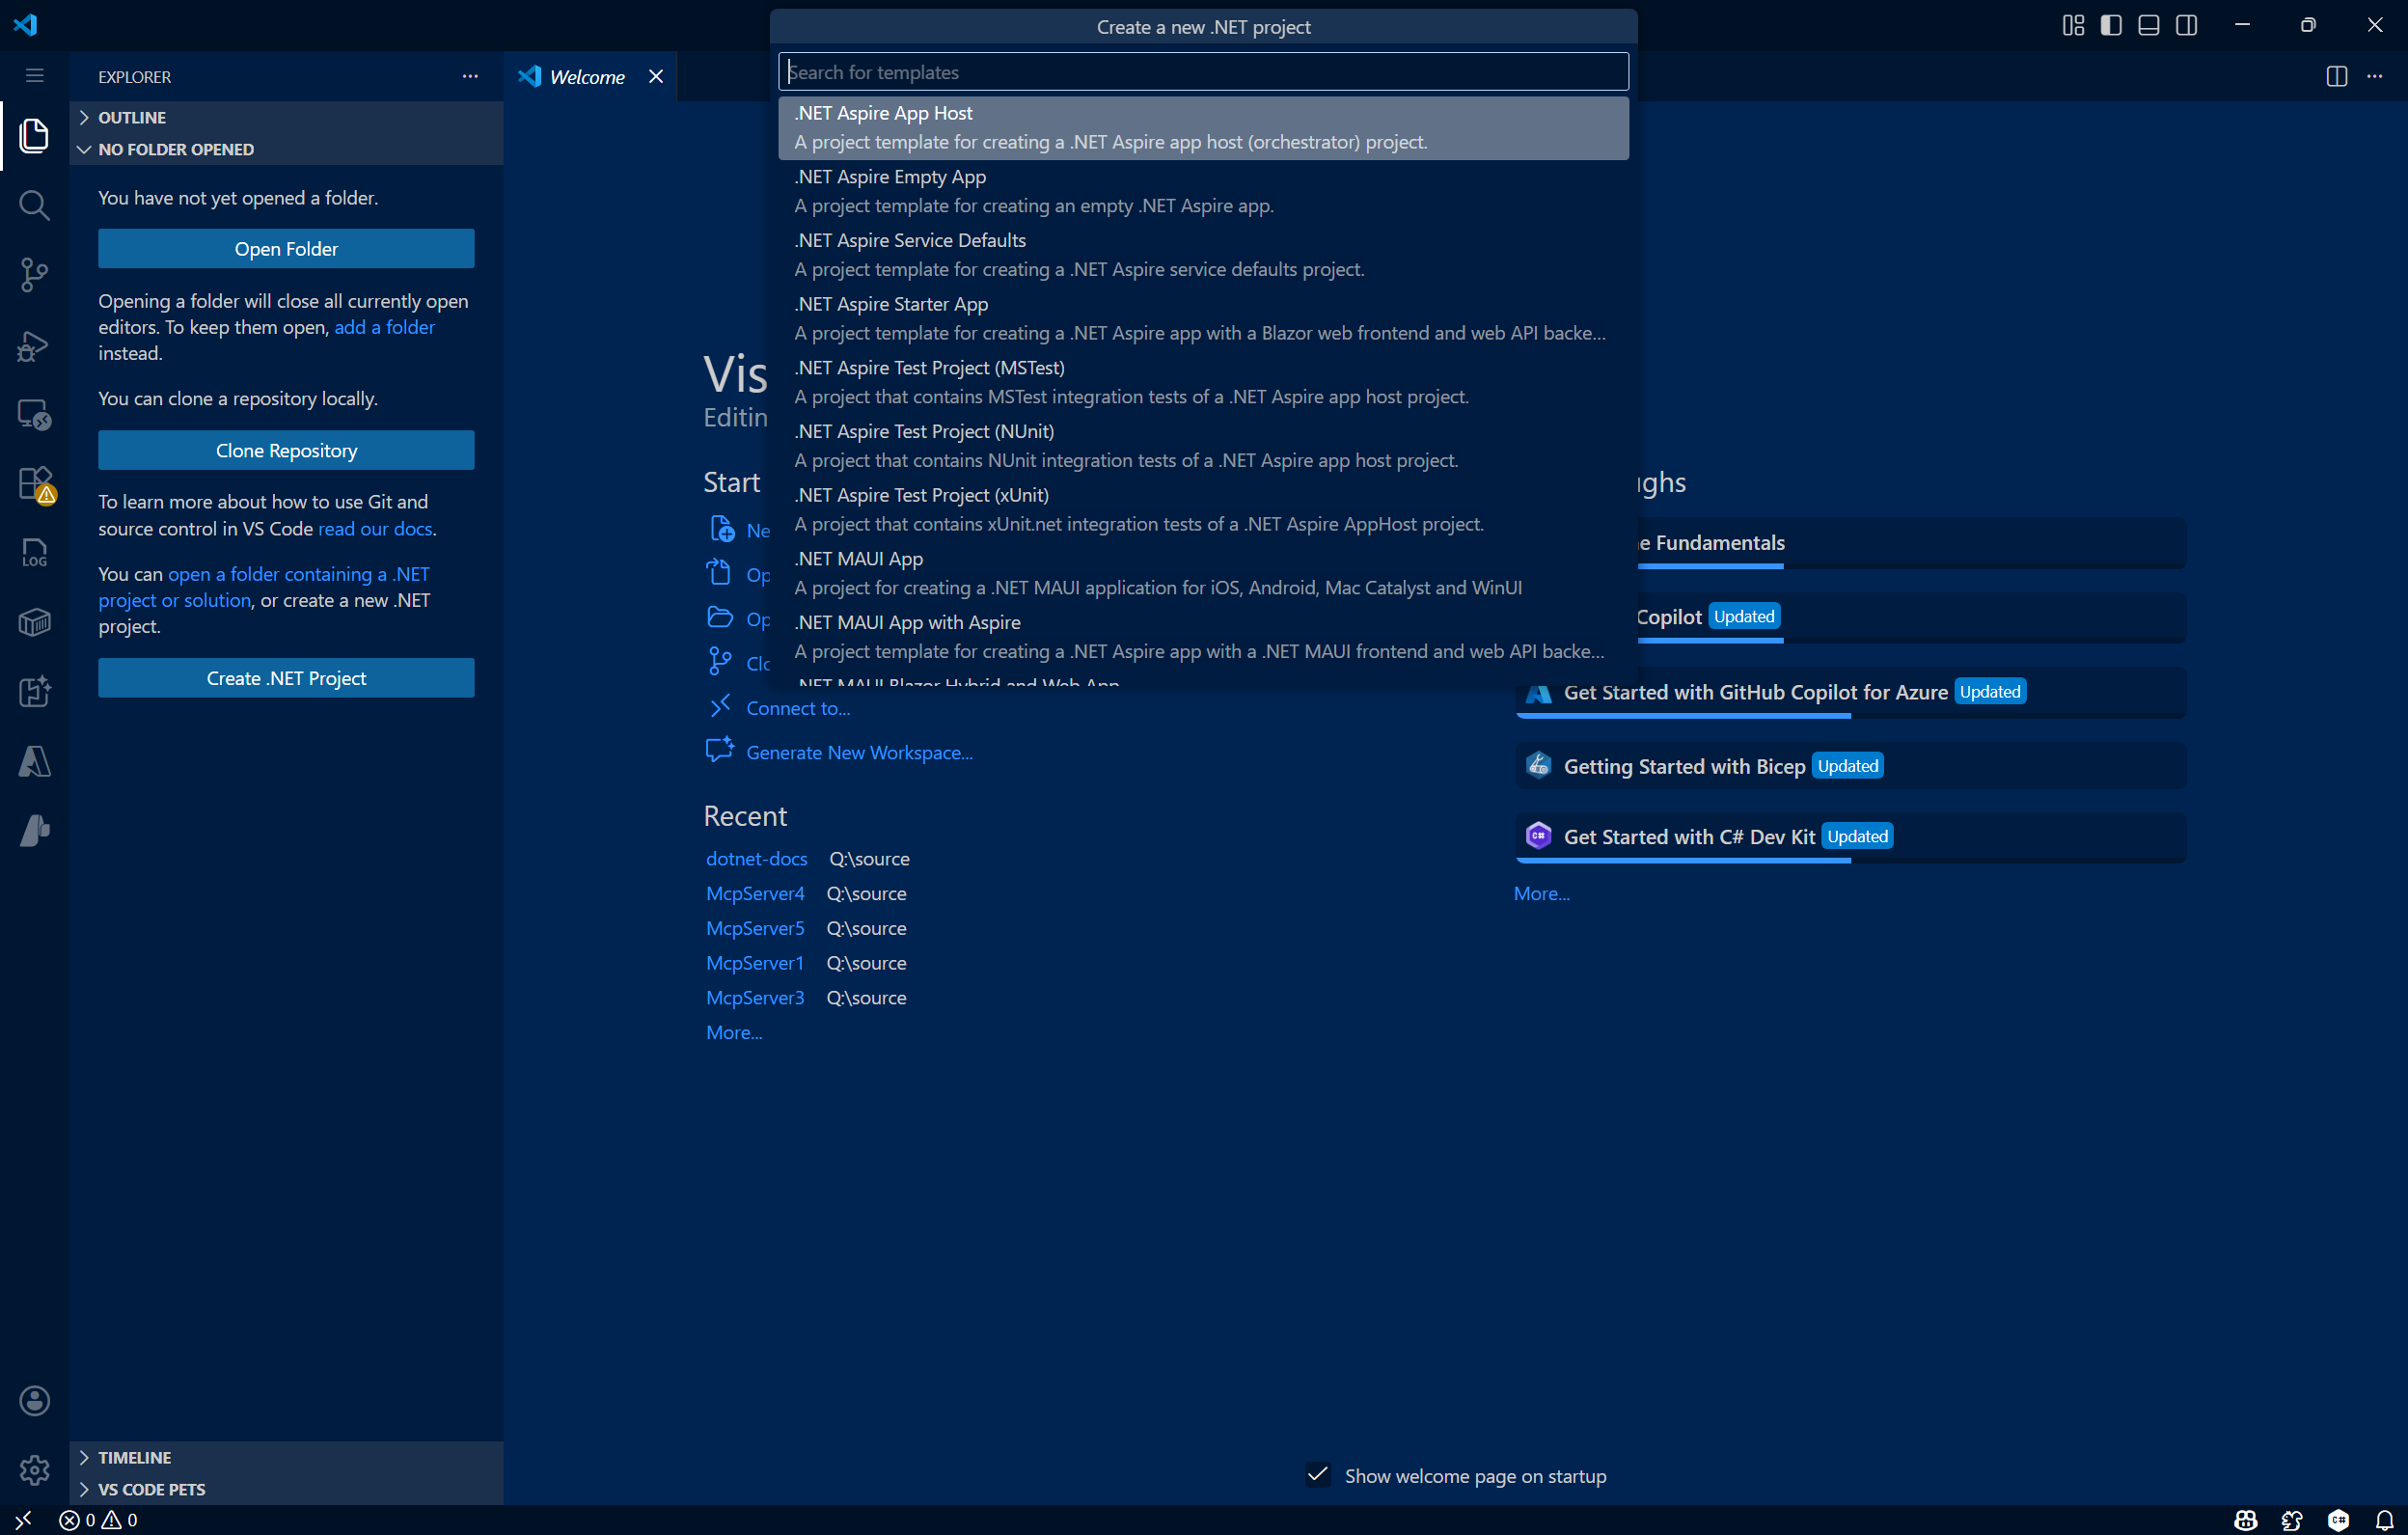
选择命令后,使用命令面板中的搜索栏或向下滚动以找到 MCP 服务器应用 模板。

选择要创建新项目的位置。
为新项目命名 MyMCPServer。 按 Enter。

选择解决方案文件格式(
.sln或.slnx)。选择 模板选项。 在这里,可以配置以下选项:
- 框架:选择目标 .NET Framework。
- MCP 服务器传输类型:在创建 本地 (stdio)或 远程 (http) MCP 服务器之间进行选择。
- 启用本机 AOT(提前编译)发布:使 MCP 服务器能够自包含并编译为本机代码。 有关详细信息,请参阅 本机 AOT 部署指南。
- 启用自包含发布:允许 MCP 服务器发布为自包含可执行文件。 有关详细信息,请参阅 .NET 应用程序发布指南的“独立部署”部分。
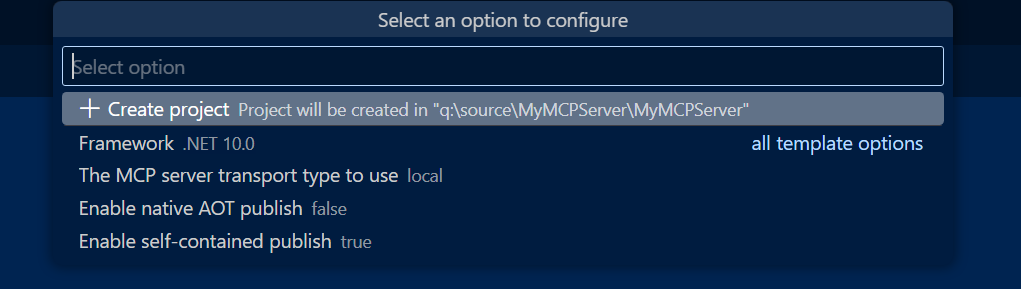
选择首选选项或保留默认选项,然后选择“ 创建项目”。
VS Code 打开新项目。
更新
<PackageId>文件中的.csproj,以便在 NuGet.org 中实现唯一,例如<NuGet.org username>.SampleMcpServer。
使用
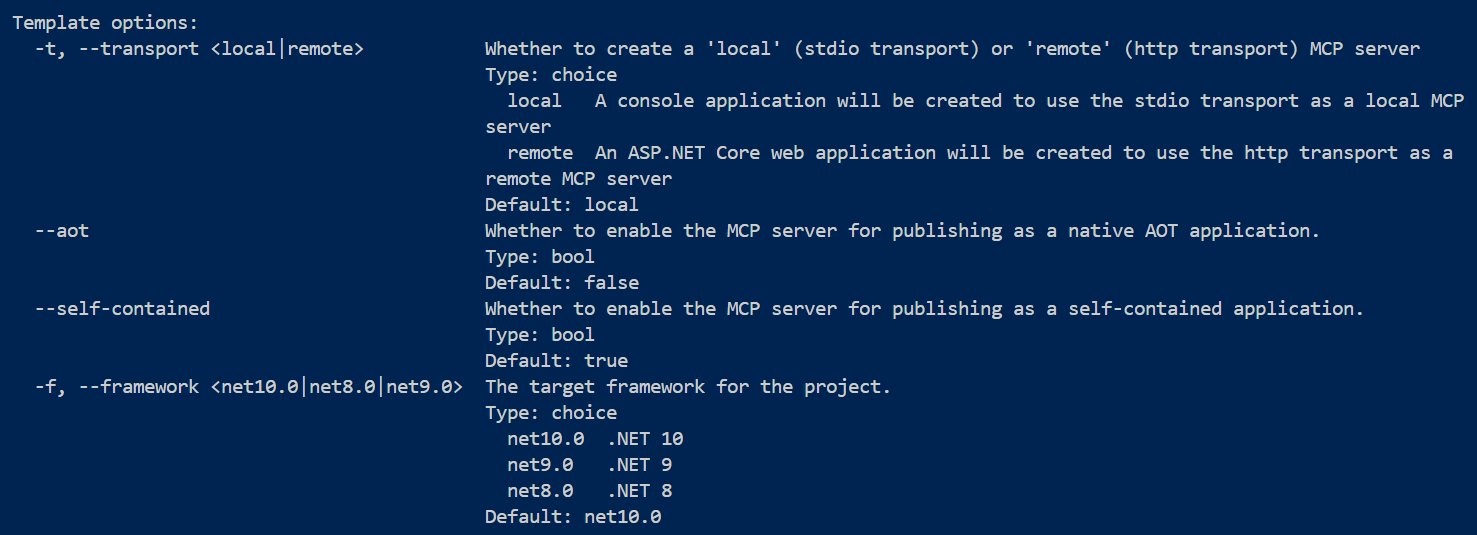
dotnet new mcpserver以下命令创建新的 MCP 服务器应用:dotnet new mcpserver -n SampleMcpServer默认情况下,此命令将创建一个自包含的工具包,该包面向 .NET 支持的所有最常见平台。 若要查看更多选项,请使用
dotnet new mcpserver --help。dotnet new mcpserver --help使用此命令,可以在创建新的 MCP 服务器时添加多个模板选项:- 框架:选择目标 .NET Framework。
- MCP 服务器传输类型:在创建 本地 (stdio)或 远程 (http) MCP 服务器之间进行选择。
- 启用本机 AOT(提前编译)发布:使 MCP 服务器能够自包含并编译为本机代码。 有关详细信息,请参阅 本机 AOT 部署指南。
- 启用自包含发布:允许 MCP 服务器发布为自包含可执行文件。 有关详细信息,请参阅 .NET 应用程序发布指南的“独立部署”部分。
导航到
SampleMcpServer目录:cd SampleMcpServer生成项目:
dotnet build更新
<PackageId>文件中的.csproj,以便在 NuGet.org 中实现唯一,例如<NuGet.org username>.SampleMcpServer。
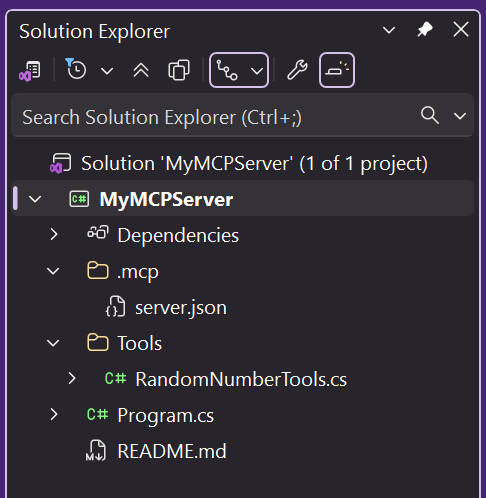
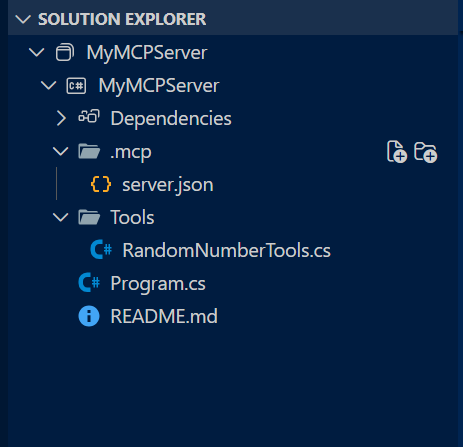
浏览 MCP 服务器项目
通过模板创建 MCP 服务器项目带给您以下主要文件:
-
Program.cs:将应用程序定义为 MCP 服务器并注册 MCP 服务(如传输类型和 MCP 工具)的文件。- 在创建项目时选择(默认)stdio 传输选项,此文件将配置为将 MCP 服务器定义为本地服务器(即)。
.withStdioServerTransport() - 选择 http 传输选项会将此文件配置为包含远程传输特定的定义(即,
.withHttpServerTransport()MapMcp())。
- 在创建项目时选择(默认)stdio 传输选项,此文件将配置为将 MCP 服务器定义为本地服务器(即)。
-
RandomNumberTools.cs:定义示例 MCP 服务器工具的类,用于返回用户指定的最小值/最大值之间的随机数。 -
[仅 HTTP 传输]
[MCPServerName].http:定义 HTTP MCP 服务器的默认主机地址并 JSON-RPC 通信的文件。 -
server.json:一个文件,用于定义 MCP 服务器的发布方式和位置。
配置 MCP 服务器
将 GitHub Copilot for Visual Studio 配置为使用自定义 MCP 服务器。
在 Visual Studio 中,选择右上角的 GitHub Copilot 图标,然后选择“ 打开聊天窗口”。
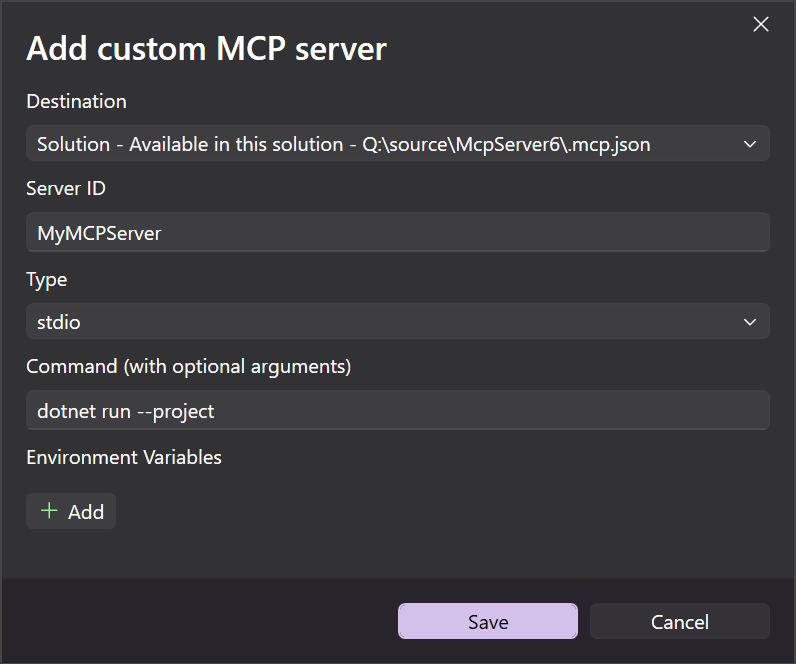
在 GitHub Copilot 聊天窗口中,单击“选择工具”扳手图标,然后单击右上角的加号图标。
在 “添加自定义 MCP 服务器 ”对话框窗口中,输入以下信息:
-
目标:选择配置 MCP 服务器的范围:
- 解决方案 - MCP 服务器仅在活动解决方案中可用。
- 全局 - MCP 服务器在所有解决方案中都可用。
- 服务器 ID:MCP 服务器的唯一名称/标识符。
- 类型:MCP 服务器的传输类型(stdio 或 HTTP)。
-
命令(仅限 Stdio 传输):用于运行 stdio MCP 服务器的命令(即
dotnet run --project [relative path to .csproj file]) - URL (仅限 HTTP 传输):HTTP MCP 服务器的地址
- 环境变量(可选)
-
目标:选择配置 MCP 服务器的范围:
选择“保存”。
.mcp.json文件将添加到指定的位置。
Stdio Transport .mcp.json
在“args”字段下为.csproj文件添加相对路径。
{
  "inputs": [],
  "servers": {
    "MyMcpServer": {
      "type": "stdio",
      "command": "dotnet",
      "args": [
        "run",
        "--project",
        "<relative-path-to-project-file>"
      ]
    }
  }
}
HTTP 传输 .mcp.json
{
 "inputs": [],
  "servers": {
    "MyMCPServer": {
      "url": "http://localhost:6278",
      "type": "http",
      "headers": {}
    }
  }
}
将 GitHub Copilot for Visual Studio Code 配置为通过 VS Code 命令面板或手动使用自定义 MCP 服务器。
命令面板配置
使用 Ctrl+Shift+P 打开命令面板(macOS 上的 Command+Shift+P )。 搜索“mcp”以找到
MCP: Add Server命令。选择要添加的 MCP 服务器类型(通常是在创建项目时选择的传输类型)。
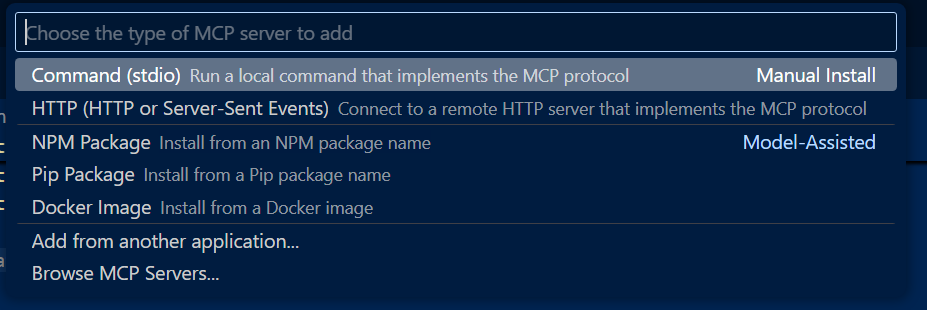
如果添加 stdio MCP 服务器,请输入命令和可选参数。 对于此示例,请使用
dotnet run --project。如果添加 HTTP MCP 服务器,请输入 localhost 或 Web 地址。
输入唯一的服务器 ID(例如:“MyMCPServer”)。
选择配置目标:
全局:使 MCP 服务器在所有工作区中可用。 生成的
mcp.json文件将显示在全局用户配置下。工作区:使 MCP 服务器仅在当前工作区中可用。 生成的
mcp.json文件将显示在工作区的.vscode文件夹下。

完成上述步骤后,将会在配置目标指定的位置创建一个
.mcp.json文件。
Stdio Transport mcp.json
在“args”字段下为.csproj文件添加相对路径。
{
  "servers": {
    "MyMcpServer": {
      "type": "stdio",
      "command": "dotnet",
      "args": [
        "run",
        "--project",
        "<relative-path-to-project-file>"
      ]
    }
  }
}
HTTP 传输 mcp.json
{
  "servers": {
    "MyMCPServer": {
      "url": "http://localhost:6278",
      "type": "http"
    }
  },
  "inputs": []
}
手动配置
在项目的根目录中创建文件夹
.vscode。在
mcp.json文件夹中添加一个.vscode文件,内容如下:{ "servers": { "SampleMcpServer": { "type": "stdio", "command": "dotnet", "args": [ "run", "--project", "<relative-path-to-project-file>" ] } } }注释
VS Code 从工作区根目录执行 MCP 服务器。
<relative-path-to-project-file>占位符应指向您的 .NET 项目文件。 例如,此示例 McpServer 应用的值将是SampleMcpServer.csproj。保存文件。
测试 MCP 服务器
MCP 服务器模板包括一个名为 get_random_number 的工具,可用于测试以及作为开发的起点。
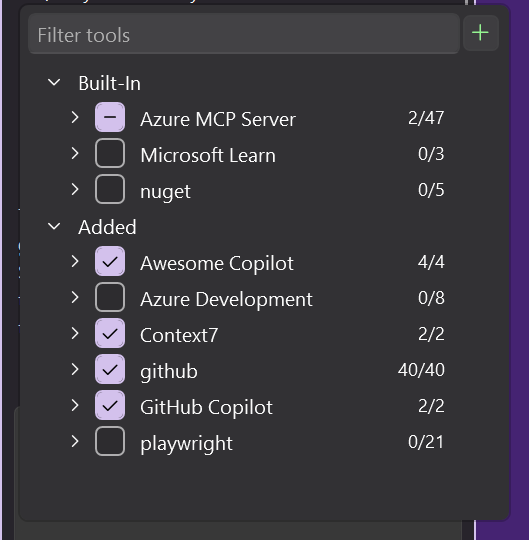
在 Visual Studio 中打开 GitHub Copilot 聊天并切换到 代理 模式。
选择 “选择工具 ”图标,验证 MyMCPServer 是否在列出的示例工具中可用。
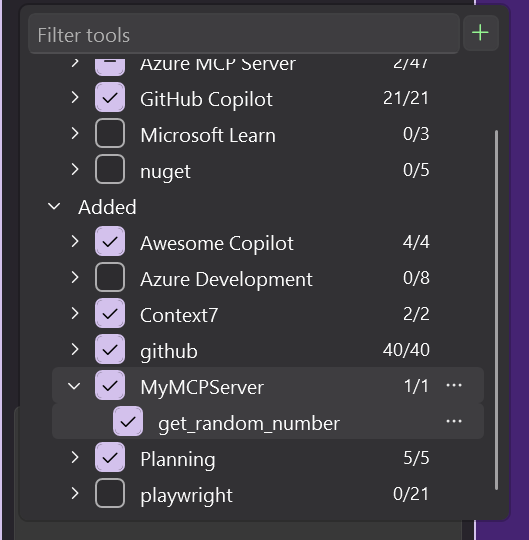
输入运行 get_random_number 工具的提示:
Give me a random number between 1 and 100.GitHub Copilot 请求获取权限以运行针对提示的 get_random_number 工具。 选择 “继续 ”或使用箭头选择更具体的行为:
- 当前会话 始终在当前 GitHub Copilot 代理模式会话中运行作。
- 当前解决方案 始终运行当前 VS 解决方案的命令。
- 始终允许 将操作设置为始终针对任何 GitHub Copilot 代理模式会话运行。
验证服务器是否使用随机数进行响应:
Your random number is 42.
MCP 服务器模板包括一个名为 get_random_number 的工具,可用于测试以及作为开发的起点。
在 VS Code 中打开 GitHub Copilot 聊天并切换到 代理 模式。
选择 “选择工具 ”图标,验证 MyMCPServer 是否在列出的示例工具中可用。
输入运行 get_random_number 工具的提示:
Give me a random number between 1 and 100.GitHub Copilot 请求获取权限以运行针对提示的 get_random_number 工具。 选择 “继续 ”或使用箭头选择更具体的行为:
- 当前会话 始终在当前 GitHub Copilot 代理模式会话中运行作。
- 当前工作区 始终运行当前 VS Code 工作区的命令。
- 始终允许 将操作设置为始终针对任何 GitHub Copilot 代理模式会话运行。
验证服务器是否使用随机数进行响应:
Your random number is 42.
添加输入和配置选项
在此示例中,将增强 MCP 服务器以使用环境变量中设置的配置值。 这可能是 MCP 服务器正常运行所需的配置,例如 API 密钥、要连接到的终结点或本地目录路径。
在
GetRandomNumber中的Tools/RandomNumberTools.cs方法后,添加另一个工具方法。 更新工具代码以使用环境变量。[McpServerTool] [Description("Describes random weather in the provided city.")] public string GetCityWeather( [Description("Name of the city to return weather for")] string city) { // Read the environment variable during tool execution. // Alternatively, this could be read during startup and passed via IOptions dependency injection var weather = Environment.GetEnvironmentVariable("WEATHER_CHOICES"); if (string.IsNullOrWhiteSpace(weather)) { weather = "balmy,rainy,stormy"; } var weatherChoices = weather.Split(","); var selectedWeatherIndex = Random.Shared.Next(0, weatherChoices.Length); return $"The weather in {city} is {weatherChoices[selectedWeatherIndex]}."; }将
.vscode/mcp.json更新为设置WEATHER_CHOICES环境变量以进行测试。{ "servers": { "SampleMcpServer": { "type": "stdio", "command": "dotnet", "args": [ "run", "--project", "<relative-path-to-project-file>" ], "env": { "WEATHER_CHOICES": "sunny,humid,freezing" } } } }在 VS Code 中使用 Copilot 尝试另一个提示,例如:
What is the weather in Redmond, Washington?VS Code 应返回随机天气说明。
更新
.mcp/server.json以声明您的环境变量输入。 文件server.json架构由 MCP 注册表项目 定义,NuGet.org 用于生成 VS Code MCP 配置。使用
environmentVariables属性声明应用程序的环境变量,这些变量将由客户端使用 MCP 服务器(例如 VS Code)来设置。使用该
packageArguments属性定义将传递给应用的 CLI 参数。 有关更多示例,请参阅 MCP 注册表项目。
{
  "$schema": "https://static.modelcontextprotocol.io/schemas/2025-10-17/server.schema.json",
  "description": "<your description here>",
  "name": "io.github.<your GitHub username here>/<your repo name>",
  "version": "<your package version here>",
  "packages": [
    {
      "registryType": "nuget",
      "registryBaseUrl": "https://api.nuget.org",
      "identifier": "<your package ID here>",
      "version": "<your package version here>",
      "transport": {
        "type": "stdio"
      },
      "packageArguments": [],
      "environmentVariables": [
        {
          "name": "WEATHER_CHOICES",
          "value": "{weather_choices}",
          "variables": {
            "weather_choices": {
              "description": "Comma separated list of weather descriptions to randomly select.",
              "isRequired": true,
              "isSecret": false
            }
          }
        }
      ]
    }
  ],
  "repository": {
    "url": "https://github.com/<your GitHub username here>/<your repo name>",
    "source": "github"
  }
}
NuGet.org 在
server.json中使用的唯一信息是第一个packages数组项,该项的registryType值与nuget匹配。 除了该属性之外的其他顶级属性packages当前未使用,并且适用于即将推出的中央 MCP 注册表。 可以保留占位符值,直到 MCP 注册表处于活动状态并准备好接受 MCP 服务器条目。
在继续之前,可以 再次测试 MCP 服务器 。
打包并发布到 NuGet
打包项目:
dotnet pack -c Release此命令基于列表中的
<RuntimeIdentifiers>列表生成一个工具包和多个特定于平台的SampleMcpServer.csproj包。将包发布到 NuGet:
dotnet nuget push bin/Release/*.nupkg --api-key <your-api-key> --source https://api.nuget.org/v3/index.json请务必发布所有
.nupkg文件,以确保每个受支持的平台都可以运行 MCP 服务器。如果要在发布到 NuGet.org 之前测试发布流程,可以在 NuGet Gallery 集成环境中注册帐户:https://int.nugettest.org命令会被修改为:
pushdotnet nuget push bin/Release/*.nupkg --api-key <your-api-key> --source https://apiint.nugettest.org/v3/index.json
有关详细信息,请参阅 发布包。
发现 NuGet.org 上的 MCP 服务器
在 NuGet.org 上搜索您的 MCP 服务器包(如果是发布到集成环境,则在 int.nugettest.org 上搜索),并从列表中选择它。
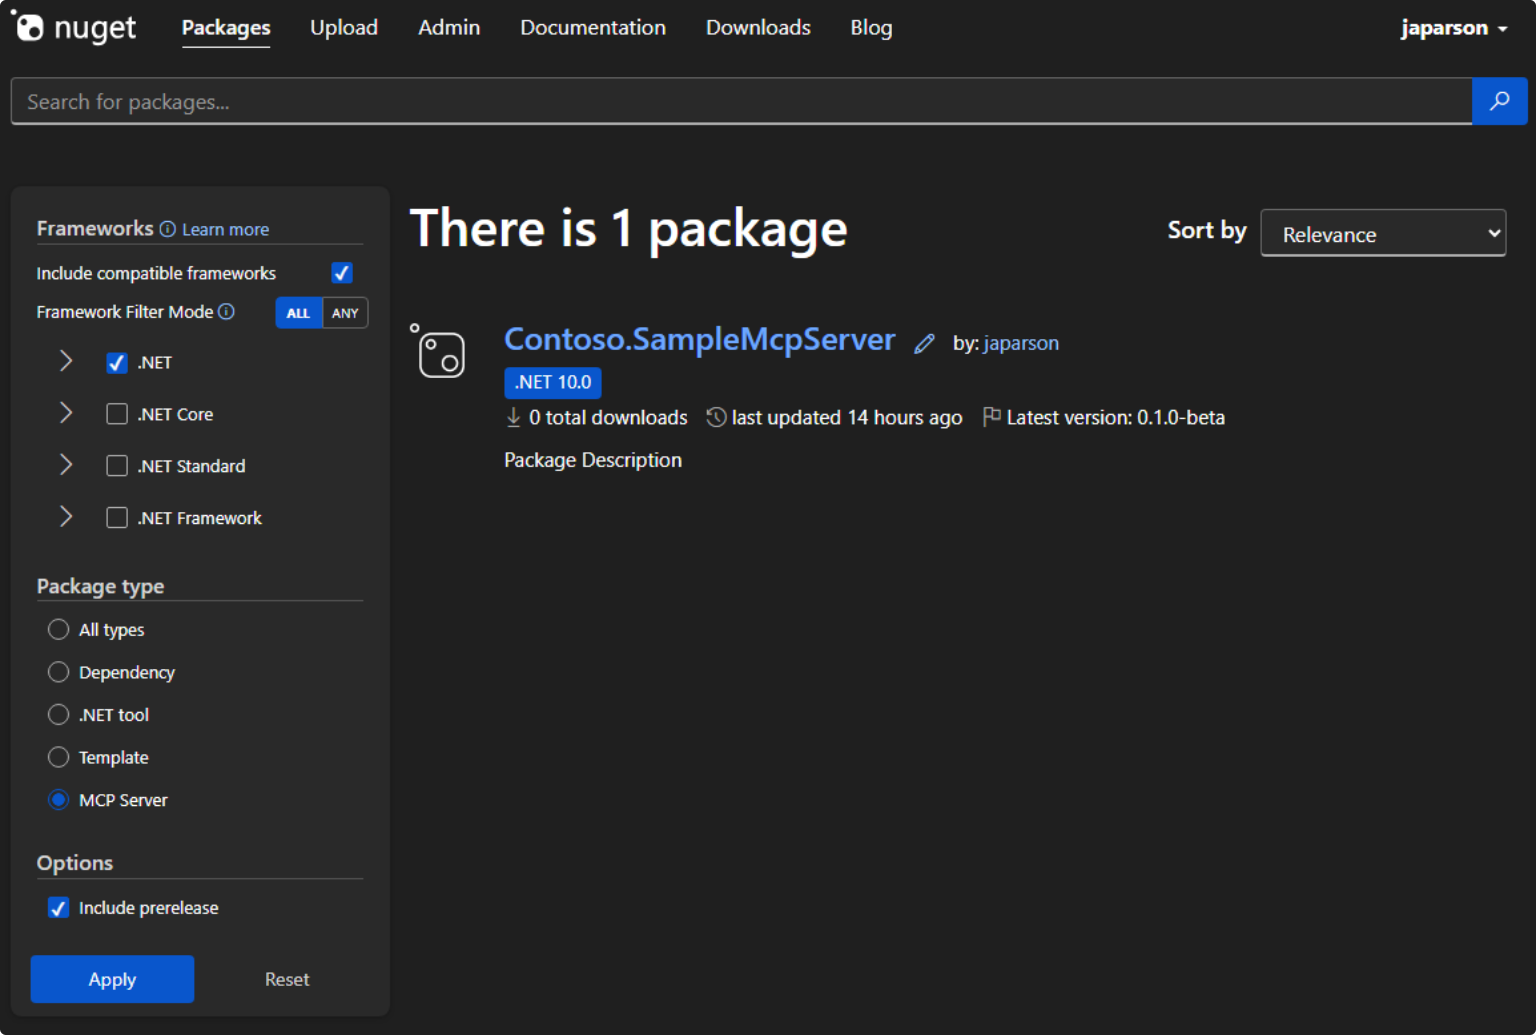
查看包详细信息,并从“MCP 服务器”选项卡中复制 JSON。
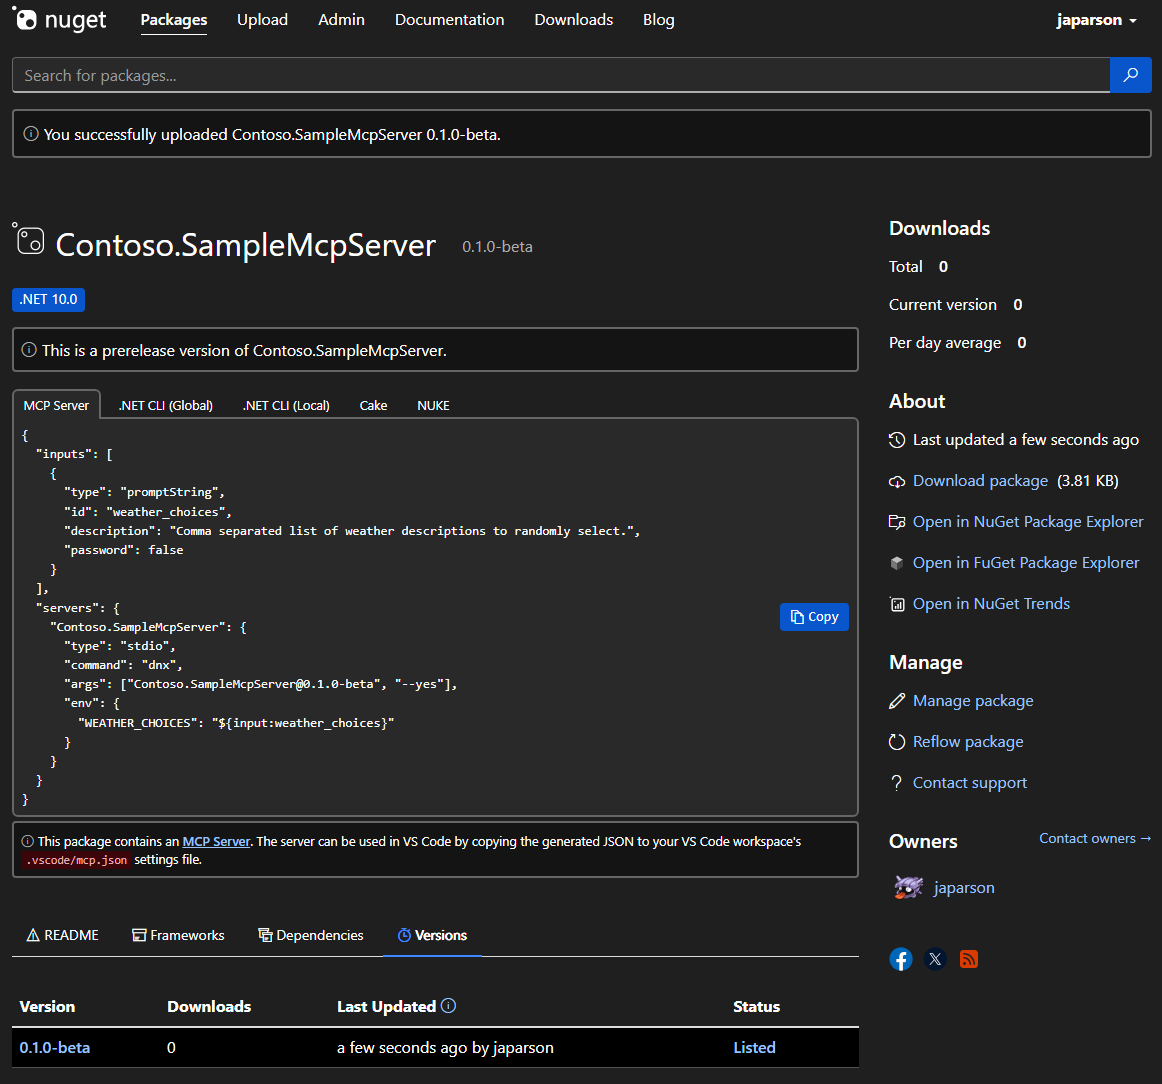
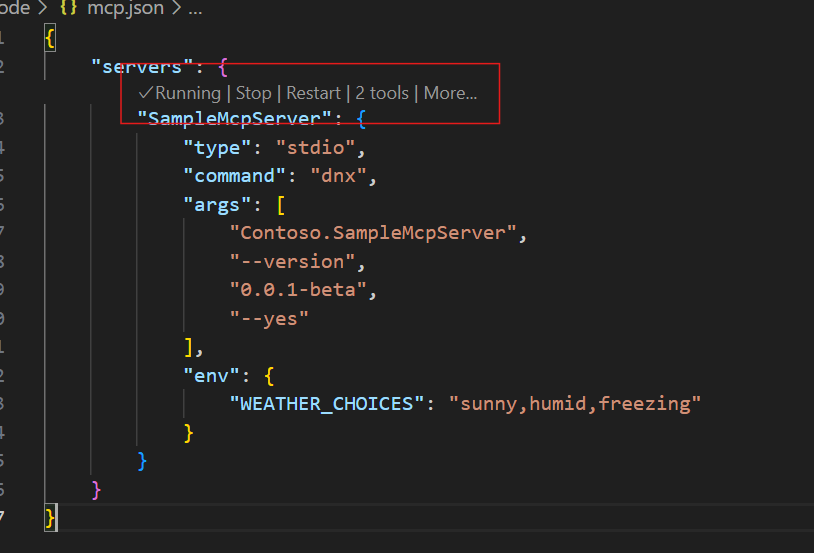
在
mcp.json文件夹中的.vscode文件中,添加复制的 JSON,如下所示:{ "inputs": [ { "type": "promptString", "id": "weather_choices", "description": "Comma separated list of weather descriptions to randomly select.", "password": false } ], "servers": { "Contoso.SampleMcpServer": { "type": "stdio", "command": "dnx", "args": ["Contoso.SampleMcpServer@0.0.1-beta", "--yes"], "env": { "WEATHER_CHOICES": "${input:weather_choices}" } } } }如果发布到 NuGet Gallery 集成环境中,则需要在
"--add-source", "https://apiint.nugettest.org/v3/index.json"数组末尾添加"args"。保存文件。
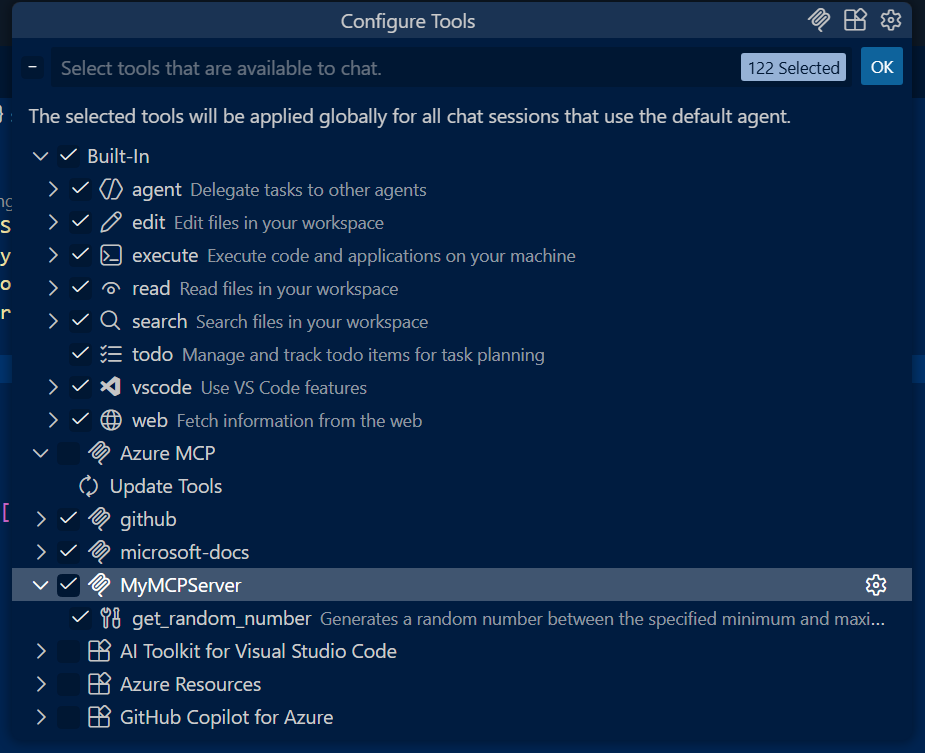
在 GitHub Copilot 中,选择 “选择工具 ”图标以验证 SampleMcpServer 是否可用于列出的工具。
输入运行新 get_city_weather 工具的提示:
What is the weather in Redmond?如果将输入添加到 MCP 服务器(例如
WEATHER_CHOICES),系统会提示您提供数值。验证服务器是否响应随机天气:
The weather in Redmond is balmy.
常见问题
找不到运行 SampleMcpServer 所需的命令“dnx”
如果 VS Code 在启动 MCP 服务器时显示此错误,则需要安装兼容版本的 .NET SDK。
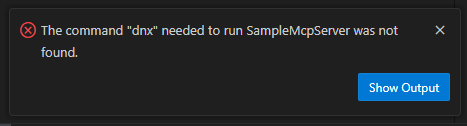
该 dnx 命令作为 .NET SDK 的一部分提供,从版本 10 开始。
安装 .NET 10 SDK 以解决此问题。
GitHub Copilot 不使用你的工具(提供答案而不调用你的工具)
通常而言,会告知 GitHub Copilot 这样的 AI 代理,其某些工具由客户端应用程序(例如 VS Code)提供。 某些工具(如示例随机数工具)可能不会被 AI 代理利用,因为它内置了类似的功能。
如果您的工具未被使用,请检查以下步骤:
- 验证工具是否显示在 VS Code 已启用的工具列表中。 有关如何检查此问题 ,请参阅“测试 MCP 服务器 ”中的屏幕截图。
- 在提示中显式引用工具的名称。 在 VS Code 中,可以按名称引用工具。 例如,
Using #get_random_weather, what is the weather in Redmond?。 - 验证 MCP 服务器是否能够启动。 可以通过单击 VS Code 用户或工作区设置中 MCP 服务器配置上方可见的“开始”按钮进行检查。