数据绑定和 MVVM
 浏览示例
浏览示例模型-视图-视图模型 (MVVM) 模式将三个软件层隔离:XAML 用户界面(视图)、基础数据(模型)以及视图与模型之间的中介(视图模型)。 视图和视图模型通常通过 XAML 中定义的数据绑定进行连接。 视图的 BindingContext 通常是视图模型的实例。
重要说明
.NET Multi-platform App UI (.NET MAUI) 将绑定更新封送到 UI 线程。 使用 MVVM 时,可以从任何线程更新数据绑定视图模型属性,.NET MAUI 的绑定引擎会将这些更新引入 UI 线程。
实现 MVVM 模式有多种方法,而本文重点介绍一种简单方法。 该方法使用视图和视图模型(而非模型),只关注这两个层之间的数据绑定。 有关在 .NET MAUI 中使用 MVVM 模式的详细说明,请参阅使用 .NET MAUI 的企业应用程序模式中的模型-视图-视图模型 (MVVM)。 有关指导实现 MVVM 模式的教程,请参阅使用 MVVM 概念完成应用升级。
简单 MVVM
在 XAML 标记扩展中,你已了解如何定义新的 XML 命名空间声明,使 XAML 文件能够引用其他程序集中的类。 以下示例使用 x:Static 标记扩展从 System 命名空间中的静态 DateTime.Now 属性获取当前日期和时间:
<ContentPage xmlns="http://schemas.microsoft.com/dotnet/2021/maui"
             xmlns:x="http://schemas.microsoft.com/winfx/2009/xaml"
             xmlns:sys="clr-namespace:System;assembly=netstandard"
             x:Class="XamlSamples.OneShotDateTimePage"
             Title="One-Shot DateTime Page">

    <VerticalStackLayout BindingContext="{x:Static sys:DateTime.Now}"
                         Spacing="25" Padding="30,0"
                         VerticalOptions="Center" HorizontalOptions="Center">

        <Label Text="{Binding Year, StringFormat='The year is {0}'}" />
        <Label Text="{Binding StringFormat='The month is {0:MMMM}'}" />
        <Label Text="{Binding Day, StringFormat='The day is {0}'}" />
        <Label Text="{Binding StringFormat='The time is {0:T}'}" />

    </VerticalStackLayout>

</ContentPage>
在此示例中,检索到的 DateTime 值设置为 StackLayout 上的 BindingContext。 在一个元素上设置 BindingContext 时,该元素的所有子级都会继承它。 这意味着 StackLayout 的所有子级都具有相同的 BindingContext,并且它们可包含对该对象属性的绑定:
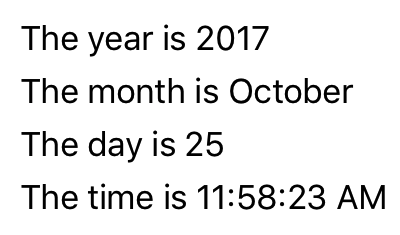
但问题是,日期和时间是在页面构造和初始化时一次性设置的,是固定不变的。
XAML 页面可显示始终反映当前时间的时钟,但这需要额外代码。 当将视觉对象与基础数据的属性进行数据绑定时,会自然而然为 .NET MAUI 应用选择 MVVM 模式。 从 MVVM 角度来看,模型和视图模型是完全在代码中编写的类。 而视图通常是一个 XAML 文件,通过数据绑定引用视图模型中定义的属性。 在 MVVM 中,模型对视图模型无感知,视图模型对视图无感知。 但通常会根据与 UI 关联的类型来确定视图模型公开的类型。
注意
在简单的 MVVM 示例中,例如本文中的示例,通常完全没有模型,并且该模式只涉及与数据绑定链接的视图和视图模型。
以下示例演示一个时钟的视图模型,其中包含一个名为 DateTime 的属性,该属性每秒更新一次:
using System.ComponentModel;
using System.Runtime.CompilerServices;

namespace XamlSamples;

class ClockViewModel: INotifyPropertyChanged
{
    public event PropertyChangedEventHandler PropertyChanged;

    private DateTime _dateTime;
    private Timer _timer;

    public DateTime DateTime
    {
        get => _dateTime;
        set
        {
            if (_dateTime != value)
            {
                _dateTime = value;
                OnPropertyChanged(); // reports this property
            }
        }
    }

    public ClockViewModel()
    {
        this.DateTime = DateTime.Now;

        // Update the DateTime property every second.
        _timer = new Timer(new TimerCallback((s) => this.DateTime = DateTime.Now),
                           null, TimeSpan.Zero, TimeSpan.FromSeconds(1));
    }

    ~ClockViewModel() =>
        _timer.Dispose();

    public void OnPropertyChanged([CallerMemberName] string name = "") =>
        PropertyChanged?.Invoke(this, new PropertyChangedEventArgs(name));
}
视图模型通常实现 INotifyPropertyChanged 接口,该接口可让类在其任何一个属性发生更改时引发 PropertyChanged 事件。 .NET MAUI 中的数据绑定机制向此 PropertyChanged 事件附加一个处理程序,这样当有属性发生更改时,它就会收到通知,并用新值更新目标。 在上面的代码示例中,OnPropertyChanged 方法负责引发事件,同时自动确定属性源名:DateTime。
下面的示例显示使用 ClockViewModel 的 XAML:
<ContentPage xmlns="http://schemas.microsoft.com/dotnet/2021/maui"
             xmlns:x="http://schemas.microsoft.com/winfx/2009/xaml"
             xmlns:local="clr-namespace:XamlSamples"
             x:Class="XamlSamples.ClockPage"
             Title="Clock Page">
    <ContentPage.BindingContext>
        <local:ClockViewModel />
    </ContentPage.BindingContext>

    <Label Text="{Binding DateTime, StringFormat='{0:T}'}"
           FontSize="18"
           HorizontalOptions="Center"
           VerticalOptions="Center" />
</ContentPage>
在此示例中,ClockViewModel 通过属性元素标记设置为 ContentPage 的 BindingContext。 或可由代码隐藏文件将视图模型实例化。
Label 的 Text 属性上的 Binding 标记扩展对 DateTime 属性进行格式化。 以下屏幕截图显示了结果:

此外,还可通过用句号分隔属性来访问视图模型 DateTime 属性的各属性:
<Label Text="{Binding DateTime.Second, StringFormat='{0}'}" … >
交互式 MVVM
通常会基于基础数据模型将 MVVM 和双向数据绑定结合用于交互式视图。
以下示例演示了 HslViewModel,其中将 Color 值转换为 Hue、Saturation 和 Luminosity 值,然后再转换回来:
using System.ComponentModel;
using System.Runtime.CompilerServices;

namespace XamlSamples;

class HslViewModel: INotifyPropertyChanged
{
    public event PropertyChangedEventHandler PropertyChanged;

    private float _hue, _saturation, _luminosity;
    private Color _color;

    public float Hue
    {
        get => _hue;
        set
        {
            if (_hue != value)
                Color = Color.FromHsla(value, _saturation, _luminosity);
        }
    }

    public float Saturation
    {
        get => _saturation;
        set
        {
            if (_saturation != value)
                Color = Color.FromHsla(_hue, value, _luminosity);
        }
    }

    public float Luminosity
    {
        get => _luminosity;
        set
        {
            if (_luminosity != value)
                Color = Color.FromHsla(_hue, _saturation, value);
        }
    }

    public Color Color
    {
        get => _color;
        set
        {
            if (_color != value)
            {
                _color = value;
                _hue = _color.GetHue();
                _saturation = _color.GetSaturation();
                _luminosity = _color.GetLuminosity();

                OnPropertyChanged("Hue");
                OnPropertyChanged("Saturation");
                OnPropertyChanged("Luminosity");
                OnPropertyChanged(); // reports this property
            }
        }
    }

    public void OnPropertyChanged([CallerMemberName] string name = "") =>
        PropertyChanged?.Invoke(this, new PropertyChangedEventArgs(name));
}
在此示例中,对 Hue、Saturation 和 Luminosity 属性的更改导致 Color 属性发生更改,而对 Color 属性的更改又导致另外三个属性发生更改。 这看上去像是一个无限循环,只不过视图模型在属性不发生更改时不会调用 PropertyChanged 事件。
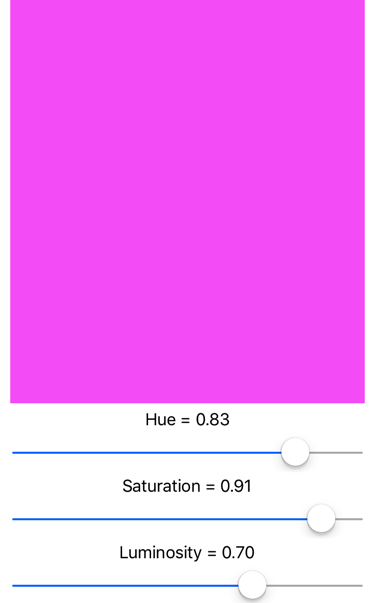
以下 XAML 示例包含一个 BoxView(其 Color 属性绑定到视图模型的 Color 属性),以及三个 Slider 和三个 Label 视图(绑定到 Hue、Saturation 和 Luminosity 属性)
<ContentPage xmlns="http://schemas.microsoft.com/dotnet/2021/maui"
             xmlns:x="http://schemas.microsoft.com/winfx/2009/xaml"
             xmlns:local="clr-namespace:XamlSamples"
             x:Class="XamlSamples.HslColorScrollPage"
             Title="HSL Color Scroll Page">
    <ContentPage.BindingContext>
        <local:HslViewModel Color="Aqua" />
    </ContentPage.BindingContext>

    <VerticalStackLayout Padding="10, 0, 10, 30">
        <BoxView Color="{Binding Color}"
                 HeightRequest="100"
                 WidthRequest="100"
                 HorizontalOptions="Center" />
        <Label Text="{Binding Hue, StringFormat='Hue = {0:F2}'}"
               HorizontalOptions="Center" />
        <Slider Value="{Binding Hue}"
                Margin="20,0,20,0" />
        <Label Text="{Binding Saturation, StringFormat='Saturation = {0:F2}'}"
               HorizontalOptions="Center" />
        <Slider Value="{Binding Saturation}"
                Margin="20,0,20,0" />
        <Label Text="{Binding Luminosity, StringFormat='Luminosity = {0:F2}'}"
               HorizontalOptions="Center" />
        <Slider Value="{Binding Luminosity}"
                Margin="20,0,20,0" />
    </VerticalStackLayout>
</ContentPage>
每个 Label 上的绑定都是默认 OneWay。 它只需要显示值。 但是,每个 Slider 上的默认绑定是 TwoWay。 这使 Slider 能够从视图模型中初始化。 视图模型实例化后,其 Color 属性设置为 Aqua。 当 Slider 发生更改时,会在视图模型中为该属性设置一个新值,然后视图模型会计算出一个新颜色:
命令
有时,应用的需求超出了属性绑定的范围,需要用户启动命令来影响视图模型中的某些内容。 这些命令通常通过点击按钮或手指敲击触发信号,往往是以下两个事件的处理程序中的代码隐藏文件中处理它们:Button 的 Clicked 事件或 TapGestureRecognizer 的 Tapped 事件。
命令接口提供了另一种实现命令的方法,这种方法更适合 MVVM 体系结构。 视图模型可以包含命令,这些命令是针对视图中的特定活动(例如单击 Button)而执行的方法。 在这些命令和 Button 之间定义了数据绑定。
为了实现 Button 和视图模型之间的数据绑定,Button 定义了两个属性:
System.Windows.Input.ICommand类型的CommandObject类型的CommandParameter
注意
有许多其他控件也定义 Command 和 CommandParameter 属性。
ICommand 接口是在 System.Windows.Input 命名空间中定义的,由两个方法和一个事件组成:
void Execute(object arg)bool CanExecute(object arg)event EventHandler CanExecuteChanged
视图模型可以定义 ICommand 类型的属性。 然后,可将这些属性绑定到每个 Button 或其他元素的 Command 属性,或绑定到实现此接口的自定义视图。 可以选择设置 CommandParameter 属性来标识绑定到此视图模型属性的各个 Button 对象(或其他元素)。 在内部,每当用户点击 Button 时,Button 都会调用 Execute 方法,并将其 CommandParameter 传递给 Execute 方法。
当 Button 点击在当前无效时,则使用 CanExecute 方法和 CanExecuteChanged 事件,在这种情况下,Button 应禁用自身。 首次设置 Command 属性以及每当引发 CanExecuteChanged 事件时,Button 都会调用 CanExecute。 如果 CanExecute 返回 false,则 Button 禁用自身,并且不生成 Execute 调用。
可使用 .NET MAUI 中包含的 Command 或 Command<T> 类来实现 ICommand 接口。 这两个类定义多个构造函数和一个 ChangeCanExecute 方法,视图模型可调用该方法来强制 Command 对象引发 CanExecuteChanged 事件。
以下示例演示用于输入电话号码的简单键盘的视图模型:
using System.ComponentModel;
using System.Runtime.CompilerServices;
using System.Windows.Input;

namespace XamlSamples;

class KeypadViewModel: INotifyPropertyChanged
{
    public event PropertyChangedEventHandler PropertyChanged;

    private string _inputString = "";
    private string _displayText = "";
    private char[] _specialChars = { '*', '#' };

    public ICommand AddCharCommand { get; private set; }
    public ICommand DeleteCharCommand { get; private set; }

    public string InputString
    {
        get => _inputString;
        private set
        {
            if (_inputString != value)
            {
                _inputString = value;
                OnPropertyChanged();
                DisplayText = FormatText(_inputString);

                // Perhaps the delete button must be enabled/disabled.
                ((Command)DeleteCharCommand).ChangeCanExecute();
            }
        }
    }

    public string DisplayText
    {
        get => _displayText;
        private set
        {
            if (_displayText != value)
            {
                _displayText = value;
                OnPropertyChanged();
            }
        }
    }

    public KeypadViewModel()
    {
        // Command to add the key to the input string
        AddCharCommand = new Command<string>((key) => InputString += key);

        // Command to delete a character from the input string when allowed
        DeleteCharCommand =
            new Command(
                // Command will strip a character from the input string
                () => InputString = InputString.Substring(0, InputString.Length - 1),

                // CanExecute is processed here to return true when there's something to delete
                () => InputString.Length > 0
            );
    }

    string FormatText(string str)
    {
        bool hasNonNumbers = str.IndexOfAny(_specialChars) != -1;
        string formatted = str;

        // Format the string based on the type of data and the length
        if (hasNonNumbers || str.Length < 4 || str.Length > 10)
        {
            // Special characters exist, or the string is too small or large for special formatting
            // Do nothing
        }

        else if (str.Length < 8)
            formatted = string.Format("{0}-{1}", str.Substring(0, 3), str.Substring(3));

        else
            formatted = string.Format("({0}) {1}-{2}", str.Substring(0, 3), str.Substring(3, 3), str.Substring(6));

        return formatted;
    }


    public void OnPropertyChanged([CallerMemberName] string name = "") =>
        PropertyChanged?.Invoke(this, new PropertyChangedEventArgs(name));
}
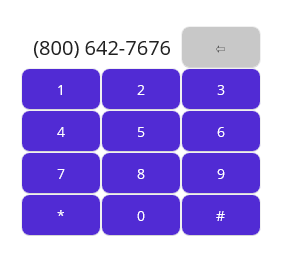
在此示例中,命令的 Execute 和 CanExecute 方法在构造函数中定义为 Lambda 函数。 视图模型假定 AddCharCommand 属性绑定到多个按钮(或任何其他具有命令接口的控件)的 Command 属性,其中每个按钮都由 CommandParameter 标识。 这些按钮将字符添加到 InputString 属性,然后格式化为 DisplayText 属性的电话号码。 还有另一个 ICommand 类型的属性,名为 DeleteCharCommand。 该属性绑定到退格按钮,但如果没有要删除的字符,应禁用该按钮。
下面的示例显示使用 KeypadViewModel 的 XAML:
<ContentPage xmlns="http://schemas.microsoft.com/dotnet/2021/maui"
xmlns:x="http://schemas.microsoft.com/winfx/2009/xaml"
xmlns:local="clr-namespace:XamlSamples"
x:Class="XamlSamples.KeypadPage"
Title="Keypad Page">
<ContentPage.BindingContext>
<local:KeypadViewModel />
</ContentPage.BindingContext>
<Grid HorizontalOptions="Center" VerticalOptions="Center">
<Grid.RowDefinitions>
<RowDefinition Height="Auto" />
<RowDefinition Height="Auto" />
<RowDefinition Height="Auto" />
<RowDefinition Height="Auto" />
<RowDefinition Height="Auto" />
</Grid.RowDefinitions>
<Grid.ColumnDefinitions>
<ColumnDefinition Width="80" />
<ColumnDefinition Width="80" />
<ColumnDefinition Width="80" />
</Grid.ColumnDefinitions>
<Label Text="{Binding DisplayText}"
Margin="0,0,10,0" FontSize="20" LineBreakMode="HeadTruncation"
VerticalTextAlignment="Center" HorizontalTextAlignment="End"
Grid.ColumnSpan="2" />
<Button Text="⇦" Command="{Binding DeleteCharCommand}" Grid.Column="2"/>
<Button Text="1" Command="{Binding AddCharCommand}" CommandParameter="1" Grid.Row="1" />
<Button Text="2" Command="{Binding AddCharCommand}" CommandParameter="2" Grid.Row="1" Grid.Column="1" />
<Button Text="3" Command="{Binding AddCharCommand}" CommandParameter="3" Grid.Row="1" Grid.Column="2" />
<Button Text="4" Command="{Binding AddCharCommand}" CommandParameter="4" Grid.Row="2" />
<Button Text="5" Command="{Binding AddCharCommand}" CommandParameter="5" Grid.Row="2" Grid.Column="1" />
<Button Text="6" Command="{Binding AddCharCommand}" CommandParameter="6" Grid.Row="2" Grid.Column="2" />
<Button Text="7" Command="{Binding AddCharCommand}" CommandParameter="7" Grid.Row="3" />
<Button Text="8" Command="{Binding AddCharCommand}" CommandParameter="8" Grid.Row="3" Grid.Column="1" />
<Button Text="9" Command="{Binding AddCharCommand}" CommandParameter="9" Grid.Row="3" Grid.Column="2" />
<Button Text="*" Command="{Binding AddCharCommand}" CommandParameter="*" Grid.Row="4" />
<Button Text="0" Command="{Binding AddCharCommand}" CommandParameter="0" Grid.Row="4" Grid.Column="1" />
<Button Text="#" Command="{Binding AddCharCommand}" CommandParameter="#" Grid.Row="4" Grid.Column="2" />
</Grid>
</ContentPage>
在此示例中,第一个 Button 的 Command 属性绑定到 DeleteCharCommand。 其他按钮绑定到 AddCharCommand,其 CommandParameter 与 Button 上显示的字符相同:
反馈
即将发布:在整个 2024 年,我们将逐步淘汰作为内容反馈机制的“GitHub 问题”,并将其取代为新的反馈系统。 有关详细信息,请参阅:https://aka.ms/ContentUserFeedback。
提交和查看相关反馈